


 本文详细解析Spring框架中的关键注解,包括@Component、@Service、@Repository、@Autowired、@Qualifier、@Resource、@Scope、@Bean等,以及它们在不同场景下的应用。同时深入探讨Spring AOP的配置与使用,包括基于XML和注解的配置方式,以及各种通知类型如前置、后置、异常、最终和环绕通知的实现。
spring小记
注解分类:
1.用于创建对象
2.用于注入数据
3.改变作用范围
4.生命周期
1.1 注解详解:
/**
 * 账户的业务层实现类
 *
 * 曾经XML的配置:
 *  <bean id="accountService" class="com.itheima.service.impl.AccountServiceImpl"
 *        scope=""  init-method="" destroy-method="">
 *      <property name=""  value="" | ref=""></property>
 *  </bean>
 *
 * 用于创建对象的
 *      他们的作用就和在XML配置文件中编写一个<bean>标签实现的功能是一样的
 *      @Component:
 *          作用:用于把当前类对象存入spring容器中
 *          属性:
 *              value:用于指定bean的id。当我们不写时,它的默认值是当前类名,且首字母改小写。
 *      @Controller:一般用在表现层
 *      @Service:一般用在业务层
 *      @Repository:一般用在持久层
 *      以上三个注解他们的作用和属性与Component是一模一样。
 *      他们三个是spring框架为我们提供明确的三层使用的注解,使我们的三层对象更加清晰
 *
 *
 * 用于注入数据的
 *      他们的作用就和在xml配置文件中的bean标签中写一个<property>标签的作用是一样的
 *      @Autowired:
 *          作用:自动按照类型注入。只要容器中有唯一的一个bean对象类型和要注入的变量类型匹配,就可以注入成功
 *                如果ioc容器中没有任何bean的类型和要注入的变量类型匹配,则报错。
 *                如果Ioc容器中有多个类型匹配时:
 *          出现位置:
 *              可以是变量上,也可以是方法上
 *          细节:
 *              在使用注解注入时,set方法就不是必须的了。
 *      @Qualifier:
 *          作用:在按照类中注入的基础之上再按照名称注入。它在给类成员注入时不能单独使用,需要配合Autowired一起。但是在给方法参数注入时可以(见1.3)
 *          属性:
 *              value:用于指定注入bean的id。
 *      @Resource
 *          作用:直接按照bean的id注入。它可以独立使用
 *          属性:
 *              name:用于指定bean的id。
 *      以上三个注入都只能注入其他bean类型的数据,而基本类型和String类型无法使用上述注解实现。
 *      另外,集合类型的注入只能通过XML来实现。
 *
 *      @Value
 *          作用:用于注入基本类型和String类型的数据
 *          属性:
 *              value:用于指定数据的值。它可以使用spring中SpEL(也就是spring的el表达式)
 *                      SpEL的写法:${表达式}
 *          问题:jsp、mybatis、spring中都有el表达式,如何区分el表达式是谁的?看写在哪,卸载jsp中就去jsp四大域
 *               中取值
 *
 * 用于改变作用范围的
 *      他们的作用就和在bean标签中使用scope属性实现的功能是一样的
 *      @Scope
 *          作用:用于指定bean的作用范围
 *          属性:
 *              value:指定范围的取值。常用取值:singleton prototype
 *
 * 和生命周期相关 (了解)
 *      他们的作用就和在bean标签中使用init-method和destroy-methode的作用是一样的
 *      @PreDestroy
 *          作用:用于指定销毁方法
 *      @PostConstruct
 *          作用:用于指定初始化方法
 */
@Service("accountService")
//@Scope("prototype")
public class AccountServiceImpl implements IAccountService {

//    @Autowired
//    @Qualifier("accountDao1")
    @Resource(name = "accountDao2")
    private IAccountDao accountDao = null;

    @PostConstruct
    public void  init(){
        System.out.println("初始化方法执行了");
    }

    @PreDestroy
    public void  destroy(){
        System.out.println("销毁方法执行了");
    }

    public void  saveAccount(){
        accountDao.saveAccount();
    }
}
1.2 配置注解
/**
 * 该类是一个配置类,它的作用和bean.xml是一样的
 * spring中的新注解
 * Configuration
 *     作用:指定当前类是一个配置类
 *     细节:当配置类作为AnnotationConfigApplicationContext对象创建的参数时,该注解可以不写。
 * ComponentScan
 *      作用:用于通过注解指定spring在创建容器时要扫描的包
 *      属性:
 *          value:它和basePackages的作用是一样的,都是用于指定创建容器时要扫描的包。
 *                 我们使用此注解就等同于在xml中配置了:
 *                      <context:component-scan base-package="com.itheima"></context:component-scan>
 *  Bean
 *      作用:用于把当前方法的返回值作为bean对象存入spring的ioc容器中
 *      属性:
 *          name:用于指定bean的id。当不写时,默认值是当前方法的名称
 *      细节:
 *          当我们使用注解配置方法时,如果方法有参数,spring框架会去容器中查找有没有可用的bean对象。
 *          查找的方式和Autowired注解的作用是一样的
 *  Import
 *      作用:用于导入其他的配置类
 *      属性:
 *          value:用于指定其他配置类的字节码。
 *                  当我们使用Import的注解之后,有Import注解的类就父配置类,而导入的都是子配置类
 *  PropertySource
 *      作用:用于指定properties文件的位置
 *      属性:
 *          value:指定文件的名称和路径。
 *                  关键字:classpath,表示类路径下
 */
//@Configuration
@ComponentScan("com.itheima")
@Import(JdbcConfig.class)
@PropertySource("classpath:jdbcConfig.properties")
public class SpringConfiguration {


}
什么时候选择注解、什么时候选择xml配置呢?
存在于jar包中的,选择xml配置
自己写的就用注解配置
1.3 配置数据源形式的注解
/**
 * 和spring连接数据库相关的配置类
 */
public class JdbcConfig {

    @Value("${jdbc.driver}")
    private String driver;

    @Value("${jdbc.url}")
    private String url;

    @Value("${jdbc.username}")
    private String username;

    @Value("${jdbc.password}")
    private String password;

    /**
     * 用于创建一个QueryRunner对象
     * @param dataSource
     * @return
     */
    @Bean(name="runner")
    @Scope("prototype")
    public QueryRunner createQueryRunner(@Qualifier("ds2") DataSource dataSource){
        return new QueryRunner(dataSource);
    }

    /**
     * 创建数据源对象
     * @return
     */
    @Bean(name="ds2")
    public DataSource createDataSource(){
        try {
            ComboPooledDataSource ds = new ComboPooledDataSource();
            ds.setDriverClass(driver);
            ds.setJdbcUrl(url);
            ds.setUser(username);
            ds.setPassword(password);
            return ds;
        }catch (Exception e){
            throw new RuntimeException(e);
        }
    }

    @Bean(name="ds1")
    public DataSource createDataSource1(){
        try {
            ComboPooledDataSource ds = new ComboPooledDataSource();
            ds.setDriverClass(driver);
            ds.setJdbcUrl("jdbc:mysql://localhost:3306/eesy02");
            ds.setUser(username);
            ds.setPassword(password);
            return ds;
        }catch (Exception e){
            throw new RuntimeException(e);
        }
    }
}
1.4 spring整合junit测试的配置
1、应用程序的入口
	main方法
2、junit单元测试中,没有main方法也能执行
	junit集成了一个main方法
	该方法就会判断当前测试类中哪些方法有 @Test注解
	junit就让有Test注解的方法执行
3、junit不会管我们是否采用spring框架
	在执行测试方法时,junit根本不知道我们是不是使用了spring框架
	所以也就不会为我们读取配置文件/配置类创建spring核心容器
4、由以上三点可知
	当测试方法执行时,没有Ioc容器,就算写了Autowired注解,也无法实现注入
/**
 * 使用Junit单元测试:测试我们的配置
 * Spring整合junit的配置
 *      1、导入spring整合junit的jar(坐标)
 *      2、使用Junit提供的一个注解把原有的main方法替换了,替换成spring提供的
 *             @Runwith
 *      3、告知spring的运行器,spring和ioc创建是基于xml还是注解的,并且说明位置
 *          @ContextConfiguration
 *                  locations:指定xml文件的位置,加上classpath关键字,表示在类路径下
 *                  classes:指定注解类所在地位置
 *
 *   当我们使用spring 5.x版本的时候,要求junit的jar必须是4.12及以上
 */
@RunWith(SpringJUnit4ClassRunner.class)
@ContextConfiguration(classes = SpringConfiguration.class)
public class AccountServiceTest {

    @Autowired
    private IAccountService as = null;


    @Test
    public void testFindAll() {
        //3.执行方法
        List<Account> accounts = as.findAllAccount();
        for(Account account : accounts){
            System.out.println(account);
        }
    }

    @Test
    public void testFindOne() {
        //3.执行方法
        Account account = as.findAccountById(1);
        System.out.println(account);
    }

    @Test
    public void testSave() {
        Account account = new Account();
        account.setName("test anno");
        account.setMoney(12345f);
        //3.执行方法
        as.saveAccount(account);

    }

    @Test
    public void testUpdate() {
        //3.执行方法
        Account account = as.findAccountById(4);
        account.setMoney(23456f);
        as.updateAccount(account);
    }

    @Test
    public void testDelete() {
        //3.执行方法
        as.deleteAccount(4);
    }
}
Spring声明式事务
/**
 * 和事务管理相关的工具类,它包含了,开启事务,提交事务,回滚事务和释放连接
 */
public class TransactionManager {

    private ConnectionUtils connectionUtils;

    public void setConnectionUtils(ConnectionUtils connectionUtils) {
        this.connectionUtils = connectionUtils;
    }

    /**
     * 开启事务
     */
    public  void beginTransaction(){
        try {
            connectionUtils.getThreadConnection().setAutoCommit(false);
        }catch (Exception e){
            e.printStackTrace();
        }
    }

    /**
     * 提交事务
     */
    public  void commit(){
        try {
            connectionUtils.getThreadConnection().commit();
        }catch (Exception e){
            e.printStackTrace();
        }
    }

    /**
     * 回滚事务
     */
    public  void rollback(){
        try {
            connectionUtils.getThreadConnection().rollback();
        }catch (Exception e){
            e.printStackTrace();
        }
    }


    /**
     * 释放连接
     */
    public  void release(){
        try {
            connectionUtils.getThreadConnection().close();//还回连接池中
            connectionUtils.removeConnection();
        }catch (Exception e){
            e.printStackTrace();
        }
    }
}
/**
 * 账户的业务层实现类
 *
 * 事务控制应该都是在业务层
 */
public class AccountServiceImpl_OLD implements IAccountService{

    private IAccountDao accountDao;
    private TransactionManager txManager;

    public void setTxManager(TransactionManager txManager) {
        this.txManager = txManager;
    }

    public void setAccountDao(IAccountDao accountDao) {
        this.accountDao = accountDao;
    }

    @Override
    public List<Account> findAllAccount() {
        try {
            //1.开启事务
            txManager.beginTransaction();
            //2.执行操作
            List<Account> accounts = accountDao.findAllAccount();
            //3.提交事务
            txManager.commit();
            //4.返回结果
            return accounts;
        }catch (Exception e){
            //5.回滚操作
            txManager.rollback();
            throw new RuntimeException(e);
        }finally {
            //6.释放连接
            txManager.release();
        }

    }

    @Override
    public Account findAccountById(Integer accountId) {
        try {
            //1.开启事务
            txManager.beginTransaction();
            //2.执行操作
            Account account = accountDao.findAccountById(accountId);
            //3.提交事务
            txManager.commit();
            //4.返回结果
            return account;
        }catch (Exception e){
            //5.回滚操作
            txManager.rollback();
            throw new RuntimeException(e);
        }finally {
            //6.释放连接
            txManager.release();
        }
    }

    @Override
    public void saveAccount(Account account) {
        try {
            //1.开启事务
            txManager.beginTransaction();
            //2.执行操作
            accountDao.saveAccount(account);
            //3.提交事务
            txManager.commit();
        }catch (Exception e){
            //4.回滚操作
            txManager.rollback();
        }finally {
            //5.释放连接
            txManager.release();
        }

    }

    @Override
    public void updateAccount(Account account) {
        try {
            //1.开启事务
            txManager.beginTransaction();
            //2.执行操作
            accountDao.updateAccount(account);
            //3.提交事务
            txManager.commit();
        }catch (Exception e){
            //4.回滚操作
            txManager.rollback();
        }finally {
            //5.释放连接
            txManager.release();
        }

    }

    @Override
    public void deleteAccount(Integer acccountId) {
        try {
            //1.开启事务
            txManager.beginTransaction();
            //2.执行操作
            accountDao.deleteAccount(acccountId);
            //3.提交事务
            txManager.commit();
        }catch (Exception e){
            //4.回滚操作
            txManager.rollback();
        }finally {
            //5.释放连接
            txManager.release();
        }

    }

    @Override
    public void transfer(String sourceName, String targetName, Float money) {
        try {
            //1.开启事务
            txManager.beginTransaction();
            //2.执行操作

            //2.1根据名称查询转出账户
            Account source = accountDao.findAccountByName(sourceName);
            //2.2根据名称查询转入账户
            Account target = accountDao.findAccountByName(targetName);
            //2.3转出账户减钱
            source.setMoney(source.getMoney()-money);
            //2.4转入账户加钱
            target.setMoney(target.getMoney()+money);
            //2.5更新转出账户
            accountDao.updateAccount(source);

            int i=1/0;

            //2.6更新转入账户
            accountDao.updateAccount(target);
            //3.提交事务
            txManager.commit();

        }catch (Exception e){
            //4.回滚操作
            txManager.rollback();
            e.printStackTrace();
        }finally {
            //5.释放连接
            txManager.release();
        }


    }
}
动态代理
1.5基于接口的动态代理
/**
 * 一个生产者
 */
public class Producer implements IProducer{

    /**
     * 销售
     * @param money
     */
    public void saleProduct(float money){
        System.out.println("销售产品,并拿到钱:"+money);
    }

    /**
     * 售后
     * @param money
     */
    public void afterService(float money){
        System.out.println("提供售后服务,并拿到钱:"+money);
    }
}
/**
 * 对生产厂家要求的接口
 */
public interface IProducer {

    /**
     * 销售
     * @param money
     */
    public void saleProduct(float money);

    /**
     * 售后
     * @param money
     */
    public void afterService(float money);
}
/**
 * 模拟一个消费者
 */
public class Client {

    public static void main(String[] args) {
        final Producer producer = new Producer();

        /**
         * 动态代理:
         *  特点:字节码随用随创建,随用随加载
         *  作用:不修改源码的基础上对方法增强
         *  分类:
         *      基于接口的动态代理
         *      基于子类的动态代理
         *  基于接口的动态代理:
         *      涉及的类:Proxy
         *      提供者:JDK官方
         *  如何创建代理对象:
         *      使用Proxy类中的newProxyInstance方法
         *  创建代理对象的要求:
         *      被代理类最少实现一个接口,如果没有则不能使用
         *  newProxyInstance方法的参数:
         *      ClassLoader:类加载器
         *          它是用于加载代理对象字节码的。和被代理对象使用相同的类加载器。固定写法。
         *      Class[]:字节码数组
         *          它是用于让代理对象和被代理对象有相同方法。固定写法。
         *      InvocationHandler:用于提供增强的代码
         *          它是让我们写如何代理。我们一般都是些一个该接口的实现类,通常情况下都是匿名内部类,但不是必须的。
         *          此接口的实现类都是谁用谁写。
         */
       IProducer proxyProducer = (IProducer) Proxy.newProxyInstance(producer.getClass().getClassLoader(),
                producer.getClass().getInterfaces(),
                new InvocationHandler() {
                    /**
                     * 作用:执行被代理对象的任何接口方法都会经过该方法
                     * 方法参数的含义
                     * @param proxy   代理对象的引用
                     * @param method  当前执行的方法
                     * @param args    当前执行方法所需的参数
                     * @return        和被代理对象方法有相同的返回值
                     * @throws Throwable
                     */
                    @Override
                    public Object invoke(Object proxy, Method method, Object[] args) throws Throwable {
                        //提供增强的代码
                        Object returnValue = null;

                        //1.获取方法执行的参数
                        Float money = (Float)args[0];
                        //2.判断当前方法是不是销售
                        if("saleProduct".equals(method.getName())) {
                            returnValue = method.invoke(producer, money*0.8f);
                        }
                        return returnValue;
                    }
                });
        proxyProducer.saleProduct(10000f);
    }
}
1.6基于子类的动态代理
/**
 * 一个生产者
 */
public class Producer {

    /**
     * 销售
     * @param money
     */
    public void saleProduct(float money){
        System.out.println("销售产品,并拿到钱:"+money);
    }

    /**
     * 售后
     * @param money
     */
    public void afterService(float money){
        System.out.println("提供售后服务,并拿到钱:"+money);
    }
}
/**
 * 模拟一个消费者
 */
public class Client {

    public static void main(String[] args) {
        final Producer producer = new Producer();

        /**
         * 动态代理:
         *  特点:字节码随用随创建,随用随加载
         *  作用:不修改源码的基础上对方法增强
         *  分类:
         *      基于接口的动态代理
         *      基于子类的动态代理
         *  基于子类的动态代理:
         *      涉及的类:Enhancer
         *      提供者:第三方cglib库
         *  如何创建代理对象:
         *      使用Enhancer类中的create方法
         *  创建代理对象的要求:
         *      被代理类不能是最终类
         *  create方法的参数:
         *      Class:字节码
         *          它是用于指定被代理对象的字节码。
         *
         *      Callback:用于提供增强的代码
         *          它是让我们写如何代理。我们一般都是些一个该接口的实现类,通常情况下都是匿名内部类,但不是必须的。
         *          此接口的实现类都是谁用谁写。
         *          我们一般写的都是该接口的子接口实现类:MethodInterceptor
         */
        Producer cglibProducer = (Producer)Enhancer.create(producer.getClass(), new MethodInterceptor() {
            /**
             * 执行北地阿里对象的任何方法都会经过该方法
             * @param proxy
             * @param method
             * @param args
             *    以上三个参数和基于接口的动态代理中invoke方法的参数是一样的
             * @param methodProxy :当前执行方法的代理对象
             * @return
             * @throws Throwable
             */
            @Override
            public Object intercept(Object proxy, Method method, Object[] args, MethodProxy methodProxy) throws Throwable {
                //提供增强的代码
                Object returnValue = null;

                //1.获取方法执行的参数
                Float money = (Float)args[0];
                //2.判断当前方法是不是销售
                if("saleProduct".equals(method.getName())) {
                    returnValue = method.invoke(producer, money*0.8f);
                }
                return returnValue;
            }
        });
        cglibProducer.saleProduct(12000f);
    }
}
用动态代理实现事务控制
Java代码:
/**
* 账户的业务层实现类
*
* 事务控制应该都是在业务层
*/
public class AccountServiceImpl implements IAccountService{
private IAccountDao accountDao;
public void setAccountDao(IAccountDao accountDao) {
this.accountDao = accountDao;
}
@Override
public List<Account> findAllAccount() {
return accountDao.findAllAccount();
}
@Override
public Account findAccountById(Integer accountId) {
return accountDao.findAccountById(accountId);
}
@Override
public void saveAccount(Account account) {
accountDao.saveAccount(account);
}
@Override
public void updateAccount(Account account) {
accountDao.updateAccount(account);
}
@Override
public void deleteAccount(Integer acccountId) {
accountDao.deleteAccount(acccountId);
}
@Override
public void transfer(String sourceName, String targetName, Float money) {
System.out.println("transfer....");
//2.1根据名称查询转出账户
Account source = accountDao.findAccountByName(sourceName);
//2.2根据名称查询转入账户
Account target = accountDao.findAccountByName(targetName);
//2.3转出账户减钱
source.setMoney(source.getMoney()-money);
//2.4转入账户加钱
target.setMoney(target.getMoney()+money);
//2.5更新转出账户
accountDao.updateAccount(source);
// int i=1/0;
//2.6更新转入账户
accountDao.updateAccount(target);
}
}
/**
* 用于创建Service的代理对象的工厂
*/
public class BeanFactory {
private IAccountService accountService;
private TransactionManager txManager;
public void setTxManager(TransactionManager txManager) {
this.txManager = txManager;
}
public final void setAccountService(IAccountService accountService) {
this.accountService = accountService;
}
/**
* 获取Service代理对象
* @return
*/
public IAccountService getAccountService() {
return (IAccountService)Proxy.newProxyInstance(accountService.getClass().getClassLoader(),
accountService.getClass().getInterfaces(),
new InvocationHandler() {
/**
* 添加事务的支持
*
* @param proxy
* @param method
* @param args
* @return
* @throws Throwable
*/
@Override
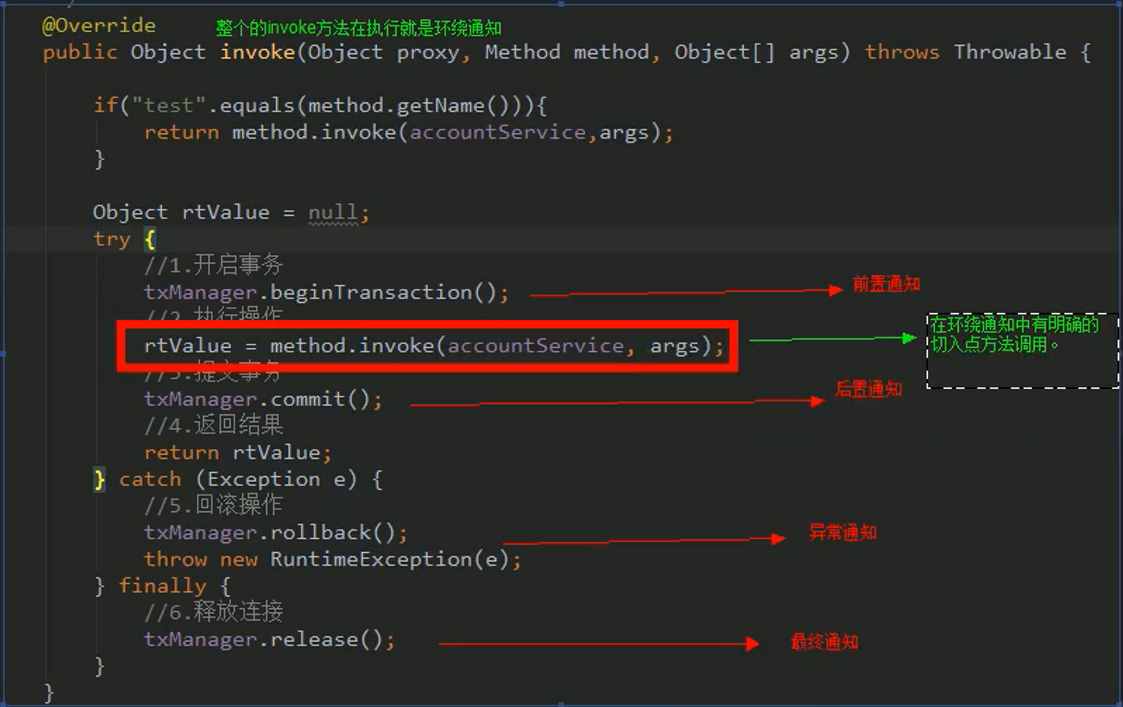
public Object invoke(Object proxy, Method method, Object[] args) throws Throwable {
if("test".equals(method.getName())){
return method.invoke(accountService,args);
}
Object rtValue = null;
try {
//1.开启事务
txManager.beginTransaction();
//2.执行操作
rtValue = method.invoke(accountService, args);
//3.提交事务
txManager.commit();
//4.返回结果
return rtValue;
} catch (Exception e) {
//5.回滚操作
txManager.rollback();
throw new RuntimeException(e);
} finally {
//6.释放连接
txManager.release();
}
}
});
}
}
xml配置:
<?xml version="1.0" encoding="UTF-8"?>
<beans xmlns="http://www.springframework.org/schema/beans"
       xmlns:xsi="http://www.w3.org/2001/XMLSchema-instance"
       xsi:schemaLocation="http://www.springframework.org/schema/beans
        http://www.springframework.org/schema/beans/spring-beans.xsd">

    <!--配置代理的service-->
    <bean id="proxyAccountService" factory-bean="beanFactory" factory-method="getAccountService"></bean>

    <!--配置beanfactory-->
    <bean id="beanFactory" class="com.itheima.factory.BeanFactory">
        <!-- 注入service -->
        <property name="accountService" ref="accountService"></property>
        <!-- 注入事务管理器 -->
        <property name="txManager" ref="txManager"></property>
    </bean>

     <!-- 配置Service -->
    <bean id="accountService" class="com.itheima.service.impl.AccountServiceImpl">
        <!-- 注入dao -->
        <property name="accountDao" ref="accountDao"></property>
    </bean>

    <!--配置Dao对象-->
    <bean id="accountDao" class="com.itheima.dao.impl.AccountDaoImpl">
        <!-- 注入QueryRunner -->
        <property name="runner" ref="runner"></property>
        <!-- 注入ConnectionUtils -->
        <property name="connectionUtils" ref="connectionUtils"></property>
    </bean>

    <!--配置QueryRunner-->
    <bean id="runner" class="org.apache.commons.dbutils.QueryRunner" scope="prototype"></bean>

    <!-- 配置数据源 -->
    <bean id="dataSource" class="com.mchange.v2.c3p0.ComboPooledDataSource">
        <!--连接数据库的必备信息-->
        <property name="driverClass" value="com.mysql.jdbc.Driver"></property>
        <property name="jdbcUrl" value="jdbc:mysql://localhost:3306/eesy"></property>
        <property name="user" value="root"></property>
        <property name="password" value="1234"></property>
    </bean>

    <!-- 配置Connection的工具类 ConnectionUtils -->
    <bean id="connectionUtils" class="com.itheima.utils.ConnectionUtils">
        <!-- 注入数据源-->
        <property name="dataSource" ref="dataSource"></property>
    </bean>

    <!-- 配置事务管理器-->
    <bean id="txManager" class="com.itheima.utils.TransactionManager">
        <!-- 注入ConnectionUtils -->
        <property name="connectionUtils" ref="connectionUtils"></property>
    </bean>
</beans>
Spring-AOP
连接点:所有被动态代理的业务层的方法
切入点:被增强的方法
所以:所有的切入点都是连接点,反之则不一定
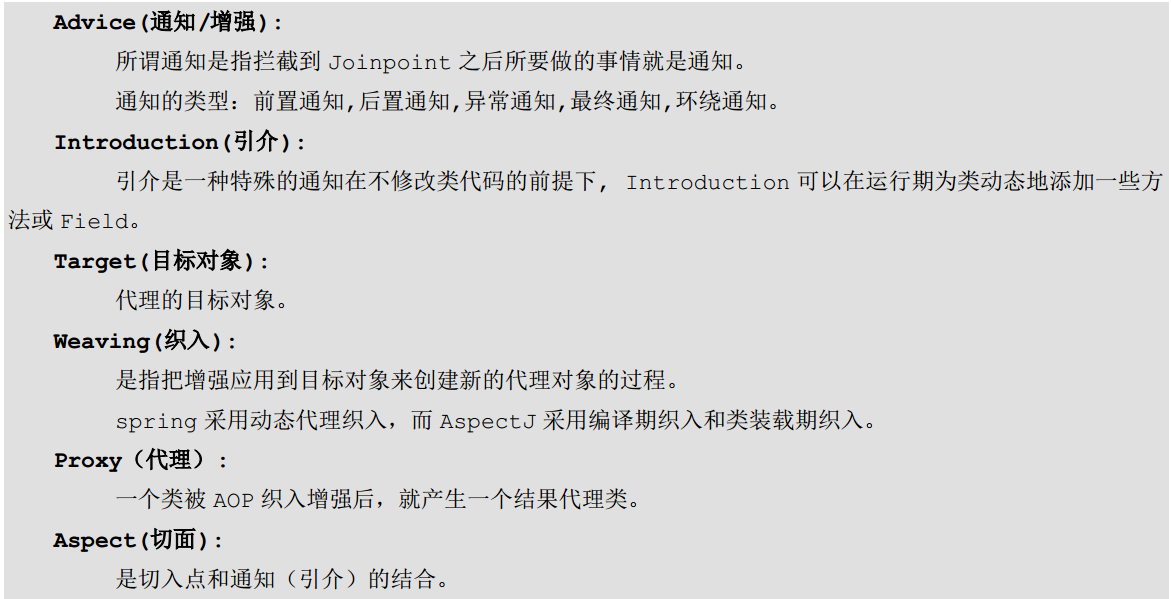
1.7 AOP 相关术语:
1.8 spring-AOP配置
Java代码:
/**
 * 通知类:用于记录日志的工具类,它里面提供了公共的代码
 */
public class Logger {

    /**
     * 用于打印日志:计划让其在切入点方法执行之前执行(切入点方法就是业务层方法)
     */
    public  void printLog(){
        System.out.println("Logger类中的pringLog方法开始记录日志了。。。");
    }
}
/**
 * 账户的业务层接口
 */
public interface IAccountService {

    /**
     * 模拟保存账户
     */
   void saveAccount();

    /**
     * 模拟更新账户
     * @param i
     */
   void updateAccount(int i);

    /**
     * 删除账户
     * @return
     */
   int  deleteAccount();
}
/**
 * 账户的业务层实现类
 */
public class AccountServiceImpl implements IAccountService{

    @Override
    public void saveAccount() {
        System.out.println("执行了保存");
    }

    @Override
    public void updateAccount(int i) {
        System.out.println("执行了更新"+i);

    }

    @Override
    public int deleteAccount() {
        System.out.println("执行了删除");
        return 0;
    }
}
<?xml version="1.0" encoding="UTF-8"?>
<beans xmlns="http://www.springframework.org/schema/beans"
       xmlns:xsi="http://www.w3.org/2001/XMLSchema-instance"
       xmlns:aop="http://www.springframework.org/schema/aop"
       xsi:schemaLocation="http://www.springframework.org/schema/beans
        http://www.springframework.org/schema/beans/spring-beans.xsd
        http://www.springframework.org/schema/aop
        http://www.springframework.org/schema/aop/spring-aop.xsd">
xml配置:
<!-- 配置srping的Ioc,把service对象配置进来-->
    <bean id="accountService" class="com.itheima.service.impl.AccountServiceImpl"></bean>

    <!--spring中基于XML的AOP配置步骤
        1、把通知Bean也交给spring来管理
        2、使用aop:config标签表明开始AOP的配置
        3、使用aop:aspect标签表明配置切面
                id属性:是给切面提供一个唯一标识
                ref属性:是指定通知类bean的Id。
        4、在aop:aspect标签的内部使用对应标签来配置通知的类型
               我们现在示例是让printLog方法在切入点方法执行之前之前:所以是前置通知
               aop:before:表示配置前置通知
                    method属性:用于指定Logger类中哪个方法是前置通知
                    pointcut属性:用于指定切入点表达式,该表达式的含义指的是对业务层中哪些方法增强

            切入点表达式的写法:
                关键字:execution(表达式)
                表达式:
                    访问修饰符  返回值  包名.包名.包名...类名.方法名(参数列表)
                标准的表达式写法:
                    public void com.itheima.service.impl.AccountServiceImpl.saveAccount()
                访问修饰符可以省略
                    void com.itheima.service.impl.AccountServiceImpl.saveAccount()
                返回值可以使用通配符,表示任意返回值
                    * com.itheima.service.impl.AccountServiceImpl.saveAccount()
                包名可以使用通配符,表示任意包。但是有几级包,就需要写几个*.
                    * *.*.*.*.AccountServiceImpl.saveAccount())
                包名可以使用..表示当前包及其子包
                    * *..AccountServiceImpl.saveAccount()
                类名和方法名都可以使用*来实现通配
                    * *..*.*()
                参数列表:
                    可以直接写数据类型:
                        基本类型直接写名称           int
                        引用类型写包名.类名的方式   java.lang.String
                    可以使用通配符表示任意类型,但是必须有参数
                    可以使用..表示有无参数均可,有参数可以是任意类型
                全通配写法:
                    * *..*.*(..)

                实际开发中切入点表达式的通常写法:
                    切到业务层实现类下的所有方法
                        * com.itheima.service.impl.*.*(..)
    -->

    <!-- 配置Logger类 -->
    <bean id="logger" class="com.itheima.utils.Logger"></bean>

    <!--配置AOP-->
    <aop:config>
        <!--配置切面 -->
        <aop:aspect id="logAdvice" ref="logger">
            <!-- 配置通知的类型,并且建立通知方法和切入点方法的关联-->
            <aop:before method="printLog" pointcut="execution(* com.itheima.service.impl.*.*(..))"></aop:before>
        </aop:aspect>
    </aop:config>

</beans>
1.9 通用切入点表达式
xml 配置:
<?xml version="1.0" encoding="UTF-8"?>

-<beans xsi:schemaLocation="http://www.springframework.org/schema/beans http://www.springframework.org/schema/beans/spring-beans.xsd http://www.springframework.org/schema/aop http://www.springframework.org/schema/aop/spring-aop.xsd" xmlns:aop="http://www.springframework.org/schema/aop" xmlns:xsi="http://www.w3.org/2001/XMLSchema-instance" xmlns="http://www.springframework.org/schema/beans">

<!-- 配置srping的Ioc,把service对象配置进来-->


<bean class="com.itheima.service.impl.AccountServiceImpl" id="accountService"/>

<!-- 配置Logger类 -->


<bean class="com.itheima.utils.Logger" id="logger"/>

<!--配置AOP-->


-<aop:config>

<!-- 配置切入点表达式 id属性用于指定表达式的唯一标识。expression属性用于指定表达式内容 此标签写在aop:aspect标签内部只能当前切面使用。 它还可以写在aop:aspect外面,此时就变成了所有切面可用 -->


<aop:pointcut id="pt1" expression="execution(* com.itheima.service.impl.*.*(..))"/>

<!--配置切面 -->


-<aop:aspect id="logAdvice" ref="logger">

<!-- 配置前置通知:在切入点方法执行之前执行 <aop:before method="beforePrintLog" pointcut-ref="pt1" ></aop:before>-->


<!-- 配置后置通知:在切入点方法正常执行之后值。它和异常通知永远只能执行一个 <aop:after-returning method="afterReturningPrintLog" pointcut-ref="pt1"></aop:after-returning>-->


<!-- 配置异常通知:在切入点方法执行产生异常之后执行。它和后置通知永远只能执行一个 <aop:after-throwing method="afterThrowingPrintLog" pointcut-ref="pt1"></aop:after-throwing>-->


<!-- 配置最终通知:无论切入点方法是否正常执行它都会在其后面执行 <aop:after method="afterPrintLog" pointcut-ref="pt1"></aop:after>-->


<!-- 配置环绕通知 详细的注释请看Logger类中-->


<aop:around pointcut-ref="pt1" method="aroundPringLog"/>

</aop:aspect>

</aop:config>

</beans>
Java代码:
public class Logger {

    /**
     * 前置通知
     */
    public  void beforePrintLog(){
        System.out.println("前置通知Logger类中的beforePrintLog方法开始记录日志了。。。");
    }

    /**
     * 后置通知
     */
    public  void afterReturningPrintLog(){
        System.out.println("后置通知Logger类中的afterReturningPrintLog方法开始记录日志了。。。");
    }
    /**
     * 异常通知
     */
    public  void afterThrowingPrintLog(){
        System.out.println("异常通知Logger类中的afterThrowingPrintLog方法开始记录日志了。。。");
    }

    /**
     * 最终通知
     */
    public  void afterPrintLog(){
        System.out.println("最终通知Logger类中的afterPrintLog方法开始记录日志了。。。");
    }

    /**
     * 环绕通知
     * 问题:
     *      当我们配置了环绕通知之后,切入点方法没有执行,而通知方法执行了。
     * 分析:
     *      通过对比动态代理中的环绕通知代码,发现动态代理的环绕通知有明确的切入点方法调用,而我们的代码中没有。
     * 解决:
     *      Spring框架为我们提供了一个接口:ProceedingJoinPoint。该接口有一个方法proceed(),此方法就相当于明确调用切入点方法。
     *      该接口可以作为环绕通知的方法参数,在程序执行时,spring框架会为我们提供该接口的实现类供我们使用。
     *
     * spring中的环绕通知:
     *      它是spring框架为我们提供的一种可以在代码中手动控制增强方法何时执行的方式。
     */
    public Object aroundPringLog(ProceedingJoinPoint pjp){
        Object rtValue = null;
        try{
            Object[] args = pjp.getArgs();//得到方法执行所需的参数

            System.out.println("Logger类中的aroundPringLog方法开始记录日志了。。。前置");

            rtValue = pjp.proceed(args);//明确调用业务层方法(切入点方法)

            System.out.println("Logger类中的aroundPringLog方法开始记录日志了。。。后置");

            return rtValue;
        }catch (Throwable t){
            System.out.println("Logger类中的aroundPringLog方法开始记录日志了。。。异常");
            throw new RuntimeException(t);
        }finally {
            System.out.println("Logger类中的aroundPringLog方法开始记录日志了。。。最终");
        }
    }
}
1.10 springAOP的基于注解配置:
使用环绕通知,会按正常顺序输出,而分别使用其他4种通知则存在顺序问题
/**
 * 测试AOP的配置
 */
public class AOPTest {

    public static void main(String[] args) {
        //1.获取容器
        ApplicationContext ac = new ClassPathXmlApplicationContext("bean.xml");
        //2.获取对象
        IAccountService as = (IAccountService)ac.getBean("accountService");
        //3.执行方法
        as.saveAccount();
    }
}

/**
 * 账户的业务层接口
 */
public interface IAccountService {

    /**
     * 模拟保存账户
     */
   void saveAccount();

    /**
     * 模拟更新账户
     * @param i
     */
   void updateAccount(int i);

    /**
     * 删除账户
     * @return
     */
   int  deleteAccount();
}
/**
 * 账户的业务层实现类
 */
@Service("accountService")
public class AccountServiceImpl implements IAccountService{

    @Override
    public void saveAccount() {
        System.out.println("执行了保存");
        int i=1/0;
    }

    @Override
    public void updateAccount(int i) {
        System.out.println("执行了更新"+i);

    }

    @Override
    public int deleteAccount() {
        System.out.println("执行了删除");
        return 0;
    }
}
import org.aspectj.lang.ProceedingJoinPoint;
import org.aspectj.lang.annotation.*;
import org.springframework.stereotype.Component;

/**
 * 用于记录日志的工具类,它里面提供了公共的代码
 */
@Component("logger")
@Aspect//表示当前类是一个切面类
public class Logger {

    @Pointcut("execution(* com.itheima.service.impl.*.*(..))")
    private void pt1(){}

    /**
     * 前置通知
     */
//    @Before("pt1()")
    public  void beforePrintLog(){
        System.out.println("前置通知Logger类中的beforePrintLog方法开始记录日志了。。。");
    }

    /**
     * 后置通知
     */
//    @AfterReturning("pt1()")
    public  void afterReturningPrintLog(){
        System.out.println("后置通知Logger类中的afterReturningPrintLog方法开始记录日志了。。。");
    }
    /**
     * 异常通知
     */
//    @AfterThrowing("pt1()")
    public  void afterThrowingPrintLog(){
        System.out.println("异常通知Logger类中的afterThrowingPrintLog方法开始记录日志了。。。");
    }

    /**
     * 最终通知
     */
//    @After("pt1()")
    public  void afterPrintLog(){
        System.out.println("最终通知Logger类中的afterPrintLog方法开始记录日志了。。。");
    }

    /**
     * 环绕通知
     * 问题:
     *      当我们配置了环绕通知之后,切入点方法没有执行,而通知方法执行了。
     * 分析:
     *      通过对比动态代理中的环绕通知代码,发现动态代理的环绕通知有明确的切入点方法调用,而我们的代码中没有。
     * 解决:
     *      Spring框架为我们提供了一个接口:ProceedingJoinPoint。该接口有一个方法proceed(),此方法就相当于明确调用切入点方法。
     *      该接口可以作为环绕通知的方法参数,在程序执行时,spring框架会为我们提供该接口的实现类供我们使用。
     *
     * spring中的环绕通知:
     *      它是spring框架为我们提供的一种可以在代码中手动控制增强方法何时执行的方式。
     */
    @Around("pt1()")
    public Object aroundPringLog(ProceedingJoinPoint pjp){
        Object rtValue = null;
        try{
            Object[] args = pjp.getArgs();//得到方法执行所需的参数

            System.out.println("Logger类中的aroundPringLog方法开始记录日志了。。。前置");

            rtValue = pjp.proceed(args);//明确调用业务层方法(切入点方法)

            System.out.println("Logger类中的aroundPringLog方法开始记录日志了。。。后置");

            return rtValue;
        }catch (Throwable t){
            System.out.println("Logger类中的aroundPringLog方法开始记录日志了。。。异常");
            throw new RuntimeException(t);
        }finally {
            System.out.println("Logger类中的aroundPringLog方法开始记录日志了。。。最终");
        }
    }
}
xml 配置:
<beans xmlns="http://www.springframework.org/schema/beans"
       xmlns:xsi="http://www.w3.org/2001/XMLSchema-instance"
       xmlns:aop="http://www.springframework.org/schema/aop"
       xmlns:context="http://www.springframework.org/schema/context"
       xsi:schemaLocation="http://www.springframework.org/schema/beans
        http://www.springframework.org/schema/beans/spring-beans.xsd
        http://www.springframework.org/schema/aop
        http://www.springframework.org/schema/aop/spring-aop.xsd
        http://www.springframework.org/schema/context
        http://www.springframework.org/schema/context/spring-context.xsd">


    <!-- 配置spring创建容器时要扫描的包-->
<context:component-scan base-package="com.itheima"></context:component-scan>

<!-- 配置spring开启注解AOP的支持 -->
<aop:aspectj-autoproxy></aop:aspectj-autoproxy>
<?xml version="1.0" encoding="UTF-8"?>
    </beans>
1.11不使用XML配置方式:
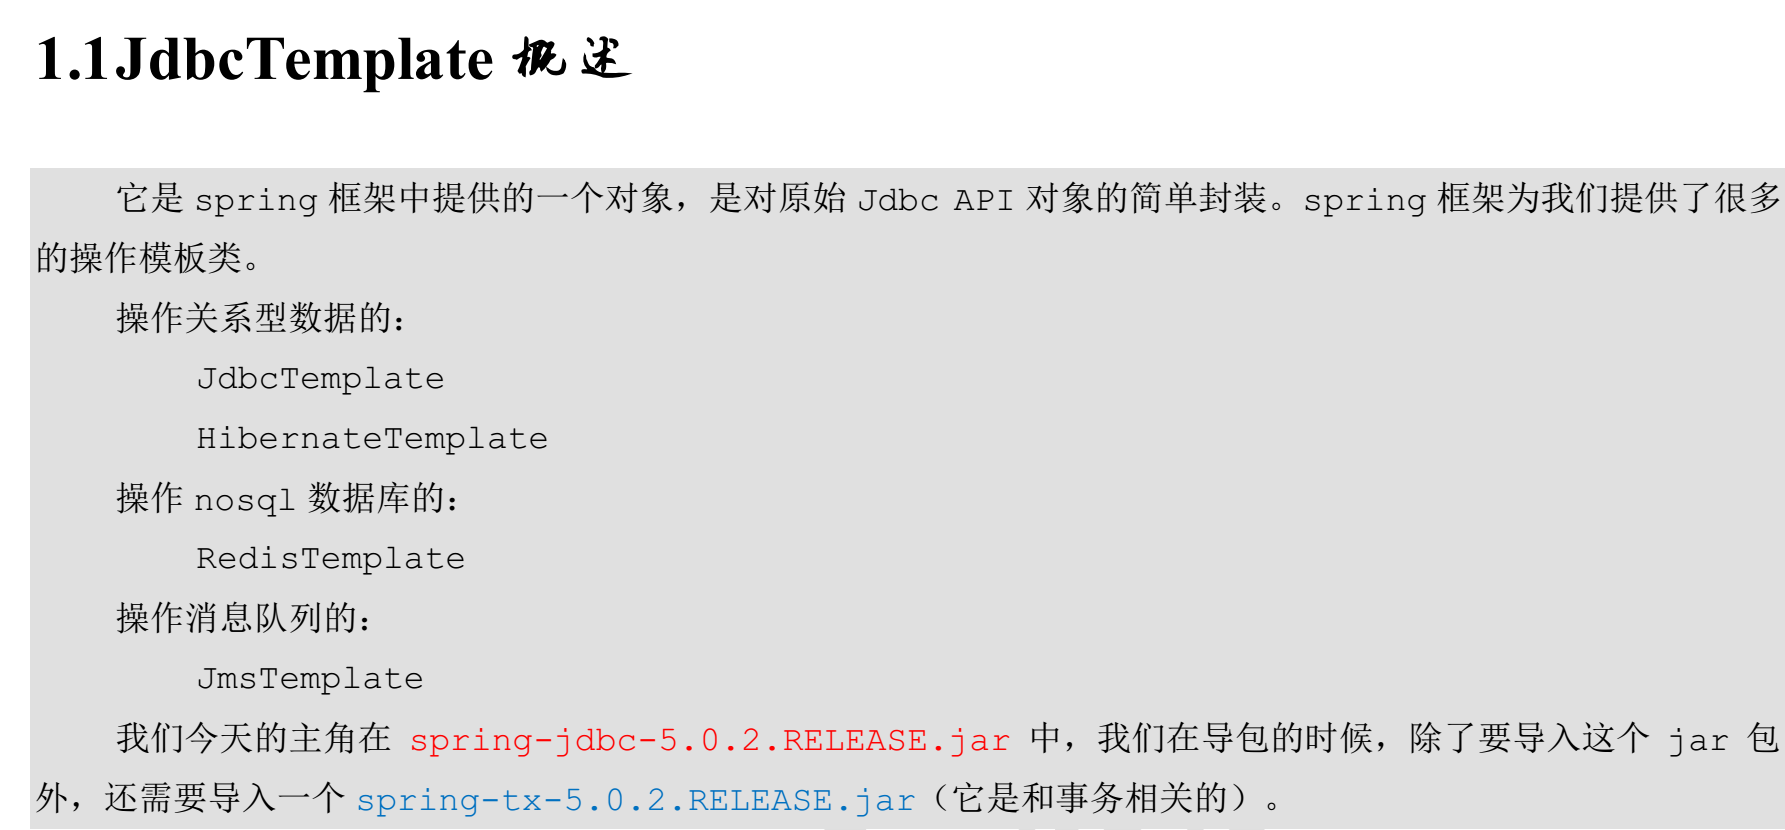
JDBCTemplate


 被折叠的 条评论
为什么被折叠?
被折叠的 条评论
为什么被折叠?
 到【灌水乐园】发言


