


GCN
为什么需要gcn
- 之前的cnn无法处理非欧式距离的数据
- 而非欧式距离的数据(比如拓扑结构,网络结构)在现实中是一种广泛存在的数据结构
GCN原理
比较多的是从谱域来解释,关于怎么从二维卷积到图卷积,参考这个:从二维卷积到图卷积
- 定义谱域的卷积操作,其中有用到拉普拉斯矩阵
- 完整的卷积公式很复杂,通过切比雪夫近似得到gcn的迭代公式:
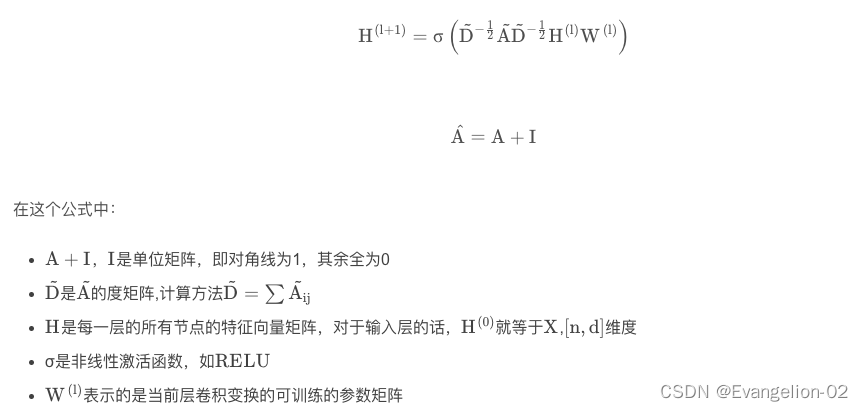
说明:
- A和D是基于图结构得到的,固定参数
- H是输入,节点的特征矩阵,输入一次H0,迭代得到中间层
- W是要学习的参数
理解:
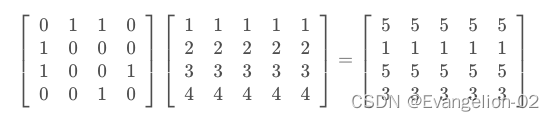
- A 和 H 的乘积其实就是把所有的邻居节点向量进行相加
- A+I是把自身节点加上【Q1】
- DAD是对A做归一化,防止某些度比较大的节点影响模型训练【Q2】
- DADH就是利用邻接矩阵对H根据邻居信息进行聚合,最后乘以W类似于全连接矩阵。
代码实现
dgl官网代码:gcn
dgl里面图卷积用的公式为:
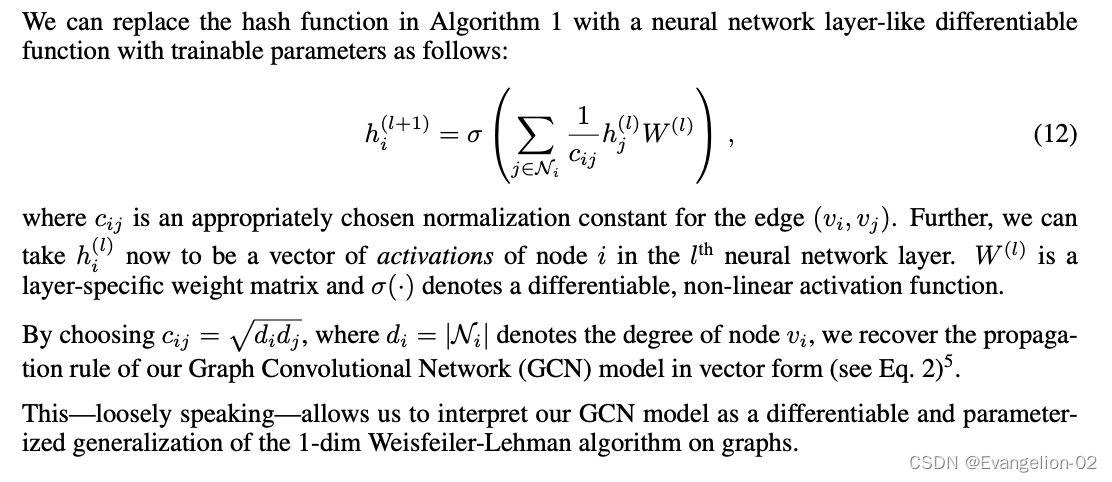
这是原论文里面公式12,论文
原理和上面的公式是一样的,主要是对邻居借点做归一化。
补充一个讲解:GCN
卷积部分: GraphConv
# 这个模块就是最基础的图卷积,也就是走 DADHW 这个公式

# __ini__() 定义里面主要是定义W和激活函数
self._in_feats = in_feats
self._out_feats = out_feats
self._norm = norm
self._allow_zero_in_degree = allow_zero_in_degree

if weight:
    self.weight = nn.Parameter(th.Tensor(in_feats, out_feats))
else:
    self.register_parameter('weight', None)

if bias:
    self.bias = nn.Parameter(th.Tensor(out_feats))
else:
    self.register_parameter('bias', None)

self.reset_parameters()

self._activation = activation


# forward(), 主要做归一化,然后全连接,核心代码如下:

# 做归一化
degs = graph.out_degrees().float().clamp(min=1)
norm = th.pow(degs, -0.5)

# 全联接
feat_src = feat_src * norm
feat_src = th.matmul(feat_src, weight)
rst = rst + self.bias

# 激活
rst = self._activation(rst)
GCN模型
# 卷积层定义好后,这里就是定义2层卷积就行了,
class GCN(nn.Module):
   def __init__(self, in_size, hid_size, out_size):
       super().__init__()
       self.layers = nn.ModuleList()
       # two-layer GCN
       self.layers.append(dglnn.GraphConv(in_size, hid_size, activation=F.relu))
       self.layers.append(dglnn.GraphConv(hid_size, out_size))
       self.dropout = nn.Dropout(0.5)

   def forward(self, g, features):
       h = features
       for i, layer in enumerate(self.layers):
           if i != 0:
               h = self.dropout(h)
           h = layer(g, h)
       return h
训练代码:
for epoch in range(200):
     model.train()
     logits = model(g, features)
     loss = loss_fcn(logits[train_mask], labels[train_mask])
     optimizer.zero_grad()
     loss.backward()
     optimizer.step()
- 这里可以看出模型的输入是整个graph和所有特征节点向量。计算loss的时候用train_mask来筛选训练数据计算loss。因此gcn的方法对于动态图就不适应了。比如定义好graph后,训练完了,有新的节点加入,那么需要重新训练模型
cora数据结果
Epoch 00197 | Loss 0.3549 | Accuracy 0.7860
Epoch 00198 | Loss 0.3656 | Accuracy 0.7880
Epoch 00199 | Loss 0.3818 | Accuracy 0.7900
Testing...
Test accuracy 0.8090
- paper里面是0.815


 1万+
1万+


 被折叠的 条评论
为什么被折叠?
被折叠的 条评论
为什么被折叠?
 到【灌水乐园】发言


