


引言
在Android 中,内容提供者Content Provider提供了对内容和外部数据进行增删改查的功能,应用程序可以通过内容提供者来访问其他应用程序的数据,作为内容提供者也可以成为内容提供者向其他应用程序共享内部数据。通常系统的一些内部数据例如联系人数据、短信、图像、音频和视频,都可以通过系统预定义的内容提供器(android.provider.*)进行访问。
一内容提供者Content Provider的概念
内容提供者就是相当于一个跨应用的数据库或者数据接口,通过内容提供者我们可以把系统内部原本私有的或者某个应用私有的数据向其他应用程序暴露共享,而且游戏Android系统本身的数据结构复杂,要想直接访问可能需要连接若干个表和视图才能实现,通过内容提供者的query等方法,操作更加快捷,同时也能更加有效地控制权限。
二一些系统常用内容提供者Content Provider
- 读取短信收到的短信的URI :content://sms/inbox
- 通讯录联系人的URI:content://com.android.contacts/contacts
- 呼叫记录的URI:content://call_log
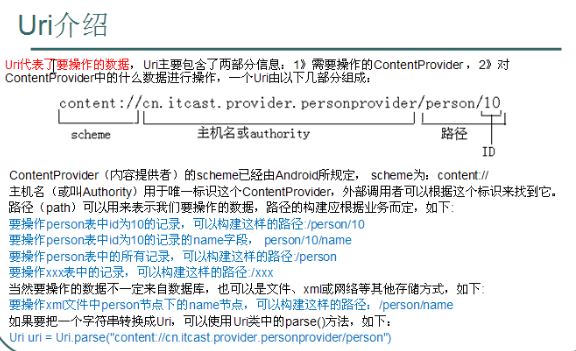
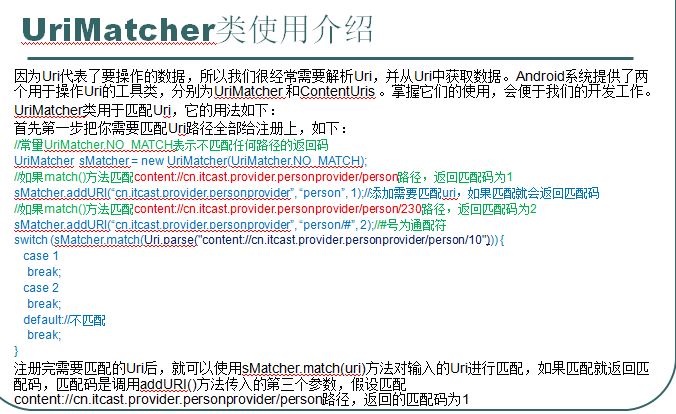
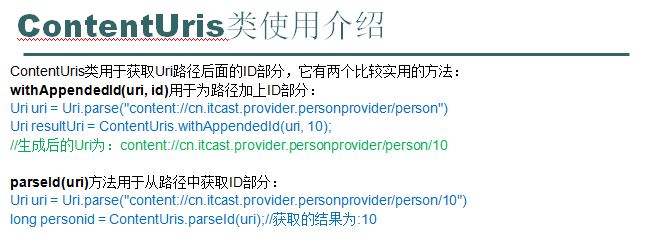
三 URI 、UriMatcher和ContentUris介绍
三内容提供者Content Provider的应用
通过Content Provider,其他应用程序就可以通过,Context.getContentResolver方法首先获得ContentResolver对象,并使用ContentResolver.insert、ContentResolver.delete、ContentResolver.update、ContentResolver.query对数据进行增删改查操作。
- ContentResolver.insert
public final Uri insert(Uri uri,ContentValues values)
/**
*ContentValues其实是一个Map扩展(其内部封装了一个HashMap),也是一个键值对对象
*/
//使用ContentValues和insert
ContentValues values=new ContentValues();
values.put("key","value");
values.put("键","值");
getContentResolver().insert(Uri.parse("Content://contentProvider"),values);- ContentResolver.delete
public final int delete(Uri uri,String[] projection,String selection,String[] selectionArgs)- ContentResolver.update
public final int update(Uri uri,ContentValues values,String where,selectionArgs )- ContentResolver.query
/**
query方法返回一个Cursor游标对象,这个对象和SQLite返回的对象完全一样,可以通过next()直接访问Cursor对象中的数据,也可以和CursorAdaperter结合使用。
@parm uri:表示内容提供者的Uri,例如收件箱的Uri.parse("content://sms/inbox")
@parm projection:相当于SQL语句中select和from 之间的的部分,即查询的字段,但是不包括Select关键字,例"name,_id"
@parm selection:相当于where字句后面的查询条件部分
@parm selectionArgs:如果参数值包含了参数,即用通配符?,selectionArgs则表示为将替代通配符的数据,例new String[]{"cmo","1"}
@parm sortOrder :即order by字句后的部分,例按_id降序排列"_id desc"
*/
public final Cursor query(Uri uri,String[] projection,String selection,String[] selectionArgs,String sortOrder )
1使用系统预定义的内容提供者
1.1使用系统预定义的内容提供者的步骤
- 查询源码或者其他资料找到对应的Uri
- 通过上下文获取ContentResolver实例
- 利用ContentResolver实例调用对应的方法
- 做到以上3步之后,就完成了与内容提供者的交互,接下来就是再结合自己的本地处理
1.2查看通信联系人和添加新的联系人
package cmo.test.unittest;

import java.util.ArrayList;

import android.content.ContentProviderOperation;
import android.content.ContentResolver;
import android.content.ContentUris;
import android.content.ContentValues;
import android.content.OperationApplicationException;
import android.database.Cursor;
import android.net.Uri;
import android.os.RemoteException;
import android.test.AndroidTestCase;
import android.util.Log;
/*
 * 单元测试类
 *@author cmo
 */
public class ContactTest extends AndroidTestCase{
    private static final String contactUri="";
    private static final String Tag="CONTACTS";
    //获取所有通讯录里的联系人的姓名、邮件、电话
    public void testGetContacs() throws Exception{

        //Uri uri=Uri.parse("content://com.android.contacts");//通过uri找到了联系人的内容提供者
        /*那么怎么通过Uri得到了内容提供者,而需要访问的数据则是通过路径来确定的,即是在静态代码块中添加的,一般都是把业务路径添加到
         * UriMatcher对象中的,再进行URI匹配,
        */
        Uri uri=Uri.parse("content://com.android.contacts/contacts");//加上了路径,这个URI就是获取所有的联系人raw_contacts的表的数据,但是真正的数据是存在data表的,所以raw_contacts我们只需要获取id去关联到data表即可
        ContentResolver resolver=getContext().getContentResolver();
        Cursor cursor=resolver.query(uri, new String[]{"_id"}, null, null, null);
        if(cursor!=null){
            while(cursor.moveToNext()){
                int contactsId=cursor.getInt(cursor.getColumnIndex("_id"));
                StringBuilder sb=new StringBuilder("contactsId=");
                sb.append(contactsId);

                uri=Uri.parse("content://com.android.contacts/contacts/"+contactsId+"/data");
                Cursor dataCursor=resolver.query(uri,new String[]{"mimetype","data1","data2"}, null,null,null);
                while(dataCursor.moveToNext()){
                    String data=dataCursor.getString(dataCursor.getColumnIndex("data1"));
                    String datatype=dataCursor.getString(dataCursor.getColumnIndex("mimetype"));
                    //String data=dataCursor.getString(dataCursor.getColumnIndex(""));
                    if("vnd.android.cursor.item/name".equals(datatype)){
                        //姓名
                        sb.append("name="+data);
                    }else if("vnd.android.cursor.item/email_v2".equals(datatype)){
                        //邮件
                        sb.append("email="+data);
                    }else if("vnd.android.cursor.item/phone_v2".equals(datatype)){
                        //电话
                        sb.append("phone="+data);
                    }
                }
                Log.d(Tag,sb.toString());
            }
        }
    }

    //根据指定电话号码获取联系人的姓名
    public void testGetContactNameByNum() throws Exception{
        String number="15676964983";
        Uri uri=Uri.parse("content://com.android.contacts/data/phones/filter/"+number);
        ContentResolver resolver=getContext().getContentResolver();
        Cursor cursor=resolver.query(uri, new String[]{"display_name"}, null, null, null);
        if(cursor.moveToNext()){
            String name=cursor.getString(0);
            Log.d(Tag,name);
        }
    }

    public void testAddNewContact() throws Exception{
        //分两步,第一步把id添加到raw_contacts保存联系人的id,第二部插入到data

        Uri uri=Uri.parse("content://com.android.contacts/raw_contacts");
        ContentResolver resolver=getContext().getContentResolver();
        ContentValues values=new ContentValues();//由于在raw——Contacts表中只需要插入id即可其他字段不需要插入
        resolver.insert(uri, values);//返回的是新插入数据的Uri形如content://com.android.contacts/row_contacts/1
        long contactid=ContentUris.parseId(resolver.insert(uri, values));//从Uri中截取id部分的值

        //添加姓名
        uri =Uri.parse("content://com.android.contacts/data");
        values.put("raw_contact_id", contactid);//外键值
        values.put("mimetype", "vnd.android.cursor.item/name");//数据类型,是姓名、电话还是其他
        values.put("data2", "新联系人姓名");//data1不用添加,因为系统会自动把姓和名的值连接起来保存到一起data1
        resolver.insert(uri, values);
        //添加电话
        values.clear();
        uri =Uri.parse("content://com.android.contacts/data");
        values.put("raw_contact_id", contactid);//外键值
        values.put("mimetype", "vnd.android.cursor.item/phone_v2");//数据类型,是姓名、电话还是其他
        values.put("data2", "2");//用于辨识号码是家庭、工作等
        values.put("data1", "18787878317");//真正保存电话号码的字段
        resolver.insert(uri, values);

        //添加邮件
        values.clear();
        uri =Uri.parse("content://com.android.contacts/data");
        values.put("raw_contact_id", contactid);//外键值
        values.put("mimetype", "vnd.android.cursor.item/email_v2");//数据类型,是姓名、电话还是其他
        values.put("data2", "2");//
        values.put("data1", "test@gmail.com");//真正保存电话号码的字段
        resolver.insert(uri, values);
    }

    //在内容提供者中:批量操作,使用事务
    public void testAddContactBtTranstion() throws Exception{
        Uri uri=Uri.parse("content://com.android.contacts/raw_contacts");
        ContentResolver resolver=getContext().getContentResolver();

        ArrayList<ContentProviderOperation> operlations=new ArrayList<ContentProviderOperation>();
        ContentProviderOperation addid=ContentProviderOperation.newInsert(uri)
        .withValue("account_name", null)//为谷歌账户account_name字段赋值
        .build();//得到一个针对添加功能操作对象,但是还没有执行
        operlations.add(addid);

        //添加姓名
        uri =Uri.parse("content://com.android.contacts/data");
        ContentProviderOperation addname=ContentProviderOperation.newInsert(uri)
                .withValueBackReference("raw_contact_id", 0)//怎么获取外键id?获取ArrayList[0]所对应的操作返回的结果
                .withValue("mimetype", "vnd.android.cursor.item/name")
                .withValue("data2", "新联系")
                .build();//得到一个针对添加功能操作对象,但是还没有执行
                operlations.add(addname);

        //添加电话
        uri =Uri.parse("content://com.android.contacts/data");
        ContentProviderOperation addphone=ContentProviderOperation.newInsert(uri)
                .withValueBackReference("raw_contact_id", 0)//怎么获取外键id?获取ArrayList[0]所对应的操作返回的结果
                .withValue("mimetype", "vnd.android.cursor.item/phone_v2")
                .withValue("data2", "2")
                .withValue("data1", "18989788823")
                .build();//得到一个针对添加功能操作对象,但是还没有执行
                operlations.add(addphone);

        //添加电话
        uri =Uri.parse("content://com.android.contacts/data");
        ContentProviderOperation addmail=ContentProviderOperation.newInsert(uri)
                .withValueBackReference("raw_contact_id", 0)//怎么获取外键id?获取ArrayList[0]所对应的操作返回的结果
                .withValue("mimetype", "vnd.android.cursor.item/email_v2")
                .withValue("data2", "2")
                .withValue("data1", "test@gmail.com")
                .build();//得到一个针对添加功能操作对象,但是还没有执行
                operlations.add(addmail);

        resolver.applyBatch("com.android.contacts", operlations);//执行批量操作
    }
}
要想获取其他系统预定义的内容提供者,步骤大同小异,只需要先找到对应的Uri。
3使用自定义的内容提供者(在这个APP的基础上SQLite的应用)
3.1使用自定义的内容提供者的步骤
- 继承ContentProvider,并实现了父类中的相关方法
- 定义ContentProvider特有的URI,格式一般为content://authority/path/param,authority宜设置为唯一标识。这个作为其他应用识别该内容提供者的唯一标识
- 在static 静态代码块中使用UriMatcher对象Uri和返回码。
- 根据自己的业务需求实现具体的方法
- 使用UriMatcher.match方法将URI映射成与第四步匹配的代码(addURI方法的最后一个参数)
- 在manifest清单文件中的provider节点注册ContentProvider,其中authority值设置为第三步中的
3.2自定义的内容提供者的应用
假如一个应用A用于操作Student类的信息,现在我们想把Student的信息共享给其他应用B,在B中通过内容提供者操作Student数据。
3.2.1 开发作为自定义的内容提供者的应用
/**这个应用用于保存Student的信息到数据库中
*Student类的数据库操作类
*/
package cmo.learn.service;

import java.util.ArrayList;
import java.util.List;
import android.content.ContentValues;
import android.content.Context;
import android.database.Cursor;
import android.database.sqlite.SQLiteDatabase;
import cmo.learn.domain.Student;

public class StudentDBOperate {
    private DBHelper dbhelper;
    //要操作数据库操作实例首先得得到数据库操作实例
    public StudentDBOperate(Context context){
        this.dbhelper=new DBHelper(context);
    }

    public void save(Student stu){
        SQLiteDatabase db=dbhelper.getWritableDatabase();
        ContentValues values=new ContentValues();
        values.put("name", stu.getName());
        values.put("sex",stu.getSex());
        db.insert("Student", null, values);
        db.close();
    }
    public void delete(Integer id){
        SQLiteDatabase db=dbhelper.getWritableDatabase();
        db.delete("Student", "_id=?", new String[]{id.toString()});

    }

    public void update(Student stu){
        SQLiteDatabase db=dbhelper.getWritableDatabase();
        ContentValues values=new ContentValues();
        values.put("name", stu.getName());
        values.put("sex",stu.getSex());
        db.update("Student", values, "_id=?", new String[]{String.valueOf(stu.get_id())});
    }

    public Student query(Integer _id){
        SQLiteDatabase db=dbhelper.getReadableDatabase();
        Cursor stuimf= db.query("Student", new String[]{"_id","name","sex"}, "_id=?",new String[]{_id.toString()}, null, null, null);
        if(stuimf!=null){
            if(stuimf.moveToFirst()){
                int id=stuimf.getInt(stuimf.getColumnIndex("_id"));
                String name=stuimf.getString(stuimf.getColumnIndex("name"));
                String sex=stuimf.getString(stuimf.getColumnIndex("sex"));
                return new Student(id,name,sex);
            }
        }
        return null;
    }
    /**
     * 分页查询
     * @param offset  跳过前面多少记录
     * @param maxRecord 每页获取多少记录
     * @return
     */
    public List<Student> getScrollData(int offset,int maxRecord){
        SQLiteDatabase db=dbhelper.getReadableDatabase();
        List<Student> stulist = new ArrayList<Student>();
        Cursor stuimf=db.rawQuery("Select _id,name,sex from Student order by _id asc limit ?,?",
                new String[] {String.valueOf(offset),String.valueOf(maxRecord)});
        if(stuimf!=null){
            while(stuimf.moveToNext()){
                int id=stuimf.getInt(stuimf.getColumnIndex("_id"));
                String name=stuimf.getString(stuimf.getColumnIndex("name"));
                String sex=stuimf.getString(stuimf.getColumnIndex("sex"));
                stulist.add(new Student(id,name,sex));
            }
            return stulist;
        }
        db.close();
        return null;

    }
    public long getCount(){
        long result=0;
        SQLiteDatabase db=dbhelper.getReadableDatabase();
        Cursor stuimf=db.rawQuery("Select count(*) from Student", null);
        if(stuimf!=null){
            //因为只要创建了表,count(*)最小值为1,即还未插入数据时
            stuimf.moveToFirst();
            result=stuimf.getLong(0);
        }
        return result;
    }
}
具体的界面代码和其他业务逻辑代码由于篇幅问题就不贴出了。按照普通的应用,完成了Student信息的保存、删除、更新、查询。
/**完成了基本业务的开发之后,进行第一步继承ContentProvider实现相关方*法,只有实现了相关方法之后,其他应用才能进行通过ContentResolver访问,并不需要实现所有的方法,结合自己的业务逻辑来确定,如果只想提供查询的方法,那么只需要实现query方法,其他方法就不需要实现了
*/
package cmo.learn.db;

import cmo.learn.service.DBHelper;
import android.content.ContentProvider;
import android.content.ContentUris;
import android.content.ContentValues;
import android.content.UriMatcher;
import android.database.Cursor;
import android.database.sqlite.SQLiteDatabase;
import android.net.Uri;

public class StudentProvider extends ContentProvider {
    private DBHelper dbhelper;
    private static final UriMatcher MATCHER=new UriMatcher(UriMatcher.NO_MATCH);//仅当Uri不匹配时返回的UriMatcher.NO_MATCH
    private static final int STUDENTSCODE=2;//操作所有Student
    private static final int STUDENT=3;//操作指定Student

    //自定义Uri,作用是仅当传入的Uri匹配才进行后续操作,即只有在static静态代码块中add了的Uri才是有效Uri并返回对应的操作码
    static{
        MATCHER.addURI("cmo.learn.providers.student", "Student", STUDENTSCODE);//若匹配成功之后返回操作码2
        MATCHER.addURI("cmo.learn.providers.student", "Student/#", STUDENT);//若匹配成功之后返回4,其中#代表所有数字,*代表所有字符
    }
    @Override
    public int delete(Uri arg0, String arg1, String[] arg2) {
        //提供给外部应用程序往内容提供者删除数据
        SQLiteDatabase db=dbhelper.getWritableDatabase();
        int recs=0;
        switch(MATCHER.match(arg0)){
        case 2:
            recs=db.delete("Student", arg1, arg2);
            break;
        case 3:
            long rowid=ContentUris.parseId(arg0);
            String where ="_id="+rowid;
            if(arg1!=null && !"".equals(arg1.trim())){
                where +=" and "+arg1;
            }
            recs= db.delete("Student", arg1, arg2);
            break;
        default:
            throw new IllegalArgumentException("不合法的Uri: "+arg0);
        }
        return recs;
    }

    @Override
    public String getType(Uri arg0) {
        //返回目前要操作的Uri的内容类型例如操作的是文本文件 类型是plain/txt
        return null;
    }

    @Override
    public Uri insert(Uri arg0, ContentValues arg1) {
        //提供给外部应用程序往内容提供者插入数据
        SQLiteDatabase db=dbhelper.getWritableDatabase();
        switch(MATCHER.match(arg0)){
        case 2:
            long rowid=db.insert("Student", null, arg1);//主键值
            //返回新插入的数据的uri content://cmo.leanr.providers.student/Student/1
            //Uri newRecord=Uri.parse("content://cmo.leanr.providers.student/Student/"+rowid);
            Uri newRecord=ContentUris.withAppendedId(arg0,rowid);
            return newRecord;
        default:
            throw new IllegalArgumentException("不合法的Uri"+arg0);
        }
    }

    @Override
    public boolean onCreate() {
        dbhelper=new DBHelper(getContext());
        return true;
    }

    @Override
    public Cursor query(Uri arg0, String[] arg1, String arg2, String[] arg3,
            String arg4) {
            //提供给外部程序查询的方法
        SQLiteDatabase db=dbhelper.getReadableDatabase();
        int recs=0;
        switch(MATCHER.match(arg0)){
        case 2:
            return db.query("Student", arg1, arg2, arg3, null, null,arg4);
        case 3:
            long rowid=ContentUris.parseId(arg0);
            String where ="_id="+rowid;
            if(arg2!=null && !"".equals(arg2.trim())){
                where +=" and "+arg2;
            }
            return db.query("Student", arg1, where, arg3, null, null,arg4);
        default:
            throw new IllegalArgumentException("不合法的Uri: "+arg0);
        }
    }

    @Override
    public int update(Uri arg0, ContentValues arg1, String arg2, String[] arg3) {
        //提供给外部应用程序往内容提供者更新数据
        SQLiteDatabase db=dbhelper.getWritableDatabase();
        int recs=0;
        switch(MATCHER.match(arg0)){
        case 2:
            recs=db.update("Student", arg1, arg2, arg3);
            break;
        case 3:
            long rowid=ContentUris.parseId(arg0);
            String where ="_id="+rowid;
            if(arg2!=null && !"".equals(arg2.trim())){
                where +=" and "+arg1;
            }
            recs= db.update("Student", arg1, arg2, arg3);
            break;
        default:
            throw new IllegalArgumentException("不合法的Uri: "+arg0);
        }
        return recs;
    }
}
实现了自定义的ContentProvider类之后,就在在清单文件里注册ContentProvider组件和对应的主机名
<application android:allowBackup="true" android:icon="@drawable/ic_launcher" android:label="@string/app_name" android:theme="@style/AppTheme" >
        <activity
            android:name=".MainActivity"
            android:label="@string/app_name" >
            <intent-filter>
                <action android:name="android.intent.action.MAIN" />
                <category android:name="android.intent.category.LAUNCHER" />
            </intent-filter>
        </activity>
        <!-- 其他应用是根据authorities 来识别到这个组件的 -->
        <provider android:name=".StudentProvider" android:authorities="cmo.learn.providers.student"></provider>
</application>完成以上工作之后,就已经定义了一个主机名为”cmo.learn.providers.student“的自定义内容提供者。
3.2.2 访问自定义的内容提供者
根据访问内容提供者的静态代码块中定义的Uri去访问内容提供者
package cmo.learn.test;

import android.content.ContentResolver;
import android.content.ContentValues;
import android.database.Cursor;
import android.net.Uri;
import android.test.AndroidTestCase;

public class StudentProviderTest extends AndroidTestCase {
    public void testProviderInsert() throws Exception{
        Uri uri=Uri.parse("content://cmo.learn.providers.student/Student");
        ContentResolver resoler=getContext().getContentResolver();
        ContentValues values=new ContentValues();
        values.put("name", "cmo8");
        values.put("sex", "boy");
        values.put("amount", String.valueOf(520));
        resoler.insert(uri, values);
    }
    public void testDele() throws Exception{
        Uri uri=Uri.parse("content://cmo.learn.providers.student/Student/3");
        ContentResolver resoler=getContext().getContentResolver();
        resoler.delete(uri, null, null);
    }
    public void testUpdate()throws Exception{
        Uri uri=Uri.parse("content://cmo.learn.providers.student/Student/1");
        ContentResolver resoler=getContext().getContentResolver();
        ContentValues values=new ContentValues();
        values.put("name", "cmo8");
        values.put("sex", "boy");
        resoler.update(uri, values, null, null);
    }
    public void testQuery()throws Exception{
        Uri uri=Uri.parse("content://cmo.learn.providers.student/Student/1");
        ContentResolver resoler=getContext().getContentResolver();
        Cursor cursor=resoler.query(uri, null, null, null, "_id asc");
        cursor.moveToFirst();
    }
}


 2755
2755

 被折叠的 条评论
为什么被折叠?
被折叠的 条评论
为什么被折叠?
 到【灌水乐园】发言


