


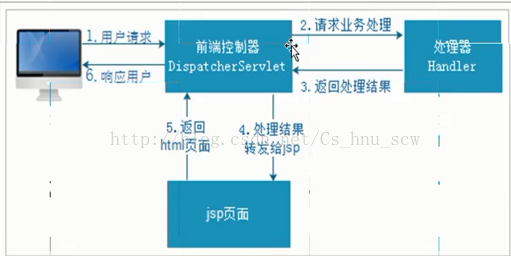
一:SpringMVC处理流程
二:SpringMVC开发步骤
当然,首先都要记得导包哦!!!!!!!!
(1)SpringMVC中得前端配置器的配置
<?xml version="1.0" encoding="UTF-8"?>
<web-app xmlns:xsi="http://www.w3.org/2001/XMLSchema-instance" xmlns="http://java.sun.com/xml/ns/javaee" xsi:schemaLocation="http://java.sun.com/xml/ns/javaee http://java.sun.com/xml/ns/javaee/web-app_2_5.xsd" id="WebApp_ID" version="2.5">
  <display-name>SpringMvc</display-name>
  <welcome-file-list>
    <welcome-file>index.html</welcome-file>
    <welcome-file>index.htm</welcome-file>
    <welcome-file>index.jsp</welcome-file>
    <welcome-file>default.html</welcome-file>
    <welcome-file>default.htm</welcome-file>
    <welcome-file>default.jsp</welcome-file>
  </welcome-file-list>

  <!-- 前端配置器 -->
  <servlet>
  		<servlet-name>springmvc</servlet-name>
  		<servlet-class>org.springframework.web.servlet.DispatcherServlet</servlet-class>
  		<!-- 默认找 /WEB-INF/[servlet的名称]-servlet.xml -->
  		<init-param>
  			<param-name>contextConfigLocation</param-name>
  			<param-value>classpath:springmvc.xml</param-value>
  		</init-param>
  </servlet>

  <servlet-mapping>
  <servlet-name>springmvc</servlet-name>
  	<!--
  		1. /*  拦截所有   jsp  js png .css  真的全拦截   建议不使用
  		2. *.action *.do 拦截以do action 结尾的请求     肯定能使用   ERP
  		3. /  拦截所有 (不包括jsp) (包含.js .png.css)  强烈建议使用     前台 面向消费者  www.jd.com/search   /对静态资源放行
  	 -->
  	<url-pattern>*.action</url-pattern>
  </servlet-mapping>

</web-app>
(2)配置springmvc.xml
<?xml version="1.0" encoding="UTF-8"?>
<beans xmlns="http://www.springframework.org/schema/beans"
	xmlns:xsi="http://www.w3.org/2001/XMLSchema-instance" xmlns:p="http://www.springframework.org/schema/p"
	xmlns:context="http://www.springframework.org/schema/context"
	xmlns:mvc="http://www.springframework.org/schema/mvc"
	xsi:schemaLocation="http://www.springframework.org/schema/beans http://www.springframework.org/schema/beans/spring-beans-4.0.xsd
        http://www.springframework.org/schema/mvc http://www.springframework.org/schema/mvc/spring-mvc-4.0.xsd
        http://www.springframework.org/schema/context http://www.springframework.org/schema/context/spring-context-4.0.xsd">

 <!-- 扫描@Controler  @Service-->
 <context:component-scan base-package="hnu.scw"></context:component-scan>


 </beans>
(3)编写Controler类,进行页面控制
package hnu.scw.controler;

import org.springframework.stereotype.Controller;
import org.springframework.web.bind.annotation.RequestMapping;
import org.springframework.web.servlet.ModelAndView;

@Controller
public class SpringMvcControler {

	@RequestMapping(value="/test/study1.action")
	public ModelAndView testControler1(){
		ModelAndView modelAndView = new ModelAndView();
		modelAndView.setViewName("/WEB-INF/jsp/itemList.jsp");
		return modelAndView;
	}
}
这上面的步骤就是一个基本的springmvc开发模式了。
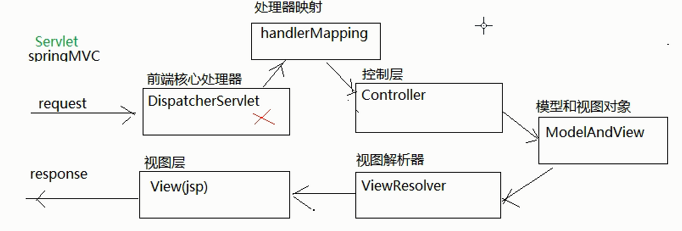
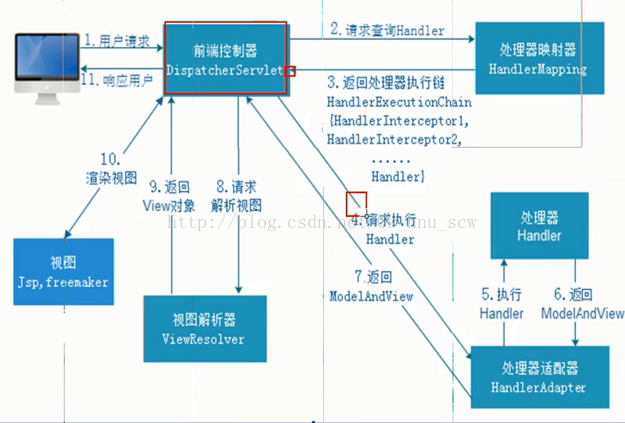
三:SpringMVC架构分析图

四:SpringMVC配置三大组件
 <!-- 处理器映射器 ,其实有三种这里写了一种,其实后面都被注解被替换,所以了解就好了,知道就行-->
<!--         <bean class="org.springframework.web.servlet.mvc.method.annotation.RequestMappingHandlerMapping"/> -->
        <!-- 处理器适配器 -->
<!--         <bean class="org.springframework.web.servlet.mvc.method.annotation.RequestMappingHandlerAdapter"/> -->
        <!-- 注解驱动 -->
        <mvc:annotation-driven/>

        <!-- 视图解释器 -->
        <bean class="org.springframework.web.servlet.view.InternalResourceViewResolver">
        	<property name="prefix" value="/WEB-INF/jsp/"/>
        	<property name="suffix" value=".jsp"/>
        </bean>
PS:(1)如果不进行配置也可以,也可以,因为SpringMVC架构有默认配置,但是只从3.1版之后,默认的就废弃了,所以配置一下最好。
(2)如果配置了注解驱动,那么处理器映射器和处理器适配器就可以不用配置
(3)视图解释器主要是为了节省在Controler的页面跳转,将相同的代码进行省略。比如有很多个都是要跳转到/WEB-INF/jsp/下面,那么就可以将这个部分提取出来。
五:SpringMVC整合Mybatis
其实这个很简单,如果看了我之前关于Mybatis文章的话,那么就很明白了。
这里所以我就不多说了,大体讲解一下步骤。
(1)将spring与Mybatis整合-----------在我的Mybatis的干货知识文章有已经讲解非常非常清楚了
(2)将SpringMVC整合到(1)中的框架中。--------------这个内容就是上面讲解的整合方式了。
六:Controler层参数绑定
(1)原始参数绑定
//去修改页面 入参 id
	@RequestMapping(value = "/itemEdit.action")
//	public ModelAndView toEdit(@RequestParam(value = "id",required = false,defaultValue = "1") Integer idaaq,
	public ModelAndView toEdit(HttpServletRequest request,HttpServletResponse response
			,HttpSession session,Model model){

		//Servlet时代开发
		String id = request.getParameter("id");
		//查询一个商品
		Items items = itemService.selectItemsById(Integer.parseInt(id));
		ModelAndView mav = new ModelAndView();
		//数据
		mav.addObject("item", items);
		mav.setViewName("editItem");
		return mav;

}
(2)绑定之简单类型
//去修改页面 入参 id
	@RequestMapping(value = "/itemEdit.action")
//	public ModelAndView toEdit(@RequestParam(value = "id",required = false,defaultValue = "1") Integer idaaq,
	public ModelAndView toEdit(Integer id ){

		//查询一个商品
		Items items = itemService.selectItemsById(id);
		ModelAndView mav = new ModelAndView();
		//数据
		mav.addObject("item", items);
		mav.setViewName("editItem");
		return mav;

}2)存在开发人员中,因为形参的名字和要接受的参数名字不一样,比如传过来的名字是id,但是形参又是设置为了idaao,所以这样的情况又怎么处理呢?其实也有处理的办法,就是使用@RequestParm来进行处理。这个情况在上面这个例子也已经进行说明了,其中还有required这个属性的意思就是,这个是否必须有。defaultValue属性的含义就是设置一个默认值。
注:这个实际都不是这样用,因为麻烦,花那么大的功夫就是为了接受参数,而还不如直接将形参的名字改成和传送的参数一样,这不是多么简单的处理方式嘛。所以这种不建议使用哦。。。
(3)绑定之实体类对象JavaBean
//提交修改页面 入参  为 Items对象
	@RequestMapping(value = "/updateitem.action")
	public ModelAndView updateitem(Items items){
		//修改
		itemService.updateItemsById(vo.getItems());
		ModelAndView mav = new ModelAndView();
		mav.setViewName("success");
		return mav;

	}
PS:必须保证实体类对象中的属性和传送过来要接受的参数名一样。。。。切记切记!!!!!!!!!!!!!!!
(4)绑定之包装JavaBean类对象
//提交修改页面 入参  为 Items对象
	@RequestMapping(value = "/updateitem.action")
	public ModelAndView updateitem(QueryVo vo){

		//修改
		itemService.updateItemsById(vo.getItems());

		ModelAndView mav = new ModelAndView();
		mav.setViewName("success");
		return mav;

}package com.itheima.springmvc.pojo;
public class QueryVo {
//商品
private Items items;
public Items getItems() {
return items;
}
public void setItems(Items items) {
this.items = items;
}
}(5)绑定参数之数组------适用于比如在页面中的checkbox组件中
//删除多个
	@RequestMapping(value = "/deletes.action")
	public ModelAndView deletes(Integer[] ids){

		ModelAndView mav = new ModelAndView();
		mav.setViewName("success");
		return mav;
	}
(6)绑定参数之List集合-----------适用于一次性修改多个相同类型格式的数据,比如更新多个片段
包装类代码:
package com.itheima.springmvc.pojo;

import java.util.List;

public class QueryVo {

	private List<Items> itemsList;

	public List<Items> getItemsList() {
		return itemsList;
	}
	public void setItemsList(List<Items> itemsList) {
		this.itemsList = itemsList;
	}
}
controller层代码:
//修改
	@RequestMapping(value = "/updates.action",method = {RequestMethod.POST,RequestMethod.GET})
	public ModelAndView updates(QueryVo vo){


		ModelAndView mav = new ModelAndView();
		mav.setViewName("success");
		return mav;
}(2)只是注意一点,在用的时候,就需要设置itemlist的下标,即itemlist[0]........,如下所示
<c:forEach items="${itemList }" var="item" varStatus="s">
<tr>
	<td><input type="checkbox" name="ids" value="${item.id }"></td>
	<td><input type="text" name="itemsList[${s.index}].name" value="${item.name }"></td>
	<td><input type="text" name="itemsList[${s.index }].price" value="${item.price }"></td>
	<td><fmt:formatDate value="${item.createtime}" pattern="yyyy-MM-dd HH:mm:ss"/></td>
	<td>${item.detail }</td>

	<td><a href="${pageContext.request.contextPath }/itemEdit.action?id=${item.id}">修改</a></td>

</tr>
</c:forEach>
(7)自定义参数转换
例子:1)在开发过程中,比如填写时间的格式的时候,本来是2017-09-11,然而填写成了2017:09:11,这样的话,在本身为Date类型的话,这样就会报错,所以为了处理这样的需求,就可以采取参数转换处理方法。
2)或者碰到某些固定的组件只能产生某种格式,但是这种格式又无法满足需求,这时候就可以通过参数转换方法将需要改变的格式进行修改,达到符合需求的作用。
步骤:(1)编写转换方法----也就是想进行参数转换的方式,即由什么格式转为什么格式的方法,
下面就以由yyyy:MM-dd HH_mm-ss的格式转为正常的Date的格式的方法
package com.itheima.springmvc.conversion;

import java.text.DateFormat;
import java.text.SimpleDateFormat;
import java.util.Date;

import org.springframework.core.convert.converter.Converter;

/**
 * 转换日期类型的数据
 * S : 页面传递过来的类型
 * T : 转换后的类型
 * @author lx
 *
 */
public class DateConveter implements Converter<String, Date>{

	public Date convert(String source) {
		// TODO Auto-generated method stub
		try {
			if(null != source){//2016:11-05 11_43-50
				DateFormat df = new SimpleDateFormat("yyyy:MM-dd HH_mm-ss");
				return df.parse(source);
			}
		} catch (Exception e) {
			// TODO: handle exception
		}
		return null;
	}

}
(2)配置spring.xml
<!-- 注解驱动 -->
        <mvc:annotation-driven conversion-service="conversionServiceFactoryBean"/>

        <!-- 配置Conveter转换器  转换工厂 (日期、去掉前后空格)。。 -->
        <bean id="conversionServiceFactoryBean" class="org.springframework.format.support.FormattingConversionServiceFactoryBean">
        	<!-- 配置 多个转换器-->
        	<property name="converters">
        		<list>
        			<bean class="com.itheima.springmvc.conversion.DateConveter"/>
        		</list>
        	</property>
        </bean>
七:SpringMVC与Struts2的区别
1、 springmvc的入口是一个servlet即前端控制器,而struts2入口是一个filter过滤器。
2、 springmvc是基于方法开发(一个url对应一个方法),请求参数传递到方法的形参,可以设计为单例或多例(建议单例),struts2是基于类开发,传递参数是通过类的属性,只能设计为多例。
3、 Struts采用值栈存储请求和响应的数据,通过OGNL存取数据,springmvc通过参数解析器是将request请求内容解析,并给方法形参赋值,将数据和视图封装成ModelAndView对象,最后又将ModelAndView中的模型数据通过request域传输到页面。Jsp视图解析器默认使用jstl。
八:配置web.xml设置post提交的乱码处理
<!-- 处理POST提交乱码问题 -->
  <filter>
  	<filter-name>encoding</filter-name>
  	<filter-class>org.springframework.web.filter.CharacterEncodingFilter</filter-class>
  	<init-param>
  		<param-name>encoding</param-name>
  		<param-value>UTF-8</param-value>
  	</init-param>
  </filter>

  <filter-mapping>
  	<filter-name>encoding</filter-name>
  	<url-pattern>*.action</url-pattern>
  </filter-mapping>
九:@ResuletMapping的适用
(1) 限定GET方法
@RequestMapping(method = RequestMethod.GET)
如果通过POST访问则报错:
HTTP Status 405 - Request method 'POST' not supported
例如:
@RequestMapping(value ="itemList",method = RequestMethod.POST)
(2) 限定POST方法
@RequestMapping(method = RequestMethod.POST)
如果通过GET访问则报错:
HTTP Status 405 - Request method 'GET' not supported
(3) GET和POST都可以
@RequestMapping(method = {RequestMethod.GET,RequestMethod.POST})
(4)限定Controller中的URL访问方法必须以某字符串开头
在class上添加@RequestMapping(url)指定通用请求前缀, 限制此类下的所有方法请求url必须以请求前缀开头
(5)为方法配置多个访问URL路径value的值是数组,可以将多个url映射到同一个方法,比如:
@RequestMapping(value = {"/item/scw.action","/item/haha.action"})十:Controller层的返回值
(1)ModelAndView-----controller方法中定义ModelAndView对象并返回,对象中可添加model数据、指定view。
(2)String
效果一:逻辑视图名---------controller方法返回字符串可以指定逻辑视图名,通过视图解析器解析为物理视图地址。
//指定逻辑视图名,经过视图解析器解析为jsp物理路径:/WEB-INF/jsp/itemList.jsp
return "itemList";效果二:Redirect重定向---Contrller方法返回字符串可以重定向到一个url地址
如下商品修改提交后重定向到商品编辑页面。
/**
 * 更新商品
 *
 * @param item
 * @return
 */
@RequestMapping("updateItem")
public String updateItemById(Item item) {
	// 更新商品
	this.itemService.updateItemById(item);

	// 修改商品成功后,重定向到商品编辑页面
	// 重定向后浏览器地址栏变更为重定向的地址,
	// 重定向相当于执行了新的request和response,所以之前的请求参数都会丢失
	// 如果要指定请求参数,需要在重定向的url后面添加 ?itemId=1 这样的请求参数
	return "redirect:/itemEdit.action?itemId=" + item.getId();
}效果三:forward转发-------Controller方法执行后继续执行另一个Controller方法
如下商品修改提交后转向到商品修改页面,修改商品的id参数可以带到商品修改方法中。
/**
 * 更新商品
 *
 * @param item
 * @return
 */
@RequestMapping("updateItem")
public String updateItemById(Item item) {
	// 更新商品
	this.itemService.updateItemById(item);

	// 修改商品成功后,重定向到商品编辑页面
	// 重定向后浏览器地址栏变更为重定向的地址,
	// 重定向相当于执行了新的request和response,所以之前的请求参数都会丢失
	// 如果要指定请求参数,需要在重定向的url后面添加 ?itemId=1 这样的请求参数
	// return "redirect:/itemEdit.action?itemId=" + item.getId();

	// 修改商品成功后,继续执行另一个方法
	// 使用转发的方式实现。转发后浏览器地址栏还是原来的请求地址,
	// 转发并没有执行新的request和response,所以之前的请求参数都存在
	return "forward:/itemEdit.action";

}
//结果转发到editItem.action,request可以带过去
return "forward: /itemEdit.action";
(3)void
在Controller方法形参上可以定义request和response,使用request或response指定响应结果:
1、使用request转发页面,如下:
request.getRequestDispatcher("页面路径").forward(request, response);
request.getRequestDispatcher("/WEB-INF/jsp/success.jsp").forward(request,response);
2、可以通过response页面重定向:
response.sendRedirect("url")
response.sendRedirect("/springmvc-web2/itemEdit.action");
3、可以通过response指定响应结果,例如响应json数据如下:
response.getWriter().print("{\"abc\":123}");
代码测试:/**
* 返回void测试
*
* @param request
* @param response
* @throws Exception
*/
@RequestMapping("queryItem")
public void queryItem(HttpServletRequest request, HttpServletResponse response) throws Exception {
// 1 使用request进行转发
// request.getRequestDispatcher("/WEB-INF/jsp/success.jsp").forward(request,
// response);
// 2 使用response进行重定向到编辑页面
// response.sendRedirect("/springmvc-web2/itemEdit.action");
// 3 使用response直接显示
response.getWriter().print("{\"abc\":123}");
}总结:针对三种不同的返回值,适用在不同的情况中:
对于ModelAndeView类型,是最无敌的,因为可以很方便的即返回数据,又返回视图。。
对于String类型,是企业和官方最推荐的,其主要是返回视图,model带数据,并且实现解耦形式。
对于void类型,其不返回视图,那么就很明显的适用于Ajax进行请求,返回Jsao格式数据足够达到了效果。
十一:异常处理器处理流程:
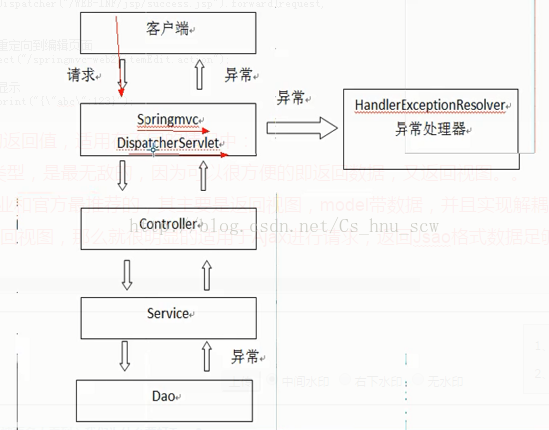
编写异常处理器类,即继承HandlerExceptionResolver类。
package com.itheima.springmvc.exception;

import javax.servlet.http.HttpServletRequest;
import javax.servlet.http.HttpServletResponse;

import org.springframework.web.servlet.HandlerExceptionResolver;
import org.springframework.web.servlet.ModelAndView;

/**
 * 异常处理器的自定义的实现类
 * @author lx
 *
 */
public class CustomExceptionResolver implements HandlerExceptionResolver{

	public ModelAndView resolveException(HttpServletRequest request,
			HttpServletResponse response, Object obj,
			Exception e) {
		// TODO Auto-generated method stub  发生异常的地方 Serivce层  方法  包名+类名+方法名(形参) 字符串
		//日志    1.发布 tomcat war  Eclipse  2.发布Tomcat  服务器上  Linux  Log4j

		ModelAndView mav = new ModelAndView();
		mav.addObject("error", "未知异常");
		mav.setViewName("error");
		return mav;
	}
}<!-- Springmvc的异常处理器 -->
<bean class="com.itheima.springmvc.exception.CustomExceptionResolver"/> 自定义异常代码:(例子)
package com.itheima.springmvc.exception;

public class MessageException extends Exception{
	private String msg;
	public MessageException(String msg) {
		super();
		this.msg = msg;
	}

	public String getMsg() {
		return msg;
	}

	public void setMsg(String msg) {
		this.msg = msg;
	}
}package com.itheima.springmvc.exception;
import javax.servlet.http.HttpServletRequest;
import javax.servlet.http.HttpServletResponse;
import org.springframework.web.servlet.HandlerExceptionResolver;
import org.springframework.web.servlet.ModelAndView;
/**
* 异常处理器的自定义的实现类
* @author lx
*
*/
public class CustomExceptionResolver implements HandlerExceptionResolver{
public ModelAndView resolveException(HttpServletRequest request,
HttpServletResponse response, Object obj,
Exception e) {
// TODO Auto-generated method stub 发生异常的地方 Serivce层 方法 包名+类名+方法名(形参) 字符串
//日志 1.发布 tomcat war Eclipse 2.发布Tomcat 服务器上 Linux Log4j
ModelAndView mav = new ModelAndView();
//判断异常为类型
if(e instanceof MessageException){
//预期异常
MessageException me = (MessageException)e;
mav.addObject("error", me.getMsg());
}else{
mav.addObject("error", "未知异常");
}
mav.setViewName("error");
return mav;
}
}十二:springmvc与json数据交互
这里要提到的一个知识点就是,对json字符串的接受与发送。。我想这个是很常见的一个开发吧。比如在ajax中发送一个json字符串过来,那么到Controller层就需要对json串进行自动解析并且封装到实体类对象类。。既然用了springmvc当然是已经帮我们实现好了的。
首先,先讲解一下什么叫json字符串,注意是字符串。。
{
"id": 1,
"name": "测试商品",
"price": 99.9,
"detail": "测试商品描述",
"pic": "123456.jpg"
}而上面的json格式对应的json字符串应该是这样的,
var params = '{"id": 1,"name": "测试商品","price": 99.9,"detail": "测试商品描述","pic": "123456.jpg"}';
对了,他们之间的差别就是外层多了两个单引号,所以这就是为什么我说的是字符串!!!!!!!!!!!!
进入正题:
首先要记住导包
比如有个ajax放松json字符串给Controller层,
$.ajax({
		url : "${pageContext.request.contextPath }/json.action",
		data : params,
		contentType : "application/json;charset=UTF-8",//发送数据的格式
		type : "post",
		dataType : "json",//回调
		success : function(data){
			alert(data.name);
		}

	});
PS:如果ajax要发送json字符串,那么就必须知名contentType属性
Controller层代码:
//json数据交互
	@RequestMapping(value = "/json.action")
        @ResponseBody
	public Items json(@RequestBody Items items){

		System.out.println(items);

		return items;
}(2)如果要发送的也是json格式的字符串,那么就用@ResponseBody在方法前面进行注解就可以了。。。
框架毕竟是框架,省去了很多事情,要不然还要自己进行拼接,麻烦很多。。。
十三:springmvc架构上传图片或者文件(用案例来分析)
首先看看jsp的代码(非常简单的就写了点):
<!-- 上传图片是需要指定属性 enctype="multipart/form-data" -->
	<!-- <form id="itemForm" action="" method="post" enctype="multipart/form-data"> -->
	<form id="itemForm"	action="${pageContext.request.contextPath }/updateitem.action" method="post" enctype="multipart/form-data">
		<input type="hidden" name="items.id" value="${item.id }" /> 修改商品信息:
		<table width="100%" border=1>
			<tr>
				<td>商品图片</td>
				<td>
					<c:if test="${item.pic !=null}">
						<img src="/pic/${item.pic}" width=100 height=100/>
						<br/>
					</c:if>
					<input type="file"  name="pictureFile"/>
				</td>
			</tr>
				<td colspan="2" align="center"><input type="submit" value="提交" />
				</td>
			</tr>
		</table>
</form>//提交修改页面 入参 为 Items对象
@RequestMapping(value = "/updateitem.action")
public String updateitem(QueryVo vo,MultipartFile pictureFile) throws Exception{
//生成唯一内容的名字,因为可能用户上传的图片或者文件的名字相同,那么就会发生覆盖,这样是不符合的
String name = UUID.randomUUID().toString().replaceAll("-", "");
//获取上传内容的后缀,比如图片就是jpg,png,文件就可能是txt,表格就可以是et,xls
String ext = FilenameUtils.getExtension(pictureFile.getOriginalFilename());
//进行保存
pictureFile.transferTo(new File("D:\\upload\\" + name + "." + ext));
//封装类中设置图片的名字
vo.getItems().setPic(name + "." + ext);
//修改
itemService.updateItemsById(vo.getItems());
return "redirect:/itemEdit.action?id=" + vo.getItems().getId();
}(2)在jsp中,对于只要存在 文件,那么就需要在form中写入entype=”multipart/form-data“
还有就是要在springmvc.xml中进行配置这个属性内容:
 <!-- 上传图片配置实现类 -->
        <bean id="multipartResolver" class="org.springframework.web.multipart.commons.CommonsMultipartResolver">
        	<!-- 上传图片的大小   B   5M  1*1024*1024*5-->
        	<property name="maxUploadSize" value="5000000"/>
        </bean>
切记:这个id和class是不可以更改的,都必须按照上面进行配置
(3)上面的方法还可以使用如下的代码也可以实现上传:
 //提交修改页面 入参  为 Items对象
	@RequestMapping(value = "/updateitem.action")
	public String updateitem(QueryVo vo,MultipartFile pictureFile) throws Exception{
		//生成唯一内容的名字,因为可能用户上传的图片或者文件的名字相同,那么就会发生覆盖,这样是不符合的
		String name = UUID.randomUUID().toString().replaceAll("-", "");
		//获取上传内容的后缀,比如图片就是jpg,png,文件就可能是txt,表格就可以是et,xls
		String ext = FilenameUtils.getExtension(pictureFile.getOriginalFilename());
		//进行保存
		FileUtils.writeByteArrayToFile(new File("D:\\upload\\" + name + "." + ext) , pictureFile.getBytes()); //不同上面方法的地方
		//封装类中设置图片的名字
		vo.getItems().setPic(name + "." + ext);
		//修改
		itemService.updateItemsById(vo.getItems());

		return "redirect:/itemEdit.action?id=" + vo.getItems().getId();
	}
十四:RestFul风格(了解就可以)
适用情况:比如又URL------localhost:8080/hnucw/update.action?id=2,即进行对id=2的内容进行修改
想换成localhost:8080/hnucw/update/2.action这样的访问地址。
这样的好处主要是外国都是这样的形式,并且京东,淘宝,csdn都有这样的用户,这样的好处在于,看地址的话好看些,不用带太长的地址
开发方法:(就是用@pathVariable进行接受就可以了,还有就是url对应的内容要用{}进行括号起来,其他都一样)
//RestFul风格的开发
	@RequestMapping(value = "/itemEdit/{id}.action")
	public ModelAndView toEdit1(@PathVariable Integer id){
		Items items = itemService.selectItemsById(id);
		ModelAndView mav = new ModelAndView();
		//数据
		mav.addObject("item", items);
		mav.setViewName("editItem");
		return mav;

	}
十五:拦截器
步骤:(1)springmvc中配置拦截器
<!-- SPringmvc的拦截器  可以配置多个-->
		<mvc:interceptors>
			<!-- 多个拦截器 -->
			<mvc:interceptor>
				<mvc:mapping path="/**"/>
				<!-- 自定义的拦截器类 -->
				<bean class="自定义拦截器类"/>
			</mvc:interceptor>
			<mvc:interceptor>
				<mvc:mapping path="/**"/>
				自定义的拦截器类
				<bean class="自定义拦截器类"/>
			</mvc:interceptor>
		</mvc:interceptors>
(2)编写拦截器
package com.itheima.springmvc.interceptor;

import javax.servlet.http.HttpServletRequest;
import javax.servlet.http.HttpServletResponse;

import org.springframework.web.servlet.HandlerInterceptor;
import org.springframework.web.servlet.ModelAndView;

public class Interceptor1 implements HandlerInterceptor{

	public boolean preHandle(HttpServletRequest request, HttpServletResponse response, Object arg2) throws Exception {
		system。out.println("方法前")
		return true;
	}
	public void postHandle(HttpServletRequest arg0, HttpServletResponse arg1, Object arg2, ModelAndView arg3)
			throws Exception {
		// TODO Auto-generated method stub
		System.out.println("方法后 1");

	}
	public void afterCompletion(HttpServletRequest arg0, HttpServletResponse arg1, Object arg2, Exception arg3)
			throws Exception {
		// TODO Auto-generated method stub
		System.out.println("页面渲染后 1");
	}
}
如果配置了多个拦截器,那么就有以下的执行顺序。。
preHandle按拦截器定义顺序调用
postHandler按拦截器定义逆序调用
afterCompletion按拦截器定义逆序调用
postHandler在拦截器链内所有拦截器返成功调用
afterCompletion只有preHandle返回true才调用
拦截器的实例应用:(拦截未登录的用户,只有当用户是登录的时候,才能访问其他页面)
jsp页面:
<form action="${pageContext.request.contextPath }/login.action" method="post">
	用户名:<input type="text" name="username" value="safdsdafas">
	<input type="submit" value="提交">
</form>package com.itheima.springmvc.interceptor;
import javax.servlet.http.HttpServletRequest;
import javax.servlet.http.HttpServletResponse;
import org.springframework.web.servlet.HandlerInterceptor;
import org.springframework.web.servlet.ModelAndView;
public class Interceptor1 implements HandlerInterceptor{
public boolean preHandle(HttpServletRequest request, HttpServletResponse response, Object arg2) throws Exception {
// TODO Auto-generated method stub
System.out.println("方法前 1");
//判断用户是否登陆 如果没有登陆 重定向到登陆页面 不放行 如果登陆了 就放行了
// URL http://localhost:8080/springmvc-mybatis/login.action
//URI /login.action
String requestURI = request.getRequestURI();
if(!requestURI.contains("/login")){
String username = (String) request.getSession().getAttribute("USER_SESSION");
if(null == username){
response.sendRedirect(request.getContextPath() + "/login.action");
return false;
}
}
return true;
}
public void postHandle(HttpServletRequest arg0, HttpServletResponse arg1, Object arg2, ModelAndView arg3)
throws Exception {
// TODO Auto-generated method stub
System.out.println("方法后 1");
}
public void afterCompletion(HttpServletRequest arg0, HttpServletResponse arg1, Object arg2, Exception arg3)
throws Exception {
// TODO Auto-generated method stub
System.out.println("页面渲染后 1");
}
}编写拦截器配置信息springmvc:
<!-- SPringmvc的拦截器 -->
		<mvc:interceptors>
			<!-- 多个拦截器 -->
			<mvc:interceptor>
				<mvc:mapping path="/**"/>
				<!-- 自定义的拦截器类 -->
				<bean class="com.itheima.springmvc.interceptor.Interceptor1"/>
			</mvc:interceptor>
</mvc:interceptors>//去登陆的页面
@RequestMapping(value = "/login.action",method = RequestMethod.GET)
public String login(){
return "login";
}
@RequestMapping(value = "/login.action",method = RequestMethod.POST)
public String login(String username
,HttpSession httpSession){
httpSession.setAttribute("USER_SESSION", username);
return "redirect:/item/itemlist.action";
}OK,这样就是整个的拦截的处理过程了哦。。这样的话就能实现如果没有登录的话,那么就需要返回到登录页面,当登录之后,才能返回其他的页面。这个例子虽然小,但是在很多的系统都有这样的处理的哦。。。而且更主要的是掌握拦截器的用法。
十六:获取一个唯一的32位的标识方法(这个在很多地方都有使用,所以这里提一下)
这里通过UUID的方法(这个是Java JDK中自带的一个方法,但是很少人会用)
UUID.randomUUID().toString().replace("-", "")十七:自定义一个万能的controller接受JSP传过来的对象(这样的好处在于,不用对于不同JSP传送过来的参数进行封装多个POJO对象了哦!!是不是很方便)
(1)自定义封装对象
package com.mbfw.util;

import java.util.Collection;
import java.util.HashMap;
import java.util.Iterator;
import java.util.Map;
import java.util.Set;

import javax.servlet.http.HttpServletRequest;

public class PageData extends HashMap implements Map {

	private static final long serialVersionUID = 1L;

	Map map = null;
	HttpServletRequest request;

	public PageData(HttpServletRequest request) {
		this.request = request;
		Map properties = request.getParameterMap();
		Map returnMap = new HashMap();
		Iterator entries = properties.entrySet().iterator();
		Map.Entry entry;
		String name = "";
		String value = "";
		while (entries.hasNext()) {
			entry = (Map.Entry) entries.next();
			name = (String) entry.getKey();
			Object valueObj = entry.getValue();
			if (null == valueObj) {
				value = "";
			} else if (valueObj instanceof String[]) {
				String[] values = (String[]) valueObj;
				for (int i = 0; i < values.length; i++) {
					value = values[i] + ",";
				}
				value = value.substring(0, value.length() - 1);
			} else {
				value = valueObj.toString();
			}
			returnMap.put(name, value);
		}
		map = returnMap;
	}

	public PageData() {
		map = new HashMap();
	}

	@Override
	public Object get(Object key) {
		Object obj = null;
		if (map.get(key) instanceof Object[]) {
			Object[] arr = (Object[]) map.get(key);
			obj = request == null ? arr : (request.getParameter((String) key) == null ? arr : arr[0]);
		} else {
			obj = map.get(key);
		}
		return obj;
	}

	public String getString(Object key) {
		return (String) get(key);
	}

	@SuppressWarnings("unchecked")
	@Override
	public Object put(Object key, Object value) {
		return map.put(key, value);
	}

	@Override
	public Object remove(Object key) {
		return map.remove(key);
	}

	public void clear() {
		map.clear();
	}

	public boolean containsKey(Object key) {
		// TODO Auto-generated method stub
		return map.containsKey(key);
	}

	public boolean containsValue(Object value) {
		// TODO Auto-generated method stub
		return map.containsValue(value);
	}

	public Set entrySet() {
		// TODO Auto-generated method stub
		return map.entrySet();
	}

	public boolean isEmpty() {
		// TODO Auto-generated method stub
		return map.isEmpty();
	}

	public Set keySet() {
		// TODO Auto-generated method stub
		return map.keySet();
	}

	@SuppressWarnings("unchecked")
	public void putAll(Map t) {
		// TODO Auto-generated method stub
		map.putAll(t);
	}

	public int size() {
		// TODO Auto-generated method stub
		return map.size();
	}

	public Collection values() {
		// TODO Auto-generated method stub
		return map.values();
	}

}
(2)自定义一个controller类,用于继承使用
package com.mbfw.controller.base;

import javax.servlet.http.HttpServletRequest;

import org.springframework.web.context.request.RequestContextHolder;
import org.springframework.web.context.request.ServletRequestAttributes;
import org.springframework.web.servlet.ModelAndView;

import com.mbfw.entity.Page;
import com.mbfw.util.Const;
import com.mbfw.util.Logger;
import com.mbfw.util.PageData;
import com.mbfw.util.Tools;
import com.mbfw.util.UuidUtil;

public class BaseController {
	private static final long serialVersionUID = 6357869213649815390L;

	/**
	 * 得到PageData
	 */
	public PageData getPageData() {
		return new PageData(this.getRequest());
	}

	/**
	 * 得到ModelAndView
	 */
	public ModelAndView getModelAndView() {
		return new ModelAndView();
	}

	/**
	 * 得到request对象
	 */
	public HttpServletRequest getRequest() {
		HttpServletRequest request = ((ServletRequestAttributes) RequestContextHolder.getRequestAttributes()).getRequest();

		return request;
	}

}
(3)使用自定义对象
@Controller
@RequestMapping(value = "/asset")
public class AssetShenpiController extends BaseController {
        @RequestMapping(value = "/atp_approvalprojectlist")
	public ModelAndView shenpiList() throws Exception {
		PageData pd = this.getPageData();
       }

}
备注:通过上面的方法,这样获取到的pd对象就能够获取到从JSP页面中传送过来的参数了(比如从form表单中提交过来的多个input内容),其中都是Map中的Key和Value的形式。。。这样是不是很简单,省了很多写不同接受对象的方式呢
十八:下载文件(比如doc,excl,txt等等)
方法一:
@RequestMapping(value = "/atp_downloadfile")
	public ResponseEntity<byte[]> download() throws IOException {
		PageData pd = this.getPageData();
		//获取文件路径
		String urlFile = URLDecoder.decode(pd.getString("fileurl"), "utf-8");
        File file=new File(urlFile);
        HttpHeaders headers = new HttpHeaders();
        //获取下载名(因为之前通过了@进行分割)
        String fileName = urlFile.split("@")[1];
        fileName = new String(fileName.getBytes("UTF-8"),"iso-8859-1");//为了解决中文名称乱码问题
        headers.setContentDispositionFormData("attachment", fileName);
        headers.setContentType(MediaType.APPLICATION_OCTET_STREAM);
        return new ResponseEntity<byte[]>(FileUtils.readFileToByteArray(file),
                                          headers, HttpStatus.CREATED);
} @RequestMapping(value = "/atp_downloadfile")
public void downLoadAlreadyFile(HttpServletRequest request ,HttpServletResponse response) throws Exception{
PageData pd = this.getPageData();
//获取文件路径
String urlFile = URLDecoder.decode(pd.getString("fileurl"), "utf-8");
//获取输入流
InputStream bis = new BufferedInputStream(new FileInputStream(new File(urlFile)));
//假如以中文名下载的话
String filename = "哈哈";
//转码,免得文件名中文乱码
filename = URLEncoder.encode(filename,"GBK");
//设置文件下载头
response.addHeader("Content-Disposition", "attachment;filename=" + filename);
//1.设置文件ContentType类型,这样设置,会自动判断下载文件类型
response.setContentType("multipart/form-data");
BufferedOutputStream out = new BufferedOutputStream(response.getOutputStream());
int len = 0;
while((len = bis.read()) != -1){
out.write(len);
out.flush();
}
out.close();
pd.put("result", "success");
return pd;
}方法三:
编写文件下载类:
package com.mbfw.util;
import java.io.BufferedOutputStream;
import java.io.OutputStream;
import java.net.URLEncoder;
import javax.servlet.http.HttpServletResponse;
public class FileDownload {
	/**
	 * @param response
	 * @param filePath //文件完整路径(包括文件名和扩展名)
	 * @param fileName //下载后看到的文件名
	 * @return 文件名
	 */
	public static void fileDownload(final HttpServletResponse response, String filePath, String fileName) throws Exception {
		byte[] data = FileUtil.toByteArray2(filePath);
		fileName = URLEncoder.encode(fileName, "UTF-8");
		response.reset();
		response.setHeader("Content-Disposition", "attachment; filename=\"" + fileName + "\"");
		response.addHeader("Content-Length", "" + data.length);
		response.setContentType("application/octet-stream;charset=UTF-8");
		OutputStream outputStream = new BufferedOutputStream(response.getOutputStream());
		outputStream.write(data);
		outputStream.flush();
		outputStream.close();
		response.flushBuffer();
	}
}
编写文件下载工具类:
package com.mbfw.util;
import java.io.BufferedInputStream;
import java.io.ByteArrayOutputStream;
import java.io.File;
import java.io.FileInputStream;
import java.io.FileNotFoundException;
import java.io.IOException;
import java.io.RandomAccessFile;
import java.nio.ByteBuffer;
import java.nio.MappedByteBuffer;
import java.nio.channels.FileChannel;
import java.nio.channels.FileChannel.MapMode;

public class FileUtil {

	public static void main(String[] args) {
		String dirName = "d:/mbfw/topic/";// 创建目录
		FileUtil.createDir(dirName);
	}

	/**
	 * 创建目录
	 *
	 * @param destDirName 目标目录名
	 * @return 目录创建成功返回true,否则返回false
	 */
	public static boolean createDir(String destDirName) {
		File dir = new File(destDirName);
		if (dir.exists()) {
			return false;
		}
		if (!destDirName.endsWith(File.separator)) {
			destDirName = destDirName + File.separator;
		}
		// 创建单个目录
		if (dir.mkdirs()) {
			return true;
		} else {
			return false;
		}
	}

	/**
	 * 删除文件
	 *
	 * @param filePathAndName String 文件路径及名称 如c:/fqf.txt
	 * @param fileContent String
	 * @return boolean
	 */
	public static void delFile(String filePathAndName) {
		try {
			String filePath = filePathAndName;
			filePath = filePath.toString();
			java.io.File myDelFile = new java.io.File(filePath);
			myDelFile.delete();

		} catch (Exception e) {
			System.out.println("删除文件操作出错");
			e.printStackTrace();

		}

	}

	/**
	 * 读取到字节数组0
	 *
	 * @param filePath //路径
	 * @throws IOException
	 */
	public static byte[] getContent(String filePath) throws IOException {
		File file = new File(filePath);
		long fileSize = file.length();
		if (fileSize > Integer.MAX_VALUE) {
			System.out.println("file too big...");
			return null;
		}
		FileInputStream fi = new FileInputStream(file);
		byte[] buffer = new byte[(int) fileSize];
		int offset = 0;
		int numRead = 0;
		while (offset < buffer.length && (numRead = fi.read(buffer, offset, buffer.length - offset)) >= 0) {
			offset += numRead;
		}
		// 确保所有数据均被读取
		if (offset != buffer.length) {
			throw new IOException("Could not completely read file " + file.getName());
		}
		fi.close();
		return buffer;
	}

	/**
	 * 读取到字节数组1
	 *
	 * @param filePath
	 * @return
	 * @throws IOException
	 */
	public static byte[] toByteArray(String filePath) throws IOException {

		File f = new File(filePath);
		if (!f.exists()) {
			throw new FileNotFoundException(filePath);
		}
		ByteArrayOutputStream bos = new ByteArrayOutputStream((int) f.length());
		BufferedInputStream in = null;
		try {
			in = new BufferedInputStream(new FileInputStream(f));
			int buf_size = 1024;
			byte[] buffer = new byte[buf_size];
			int len = 0;
			while (-1 != (len = in.read(buffer, 0, buf_size))) {
				bos.write(buffer, 0, len);
			}
			return bos.toByteArray();
		} catch (IOException e) {
			e.printStackTrace();
			throw e;
		} finally {
			try {
				in.close();
			} catch (IOException e) {
				e.printStackTrace();
			}
			bos.close();
		}
	}

	/**
	 * 读取到字节数组2
	 *
	 * @param filePath
	 * @return
	 * @throws IOException
	 */
	public static byte[] toByteArray2(String filePath) throws IOException {

		File f = new File(filePath);
		if (!f.exists()) {
			throw new FileNotFoundException(filePath);
		}

		FileChannel channel = null;
		FileInputStream fs = null;
		try {
			fs = new FileInputStream(f);
			channel = fs.getChannel();
			ByteBuffer byteBuffer = ByteBuffer.allocate((int) channel.size());
			while ((channel.read(byteBuffer)) > 0) {
				// do nothing
				// System.out.println("reading");
			}
			return byteBuffer.array();
		} catch (IOException e) {
			e.printStackTrace();
			throw e;
		} finally {
			try {
				channel.close();
			} catch (IOException e) {
				e.printStackTrace();
			}
			try {
				fs.close();
			} catch (IOException e) {
				e.printStackTrace();
			}
		}
	}

	/**
	 * Mapped File way MappedByteBuffer 可以在处理大文件时,提升性能
	 *
	 * @param filename
	 * @return
	 * @throws IOException
	 */
	public static byte[] toByteArray3(String filePath) throws IOException {

		FileChannel fc = null;
		RandomAccessFile rf = null;
		try {
			rf = new RandomAccessFile(filePath, "r");
			fc = rf.getChannel();
			MappedByteBuffer byteBuffer = fc.map(MapMode.READ_ONLY, 0, fc.size()).load();
			// System.out.println(byteBuffer.isLoaded());
			byte[] result = new byte[(int) fc.size()];
			if (byteBuffer.remaining() > 0) {
				// System.out.println("remain");
				byteBuffer.get(result, 0, byteBuffer.remaining());
			}
			return result;
		} catch (IOException e) {
			e.printStackTrace();
			throw e;
		} finally {
			try {
				rf.close();
				fc.close();
			} catch (IOException e) {
				e.printStackTrace();
			}
		}
	}

}
编写调用方法:
@RequestMapping(value = "/downExcel")
	public void downExcel(HttpServletResponse response) throws Exception {
		FileDownload.fileDownload(response, PathUtil.getClasspath() + Const.FILEPATHFILE + "Users.xls", "Users.xls");

	}
十九:JSP导入Excl表格到数据库
比如格式如下的一个Excel表格,并用一个实例来进行分析:::

JSP代码:(有用了jQuery的tip插件,当然这只是一个例子,根据需要来写就是了)
<%@ page language="java" contentType="text/html; charset=UTF-8" pageEncoding="UTF-8"%>
<%@ taglib prefix="c" uri="http://java.sun.com/jsp/jstl/core"%>
<%@ taglib prefix="fmt" uri="http://java.sun.com/jsp/jstl/fmt"%>
<%
	String path = request.getContextPath();
	String basePath = request.getScheme()+"://"+request.getServerName()+":"+request.getServerPort()+path+"/";
%>
<!DOCTYPE html>
<html lang="en">
	<head>
		<base href="<%=basePath%>">
		<meta charset="utf-8" />
		<title></title>
		<meta name="viewport" content="width=device-width, initial-scale=1.0" />
		<link href="static/css/bootstrap.min.css" rel="stylesheet" />
		<link rel="stylesheet" href="static/css/ace.min.css" />
		<link rel="stylesheet" href="static/css/ace-skins.min.css" />
		<link rel="stylesheet" href="static/assets/css/font-awesome.css" />
		<!-- ace styles -->
		<link rel="stylesheet" href="static/assets/css/ace.css" class="ace-main-stylesheet" id="main-ace-style" />

		<script type="text/javascript">

			//保存
			function save(){
				if($("#excel").val()=="" || document.getElementById("excel").files[0] =='请选择xls格式的文件'){

					$("#excel").tips({
						side:3,
			            msg:'请选择文件',
			            bg:'#AE81FF',
			            time:3
			        });
					return false;
				}

				$("#Form").submit();
				$("#zhongxin").hide();
				$("#zhongxin2").show();
			}

			function fileType(obj){
				var fileType=obj.value.substr(obj.value.lastIndexOf(".")).toLowerCase();//获得文件后缀名
			    if(fileType != '.xls'){
			    	$("#excel").tips({
						side:3,
			            msg:'请上传xls格式的文件',
			            bg:'#AE81FF',
			            time:3
			        });
			    	$("#excel").val('');
			    	document.getElementById("excel").files[0] = '请选择xls格式的文件';
			    }
			}
		</script>
	</head>
<body>
	<form action="user/readExcel.do" name="Form" id="Form" method="post" enctype="multipart/form-data">
		<div id="zhongxin">
		<table style="width:95%;" >
			<tr>
				<td style="padding-top: 20px;"><input type="file" id="excel" name="excel" style="width:50px;" οnchange="fileType(this)" /></td>
			</tr>
			<tr>
				<td style="text-align: center;">
					<a class="btn btn-mini btn-primary" οnclick="save();">导入</a>
					<a class="btn btn-mini btn-danger" οnclick="top.Dialog.close();">取消</a>.
					<a style="float: right;"  class="btn btn-mini btn-success" οnclick="window.location.href='<%=basePath%>/user/downExcel.do'">下载模版</a>
				</td>
			</tr>
		</table>
		</div>

		<div id="zhongxin2" class="center" style="display:none"><br/><img src="static/images/jzx.gif" /><br/><h4 class="lighter block green"></h4></div>

	</form>

		<!-- 引入 -->
		<!--[if !IE]> -->
		<script type="text/javascript">
			window.jQuery || document.write("<script src='static/assets/js/jquery.js'>"+"<"+"/script>");
		</script>
		<!-- <![endif]-->
		<!--[if IE]>
		<script type="text/javascript">
		 	window.jQuery || document.write("<script src='static/assets/js/jquery1x.js'>"+"<"+"/script>");
		</script>
		<![endif]-->
		<script src="static/js/bootstrap.min.js"></script>
		<!-- ace scripts -->
		<script src="static/assets/js/ace/elements.fileinput.js"></script>
		<script src="static/assets/js/ace/ace.js"></script>
		<!--提示框-->
		<script type="text/javascript" src="static/js/jquery.tips.js"></script>
		<script type="text/javascript">
		$(top.hangge());
		$(function() {
			//上传
			$('#excel').ace_file_input({
				no_file:'请选择EXCEL ...',
				btn_choose:'选择',
				btn_change:'更改',
				droppable:false,
				onchange:null,
				thumbnail:false, //| true | large
				whitelist:'xls|xls',
				blacklist:'gif|png|jpg|jpeg'
				//onchange:''
				//
			});

		});

		</script>

</body>
</html>
controller层代码:
/**
	 * 从EXCEL导入到数据库
	 */
	@RequestMapping(value = "/readExcel")
	public ModelAndView readExcel(@RequestParam(value = "excel", required = false) MultipartFile file) throws Exception {
		ModelAndView mv = this.getModelAndView();
		PageData pd = new PageData();
		if (null != file && !file.isEmpty()) {
			String filePath = PathUtil.getClasspath() + Const.FILEPATHFILE; // 文件上传路径
			String fileName = FileUpload.fileUp(file, filePath, "userexcel"); // 执行上传

			List<PageData> listPd = (List) ObjectExcelRead.readExcel(filePath, fileName, 2, 0, 0); // 执行读EXCEL操作,读出的数据导入List 2:从第3行开始;0:从第A列开始;0:第0个sheet

			/* 存入数据库操作====================================== */
			pd.put("RIGHTS", ""); // 权限
			pd.put("LAST_LOGIN", ""); // 最后登录时间
			pd.put("IP", ""); // IP
			pd.put("STATUS", "0"); // 状态
			pd.put("SKIN", "default"); // 默认皮肤

			List<Role> roleList = roleService.listAllERRoles(); // 列出所有二级角色

			pd.put("ROLE_ID", roleList.get(0).getROLE_ID()); // 设置角色ID为随便第一个
			/**
			 * var0 :编号 var1 :姓名 var2 :手机 var3 :邮箱 var4 :备注......等等
			 * 这个var就是readExcel方法返回对象中在方法中进行封装好的信息,也就是对应的信息
			 */
			for (int i = 0; i < listPd.size(); i++) {
				pd.put("USER_ID", this.get32UUID()); // 产生唯一的ID,这个在上面的知识点中有提到了,可以参考
				pd.put("NAME", listPd.get(i).getString("var1")); // 姓名

				String USERNAME = GetPinyin.getPingYin(listPd.get(i).getString("var1")); // 根据姓名汉字生成全拼
				pd.put("USERNAME", USERNAME);
				if (userService.findByUId(pd) != null) { // 判断用户名是否重复,如果重复了就再后面添加随机生成的六位数
					USERNAME = GetPinyin.getPingYin(listPd.get(i).getString("var1")) + Tools.getRandomNum();
					pd.put("USERNAME", USERNAME);
				}
				pd.put("BZ", listPd.get(i).getString("var4")); // 备注
				if (Tools.checkEmail(listPd.get(i).getString("var3"))) { // 邮箱格式不对就跳过
					pd.put("EMAIL", listPd.get(i).getString("var3"));
					if (userService.findByUE(pd) != null) { // 邮箱已存在就跳过
						continue;
					}
				} else {
					continue;
				}

				pd.put("NUMBER", listPd.get(i).getString("var0")); // 编号已存在就跳过
				pd.put("PHONE", listPd.get(i).getString("var2")); // 手机号

				pd.put("PASSWORD", new SimpleHash("SHA-1", USERNAME, "123").toString()); // 设置初始默认密码为123,并且将这个密码加密到数据库中
				if (userService.findByUN(pd) != null) {
					continue;
				}
				userService.saveU(pd);//保存数据到数据库中
			}
			/* 存入数据库操作====================================== */
			mv.addObject("msg", "success");
		}
		mv.setViewName("save_result");
		return mv;
}package com.mbfw.util;
import java.io.File;
import javax.servlet.http.HttpServletRequest;
import org.springframework.web.context.request.RequestContextHolder;
import org.springframework.web.context.request.ServletRequestAttributes;
/**
* 路径工具类
*
* @author
*/
public class PathUtil {
/**
* 图片访问路径
*
* @param pathType 图片类型 visit-访问;save-保存
* @param pathCategory 图片类别,如:话题图片-topic、话题回复图片-reply、商家图片
* @return
*/
public static String getPicturePath(String pathType, String pathCategory) {
String strResult = "";
HttpServletRequest request = ((ServletRequestAttributes) RequestContextHolder.getRequestAttributes()).getRequest();
StringBuffer strBuf = new StringBuffer();
if ("visit".equals(pathType)) {
} else if ("save".equals(pathType)) {
String projectPath = PublicUtil.getPorjectPath().replaceAll("\\\\", "/");
projectPath = splitString(projectPath, "bin/");
strBuf.append(projectPath);
strBuf.append("webapps/ROOT/");
}
strResult = strBuf.toString();
return strResult;
}
private static String splitString(String str, String param) {
String result = str;
if (str.contains(param)) {
int start = str.indexOf(param);
result = str.substring(0, start);
}
return result;
}
/*
* 获取classpath1
*/
public static String getClasspath() {
String path = (String.valueOf(Thread.currentThread().getContextClassLoader().getResource("")) + "../../").replaceAll("file:/", "").replaceAll("%20", " ").trim();
if (path.indexOf(":") != 1) {
path = File.separator + path;
}
return path;
}
/*
* 获取classpath2
*/
public static String getClassResources() {
String path = (String.valueOf(Thread.currentThread().getContextClassLoader().getResource(""))).replaceAll("file:/", "").replaceAll("%20", " ").trim();
if (path.indexOf(":") != 1) {
path = File.separator + path;
}
return path;
}
public static String PathAddress() {
String strResult = "";
HttpServletRequest request = ((ServletRequestAttributes) RequestContextHolder.getRequestAttributes()).getRequest();
StringBuffer strBuf = new StringBuffer();
strBuf.append(request.getScheme() + "://");
strBuf.append(request.getServerName() + ":");
strBuf.append(request.getServerPort() + "");
strBuf.append(request.getContextPath() + "/");
strResult = strBuf.toString();// +"ss/";//加入项目的名称
return strResult;
}
}
package com.mbfw.util;

import java.io.File;
import java.io.IOException;
import java.io.InputStream;

import org.apache.commons.io.FileUtils;
import org.springframework.web.multipart.MultipartFile;

/**
 * 上传文件 创建人:研发中心 创建时间:2014年12月23日
 *
 * @version
 */
public class FileUpload {

	/**
	 * @param file //文件对象
	 * @param filePath //上传路径
	 * @param fileName //文件名
	 * @return 文件名
	 */
	public static String fileUp(MultipartFile file, String filePath, String fileName) {
		String extName = ""; // 扩展名格式:
		try {
			if (file.getOriginalFilename().lastIndexOf(".") >= 0) {
				extName = file.getOriginalFilename().substring(file.getOriginalFilename().lastIndexOf("."));
			}
			copyFile(file.getInputStream(), filePath, fileName + extName).replaceAll("-", "");
		} catch (IOException e) {
			System.out.println(e);
		}
		return fileName + extName;
	}

	/**
	 * 写文件到当前目录的upload目录中
	 *
	 * @param in
	 * @param fileName
	 * @throws IOException
	 */
	private static String copyFile(InputStream in, String dir, String realName) throws IOException {
		File file = new File(dir, realName);
		if (!file.exists()) {
			if (!file.getParentFile().exists()) {
				file.getParentFile().mkdirs();
			}
			file.createNewFile();
		}
		FileUtils.copyInputStreamToFile(in, file);
		return realName;
	}
}package com.mbfw.util;
import java.io.File;
import java.io.FileInputStream;
import java.util.ArrayList;
import java.util.List;
import org.apache.poi.hssf.usermodel.HSSFCell;
import org.apache.poi.hssf.usermodel.HSSFRow;
import org.apache.poi.hssf.usermodel.HSSFSheet;
import org.apache.poi.hssf.usermodel.HSSFWorkbook;
public class ObjectExcelRead {
/**
* @param filepath //文件路径
* @param filename //文件名
* @param startrow //开始行号:默认开始传入的时候设置为2,这个根据Excl表格形式来
* @param startcol //开始列号:默认为0开始
* @param sheetnum //sheet
* @return list
*/
public static List<Object> readExcel(String filepath, String filename, int startrow, int startcol, int sheetnum) {
List<Object> varList = new ArrayList<Object>();
try {
File target = new File(filepath, filename);
FileInputStream fi = new FileInputStream(target);
HSSFWorkbook wb = new HSSFWorkbook(fi); // 创建一个Excel文件
HSSFSheet sheet = wb.getSheetAt(sheetnum); // sheet 从0开始
int rowNum = sheet.getLastRowNum() + 1; // 取得最后一行的行号
for (int i = startrow; i < rowNum; i++) { // 行循环开始
PageData varpd = new PageData();//这里用的是自己封装的对象,这里只需要用你需要读取Excl数据封装成的对象即可
HSSFRow row = sheet.getRow(i); // 获取对应行
int cellNum = row.getLastCellNum(); // 每行的最后一个单元格位置
for (int j = startcol; j < cellNum; j++) { // 列循环开始
HSSFCell cell = row.getCell(Short.parseShort(j + ""));//获取对应列
String cellValue = null;
if (null != cell) {
switch (cell.getCellType()) { // 判断excel单元格每列的内容的格式,并对其进行转换,以便插入数据库
case 0: //获取的类型是数字HSSFCell.CELL_TYPE_NUMERIC
cellValue = String.valueOf((int) cell.getNumericCellValue());
break;
case 1: //获取的类型就是字符串HSSFCell.CELL_TYPE_STRING
cellValue = cell.getStringCellValue();
break;
case 2://获取的类型是时间
cellValue = cell.getNumericCellValue() + "";
// cellValue = String.valueOf(cell.getDateCellValue());
break;
case 3://获取的是空值,HSSFCell.CELL_TYPE_BLANK
cellValue = "";
break;
case 4://获取的是Boolean,HSSFCell.CELL_TYPE_BOOLEAN
cellValue = String.valueOf(cell.getBooleanCellValue());
break;
case 5://获取的是非法字符,HSSFCell.CELL_TYPE_ERROR
cellValue = String.valueOf(cell.getErrorCellValue());
break;
}
} else {
cellValue = "";
}
varpd.put("var" + j, cellValue); //在行中,添加对应的列的内容
}
varList.add(varpd);//添加每一行的内容
}
} catch (Exception e) {
System.out.println(e);
}
return varList; //将封装好的数据对象,返回从Excel表中读取的内容
}
}public class GetPinyin {
/**
* 得到 全拼
*
* @param src
* @return
*/
public static String getPingYin(String src) {
char[] t1 = null;
t1 = src.toCharArray();
String[] t2 = new String[t1.length];
HanyuPinyinOutputFormat t3 = new HanyuPinyinOutputFormat();
t3.setCaseType(HanyuPinyinCaseType.LOWERCASE);
t3.setToneType(HanyuPinyinToneType.WITHOUT_TONE);
t3.setVCharType(HanyuPinyinVCharType.WITH_V);
String t4 = "";
int t0 = t1.length;
try {
for (int i = 0; i < t0; i++) {
// 判断是否为汉字字符
if (java.lang.Character.toString(t1[i]).matches("[\\u4E00-\\u9FA5]+")) {
t2 = PinyinHelper.toHanyuPinyinStringArray(t1[i], t3);
t4 += t2[0];
} else {
t4 += java.lang.Character.toString(t1[i]);
}
}
return t4;
} catch (BadHanyuPinyinOutputFormatCombination e1) {
e1.printStackTrace();
}
return t4;
}controller层中随机生成一个六位数的类Tools:(这个很简单的)
public class Tools {

	/**
	 * 随机生成六位数验证码
	 *
	 * @return
	 */
	public static int getRandomNum() {
		Random r = new Random();
		return r.nextInt(900000) + 100000;// (Math.random()*(999999-100000)+100000)
	}
二十:导出数据库中的内容到Excl表格
JSP代码:
<!-- 检索  -->
			<form action="user/listUsers.do" method="post" name="userForm" id="userForm">
			<table>
				<tr>
					<td style="vertical-align:top;">
						<span class="input-icon">
							<input autocomplete="off" id="nav-search-input" type="text" name="USERNAME" value="${pd.USERNAME }" placeholder="这里输入检索关键词" title="检索范围列表:从用户名,用户姓名,邮箱,部门,备注列表中进行搜索" />
							<i id="nav-search-icon" class="icon-search"></i>
						</span>
					</td>
					<td style="vertical-align:top;">
					 	<select class="chzn-select" name="ROLE_ID" id="role_id" data-placeholder="请选择系统角色" style="vertical-align:top;">
						<option value=""></option>
						<option value="">全部</option>
						<c:forEach items="${roleList}" var="role">
							<option value="${role.ROLE_ID }" <c:if test="${pd.ROLE_ID==role.ROLE_ID}">selected</c:if>>${role.ROLE_NAME }</option>
						</c:forEach>
					  	</select>
					</td>
					<!-- 用户权限搜索 -->
					<td style="vertical-align:top;">
						<select class="chzn-select" name="user_Permission" id="user_Permission" data-placeholder="请选择用户部门权限" style="vertical-align:top;">
						<option value=""></option>
						<option value="">全部</option>
						<c:forEach items="${userDepartmentAuthoritys}" var="department">
							<option value="${department.authority_Code}" <c:if test="${department.authority_Code==pd.user_Permission}">selected</c:if>>
							${department.authority_Name}
							</option>
						</c:forEach>
					  	</select>
					</td>
					<td><input class="span10 date-picker" name="creatuser_Time" id="creatuser_Time"  value="${pd.creatuser_Time}" type="text" data-date-format="yyyy-mm-dd" readonly="readonly"  placeholder="用户创建开始日期搜索" title="用户创建开始日期" style="width: 155px;"/></td>
					<td><input class="span10 date-picker" name="creatuser_endTime" id="creatuser_endTime"  value="${pd.creatuser_endTime}" type="text" data-date-format="yyyy-mm-dd" readonly="readonly"  placeholder="用户创建截止日期搜索" title="用户创建截止日期" style="width: 155px;"/></td>
					<c:if test="${QX.cha == 1 }">
					<td style="vertical-align:top;"><button class="btn btn-mini btn-light" οnclick="search();" title="检索"><i id="nav-search-icon" class="icon-search"></i></button></td>
					<%-- <!--这个功能现在不要 -->
					<td style="vertical-align:top;"><a class="btn btn-mini btn-light" οnclick="window.location.href='<%=basePath%>/user/listtabUsers.do';" title="切换模式"><i id="nav-search-icon" class="icon-exchange"></i></a></td>
 					--%>
 					<td style="vertical-align:top;"><a class="btn btn-mini btn-light" οnclick="toExcel();" title="导出到EXCEL"><i id="nav-search-icon" class="icon-download-alt"></i></a></td>
					<c:if test="${QX.edit == 1 }"><td style="vertical-align:top;"><a class="btn btn-mini btn-light" οnclick="fromExcel();" title="从EXCEL导入"><i id="nav-search-icon" class="icon-cloud-upload"></i></a></td></c:if>
					</c:if>
				</tr>
			</table>
备注:上面的有几个都是关于检索内容的控制,如果不写也是可以的,因为这个功能一般都还有限制信息的情况下,也是一样,所以说,如果想导出所有的数据,那么不选择上面的限制列表的内容就可以了哈。。。这个应该都能明白含义的。(上面那些列表的数据,我是从其他页面跳转带过来的,所以你们测试的时候可以直接写死都没关系啦)
JS代码:
//导出excel
		function toExcel(){
			var checkContent = $("#nav-search-input").val();//获取关键子搜索的内容
			var creatuser_Time = $("#creatuser_Time").val(); //获取用户创建检索内容
			var creatuser_endTime = $("#creatuser_endTime").val(); //获取用户创建截止时间检索内容
			var ROLE_ID = $("#role_id").val(); // 获取角色管理检索内容
			var department = $("#user_Permission").val(); //获取用户部门检索内容
			window.location.href='<%=basePath%>user/excel.do?checkContent='+checkContent+'&creatuser_Time='+creatuser_Time+'&creatuser_endTime='+creatuser_endTime+'&ROLE_ID='+ROLE_ID+'&department'+department;
		}
controller层代码:
/*
	 * 导出用户信息到EXCEL
	 * @return
	 */
	@RequestMapping(value = "/excel")
	public ModelAndView exportExcel() {
		ModelAndView mv = this.getModelAndView();
		PageData pd = new PageData();
		pd = this.getPageData();
		try {
			if (Jurisdiction.buttonJurisdiction(menuUrl, "cha")) {
				// 检索条件===
				String checkContent = pd.getString("checkContent");
				if (null != checkContent && !"".equals(checkContent)) {//存在检索内容
					checkContent = checkContent.trim();   //去掉末尾空字符
					pd.put("checkContent", checkContent);
				}
				String creatuser_Time = pd.getString("creatuser_Time");//获取检索用户创建时间
				String creatuser_endTime = pd.getString("creatuser_endTime"); //获取检索用户截止时间
				if (creatuser_Time != null && !"".equals(creatuser_Time)) {
					creatuser_Time = creatuser_Time + " 00:00:00";
					pd.put("creatuser_Time", creatuser_Time);
				}
				if (creatuser_endTime != null && !"".equals(creatuser_endTime)) {
					creatuser_endTime = creatuser_endTime + " 00:00:00";
					pd.put("creatuser_endTime", creatuser_endTime);
				}
				String roleContent = pd.getString("ROLE_ID"); //检索的系统角色
				if (roleContent != null && !"".equals(roleContent)) {
					pd.put("roleContent", roleContent);
				}
				String department = pd.getString("department"); //检索的用户权限内容
				if (department != null && !"".equals(department)) {
					pd.put("department", department);
				}
				// 检索条件===

				Map<String, Object> dataMap = new HashMap<String, Object>();
				List<String> titles = new ArrayList<String>();

				//设置Excel标题显示格式
				titles.add("编号"); // 1
				titles.add("用户名"); // 2
				titles.add("姓名"); // 3
				titles.add("系统角色"); // 4
				titles.add("邮箱"); // 5
				titles.add("上一级部门"); // 6
				titles.add("所属部门"); // 7
				titles.add("部门权限"); // 8
				titles.add("用户创建时间"); // 9
				titles.add("备注"); // 10

				dataMap.put("titles", titles);

				List<PageData> userList = userService.listAllUser(pd);//获取符合条件数据信息
				List<PageData> varList = new ArrayList<PageData>();
				for (int i = 0; i < userList.size(); i++) {  //添加相对应的获取到的数据到每一列中存储(这里就是10列数据)
					PageData vpd = new PageData();
					vpd.put("var1", userList.get(i).getString("NUMBER")); // 1
					vpd.put("var2", userList.get(i).getString("USERNAME")); // 2
					vpd.put("var3", userList.get(i).getString("NAME")); // 3
					vpd.put("var4", userList.get(i).getString("ROLE_NAME")); // 4
					vpd.put("var5", userList.get(i).getString("EMAIL")); // 5
					vpd.put("var6", userList.get(i).getString("superior_organization_name")); // 6
					vpd.put("var7", userList.get(i).getString("organization_name")); // 7
					//对部门权限的显示这里要处理一下
					if((Integer)(userList.get(i).get("user_Permission")) == 1){
						vpd.put("var8", "总行管理员"); // 8
					}else if((Integer)(userList.get(i).get("user_Permission")) == 2){
						vpd.put("var8", "支行管理员"); // 8
					}else if((Integer)(userList.get(i).get("user_Permission")) == 3){
						vpd.put("var8", "普通员工"); // 8
					}
					vpd.put("var9", userList.get(i).getString("creatuser_Time")); // 9
					vpd.put("var10", userList.get(i).getString("BZ")); // 10
					varList.add(vpd);
				}
				dataMap.put("varList", varList);
				ObjectExcelView erv = new ObjectExcelView(); // 执行excel操作
				mv = new ModelAndView(erv, dataMap);
			}
		} catch (Exception e) {
			logger.error(e.toString(), e);
		}
		return mv;
	}
controller层中使用到的工具类ObjectExcelView:
package com.mbfw.util;
import java.util.Date;
import java.util.List;
import java.util.Map;
import javax.servlet.http.HttpServletRequest;
import javax.servlet.http.HttpServletResponse;
import org.apache.poi.hssf.usermodel.HSSFCell;
import org.apache.poi.hssf.usermodel.HSSFCellStyle;
import org.apache.poi.hssf.usermodel.HSSFFont;
import org.apache.poi.hssf.usermodel.HSSFSheet;
import org.apache.poi.hssf.usermodel.HSSFWorkbook;
import org.springframework.web.servlet.view.document.AbstractExcelView;
public class ObjectExcelView extends AbstractExcelView {

	@Override
	protected void buildExcelDocument(Map<String, Object> model, HSSFWorkbook workbook, HttpServletRequest request, HttpServletResponse response) throws Exception {
		// TODO Auto-generated method stub
		Date date = new Date();
		String filename = Tools.date2Str(date, "yyyyMMddHHmmss");//设置下Excl的名称
		HSSFSheet sheet;
		HSSFCell cell;
		response.setContentType("application/octet-stream");  //设置下载的方式和格式
		response.setHeader("Content-Disposition", "attachment;filename=" + filename + ".xls");
		sheet = workbook.createSheet("sheet1");//创建表格

		List<String> titles = (List<String>) model.get("titles"); //获取之前设置好的标题的样式(在controller层)
		int len = titles.size();
		HSSFCellStyle headerStyle = workbook.createCellStyle(); // 标题样式
		headerStyle.setAlignment(HSSFCellStyle.ALIGN_CENTER);
		headerStyle.setVerticalAlignment(HSSFCellStyle.VERTICAL_CENTER);
		HSSFFont headerFont = workbook.createFont(); // 标题字体
		headerFont.setBoldweight(HSSFFont.BOLDWEIGHT_BOLD);
		headerFont.setFontHeightInPoints((short) 11);
		headerStyle.setFont(headerFont);
		short width = 20, height = 25 * 20;
		sheet.setDefaultColumnWidth(width);
		for (int i = 0; i < len; i++) { // 设置标题
			String title = titles.get(i);
			cell = getCell(sheet, 0, i);
			cell.setCellStyle(headerStyle);
			setText(cell, title);
		}
		sheet.getRow(0).setHeight(height);

		HSSFCellStyle contentStyle = workbook.createCellStyle(); // 内容样式
		contentStyle.setAlignment(HSSFCellStyle.ALIGN_CENTER);
		List<PageData> varList = (List<PageData>) model.get("varList");
		int varCount = varList.size();
		for (int i = 0; i < varCount; i++) {
			PageData vpd = varList.get(i);
			for (int j = 0; j < len; j++) {
				String varstr = vpd.getString("var" + (j + 1)) != null ? vpd.getString("var" + (j + 1)) : "";
				cell = getCell(sheet, i + 1, j);
				cell.setCellStyle(contentStyle);
				setText(cell, varstr);
			}

		}

	}

}
ObjectExcelView类中使用到的方法:
1:Tools类中的date2Str
/**
	 * 按照参数format的格式,日期转字符串
	 *
	 * @param date
	 * @param format
	 * @return
	 */
	public static String date2Str(Date date, String format) {
		if (date != null) {
			SimpleDateFormat sdf = new SimpleDateFormat(format);
			return sdf.format(date);
		} else {
			return "";
		}
	}
效果图:(不是很好截图,大概明白就好,关键代码,望理解哈~!!!!!)

备注:上面这几个步骤就是大概的过程了,主要是能读懂里面的代码含义,其实很简单的,而且里面进行的数据库的数据的获取,这个自己去编写啦,我就写了个service告诉大家(我用的是Mybatis框架,关于这个可以参考我其他的文章,都进行了很详细很详细的介绍的哦!!!!!)
二十一:上传文件(再多加几种实现方法)
JSP代码:
<form action="${pageContext.request.contextPath}/upload/singleUpload.action" enctype="multipart/form-data" method="post">
        <input type="file" name=singleFile>
        <input type="submit" value="submit"/>
</form>方法一:
@RequestMapping(value = "/upload/singleUpload.action", method=RequestMethod.POST)
	    public String singleUpload(@RequestParam("singleFile")  MultipartFile file, HttpServletRequest request) throws IOException{
	if (!file.isEmpty()) {
              String type = file.getOriginalFilename().substring(
                      file.getOriginalFilename().indexOf("."));// 取文件格式后缀名
              String filename = System.currentTimeMillis() + type;// 取当前时间戳作为文件名
              String path = request.getSession().getServletContext()
                     .getRealPath("/upload/" + filename);// 存放位置
              File destFile = new File(path);
              try {
                  // FileUtils.copyInputStreamToFile()这个方法里对IO进行了自动操作,不需要额外的再去关闭IO流
                 FileUtils.copyInputStreamToFile(file.getInputStream(), destFile);// 复制临时文件到指定目录下
              } catch (IOException e) {
                  e.printStackTrace();
             }
              return "success";
          } else {
              return "fail";
          }
} @RequestMapping(value = "/upload/singleUpload.action", method=RequestMethod.POST)
public String singleUpload(@RequestParam("singleFile") MultipartFile singleFile, HttpServletRequest request) throws IOException{
String savePath = request.getSession().getServletContext().getRealPath("upload/temp");
if(singleFile != null && !singleFile.isEmpty()){
String fileName = singleFile.getOriginalFilename();
//采用UUID生成随机文件名
fileName = UUID.randomUUID().toString().replace("-", "") + fileName.substring(fileName.lastIndexOf("."));
File targetFile = new File(savePath, fileName);
if(!targetFile.exists()){
targetFile.mkdir();
}
singleFile.transferTo(targetFile);
return "success";
}
return "fail';
} 二十二:服务器校验(用的很少,因为比较麻烦,这个校验一般都是在前端就进行了校验,通过才进行到后台,所以了解就好了这个)
功能:当JSP提交的内容字段,不符合实体类中定义的标准的时候,就会发生校验错误,然后就可以设置回到提交页面当中,从而达到一种校验功能。
具体的步骤:
(1)设置实体校验内容
public class Person {
	private Integer id;
	@Size(max=10,min=5,message="用户名称必须是5到10个字符组成!")      //关键点
	private String name;

	@NotNull(message="年龄不能为空!")       //关键点
	private Integer age;

	private Date joinDate;
	public Integer getId() {
		return id;
	}
	public void setId(Integer id) {
		this.id = id;
	}
	public String getName() {
		return name;
	}
	public void setName(String name) {
		this.name = name;
	}
	public Integer getAge() {
		return age;
	}
	public void setAge(Integer age) {
		this.age = age;
	}
	public Date getJoinDate() {
		return joinDate;
	}
	public void setJoinDate(Date joinDate) {
		this.joinDate = joinDate;
	}
}
(2)添加校验jar包-----就是Spring校验包和Hibernate校验包
(3)Springmvc.xml配置文件中,添加注解驱动属性
<!--注解驱动-->
<mvc:annotation-driven />
(4)Controller类中进行控制错误反馈情况----------(用修改内容的功能来做一个演示)
          //修改保存 ,注意参数中的BindingResult这个。。这是一个关键
	@RequestMapping("/person/update.action")
	public String update(@Valid Person p,
			BindingResult br,
			@RequestParam(required=true)MultipartFile uploadfile) throws IOException{

		if(br.hasErrors()){		//如果实体类校验失败
			return "person/jPersonUpdate";
		}else{
			//上传文件写磁盘
			FileUtils.writeByteArrayToFile(new File("c:\\girl.jpg"), uploadfile.getBytes());
			personService.update(p);
			return "redirect:/person/listAll.action";
		}
	}
(5)JSP显示错误内容-----------------注意这个只能使用springmvc中的标签才可以实现显示效果,所以这个很麻烦
<%@ page language="java" import="java.util.*" pageEncoding="UTF-8"%>
<%@ taglib uri="http://www.springframework.org/tags/form" prefix="sf" %>

<!DOCTYPE HTML PUBLIC "-//W3C//DTD HTML 4.01 Transitional//EN">
<html>
  <head>
  </head>

  <body>
<!--如果想一次性显示所有的错误内容,直接下面代码-->
<sf:errors path="*" />
<sf:form action="${pageContext.request.contextPath}/person/update.action"
	method="post"
	modelAttribute="person"
	enctype="multipart/form-data"
	>
	<sf:hidden path="id"/>

    修改人员信息 <br>

<table>
<tr>
	<td>姓名</td>
	<td><sf:input path="name"/><sf:errors path="name" /></td>
</tr>
<tr>
	<td>年龄</td>
	<td><sf:input path="age"/><sf:errors path="age" /></td>
</tr>
<tr>
	<td>图片</td>
	<td><input type="file" name="uploadfile"/></td>
</tr>
<tr>
	<td><input type="submit" name="btnSubmit" value="保存"/></td>
	<td></td>
</tr>
</table>

</sf:form>
  </body>
</html>
二十三:SpringMVC中针对前端日期提交的控制
功能:当前端进行提交日期,比如2017-12-12的时候,而实体中的类型是Date类型,这样不进行转换就会出现问题,所以就需要针对性的有时候进行处理,只需要在Controller类中添加如下的方法就可以了:
@InitBinder
	//此方法用于日期的转换,如果未加,当页面日期格式转换错误,将报400错误,实际是因为此方法
	public void initBinder(WebDataBinder binder) {
		DateFormat dateFormat = new SimpleDateFormat("yyyy-MM-dd");
		dateFormat.setLenient(true);
		binder.registerCustomEditor(Date.class, new CustomDateEditor(dateFormat, true));
	}
好了,当掌握这些知识点后,对于用springmvc的知识点还有利用springmvc+spring+mybatis进行开发,那是足够的了。如果还想学习Hibernate或者struts2的知识,都可以看我前面的文章的哦。。。。。总之,对于企业级的这些框架ssh+ssh,都进行了非常详细的讲解了。还会持续进行更新的哦!


 3260
3260

 被折叠的 条评论
为什么被折叠?
被折叠的 条评论
为什么被折叠?
 到【灌水乐园】发言


