


atxserver2是一款可以远程控制Android和iOS设备的设备管理平台。该平台使用的技术栈为:Python3+NodeJS+RethinkDB
1.前期准备工作
- Python >= 3.6(如果想使用tidevice,python>=3.7)
- WebDriverAgent(用 appium fork 的wda,因为appium 1.9.0在WDA中新增了一个 mjpegServer,这个是用来做屏幕同步)(下载链接:https://github.com/appium/WebDriverAgent)
- NodeJS 8
1)安装python(Welcome to Python.org)
在console中输入:python3
查看是否安装成功
2)安装WebDriverAgent(简称wda)(可以参考ATX 文档 - iOS 真机如何安装 WebDriverAgent · TesterHome)
a.下载wda
git clone https://github.com/appium/WebDriverAgent

a.也可以直接下载稳定release版本
b.cd直接进入该wda文件目录(下面的b,c操作都是基于这个目录下进行安装)
b.安装Carthage
1.执行brew install carthage 或者直接下载Carthage.pkg(https://github.com/Carthage/Carthage/releases),此时在WebDriverAgent文件下会创建一个Cartfile文件夹 2.执行carthage update --use-xcframeworks,在wda文件下会创建一个Carthage文件夹和Cartfile.resolved文件 (这个步骤按需完成)c.执行./Scripts/bootstrap.sh
d.打开wda文件目录下的WebDriverAgent.xcodeproj
1.安装到真机上都是需要证书签名的,这里xcode也需要一个注册过的Apple ID即Team即3(如何导入证书以及添加Apple ID可以百度)
2.bundle identifier即4具有唯一性,不可以重复,但是前面的io.*.webdriver像证书一样是一定的,这个是不可以随便写的,可以在后面添加如io.*.webdriver-test1或者-test2任意的字符,把下面这几个文件的bundle identifier和team都统一为一个(图1,2,3)
e.运行与测试
1.菜单栏选择目标设备Destination选择连接的真机:Product->Destination->连接机型
2.Scheme 选择 WebDriverAgentRunner: Product->Scheme->WebDriverAgentRunner
3.最后运行 Product -> Test
4.查看控制台View->Debug Area->Activate Console 如果出现下图证明成功啦
图4
手机上也会出现一下的图标
5.端口转发
有些国产的 iPhone 机器通过手机的 IP 和端口还不能访问,此时需要将手机的端口转发到 Mac 上。
1.brew install libimobiledevice --HEAD
2.iproxy 8100 8100
3.http://localhost:8100/status 出现下图可以确认 WDA 运行成功


图1


图2

图3
3)安装nodeJS 8(版本最好不要高于8)
a.安装brew,直接安装国内镜像源(Homebrew是一款Mac OS平台下的软件包管理工具,拥有安装、卸载、更新、查看、搜索等很多实用的功能。可以实现包管理,而不用关心各种依赖和文件路径)
/bin/zsh -c "$(curl -fsSL https://gitee.com/cunkai/HomebrewCN/raw/master/Homebrew.sh)"
b.安装nvm(一个node的版本管理工具)
cd ~
vim .bash_profile

在文件里添加如下配置:
export NVM_DIR=~/.nvm
source $(brew --prefix nvm)/nvm.sh

重新source使配置文件生效
source .bash_profile

vim ~/.zshrc
在文件里最后一行添加如下配置:
source ~/.bash_profile
c.使用nvm安装node
nvm ls-remote 查看 所有的node可用版本

nvm install xxx 下载你想要的版本

nvm use xxx 使用指定版本的node

nvm alias default xxx 每次启动终端都使用该版本的node
2.ATXServer2接入iOS移动设备
目前本机部署环境:
Mac:10.15
xcode:12.4
node:8.9.1
1)安装数据库rethinkdb
a.部署方式1:docker(参考https://github.com/openatx/atxserver2)
1.Mac安装docker
brew cask install docker2.切换到代码目录
docker-compose upb.部署方式2: 通过源码方式部署(我使用的是这种)
1.先准备好一个rethinkdb服务器
brew update && brew install rethinkdb2.启动rethinkdb服务器
rethinkdb

或rethinkdb --port-offset 1 --directory rethinkdb_data2 --join localhost:29015
访问http://localhost:8080/出现下图证明rethinkdb服务器启动好了

2)部署atxserver2平台(https://github.com/openatx/atxserver2)
a.将代码clone到本地
git clone https://github.com/Jodie/atxserver2.gitb.打开命令终端进入该项目
1).pip3 install -r requirements.txt
2).python3 main.py --port 4000
c.访问http://localhost:4000,若出现下图证明成功

3)atxserver2接入iOS设备(https://github.com/openatx/atxserver2-ios-provider)
前期准备:
1.连接iOS设备
a.确保设备已经解锁
b.使用数据线将苹果手机连接到电脑上(Mac)
c.当出现是否信任该设备时选择是
2.设备开启自动化
1.按下HOME -> 设置(Settings) -> 开发者(Developer) -> Enable UI Automation
2.回到 设置(Settings) -> Safari浏览器 -> 翻到最后 高级(Advanced) -> 打开 Web检查器(Web inspector)
3.设置(Settings) -> 通用 -> 设备管理 -> 点击开发者应用中的栏目
3.持续运行的设备设置
默认情况下设备会锁屏的,而当设备锁屏的时候,就自动化不了了。最简单的一个办法就是保持设备常亮
1.Home -> 设置(Settings) -> 显示与亮度(Settings & Brightness)
2.亮度调到低(可以是最低)
3.自动锁定(Auto-Lock) 设置为 永不(Never)
a.安装libimobiledevice工具包
brew uninstall --ignore-dependencies libimobiledevice
brew uninstall --ignore-dependencies usbmuxd

brew install --HEAD usbmuxd
brew unlink usbmuxd
brew link usbmuxd

brew install --HEAD libimobiledevice
brew install ideviceinstaller
brew link --overwrite ideviceinstaller
b. 将代码clone到本地
git clone https://github.com/jodie/atxserver2-ios-providerc. 打开命令终端进入该项目
pip3 install -r requirements.txtd. 避免命令行运行出错,运行一次即可
sudo xcode-select -s /Applications/Xcode.app/Contents/Developere. 解锁keychain,防止签名权限不足问题
security unlock-keychain ~/Library/Keychains/login.keychainf. 启动
1.SERVER_URL="http://localhost:4000"       # 这里修改成atxserver2的地址
2.WDA_DIRECTORY="/Users/sjh/Documents/cxm_ios/WebDriverAgent-3.12.0"    # WDA项目地址
3.python3 main.py -s $SERVER_URL -W $WDA_DIRECTORY
如果出现下图证明接入成功

3.过程中常见问题以及解决方案
1.wda阶段问题
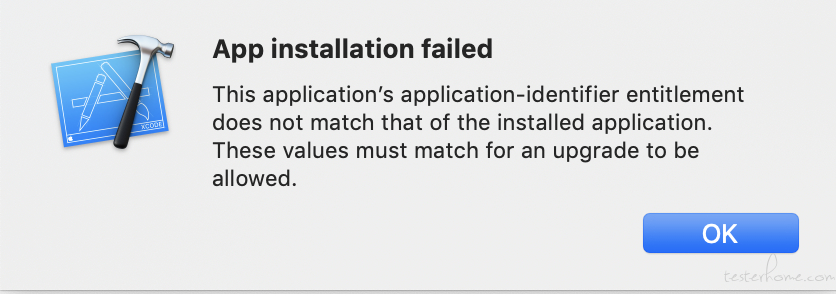
问题 1:
解决方法:
遇到这个问题,说明手机上已经有一个 WebDriverAgent 的应用了,只是 BundleID 不一致,需要先将手机上的卸载掉,重新运行 Product -> Test
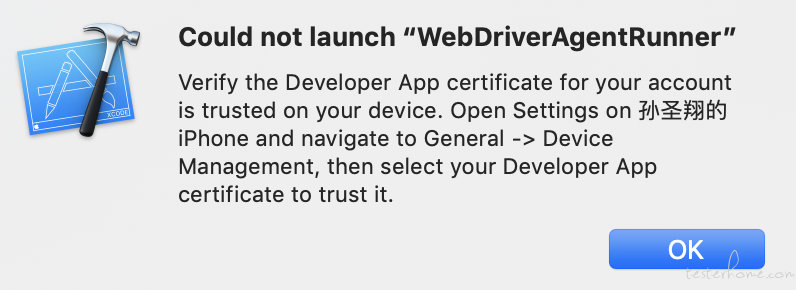
问题 2:
解决方法:
提示其实已经说了,进入设置通用设备管理开发者应用然后点击信任,之后再重新运行一遍 Product -> Test
问题3: 原因是在使用Xcode高版本时,步骤七会编译失败(git地址https://github.com/appium/WebDriverAgent/pull/286/files)
解决方案:
- WebDriverAgent/PrivateHeaders/XCTest/XCTestCase.h,加入以下代码到下图中红框位置
@property(nonatomic) BOOL shouldSetShouldHaltWhenReceivesControl; // @synthesize shouldSetShouldHaltWhenReceivesControl=_shouldSetShouldHaltWhenReceivesControl;
- WebDriverAgent/WebDriverAgentLib/Utilities/FBFailureProofTestCase.m,修改红框中代码26~36行为下方内容,替换后的代码如下图
//  self.internalImplementation = (_XCTestCaseImplementation *)[FBXCTestCaseImplementationFailureHoldingProxy proxyWithXCTestCaseImplementation:self.internalImplementation];
  if ([self respondsToSelector:@selector(internalImplementation)]) {
    // The `internalImplementation` API has been removed since Xcode 11.4
      self.internalImplementation =
        (_XCTestCaseImplementation *)[FBXCTestCaseImplementationFailureHoldingProxy
                                      proxyWithXCTestCaseImplementation:self.internalImplementation];
    } else {
      // https://github.com/appium/appium/issues/13949
      self.shouldSetShouldHaltWhenReceivesControl = NO;
      self.shouldHaltWhenReceivesControl = NO;
    }


问题4:执行./Scripts/bootstrap.sh遇到这个问题
解决方案:
执行touch /tmp/helper.xcconfig
执行vim /tmp/helper.xcconfig
中输入export XCODE_XCCONFIG_FILE=/tmp/helper.xcconfig
执行carthage build --platform iOS --no-use-binaries --cache-builds

问题5:xcframework和framework的切换问题
解决方案:
将Carthage/bulid文件下的RoutingHTTPServer.xcframework导入到xcode,将1设置为not embed,导入的设置为embed&sign,并且选择"工程配置-> Build Settings -> Build Options -> Validate Workspace",将该配置设置为Yes。如图1,不然会出现图2类似的错误
图1
图2


问题6:进行pip3 install -r requirements.txt报错
解决方案:
pip install six -i http://pypi.douban.com/simple --trusted-host pypi.douban.com

问题7:
解决方案:
node升级到8,并且执行python3 main.py -s $SERVER_URL -W $WDA_DIRECTORY时console会出现没有导入httpx模块需要手动导入
pip3 install httpx


 4608
4608

 被折叠的 条评论
为什么被折叠?
被折叠的 条评论
为什么被折叠?
 到【灌水乐园】发言


