


文章目录
25. 案例:zabbix 低级自动发现监控 mysql
本次试验说明:
	1)试验环境:
		centos 7
		5.5.68-MariaDB MariaDB Server
	2)试验目的:
		使用 yum 安装 mariadb 之后,另外增加两个 mysql 实例,监听不同的端口(例如:默认监听 3306,新增监听 3307 3308)
	3)查看监听结果
25.1. 安装 mysql
# 这里是测试使用,安装 mariadb
yum install mariadb-server.x86_64 -y

# 启动数据库并设置开机自启
[root@zabbix ~]# systemctl start mariadb.service
[root@zabbix ~]# systemctl enable mariadb.service
Created symlink from /etc/systemd/system/multi-user.target.wants/mariadb.service to /usr/lib/systemd/system/mariadb.service.
# 使用 mysql_secure_installation 命令配置数据库
mysql_secure_installation

[root@zabbix ~]# mysql_secure_installation

NOTE: RUNNING ALL PARTS OF THIS SCRIPT IS RECOMMENDED FOR ALL MariaDB
      SERVERS IN PRODUCTION USE!  PLEASE READ EACH STEP CAREFULLY!

In order to log into MariaDB to secure it, we'll need the current
password for the root user.  If you've just installed MariaDB, and
you haven't set the root password yet, the password will be blank,
so you should just press enter here.

# 输入当前数据库用户 root 密码,开始时没有密码,直接回车
Enter current password for root (enter for none):
OK, successfully used password, moving on...

Setting the root password ensures that nobody can log into the MariaDB
root user without the proper authorisation.
# 是否设置 root 密码
Set root password? [Y/n] n
 ... skipping.

By default, a MariaDB installation has an anonymous user, allowing anyone
to log into MariaDB without having to have a user account created for
them.  This is intended only for testing, and to make the installation
go a bit smoother.  You should remove them before moving into a
production environment.
# 是够删除 anonymous 用户
Remove anonymous users? [Y/n] y
 ... Success!

Normally, root should only be allowed to connect from 'localhost'.  This
ensures that someone cannot guess at the root password from the network.
# 是否禁止 root 远程登陆
Disallow root login remotely? [Y/n] y
 ... Success!

By default, MariaDB comes with a database named 'test' that anyone can
access.  This is also intended only for testing, and should be removed
before moving into a production environment.

Remove test database and access to it? [Y/n] y
 - Dropping test database...
 ... Success!
 - Removing privileges on test database...
 ... Success!

Reloading the privilege tables will ensure that all changes made so far
will take effect immediately.
# reload
Reload privilege tables now? [Y/n] y
 ... Success!

Cleaning up...

All done!  If you've completed all of the above steps, your MariaDB
installation should now be secure.

Thanks for using MariaDB!

# 登陆查看
[root@zabbix ~]# mysql
Welcome to the MariaDB monitor.  Commands end with ; or \g.
Your MariaDB connection id is 13
Server version: 5.5.68-MariaDB MariaDB Server

Copyright (c) 2000, 2018, Oracle, MariaDB Corporation Ab and others.

Type 'help;' or '\h' for help. Type '\c' to clear the current input statement.

MariaDB [(none)]> show databases;
+--------------------+
| Database           |
+--------------------+
| information_schema |
| mysql              |
| performance_schema |
+--------------------+
3 rows in set (0.00 sec)

MariaDB [(none)]> select user,host from mysql.user;
+------+-----------+
| user | host      |
+------+-----------+
| root | 127.0.0.1 |
| root | ::1       |
| root | localhost |
+------+-----------+
3 rows in set (0.00 sec)

MariaDB [(none)]>
25.2 . 配置 mysql 多实例
25.2.1 添加配置文件
# 复制默认的配置文件 /etc/my.conf 并修改文件内容

# 增加监听 3307 端口实例
cp /etc/my.cnf /etc/my3307.cnf
vim /etc/my3307.cnf
# 添加如下内容
[mysqld]

datadir=/data/3307/

socket=/data/3307/mysql.sock

port=3307

user=mysql

symbolic-links=0

[mysqld_safe]

log-error=/data/3307/mysqld.log

pid-file=/data/3307/mysqld.pid
# 增加监听 3308 端口实例
cp /etc/my3307.cnf /etc/my3308.cnf
sed -i 's#3307#3308#g' /etc/my3308.cnf
25.2.2 初始化数据库 3307
mysql_install_db --user=mysql --defaults-file=/etc/my3307.cnf

mysqld_safe --defaults-file=/etc/my3307.cnf &
25.2.3 初始化数据库 3308
mysql_install_db --user=mysql --defaults-file=/etc/my3308.cnf

mysqld_safe --defaults-file=/etc/my3308.cnf &
25.2.4 检查多实例是否正常
[root@zabbix-web ~]# netstat -lnatp | grep mysqld
tcp        0      0 0.0.0.0:3307            0.0.0.0:*               LISTEN      2159/mysqld
tcp        0      0 0.0.0.0:3308            0.0.0.0:*               LISTEN      2452/mysqld
tcp        0      0 0.0.0.0:3306            0.0.0.0:*               LISTEN      1787/mysqld
25.2.5 增加 3306 端口 sock 的软连接
# 放在同一个目录下,便于对比
mkdir /data/3306
ln -s /var/lib/mysql/mysql.sock /data/3306/
25.3 . 登陆不同实例数据库
# 查看不同监听的 sock 文件
[root@zabbix-web ~]# find /data -name *.sock
/data/3307/mysql.sock
/data/3308/mysql.sock
/data/3306/mysql.sock
# 登陆监听端口为 3306 的数据库
mysql -uroot
# 默认监听 3306 所以不加其他参数就可以默认登陆
# 登陆监听端口为 3307 的数据库
mysql -S /data/3307/mysql.sock -uroot
# 登陆监听端口为 3308 的数据库
mysql -S /data/3308/mysql.sock -uroot
25.4 修改配置文件权限
chmod 755 /data/*
25.5 获取运行的实例端口号
netstat -lntp|awk -F "[ :]+" '/mysqld/{print$5}'
25.6 编写shell脚本
# 指定一个脚本文件目录
mkdir /etc/zabbix/scripts

vim /etc/zabbix/scripts/discover.sh
#!/bin/bash
#mysql low-level discovery
# 获取实例启动监听的端口号
res=`netstat -lntp|awk -F "[ :\t]+" '/mysqld/{print$5}'`
# 将得到的值添加到一个元组中
port=($res)
printf '{'
printf '"data":['
for key in ${!port[@]}
do
	if [[ "${#port[@]}" -gt 1 && "${key}" -ne "$((${#port[@]}-1))" ]];then
		printf '{'
		printf "\"{#MYSQLPORT}\":\"${port[${key}]}\"},"
	else [[ "${key}" -eq "((${#port[@]}-1))" ]]
		printf '{'
		printf "\"{#MYSQLPORT}\":\"${port[${key}]}\"}"
	fi
done
printf ']'
printf '}\n'
- 测试脚本
sh discover.sh

[root@zabbix scripts]# sh discover.sh
{"data":[{"{#MYSQLPORT}":"3307"},{"{#MYSQLPORT}":"3308"},{"{#MYSQLPORT}":"3306"}]}
25.7 修改 zabbix agent 配置文件
25.7.1 增加 mysql_discover.conf 文件
cd /etc/zabbix/zabbix_agentd.d/
vim mysql_discover.conf

UserParameter=mysql.discovery,/bin/sh /etc/zabbix/scripts/discover.sh

# 监控 mysql 是否存活
UserParameter=mysql_alive[*],mysqladmin ping -uroot -h 127.0.0.1 -P $1 2>/dev/null | grep -c 'alive'
# 重启 zabbix-agent
systemctl restart zabbix-agent.service
25.7.2 使用 zabbix_get 测试
[root@zabbix ~]# zabbix_get -s 127.0.0.1 -k mysql.discovery
{"data":[{"{#MYSQLPORT}":"3307"},{"{#MYSQLPORT}":"3308"},{"{#MYSQLPORT}":"3306"}]}

[root@zabbix ~]# zabbix_get -s 127.0.0.1 -k mysql_alive[3306]
1
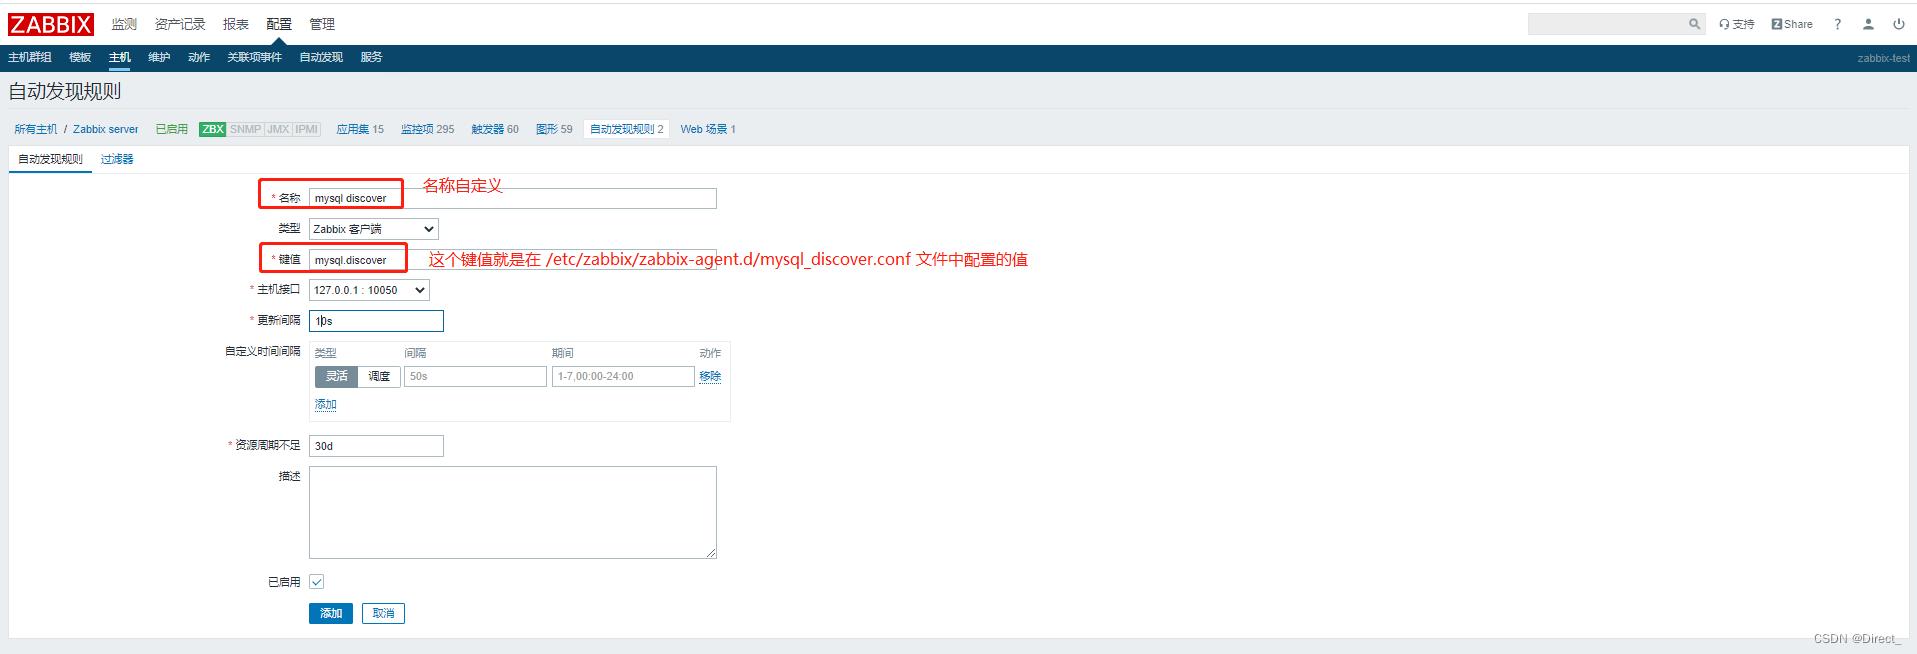
25.8 创建监控项规则
配置 --> 主机 --> 自动发现(监控那台主机就在那台主机上配置)
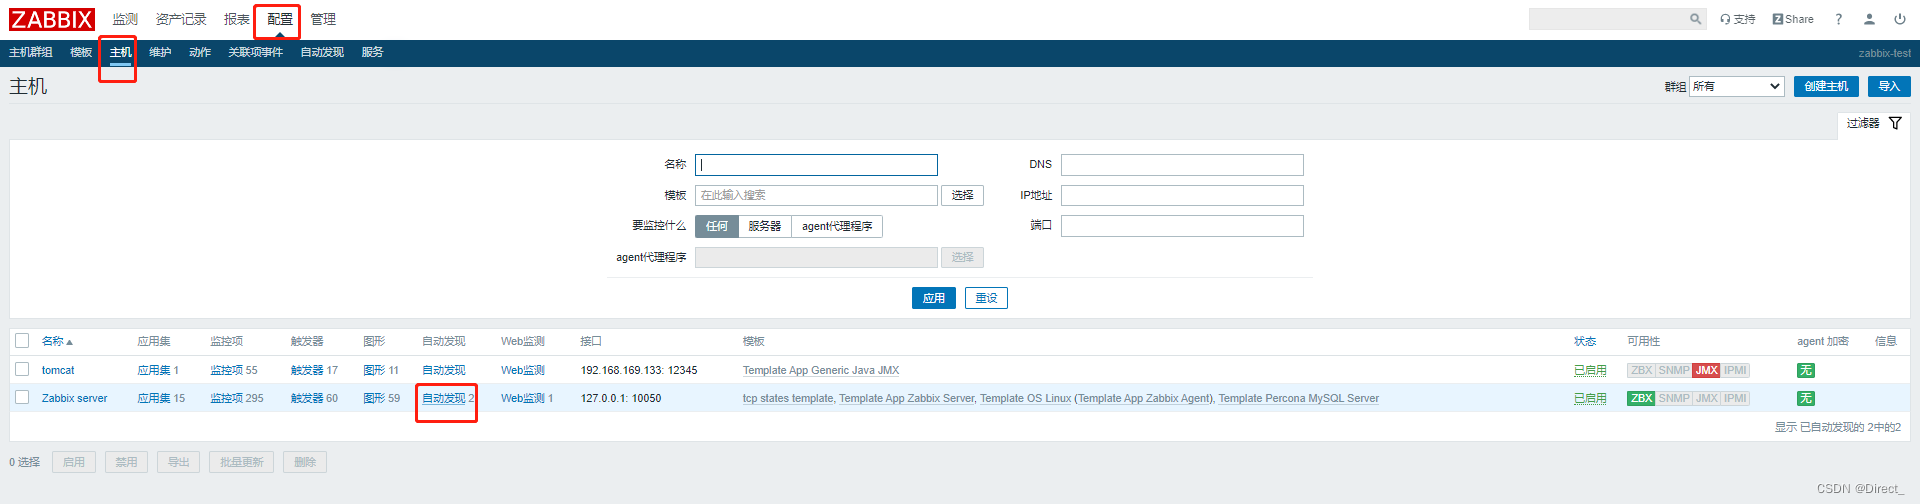
创建发现规则


25.9 创建监控项原型
# 测试监控 mysql 是否存活
mysqladmin ping -uroot -h 127.0.0.1 -P $1 2>/dev/null | grep -c 'alive'
# key 的配置项在 /etct/zabbix/zabbix_agent.d/mysql_discover.conf 配置文件中


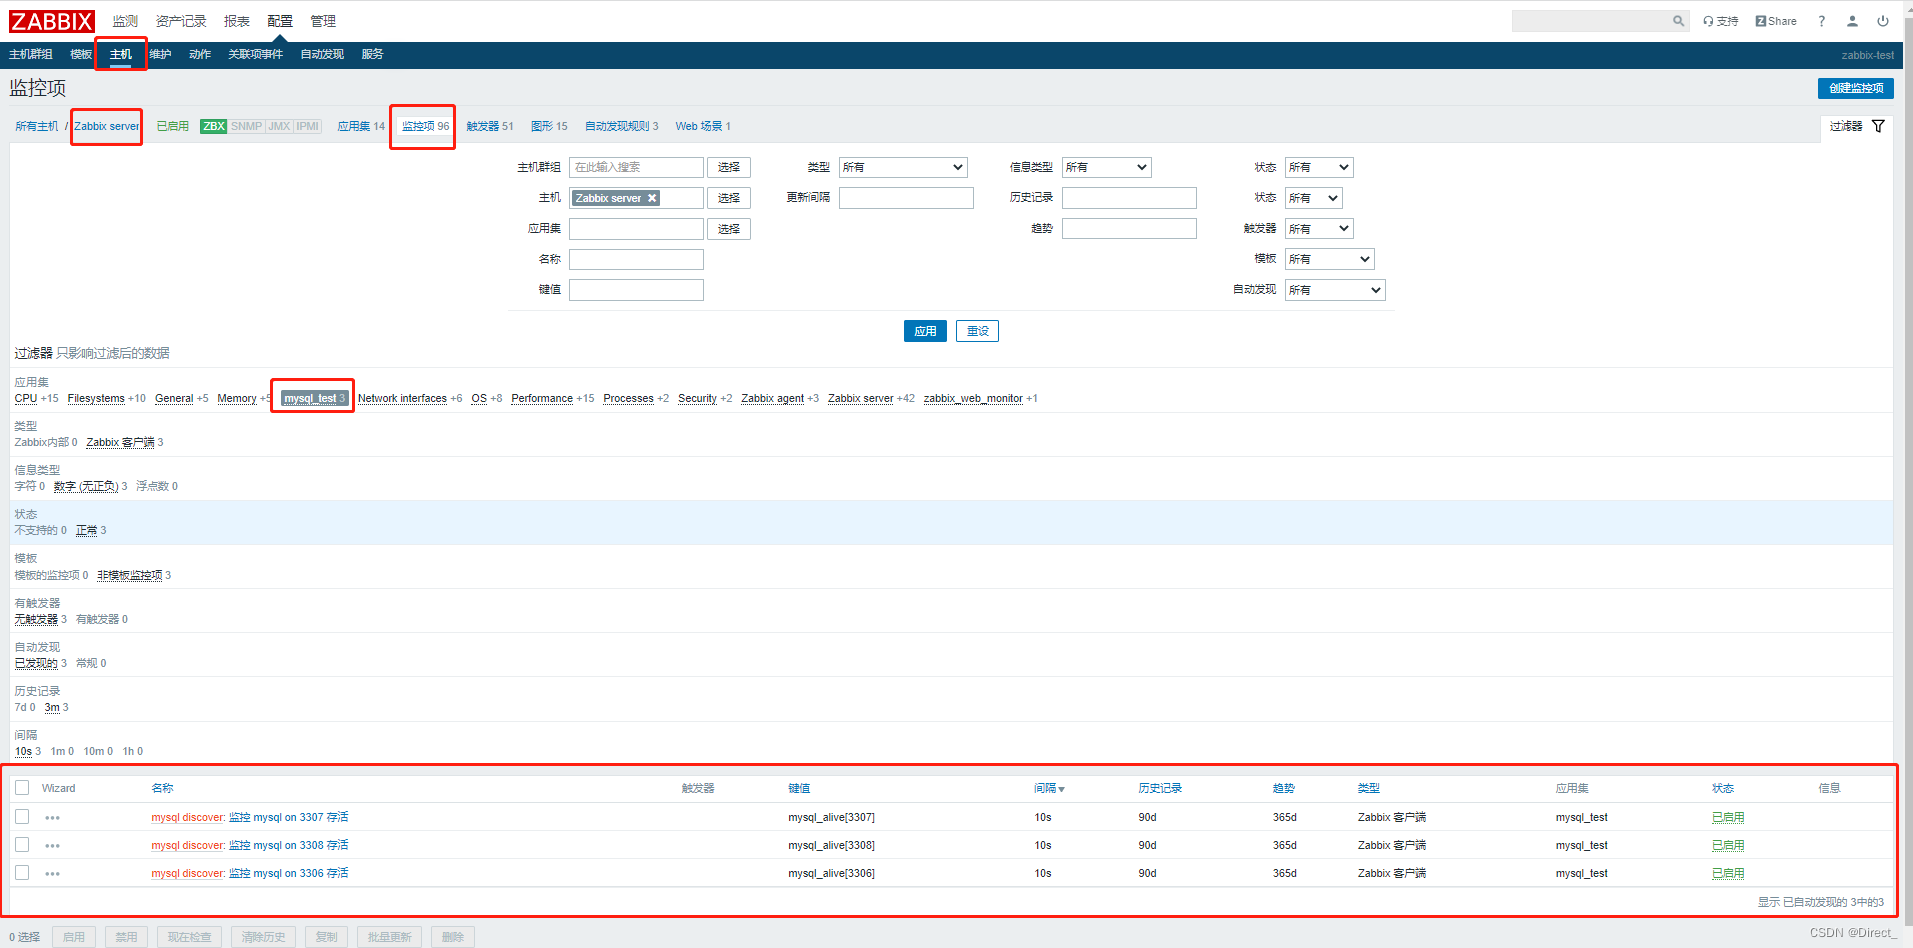
25.10 查看监控项
配置 --> 主机 --> 选择对应配置的主机 --> 监控项
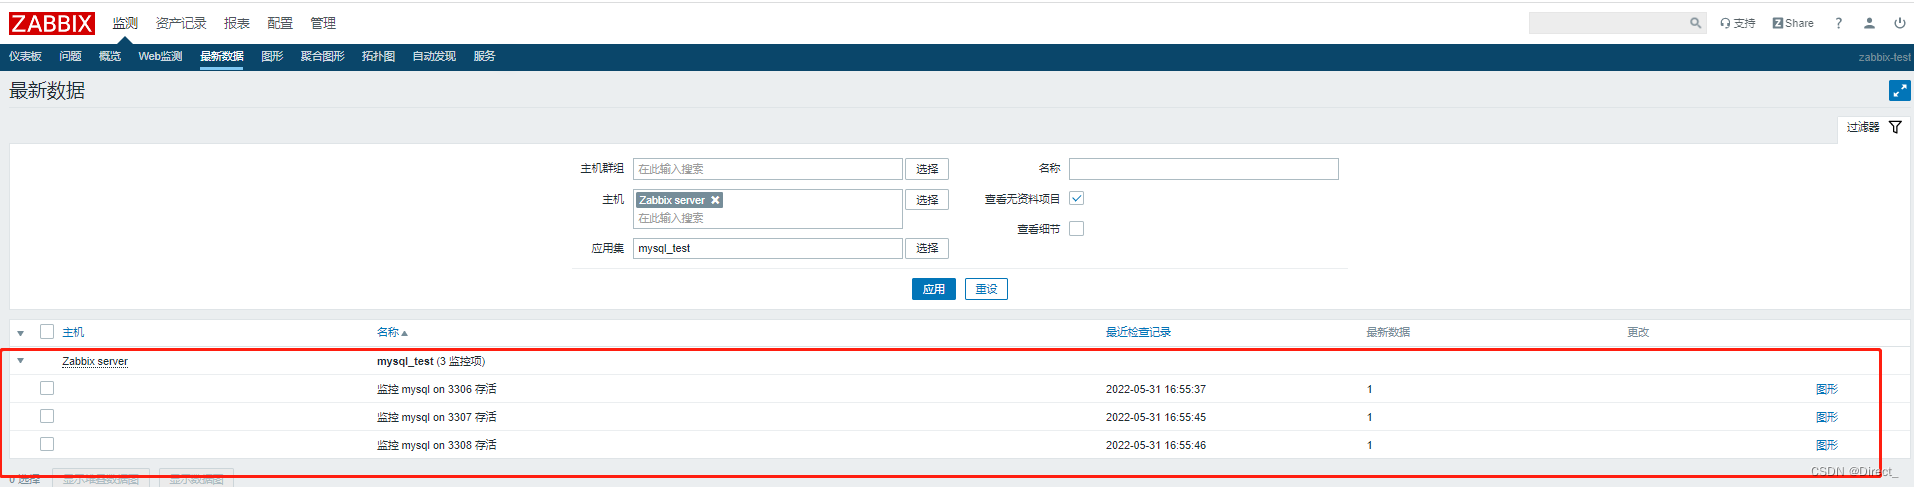
检测 --> 最新数据


 584
584


 被折叠的 条评论
为什么被折叠?
被折叠的 条评论
为什么被折叠?
 到【灌水乐园】发言


