


Your first RESTful web service
https://www.jetbrains.com/help/idea/creating-and-running-your-first-restful-web-service.html
This tutorial describes how to create a simple RESTful web service in IntelliJ IDEA and deploy it to the Tomcat application server. The service will output Hello, World! when you access a specific URL through the web browser or otherwise send a GET request to this URL. Use the switcher at the top of this page for instructions for a different application server.
本教程介绍如何在IntelliJ IDEA中创建一个简单的RESTful网络服务,并将其部署到Tomcat应用服务器上。当您通过网页浏览器访问特定URL或向该URL发送GET请求时,该服务将输出"Hello, World!"。如需针对其他应用服务器的操作指南,请使用本页顶部的切换器。
You will create a new Java Enterprise project, add the necessary Java code, tell IntelliJ IDEA where your Tomcat server is located, then use a run configuration to build the artifact, start the server, and deploy the artifact to it.
你将创建一个新的Java企业项目,添加必要的Java代码,告诉IntelliJ IDEA你的Tomcat服务器所在位置,然后使用运行配置来构建工件,启动服务器,并将工件部署到服务器上。
Here is what you will need:
| IntelliJ IDEA Ultimate | Java Enterprise / Jakarta Enterprise development is not supported in the free IntelliJ IDEA Community Edition. For more information, refer to IntelliJ IDEA Ultimate vs IntelliJ IDEA Community Edition |
| Relevant plugins | By default, the following necessary plugins are bundled and enabled in IntelliJ IDEA Ultimate. If something does not work, make sure that the following plugins are enabled:
|
| Java SE Development Kit (JDK) version 1.8 or later | You can get the JDK directly from IntelliJ IDEA as described in Java Development Kit (JDK) or download and install it manually, for example: Oracle JDK or OpenJDK. 参考:https://blog.csdn.net/D1237890/article/details/151363196?spm=1011.2415.3001.5331 |
| Tomcat | The Tomcat application server version 7 or later.
|
| Web browser | You will need a web browser to view your web application. |
Create a new Java Enterprise project
IntelliJ IDEA includes a dedicated wizard for creating Java Enterprise projects based on various Java EE and Jakarta EE implementations. In this tutorial, we will create a simple web application.
-
In the main menu, go to File | New | Project.
-
In the New Project dialog, select Jakarta EE.
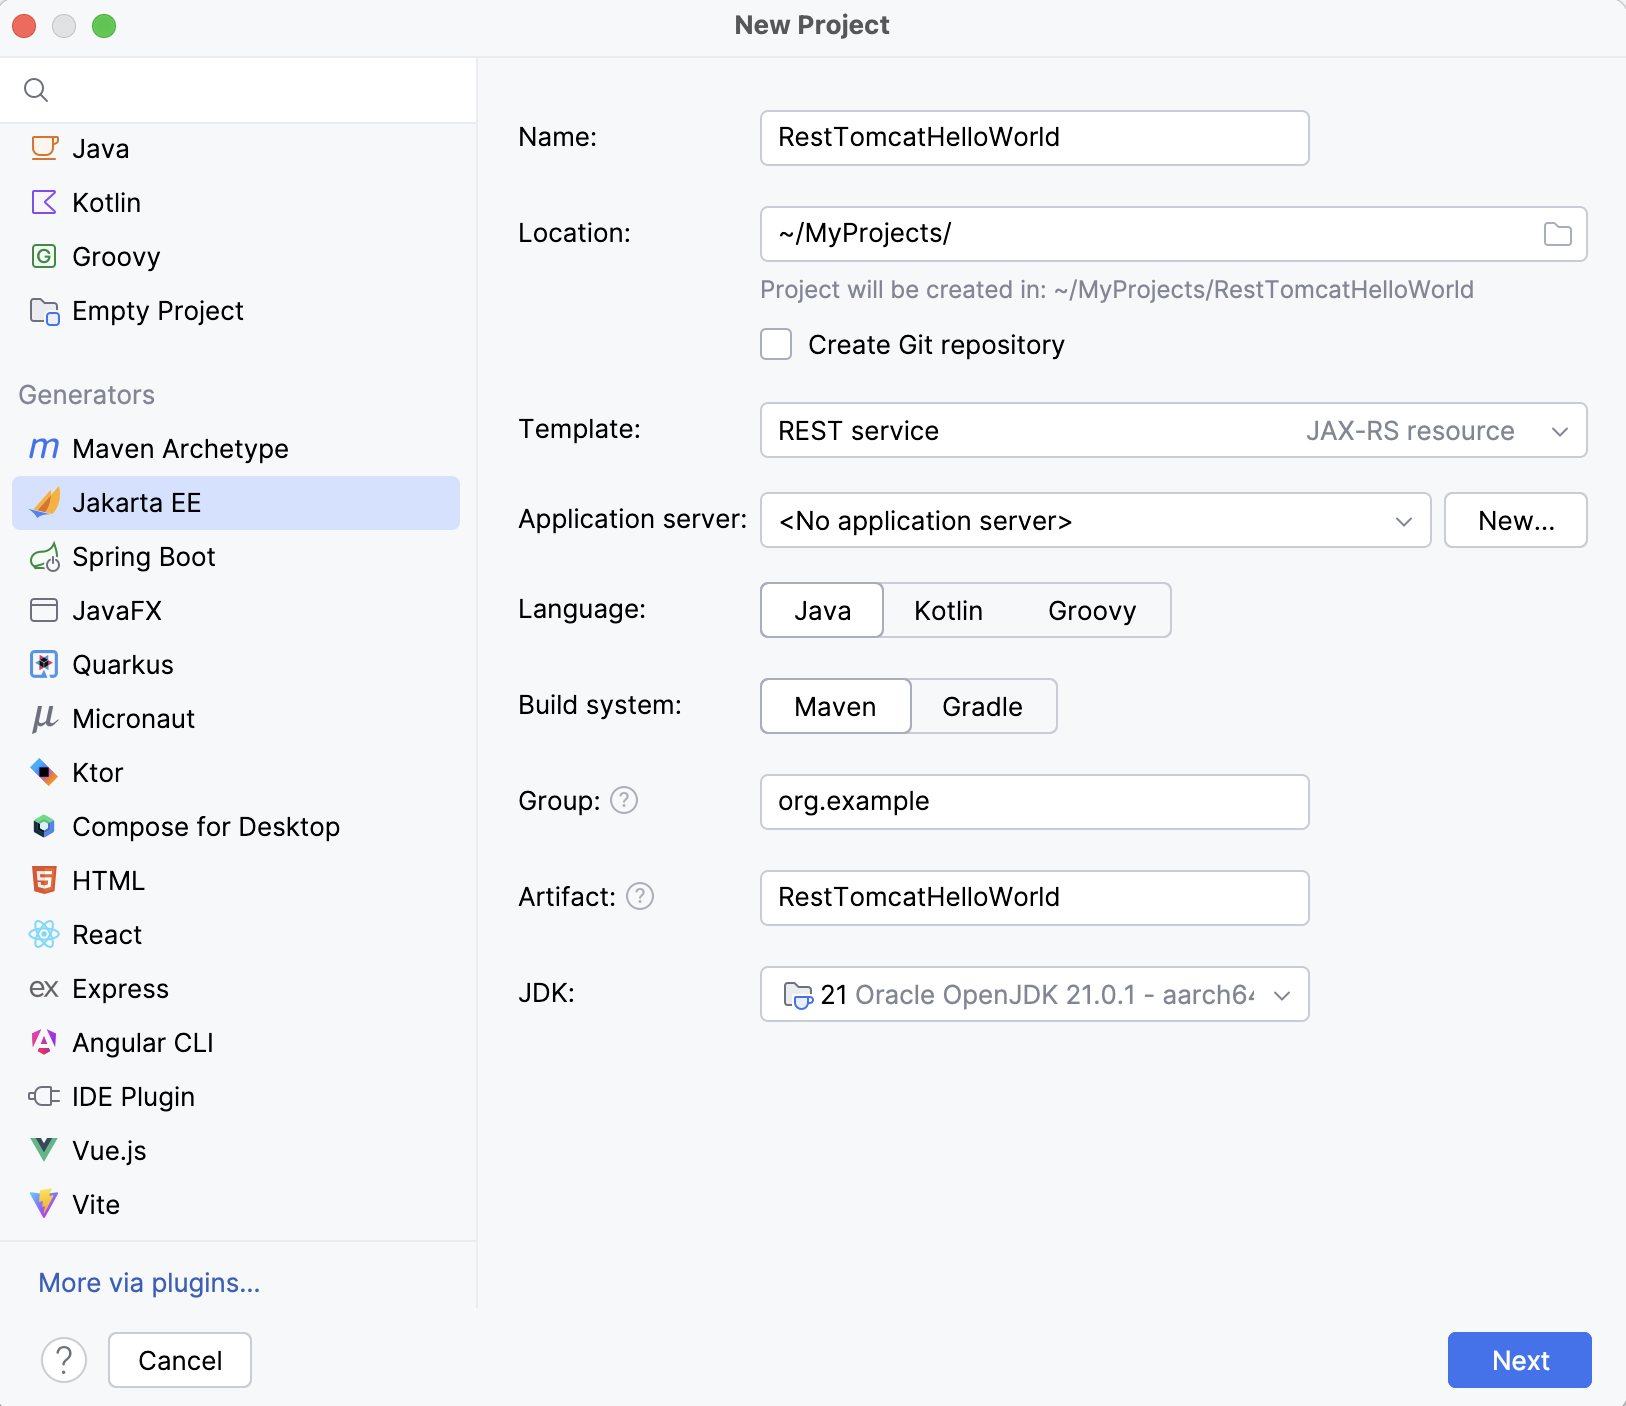
Enter a name for your project: RestTomcatHelloWorld. For this tutorial, use Oracle OpenJDK 21 as the project SDK and select the REST service template. Don't select or add an application server, we will do it later. Select Java and Maven. Click Next to continue
3. In the Version field, select Jakarta EE 10 because that's what Tomcat 10.1 used in this tutorial is compatible with.
For Tomcat 9, select Java EE 8. For Tomcat 10, select Jakarta EE 9.1.
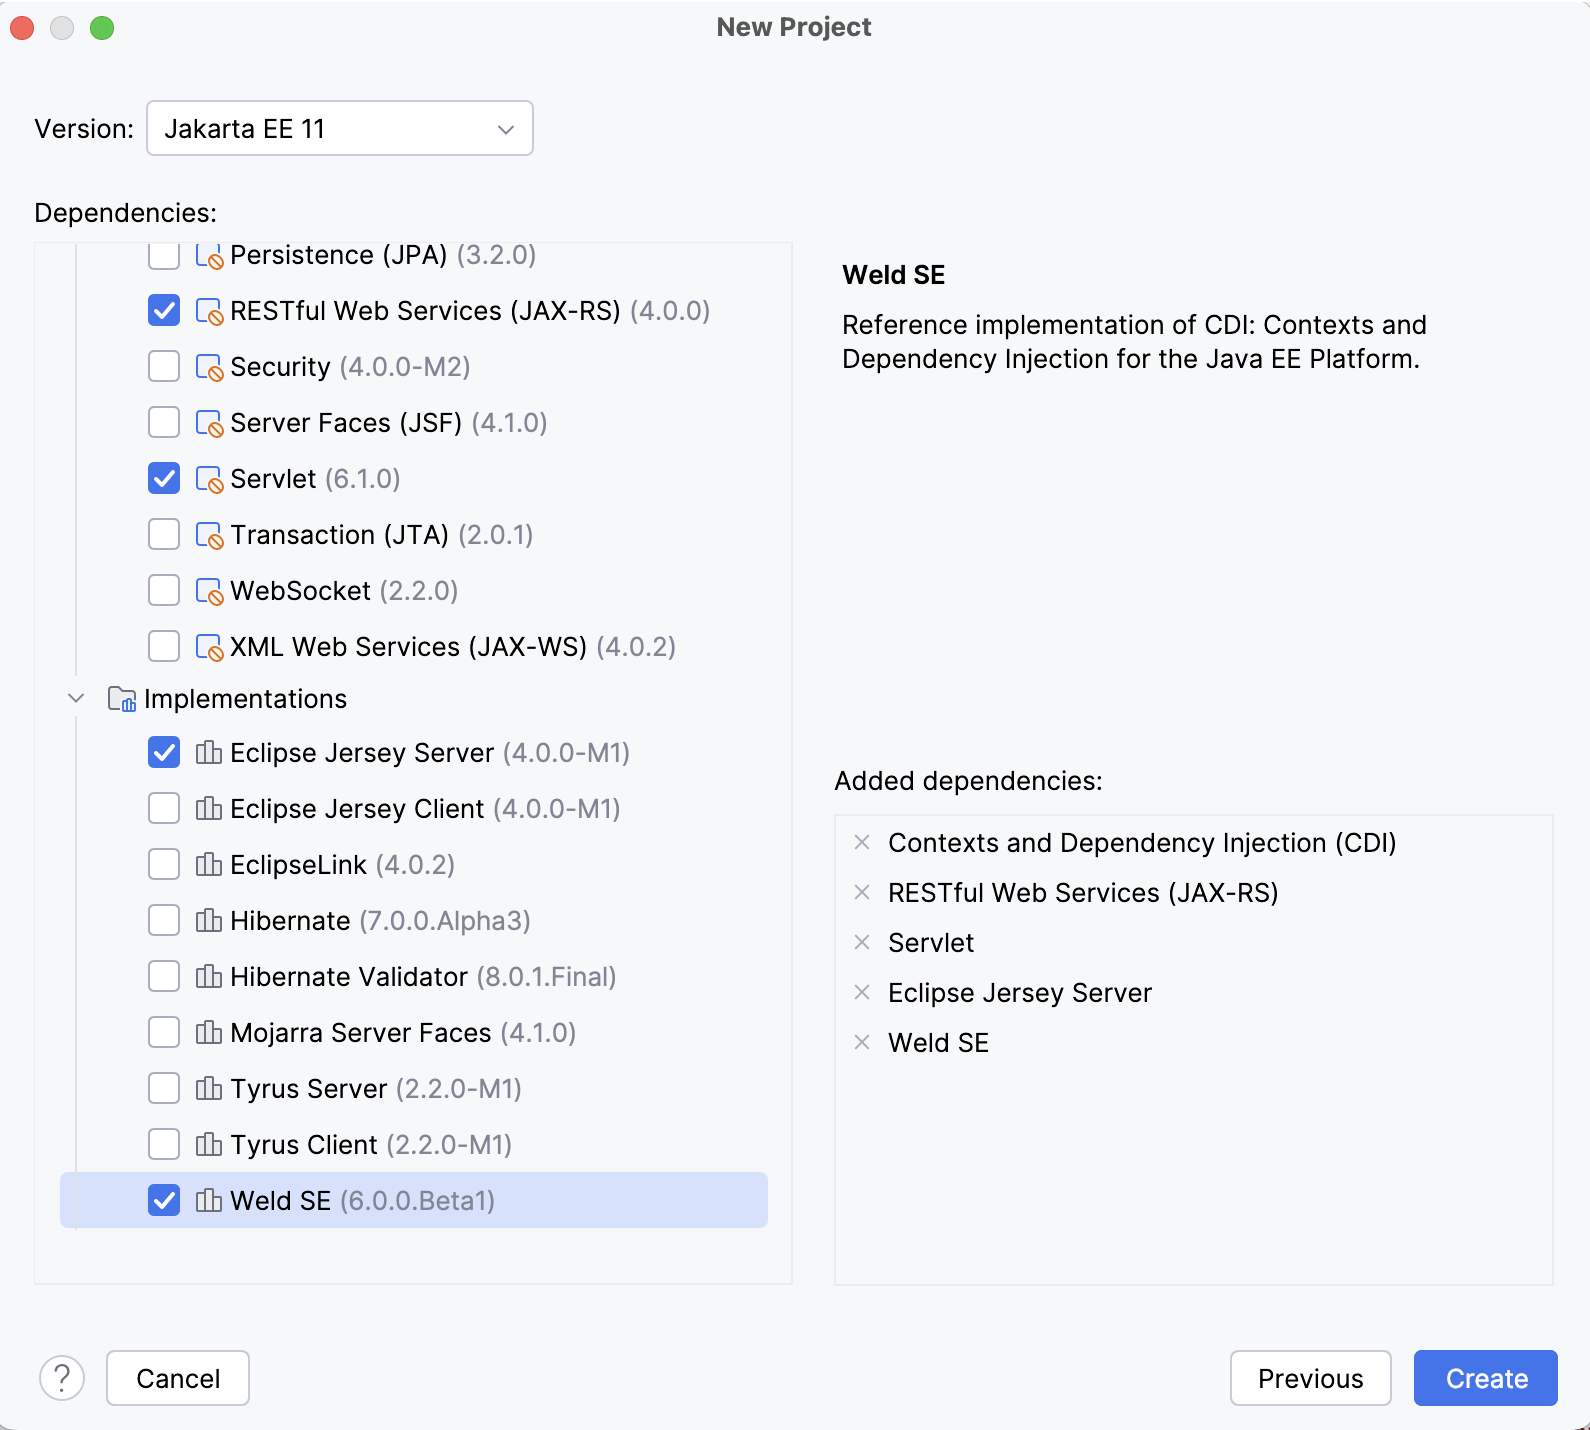
In the Dependencies list, select the following:
-
Servlet
-
Eclipse Jersey Server
-
Weld SE
Explore the default project structure
IntelliJ IDEA creates a project with some boilerplate code that you can build and deploy successfully.
Use the Project tool window to browse and open files in your project or press ⌘Cmd⇧Shift0O and type the name of the file.
-
pom.xml is the Project Object Model with Maven configuration information, including dependencies and plugins necessary for building the project.
pom.xml{...}
-
HelloResource.java is a root resource class, which uses the following JAX-RS annotations to implement the RESTful web service:
-
The
@Pathannotation identifies the URI for accessing this resource, relative to the application root. -
The
@GETannotation indicates that thehello()method will process HTTP GET requests to the specified URI. -
The
@Producesannotation specifies the MIME media type that the method produces and returns.
src/main/java/com/example/RestTomcatHelloWorld/HelloResource.java{...}
-
-
HelloApplication.java is a subclass of
javax.ws.rs.core.Application, which is used to configure the environment where the application runs REST resources defined in your resource classes. The@ApplicationPathannotation identifies the URL mapping for the application root (by default, it is set to/api).src/main/java/com/example/RestTomcatHelloWorld/HelloApplication.java{...}
Configure the application server
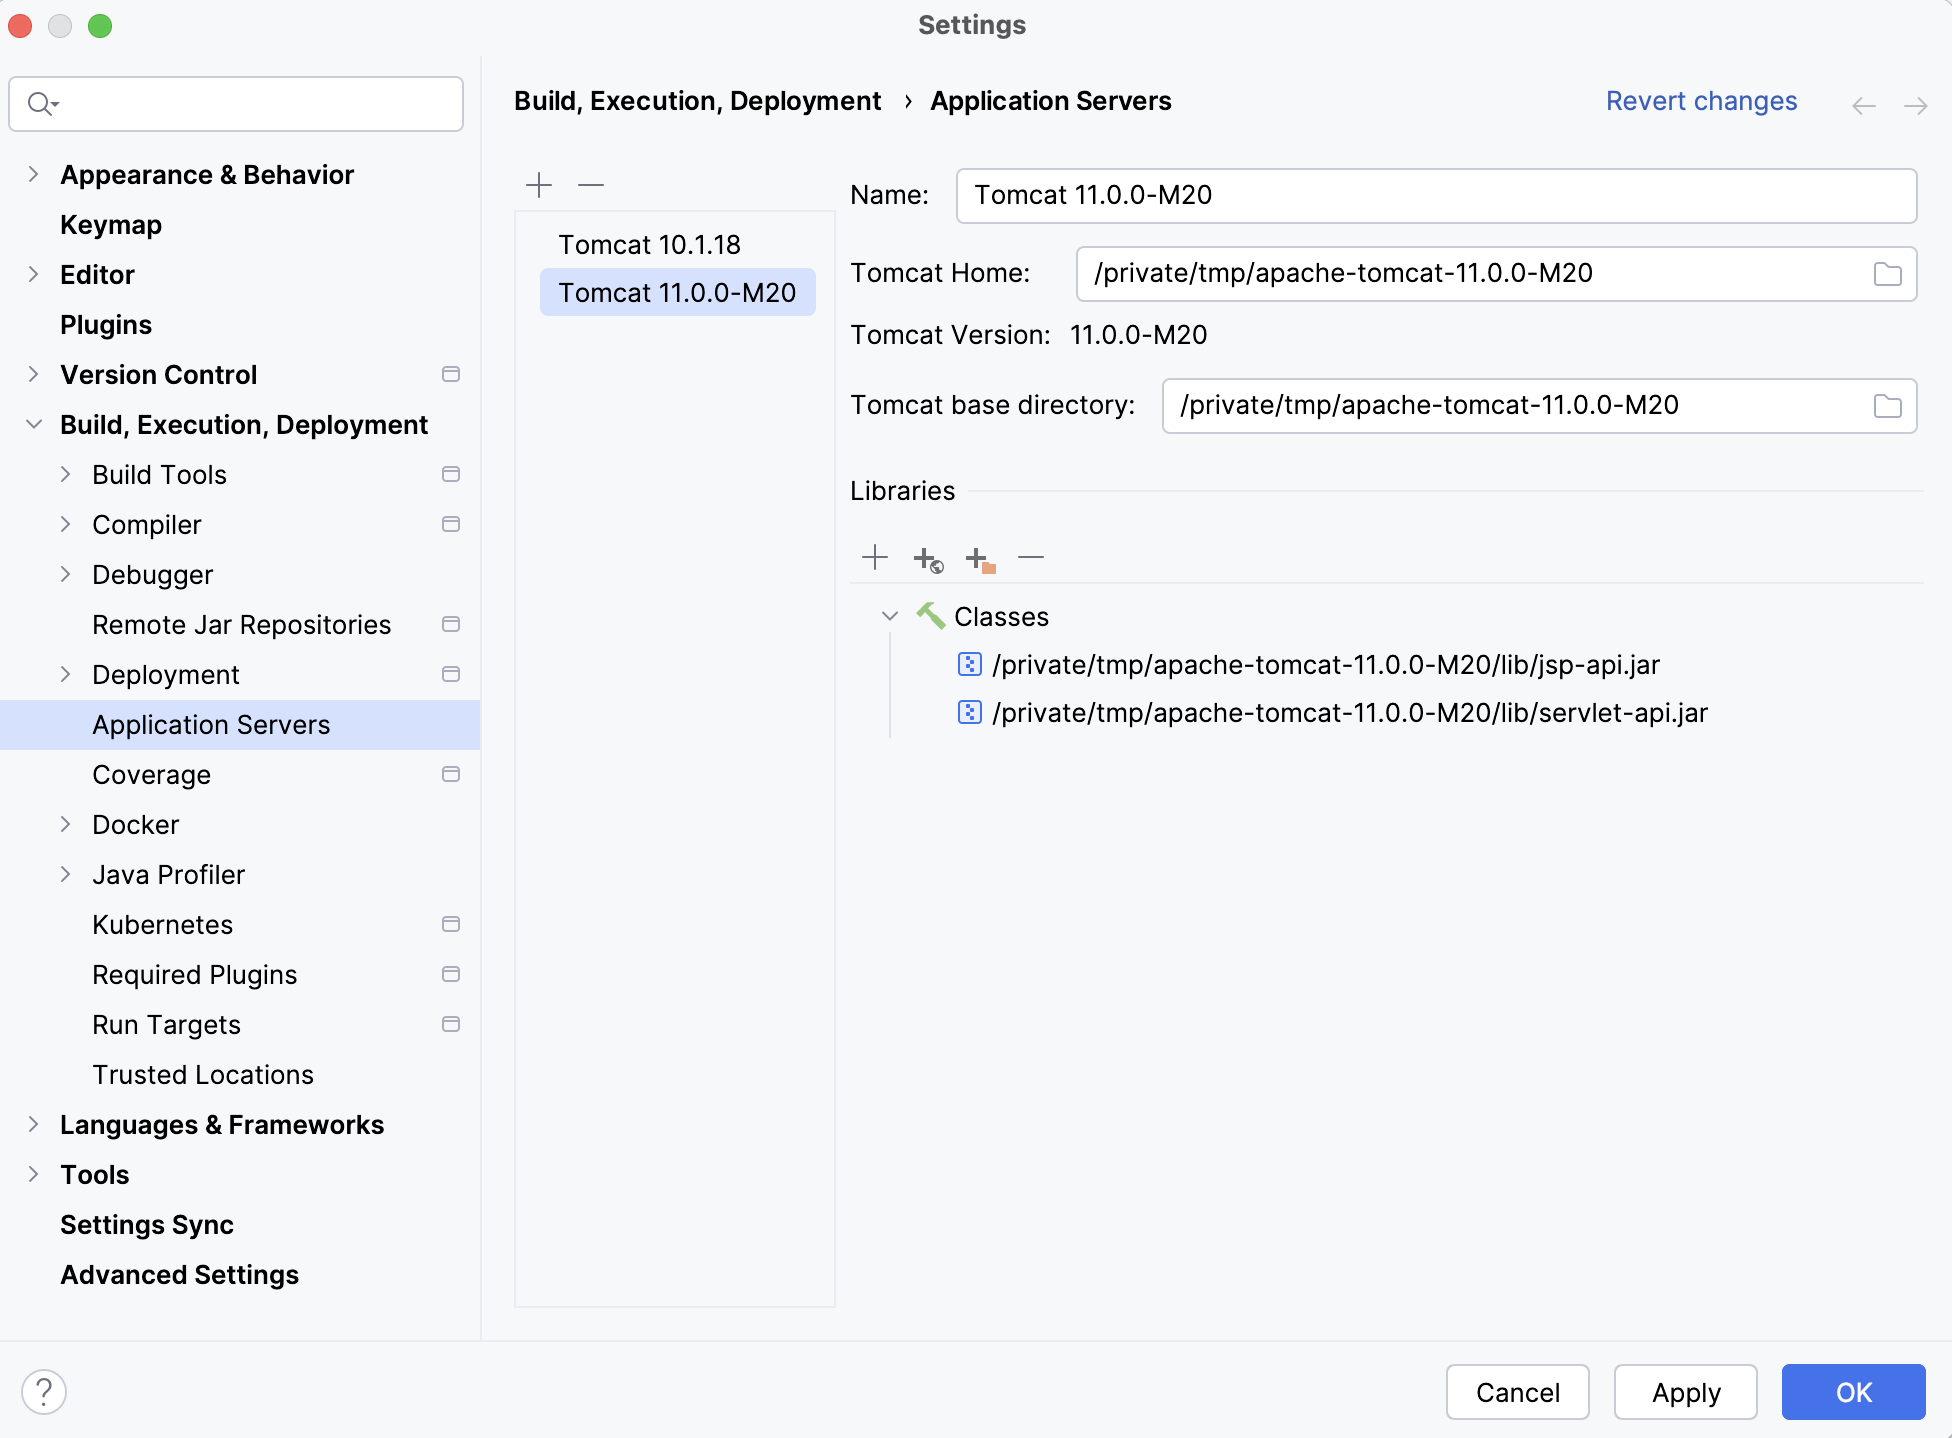
Let IntelliJ IDEA know where the Tomcat application server is located.
-
Press ⌘Cmd0, to open settings and then select Build, Execution, Deployment | Application Servers.
-
Click

and select Tomcat.
-
Specify the path to the Tomcat server install location. IntelliJ IDEA detects and sets the name and version appropriately.
Create a run configuration
IntelliJ IDEA needs a run configuration to build the artifacts and deploy them to your application server.
-
In the main menu, go to Run | Edit Configurations.
-
In the Run/Debug Configurations dialog, click

, expand the Tomcat Server node, and select Local.
-
Fix any warnings that appear at the bottom of the run configuration settings dialog.

Most likely, you will need to fix the following:
-
On the Deployment tab, add the artifact that you want to deploy:
RestTomcatHelloWorld:war exploded
-
-
On the Server tab, set the URL to point to the root resource:
http://localhost:8080/RestTomcatHelloWorld_war_exploded/api/hello-world
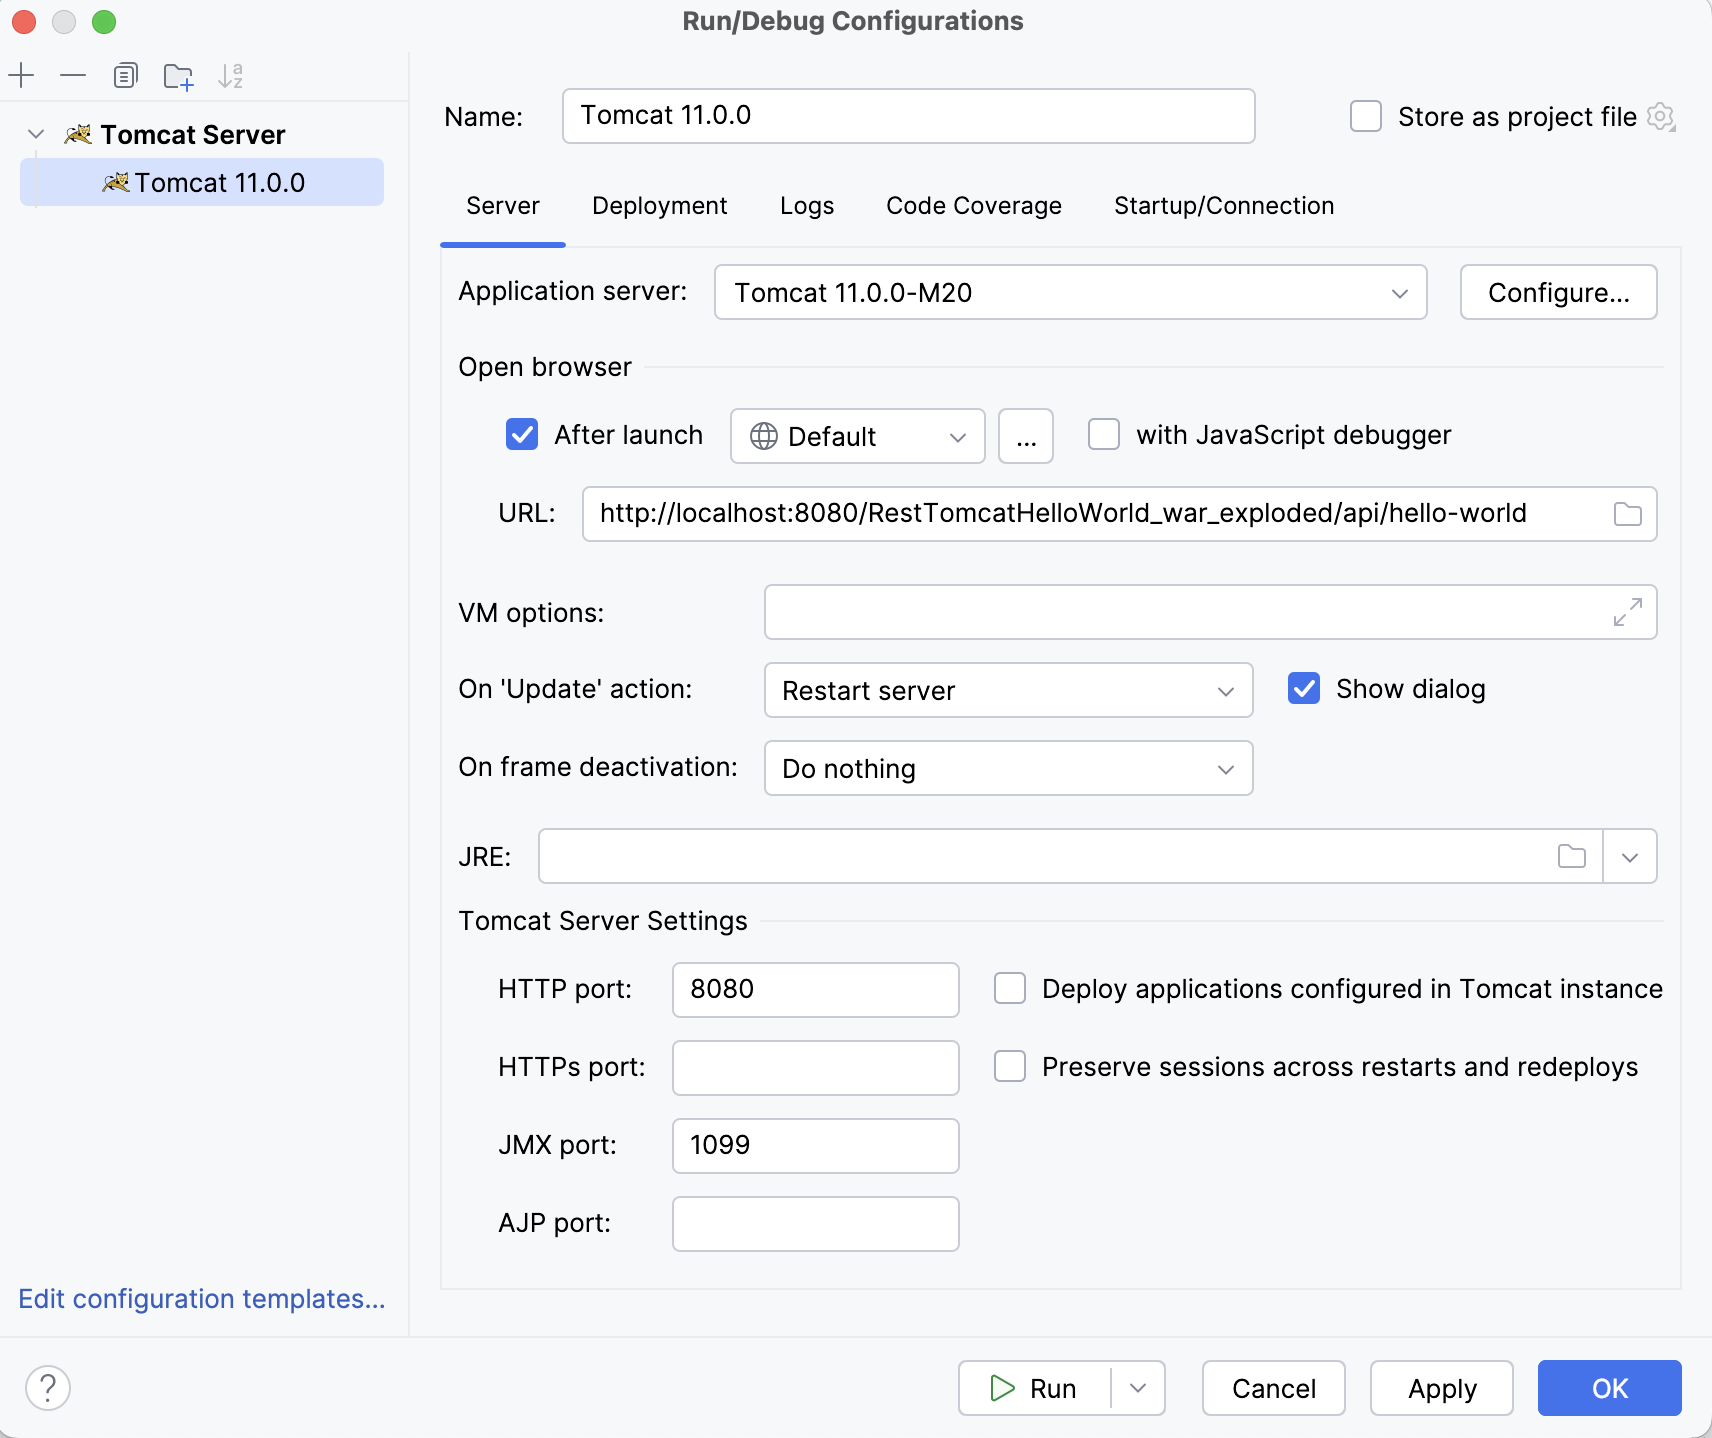
5. Click OK to save the run configuration.To run the configuration, press ⌃Ctrl⌥Option0R and select the created application server configuration.
6. Alternatively, if you have your run configuration selected in the main toolbar at the top, you can click ![]()
in the main toolbar or press ⌃Ctrl0R to run it.
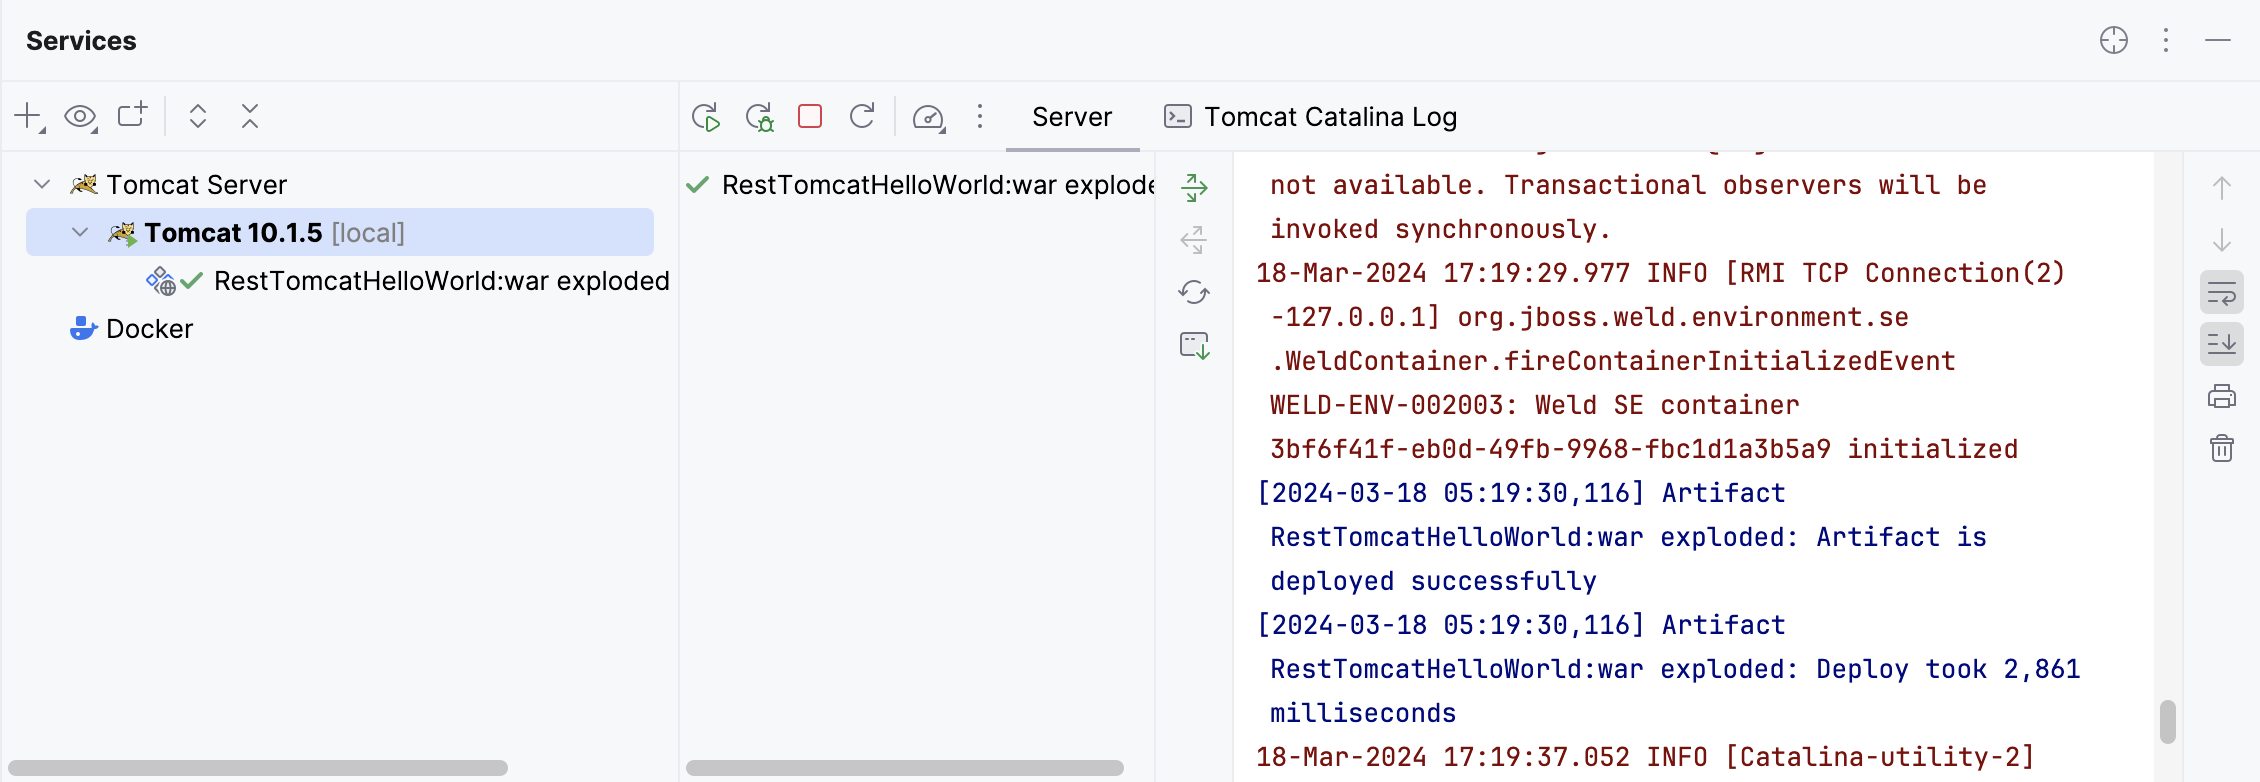
This run configuration builds the artifacts, then starts the Tomcat server, and deploys the artifacts to the server. You should see the corresponding output in the Services tool window.
<dependency>
    <groupId>org.glassfish.jersey.media</groupId>
    <artifactId>jersey-media-json-jackson</artifactId>
    <version>2.31</version>
</dependency>
<dependency>
    <groupId>org.glassfish.jersey.inject</groupId>
    <artifactId>jersey-hk2</artifactId>
    <version>2.31</version>
</dependency>
参 考
https://www.jetbrains.com/help/idea/creating-and-running-your-first-restful-web-service.html
https://blog.csdn.net/D1237890/article/details/151363196?spm=1011.2415.3001.5331


 109
109

 被折叠的 条评论
为什么被折叠?
被折叠的 条评论
为什么被折叠?
 到【灌水乐园】发言


