


显示用户面板信息
现在登录成功可以显示标签列表和问题列表
以及用户面板信息中的昵称,但是不能显示提问数等其他信息
现在来实现显示这些信息
提供问题数量的业务的服务提供者应该是faq模块
用户信息面板是用户相关的内容调用者是sys模块
这就需要Ribbon了
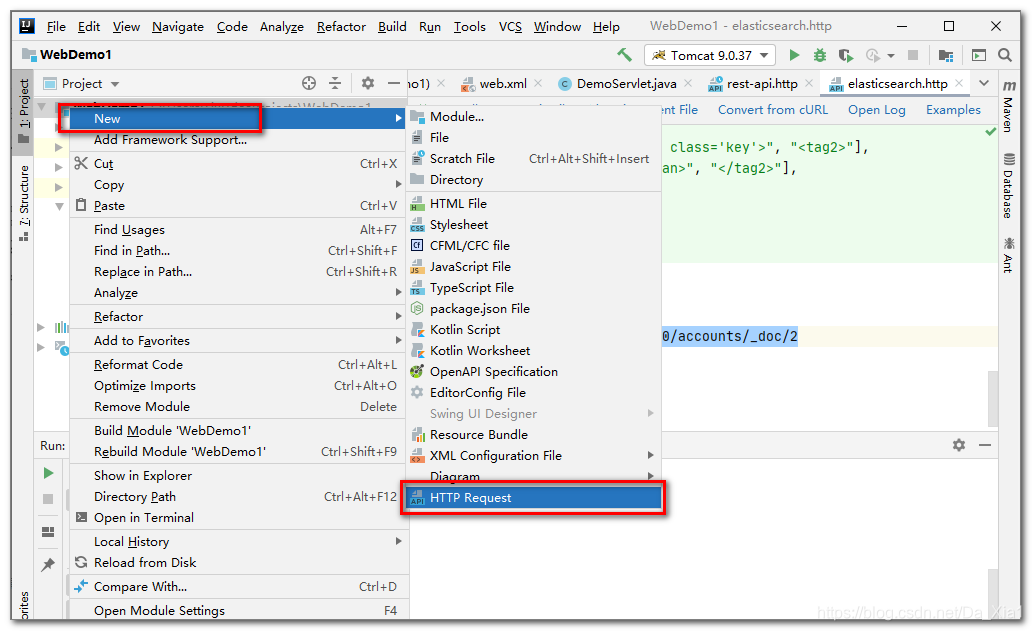
步骤1:
在faq模块的QuestionController中添加返回用户问题数的方法
	//按用户id返回该用户问题数
    @GetMapping("/count")
    public Integer count(Integer userId){
        return questionService.countQuestionsByUserId(userId);
    }
步骤2:
确认sys模块的主方法中有RestTemplate的注入
代码如下
	@Bean
    @LoadBalanced
    public RestTemplate restTemplate(){
        return new RestTemplate();
    }
步骤3:
sys模块中UserServiceImpl类中的currentUserVo方法修改如下
@Autowired
    RestTemplate restTemplate;
    @Override
    public UserVo currentUserVo(String username) {
        UserVo user=userMapper.findUserVoByUsername(username);
        String url="http://faq-service/v1/questions/count?userId={1}";
        Integer count=restTemplate.getForObject(
                url,Integer.class,user.getId());
        user.setQuestions(count);
        //问题收藏数暂时不做
        return user;
    }
开始迁移学生提问功能
create.html中编写了学生的提问功能,所以我们先让create.html能够访问
gateway模块中HomeController来编写访问这个页面的代码
//访问学生提问页面的方法
    @GetMapping("/question/create.html")
    public ModelAndView create(){
        return new ModelAndView("question/create");
    }
因为学生提问页面需要所有老师和所有标签的方法
又因为查询所有标签是faq自身的业务,但是查询所有老师是sys模块的功能
所以我们要再sys模块中提供一个查询所有老师的方法,供faq调用
sys模块中UserController中添加方法:
@GetMapping("/masters")
    public R<List<cn.tedu.straw.commons.model.User>> masters(){
        List<cn.tedu.straw.commons.model.User>
                list=userService.getMasters();
        return R.ok(list);
    }
转到faq模块
为faq模块添加统一异常处理,这次可以直接复制portal项目中的ExceptionControllerAdvice类
复制到conroller包
转到gateway模块
js/createQuestion.js中有多个ajax请求
重构将这些请求指向正确的路径
查询所有标签的loadTags
url:"/faq/v1/tags",
查询所有老师的loadTeachers
url:"/sys/v1/users/masters",
保存问题的createQuestion
url:"/faq/v1/questions",
测试发布问题(别加图片)
迁移文件上载
上面的提问之所以不能加图片
是因为我们还没有处理文件上载的功能
下面开始迁移
将单体项目中SystemController中涉及文件上传的代码
复制到resource项目中添加的ImageController中
同时迁移统一异常处理类

ImageController中需要commons的支持
添加pom.xml文件依赖
<dependency>
    <groupId>cn.tedu</groupId>
    <artifactId>straw-commons</artifactId>
</dependency>
ImageController最终代码如下
修改了资源路径和PostMapping的路径
注意:保证 s p r i n g . r e s o u r c e s . s t a t i c − l o c a t i o n s 和 {spring.resources.static-locations}和 spring.resources.static−locations和{straw.resource.host}确实在application.properties文件中有配置!
@RestController
@RequestMapping("/v1/images")
@Slf4j
public class ImageController {
    //下面两个属性值来自application.properties配置文件
    @Value("${spring.resources.static-locations}")
    private File resourcePath;
    @Value("${straw.resource.host}")
    private String resourceHost;

    //接收表单上传的文件
    @PostMapping
    public R<String> upload(MultipartFile imageFile) throws IOException {

        //按照当前日期创建文件夹
        String path= DateTimeFormatter.ofPattern("yyyy/MM/dd")
                .format(LocalDate.now());
        //path="2020/12/16"
        File folder=new File(resourcePath,path);
        //folder->F:/resource/2020/12/16
        folder.mkdirs();//创建一串文件夹带s的!!!!
        log.debug("上传的文件夹为:{}",folder.getAbsolutePath());
        //按照上传文件的原始文件名,保留扩展名xx.xx.jpg
        //                              012345678
        String fileName=imageFile.getOriginalFilename();
        String ext=fileName.substring(fileName.lastIndexOf("."));
        //使用UUID生成文件名
        String name= UUID.randomUUID().toString()+ext;
        log.debug("生成的文件名:{}",name);
        //F:/resource/2020/12/16/uuid.jpg
        File file=new File(folder,name);
        //向硬盘写入文件
        imageFile.transferTo(file);
        //直接返回路径方便调用测试
        String url=resourceHost+"/"+path+"/"+name;
        log.debug("访问这个文件的路径为:{}",url);
        return R.ok(url);
    }
}
因为今后上线,网关的ip和端口号是访问本项目的唯一入口,所以访问resource项目的资源也要从这个入口进入,这样就要求我们修改8899的端口为9000/resource才行
resource模块的application.properties文件内容为:
server.port=8899
spring.application.name=resource-server

spring.resources.static-locations=file:F:/resource
straw.resource.host=http://localhost:9000/resource
最后要修改一下ajax的请求路径
create.html文件最后的部分
url:"/resource/v1/images",
测试文件上传
开始迁移回答与评论
问题详情页detail.html页面的迁移
首先我们不急于迁移html ,先从数据访问层开始
迁移数据访问层

需要注意AnswerMapper.xml文件中的全类名路径要修改3处
<?xml version="1.0" encoding="UTF-8"?>
<!DOCTYPE mapper PUBLIC "-//mybatis.org//DTD Mapper 3.0//EN" "http://mybatis.org/dtd/mybatis-3-mapper.dtd">
<mapper namespace="cn.tedu.straw.faq.mapper.AnswerMapper">

    <!-- 通用查询映射结果 -->
    <resultMap id="answerCommentMap" type="cn.tedu.straw.commons.model.Answer">
        <id column="id" property="id"/>
        <result column="content" property="content"/>
        <result column="like_count" property="likeCount"/>
        <result column="user_id" property="userId"/>
        <result column="user_nick_name" property="userNickName"/>
        <result column="quest_id" property="questId"/>
        <result column="createtime" property="createtime"/>
        <result column="accept_status" property="acceptStatus"/>
        <collection property="comments" ofType="cn.tedu.straw.commons.model.Comment">
            <id column="comment_id" property="id" />
            <result column="comment_user_id" property="userId" />
            <result column="comment_answer_id" property="answerId" />
            <result column="comment_user_nick_name" property="userNickName" />
            <result column="comment_content" property="content" />
            <result column="comment_createtime" property="createtime" />
        </collection>
    </resultMap>
    <select id="findAnswersByQuestionId" resultMap="answerCommentMap" >
        SELECT
            a.id,
            a.content,
            a.user_id,
            a.user_nick_name,
            a.quest_id,
            a.createtime,
            a.accept_status,
            a.like_count,
            c.id AS comment_id,
            c.user_id AS comment_user_id,
            c.user_nick_name AS comment_user_nick_name,
            c.content AS comment_content,
            c.createtime AS comment_createtime,
            c.answer_id AS comment_answer_id
        FROM answer a
        LEFT JOIN `comment` c
        ON c.answer_id=a.id
        WHERE a.quest_id=#{question_id}
        ORDER BY a.createtime,c.createtime
    </select>
</mapper>
迁移业务逻辑层

将所有包都导入完毕之后,仍然有需要用户信息的方法报错,用户信息需要使用RestTemplate调用
而且两个类都使用,所以我们可以编写一个类来处理共同的需求
创建一个RibboClient类代码如下
@Component
@Slf4j
public class RibbonClient {
    @Resource
    RestTemplate restTemplate;
    public User getUser(String username){
        String url="http://sys-service/v1/auth/user?username={1}";
        User user=restTemplate.getForObject(
                url,User.class,username);
        return user;
    }
    public User[] masters(){
        String url="http://sys-service/v1/users/master";
        User[] users=restTemplate.getForObject(
                url,User[].class);
        return users;
    }
}
然后修改AnswerServiceImpl代码如下
@Service
@Slf4j
public class AnswerServiceImpl extends ServiceImpl<AnswerMapper, Answer> implements IAnswerService {

    @Resource
    private AnswerMapper answerMapper;

    @Autowired
    RibbonClient ribbonClient;
    @Override
    @Transactional
    public Answer saveAnswer(AnswerVo answerVo, String username) {
        //收集信息,先获得当前回答问题的讲师的用户信息,结合answerVo
        //User user=userMapper.findUserByUsername(username);
        User user=ribbonClient.getUser(username);
        Answer answer=new Answer()
                .setUserId(user.getId())
                .setUserNickName(user.getNickname())
                .setContent(answerVo.getContent())
                .setQuestId(answerVo.getQuestionId())
                .setLikeCount(0)
                .setAcceptStatus(0)
                .setCreatetime(LocalDateTime.now());
        int rows=answerMapper.insert(answer);
        if(rows!=1){
            throw new ServiceException("数据库忙!");
        }
        return answer;
    }

    @Override
    public List<Answer> getAnswersByQuestionId(Integer questionId) {
        if(questionId==null){
            throw ServiceException.invalidRequest("问题id不能为空");
        }
        List<Answer> answers=answerMapper.findAnswersByQuestionId(questionId);
        /*QueryWrapper<Answer> query=new QueryWrapper<>();
        query.eq("quest_id",questionId);
        query.orderByAsc("createtime");
        List<Answer> answers=answerMapper.selectList(query);*/
        return answers;

    }

    @Resource
    private QuestionMapper questionMapper;
    @Override
    @Transactional
    public boolean accept(Integer answerId) {
        //查询当前要采纳的answer对象
        Answer answer=answerMapper.selectById(answerId);
        //判断这个answer是不是已经被采纳
        if(answer.getAcceptStatus()==1){
            //如果已经被采纳返回false
            return false;
        }
        //开始执行采纳业务
        answer.setAcceptStatus(1);
        int num=answerMapper.updateStatus(answerId
                ,answer.getAcceptStatus());
        if(num!=1){
            throw ServiceException.busy();
        }
        //修改问题状态为已解决
        num=questionMapper.updateStatus(answer.getQuestId(),
                Question.SOLVED);
        if(num!=1){
            throw ServiceException.busy();
        }
        return true;
    }
}
然后修改CommentServiceImpl代码如下
@Service
@Slf4j
public class CommentServiceImpl extends ServiceImpl<CommentMapper, Comment> implements ICommentService {

    @Resource
    private CommentMapper commentMapper;

    @Resource
    RibbonClient ribbonClient;

    @Override
    public Comment saveComment(CommentVo commentVo, String username) {
        //获得当前登录用户信息
        //User user=userMapper.findUserByUsername(username);
        User user=ribbonClient.getUser(username);
        //构建要新增的评论对象
        Comment comment=new Comment()
                .setUserId(user.getId())
                .setUserNickName(user.getNickname())
                .setAnswerId(commentVo.getAnswerId())
                .setContent(commentVo.getContent())
                .setCreatetime(LocalDateTime.now());
        int num=commentMapper.insert(comment);
        if(num!=1){
            throw ServiceException.busy();
        }
        return comment;
    }

    @Override
    public boolean removeComment(Integer commentId, String username) {
        //User user=userMapper.findUserByUsername(username);
        User user=ribbonClient.getUser(username);
        System.out.println("user:"+user);
        System.out.println("type:"+user.getType());
        //判断身份
        if(user.getType()!=null&&user.getType()==1){
            //如果是老师,可以删除
            int num=commentMapper.deleteById(commentId);
            return num == 1;
        }
        //不是老师要删除评论,要判断这个评论是不是当前登录用户发布的
        //那么就获得这个评论的对象
        Comment comment=commentMapper.selectById(commentId);
        //判断要删除的评论的发布者的id是不是当前登录用户的id
        if(comment.getUserId()==user.getId()){
            //是同一用户,可以删除
            int num=commentMapper.deleteById(commentId);
            return num == 1;
        }
        throw ServiceException.invalidRequest("权限不足");
    }

    @Override
    @Transactional
    public Comment updateComment(Integer commentId,
                                 CommentVo commentVo, String username) {
        //获得登录用户信息
        //User user=userMapper.findUserByUsername(username);
        User user=ribbonClient.getUser(username);
        //获得要修改的评论信息
        Comment comment=commentMapper.selectById(commentId);
        //判断修改权限
        if((user.getType()!=null&&user.getType()==1)
                || comment.getUserId()==user.getId()){
            //权限允许,开始修改,修改只能改内容
            comment.setContent(commentVo.getContent());
            int num=commentMapper.updateById(comment);
            if(num != 1){
                throw ServiceException.busy();
            }
            return comment;
        }
        throw ServiceException.invalidRequest("权限不足");
    }
}
迁移控制层

按照上面的图片将两个控制器类复制到faq模块
完成控制层的迁移
转到gateway模块
在HomeController中编写代码
根据不同用户的身份跳转不同页面
 	//显示首页
    @GetMapping("/question/detail.html")
    public ModelAndView detail(
            @AuthenticationPrincipal User user){
        if(user.getAuthorities().contains(STUDENT)){
            return  new ModelAndView(
                    "question/detail");
        }else if(user.getAuthorities().contains(TEACHER)){
            return new ModelAndView(
                    "question/detail_teacher");
        }
        return null;
    }
在js/question_detail.js和js/post_answer.js文件中
将所有请求修改正确(主要是添加路由名称)
js/question_detail.js中:

url: '/faq/v1/questions/'+questionId,

url: '/faq/v1/answers/question/'+questionId,

url: '/faq/v1/comments',

url: '/faq/v1/comments/'+commentId+'/delete',

url: '/faq/v1/comments/'+commentId+'/update',

url:'/faq/v1/answers/'+answerId+"/solved",

js/post_answer.js中:

url: '/faq/v1/answers',
然后就可以测试了~
祝大家好运
Elasticsearch 实现搜索
Elasticsearch 概述
-
Elasticsearch意思为"富有弹性的搜索",简称ES
是java编写的全文索引库或搜索引擎
基于Lucene现在和市场上的mongoDB分庭抗礼,还有一个火过的Solr软件也是做搜索的
ES和Lucene的关系类似电脑(ES)和芯片(Lucene)
-
ES是将数据库中指定的表中的数据复制到硬盘上,并实施索引的创建
为什么需要ES
我们要先了解一下数据库的天生弱点
当我们需要在一个表中按照某个列查询下面sql语句时
SELECT * FROM question WHERE content LIKE ‘%Java%’
上面的查询可以实现查询效果,但是查询效率非常低,因为不能使用数据库自带的任何索引
所以数据库只要模糊查询以%开头的条件时,都会出现这个问题
如果需要解决这个问题就需要全文搜索引擎
实际上ES就是这种软件
它能够在上面的情况下仍然保持较快的查询效率
ES的运行存储原理

开始运行ES
ES是java开发的,所以你的电脑要有Java的运行环境
解压完运行bin/elasticsearch.bat文件即可运行程序
如果是mac或Linux系统启动代码如下
mac
tar -xvf elasticsearch-7.6.2-darwin-x86_64.tar.gz
cd elasticsearch-7.6.2/bin
./elasticsearch
linux
tar -xvf elasticsearch-7.6.2-linux-x86_64.tar.gz
cd elasticsearch-7.6.2/bin
./elasticsearch
运行开始之后不要关闭窗口!!!
ES默认端口号9200
打开浏览器输入localhost:9200看到信息就表示运行成功!
创建straw-search项目
创建search模块,用于后续的ES搜索
父子相认
使用Idea提供的工具来访问ES

安装IK分词插件
文档中的文字需要被正确分词才能高效的保存在索引库中,
ES默认是不识别中文的,无法对中文进行正确的分词
首先安装中文分词器

下面来看一下效果
运行代码
POST http://localhost:9200/_analyze
Content-Type: application/json

{
  "analyzer": "ik_smart",
  "text": "好好学习天天向上"
}
反馈结果
{
  "tokens": [
    {
      "token": "好好学习",
      "start_offset": 0,
      "end_offset": 4,
      "type": "CN_WORD",
      "position": 0
    },
    {
      "token": "天天向上",
      "start_offset": 4,
      "end_offset": 8,
      "type": "CN_WORD",
      "position": 1
    }
  ]
}
运行代码
POST http://localhost:9200/_analyze
Content-Type: application/json

{
  "analyzer": "ik_max_word",
  "text": "好好学习天天向上"
}
反馈结果
{
  "tokens": [
    {
      "token": "好好学习",
      "start_offset": 0,
      "end_offset": 4,
      "type": "CN_WORD",
      "position": 0
    },
    {
      "token": "好好学",
      "start_offset": 0,
      "end_offset": 3,
      "type": "CN_WORD",
      "position": 1
    },
    {
      "token": "好好",
      "start_offset": 0,
      "end_offset": 2,
      "type": "CN_WORD",
      "position": 2
    },
    {
      "token": "好学",
      "start_offset": 1,
      "end_offset": 3,
      "type": "CN_WORD",
      "position": 3
    },
    {
      "token": "学习",
      "start_offset": 2,
      "end_offset": 4,
      "type": "CN_WORD",
      "position": 4
    },
    {
      "token": "天天向上",
      "start_offset": 4,
      "end_offset": 8,
      "type": "CN_WORD",
      "position": 5
    },
    {
      "token": "天天",
      "start_offset": 4,
      "end_offset": 6,
      "type": "CN_WORD",
      "position": 6
    },
    {
      "token": "向上",
      "start_offset": 6,
      "end_offset": 8,
      "type": "CN_WORD",
      "position": 7
    }
  ]
}
可以看到不同的分析器分析结果不同
ik_smart:简单的分析,大段的词汇
ik_max_word:最大化的分析,大段小段词汇都有
ik_max_word虽然详细,但是更占空间,也不是越细越好
使用简单命令操作ES
使用分享给大家的Es文档中的命令
一个ES软件可以创建多个索引(index)
就像一个mysql可以创建多个数据库一样
下面就按文档操作数据即可!
SpringBoot整合ES操作
SpringBoot项目添加依赖
使用ES的客户端不方便,因为返回的结果是Json格式
而java要想使用json格式还需要转换,而这个过程是需要编写代码的
SpringBoot整合ES以后,将这个过程封装了,我们可以更简单的使用ES
在straw-search模块中添加pom依赖
<dependency>
    <groupId>org.springframework.boot</groupId>
    <artifactId>spring-boot-starter-data-elasticsearch</artifactId>
</dependency>
修改application.properties文件
spring.elasticsearch.rest.uris=http://localhost:9200

server.port=8066

logging.level.cn.tedu.straw.search=debug
# 设置ES内部的日志输出门槛
logging.level.org.elasticsearch.client.RestClient=debug;
配置完毕可以测试
测试类中编写代码
@SpringBootTest
class StrawSearchApplicationTests {

    @Resource
    ElasticsearchOperations elasticsearchOperations;
    @Test
    void contextLoads() {
        System.out.println(elasticsearchOperations);
    }

}
运行结果不出错即可
下面开始实际操作和查询一些文档
步骤1:
创建一个实体类用于操作
@Data
@Accessors(chain = true)
@AllArgsConstructor
@NoArgsConstructor
@Document(indexName = "items")
public class Item {

    @Id
    private Long id;

    @Field(type = FieldType.Text,analyzer = "ik_smart"
            ,searchAnalyzer = "ik_smart")
    private String title;
    @Field(type=FieldType.Keyword)
    private String category;
    @Field(type=FieldType.Keyword)
    private String brand;
    @Field(type=FieldType.Double)
    private Double price;
    @Field(type=FieldType.Keyword,index=false)
    private String images;

}
步骤2:
和MybatisPlus类似,我们只需要编写一个接口,Spring就会自动按照接口中方法的声明生成实现类用于操作ES使用
所以编码相对简单
先创建这个接口
代码如下
public interface ItemRepository extends
        ElasticsearchRepository<Item,Long> {
}
步骤3:
有了上面接口的编写
我们就可以获得这个接口的对象,来操作ES了
测试代码如下
 	//新增文档
 	@Resource
    ItemRepository itemRepository;
    @Test
    void addItem(){
        Item item=new Item(1L,"华为Mate40","手机"
                ,"华为",4890.0,"/image/11.jpg");
        itemRepository.save(item);
    }

	//查询文档
    @Test
    void getById(){
        Object item=itemRepository.findById(1L);
        System.out.println(item);
    }


 266
266


 被折叠的 条评论
为什么被折叠?
被折叠的 条评论
为什么被折叠?
 到【灌水乐园】发言


