


内容概述
今天学习的是mindspore的张量Tensor
打卡
张量
张量(Tensor)是一个可用来表示在一些矢量、标量和其他张量之间的线性关系的多线性函数,这些线性关系的基本例子有内积、外积、线性映射以及笛卡儿积。其坐标在 𝑛 维空间内,有 n r n^r nr个分量的一种量,其中每个分量都是坐标的函数,而在坐标变换时,这些分量也依照某些规则作线性变换。𝑟称为该张量的秩或阶(与矩阵的秩和阶均无关系)。
——来自MindSpore教程
在MindSpore中的张量有3种,一种普通的保存所有元素的Tensor和两种稀疏Tensor:CSRTensor(Compressed Sparse Row)和COOTensor(Cooridinate Format)。
一般情况下都用的是普通Tensor,在一些数据特征稀疏的情况下会用到稀疏张量,来减少计算、存储和通讯开销。
张量实操
创建张量
# 导入必要的库
import numpy as np
import mindspore
from mindspore import ops
from mindspore import Tensor, CSRTensor, COOTensor

# 根据数据直接生成
data = [1, 0, 1, 0]
x_data = Tensor(data)
print(x_data, x_data.shape, x_data.dtype)

# 从numpy数组生成
np_array = np.array(data)
x_np = Tensor(np_array)
print(x_np, x_np.shape, x_np.dtype)

# 使用init初始化器构造
from mindspore.common.initializer import One, Normal
# Initialize a tensor with ones
tensor1 = mindspore.Tensor(shape=(2, 2), dtype=mindspore.float32, init=One())
# Initialize a tensor from normal distribution
tensor2 = mindspore.Tensor(shape=(2, 2), dtype=mindspore.float32, init=Normal())

# 继承另一个张量的属性,形成新的张量
from mindspore import ops
x_ones = ops.ones_like(x_data)
x_zeros = ops.zeros_like(x_data)
张量的属性
x = Tensor(np.array([[1, 2], [3, 4]]), mindspore.int32)

print("x_shape:", x.shape)	# 形状
print("x_dtype:", x.dtype)	# 数据类型
print("x_itemsize:", x.itemsize)	# 单个元素所占字节数
print("x_nbytes:", x.nbytes)	# 占用的总字节数
print("x_ndim:", x.ndim)	# 维度,也就是张量的秩
print("x_size:", x.size)	# 所有元素个数,是一个整数
print("x_strides:", x.strides)	# 每一维的字节数
张量索引
与numpy类似
tensor = Tensor(np.array([[0, 1], [2, 3]]).astype(np.float32))

print("First row: {}".format(tensor[0]))
print("value of bottom right corner: {}".format(tensor[1, 1]))
print("Last column: {}".format(tensor[:, -1]))
print("First column: {}".format(tensor[..., 0]))
张量运算
算术运算
x = Tensor(np.array([1, 2, 3]), mindspore.float32)
y = Tensor(np.array([4, 5, 6]), mindspore.float32)

output_add = x + y
output_sub = x - y
output_mul = x * y
output_div = y / x
output_mod = y % x
output_floordiv = y // x

print("add:", output_add)
print("sub:", output_sub)
print("mul:", output_mul)
print("div:", output_div)
print("mod:", output_mod)
print("floordiv:", output_floordiv)
concat:在指定维度上拼接多个张量
data1 = Tensor(np.array([[0, 1], [2, 3]]).astype(np.float32))
data2 = Tensor(np.array([[4, 5], [6, 7]]).astype(np.float32))
output = ops.concat((data1, data2), axis=0)
stack应该是在前面多加一维叠起来
data1 = Tensor(np.array([[0, 1], [2, 3]]).astype(np.float32))
data2 = Tensor(np.array([[4, 5], [6, 7]]).astype(np.float32))
output = ops.stack([data1, data2])
Tensor与Numpy互转
t = Tensor([1., 1., 1., 1., 1.])
n = t.asnumpy()

n = np.ones(5)
t = Tensor.from_numpy(n)
稀疏张量的创建
这里简单看一下就好,COO好理解,CSR稍微复杂一点。
CSR Tensor
indptr = Tensor([0, 1, 2])
indices = Tensor([0, 1])
values = Tensor([1, 2], dtype=mindspore.float32)
shape = (2, 4)

# Make a CSRTensor
csr_tensor = CSRTensor(indptr, indices, values, shape)

print(csr_tensor.astype(mindspore.float64).dtype)
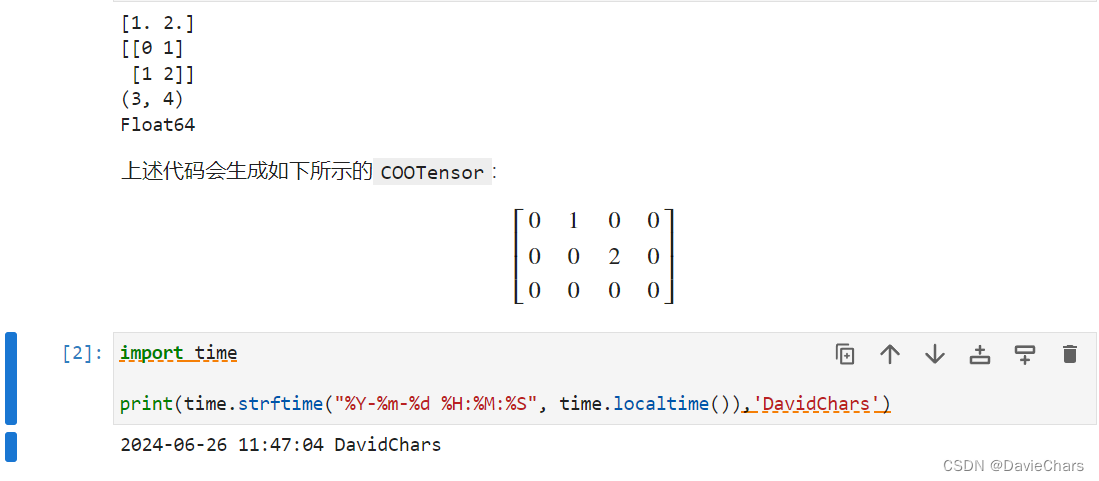
COO Tensor
indices = Tensor([[0, 1], [1, 2]], dtype=mindspore.int32)
values = Tensor([1, 2], dtype=mindspore.float32)
shape = (3, 4)

# Make a COOTensor
coo_tensor = COOTensor(indices, values, shape)

print(coo_tensor.values)
print(coo_tensor.indices)
print(coo_tensor.shape)
print(coo_tensor.astype(mindspore.float64).dtype)  # COOTensor to float64
学习心得
今天学习了张量的概念、MindSpore中张量的创建、运算、与Numpy互转等。MindSpore中既有稠密张量也有稀疏张量,基本上可以满足各种模型和场景的需要。


 946
946

 被折叠的 条评论
为什么被折叠?
被折叠的 条评论
为什么被折叠?
 到【灌水乐园】发言


