


好久没写博客了,要深刻检讨下!前言:
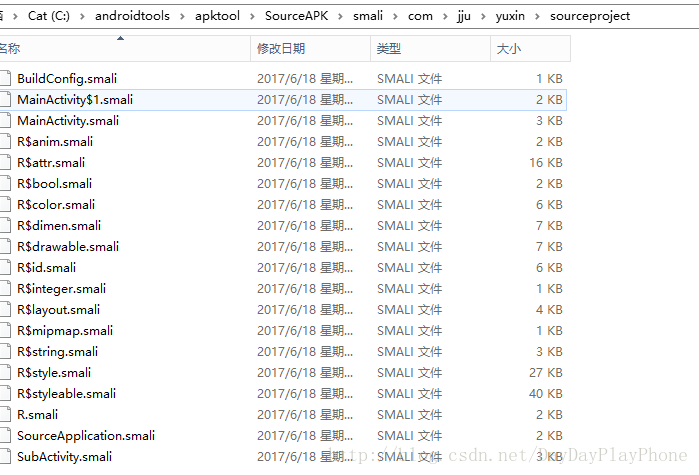
在Android中没有经过加密的Apk给人的感觉就是在裸奔,通过apktool,dex2jar,AndroidKill等各式各样的反编译工具就可以轻松的获取其smail代码,如这个叫SourceProject的helloworld程序被apktool反编译后,对于懂smail语法的逆向工程师来说就一览无余了。破解与反破解是相对的,所以我们尽可能的给自己的Apk多穿点衣服。
原理解析
首先我们先来看下Apk加壳的步骤:
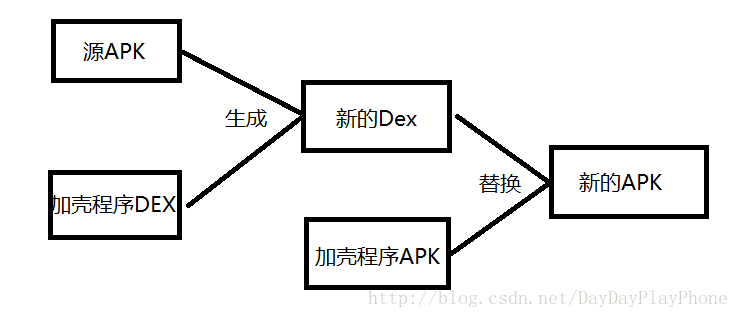
- 源Apk:需要加壳的Apk
- 加密的Apk:源Apk经过加密算法加密后的Apk
- 加壳程序Apk:是有解密源Apk和动态加载启动源Apk的外壳
首先我们拿到需要加壳的源Apk,通过加密算法加密源Apk然后与加壳Apk的dex文件组合成新的Dex文件,然后将加壳程序Apk的Dex文件替换成新的Dex,生成新的Apk重新签名。
我们先来看下Dex文件的结构:
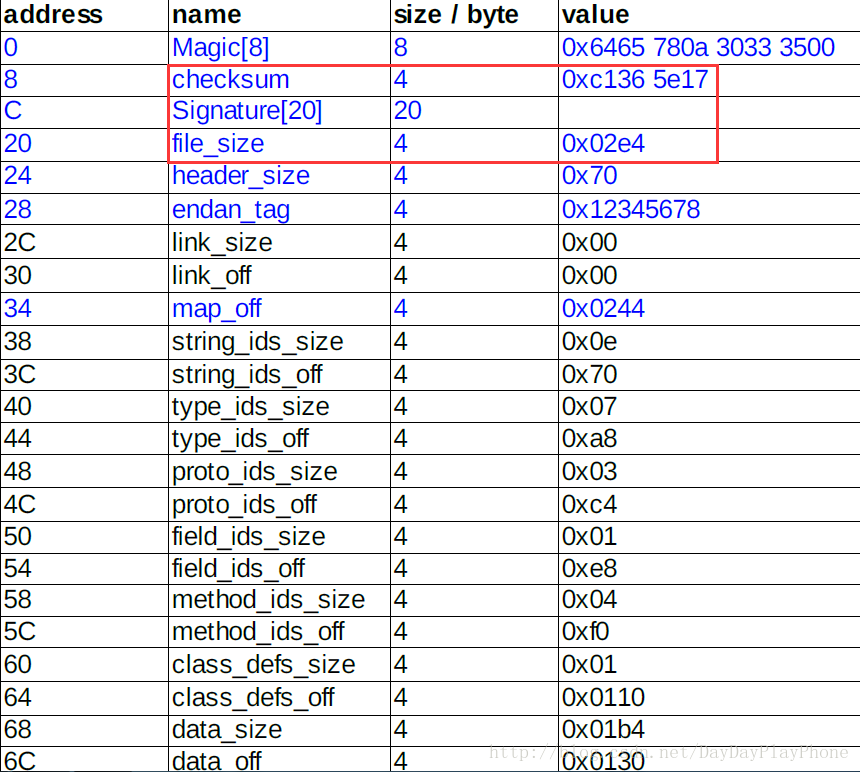
- Magic
Magic数是为了方便虚拟机识别目标文件是否是合格的Dex文件,在Dex文件中magic的值固定值 - checksum
文件校验码 ,使用alder32 算法校验文件除去 maigc ,checksum 外余下的所有文件区域 ,用于检查文件错误 - signature
使用 SHA-1 算法 hash 除去 magic ,checksum 和 signature 外余下的所有文件区域 ,用于唯一识别本文件 。 - file_size
当前Dex 文件的大小 。
所以我们在将Dex与加密算法加密后的Apk合并生成新的Dex后需要修改新Dex文件的这三个值,为了方便从新Dex中获得加密的Apk,我们需要知道加密的Apk的大小,为了方便以后获得,我们将其大小放置在新Dex的后四位,新生成的Dex文件结构:
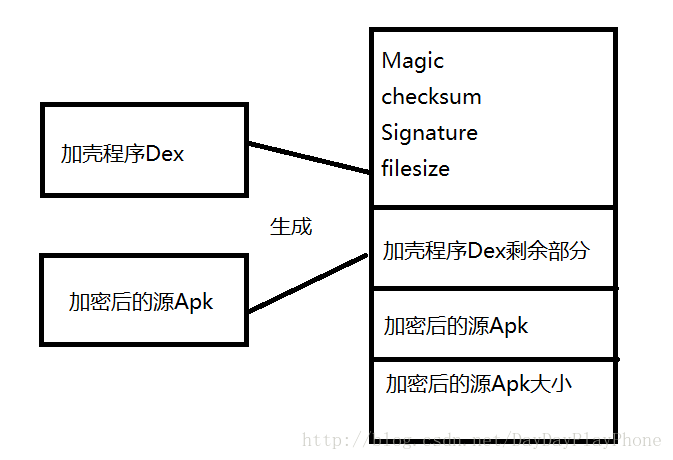
生成新Dex后,将加壳程序Apk的Dex文件替换,重新签名后加壳的Apk即完成了。如果觉得步骤理清了,我们来看下其具体的实现。
具体实现:
这过程一共要创建三个项目。
首先我们先创建一个需要加密的Apk项目,结构非常简单只有几个Log的打印,结构
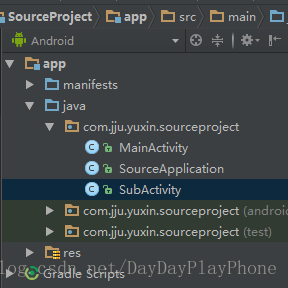
SourceApplication.java
package com.jju.yuxin.sourceproject;
import android.app.Application;
import android.util.Log;

public class SourceApplication extends Application {
    private static final String TAG=SourceApplication.class.getSimpleName();
    @Override
    public void onCreate() {
        super.onCreate();
        Log.d(TAG,"-------------onCreate");
    }
}
MainActivity.java
package com.jju.yuxin.sourceproject;

import android.app.Activity;
import android.content.Intent;
import android.support.v7.app.AppCompatActivity;
import android.os.Bundle;
import android.util.Log;
import android.view.View;
import android.widget.TextView;

public class MainActivity extends Activity {
    private static final String TAG=MainActivity.class.getSimpleName();
    @Override
    protected void onCreate(Bundle savedInstanceState) {
        super.onCreate(savedInstanceState);
        TextView tv_content = new TextView(this);
        tv_content.setText("I am Source Apk");
        tv_content.setOnClickListener(new View.OnClickListener(){
            @Override
            public void onClick(View arg0) {
                Intent intent = new Intent(MainActivity.this, SubActivity.class);
                startActivity(intent);
            }});
        setContentView(tv_content);
        Log.i(TAG, "onCreate:app:"+getApplicationContext());
    }
}
SubActivity.java
package com.jju.yuxin.sourceproject;
import android.app.Activity;
import android.support.v7.app.AppCompatActivity;
import android.os.Bundle;
import android.util.Log;
import android.widget.TextView;

public class SubActivity extends Activity {
    private static final String TAG=SubActivity.class.getSimpleName();
    @Override
    protected void onCreate(Bundle savedInstanceState) {
        super.onCreate(savedInstanceState);
        TextView tv_content = new TextView(this);
        tv_content.setText("I am SubActivity");
        setContentView(tv_content);
        Log.i(TAG, "SubActivity:app:"+getApplicationContext());
    }
}
然后将其打包生成Apk。
第二个项目是一个JAVA项目用于将源Apk加密,并合并加壳程序Dex与加密后的源Apk。在贴出这个代码时我们先不用管加壳程序Dex从何而来,假设已经有了这样一个文件。我们来看下具体实现:
package com.forceapk;

import java.io.ByteArrayOutputStream;
import java.io.File;
import java.io.FileInputStream;
import java.io.FileOutputStream;
import java.io.IOException;
import java.security.MessageDigest;
import java.security.NoSuchAlgorithmException;
import java.util.zip.Adler32;


public class mymain {
    public static void main(String[] args) {
        try {
            //需要加壳的源APK  ,以二进制形式读出,并进行加密处理
            File srcApkFile = new File("force/SourceAPK.apk");
            System.out.println("apk size:"+srcApkFile.length());
            byte[] enSrcApkArray = encrpt(readFileBytes(srcApkFile));

            //需要解壳的dex  以二进制形式读出dex
            File unShellDexFile = new File("force/shelldex.dex");
            byte[] unShellDexArray = readFileBytes(unShellDexFile);

            //将源APK长度和需要解壳的DEX长度相加并加上存放源APK大小的四位得到总长度
            int enSrcApkLen = enSrcApkArray.length;
            int unShellDexLen = unShellDexArray.length;
            int totalLen = enSrcApkLen + unShellDexLen +4;

            //依次将解壳DEX,加密后的源APK,加密后的源APK大小,拼接出新的Dex
            byte[] newdex = new byte[totalLen];
            System.arraycopy(unShellDexArray, 0, newdex, 0, unShellDexLen);
            System.arraycopy(enSrcApkArray, 0, newdex, unShellDexLen, enSrcApkLen);
            System.arraycopy(intToByte(enSrcApkLen), 0, newdex, totalLen-4, 4);


            //修改DEX file size文件头
            fixFileSizeHeader(newdex);
            //修改DEX SHA1 文件头
            fixSHA1Header(newdex);
            //修改DEX CheckSum文件头
            fixCheckSumHeader(newdex);

            //写出
            String str = "force/classes.dex";
            File file = new File(str);
            if (!file.exists()) {
                file.createNewFile();
            }
            FileOutputStream localFileOutputStream = new FileOutputStream(str);
            localFileOutputStream.write(newdex);
            localFileOutputStream.flush();
            localFileOutputStream.close();


        } catch (Exception e) {
            e.printStackTrace();
        }
    }

    //可以修改成自己的加密方法
    private static byte[] encrpt(byte[] srcdata){
        for(int i = 0;i<srcdata.length;i++){
            srcdata[i] = (byte)(0xFF ^ srcdata[i]);
        }
        return srcdata;
    }

    /**
     * 修改dex头,CheckSum 校验码
     * @param dexBytes
     */
    private static void fixCheckSumHeader(byte[] dexBytes) {
        Adler32 adler = new Adler32();
        adler.update(dexBytes, 12, dexBytes.length - 12);//从12到文件末尾计算校验码
        long value = adler.getValue();
        int va = (int) value;
        byte[] newcs = intToByte(va);
        //高位在前,低位在前掉个个
        byte[] recs = new byte[4];
        for (int i = 0; i < 4; i++) {
            recs[i] = newcs[newcs.length - 1 - i];
            System.out.println(Integer.toHexString(newcs[i]));
        }
        System.arraycopy(recs, 0, dexBytes, 8, 4);//效验码赋值(8-11)
        System.out.println(Long.toHexString(value));
        System.out.println();
    }


    /**
     * int 转byte[]
     * @param number
     * @return
     */
    public static byte[] intToByte(int number) {
        byte[] b = new byte[4];
        for (int i = 3; i >= 0; i--) {
            b[i] = (byte) (number % 256);
            number >>= 8;
        }
        return b;
    }

    /**
     * 修改dex头 sha1值
     * @param dexBytes
     * @throws NoSuchAlgorithmException
     */
    private static void fixSHA1Header(byte[] dexBytes)
            throws NoSuchAlgorithmException {
        MessageDigest md = MessageDigest.getInstance("SHA-1");
        md.update(dexBytes, 32, dexBytes.length - 32);//从32为到结束计算sha--1
        byte[] newdt = md.digest();
        System.arraycopy(newdt, 0, dexBytes, 12, 20);//修改sha-1值(12-31)
        //输出sha-1值,可有可无
        String hexstr = "";
        for (int i = 0; i < newdt.length; i++) {
            hexstr += Integer.toString((newdt[i] & 0xff) + 0x100, 16)
                    .substring(1);
        }
        System.out.println(hexstr);
    }

    /**
     * 修改dex头 file_size值
     * @param dexBytes
     */
    private static void fixFileSizeHeader(byte[] dexBytes) {
        //新文件长度
        byte[] newfs = intToByte(dexBytes.length);
        System.out.println(Integer.toHexString(dexBytes.length));
        byte[] refs = new byte[4];
        //高位在前,低位在前掉个个
        for (int i = 0; i < 4; i++) {
            refs[i] = newfs[newfs.length - 1 - i];
            System.out.println(Integer.toHexString(newfs[i]));
        }
        System.arraycopy(refs, 0, dexBytes, 32, 4);//修改(32-35)
    }

    /**
     * 以二进制读出文件内容
     * @param file
     * @return
     * @throws IOException
     */
    private static byte[] readFileBytes(File file) throws IOException {
        byte[] arrayOfByte = new byte[1024];
        ByteArrayOutputStream localByteArrayOutputStream = new ByteArrayOutputStream();
        FileInputStream fis = new FileInputStream(file);
        while (true) {
            int i = fis.read(arrayOfByte);
            if (i != -1) {
                localByteArrayOutputStream.write(arrayOfByte, 0, i);
            } else {
                return localByteArrayOutputStream.toByteArray();
            }
        }
    }
}
我们可以看到程序比较简单和我们之前描述的一样,核心部分就在文件拼接部分和修改三个头信息的部分。
            //依次将解壳DEX,加密后的源APK,加密后的源APK大小,拼接出新的Dex
            byte[] newdex = new byte[totalLen];
            System.arraycopy(unShellDexArray, 0, newdex, 0, unShellDexLen);
            System.arraycopy(enSrcApkArray, 0, newdex, unShellDexLen, enSrcApkLen);
            System.arraycopy(intToByte(enSrcApkLen), 0, newdex, totalLen-4, 4);
//修改DEX file size文件头
fixFileSizeHeader(newdex);
//修改DEX SHA1 文件头
fixSHA1Header(newdex);
//修改DEX CheckSum文件头
fixCheckSumHeader(newdex);我们再来看下第三个项目:
加壳程序,这个程序主要负责将在JAVA项目中加密的源Apk获取及解密,以及动态加载源Apk。项目结构
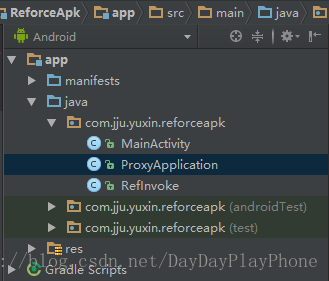
我们看下代码:
package com.jju.yuxin.reforceapk;

import android.app.Application;
import android.app.Instrumentation;
import android.content.Context;
import android.content.pm.ApplicationInfo;
import android.content.pm.PackageManager;
import android.content.res.AssetManager;
import android.content.res.Resources;
import android.os.Bundle;
import android.util.ArrayMap;
import android.util.Log;

import java.io.BufferedInputStream;
import java.io.ByteArrayInputStream;
import java.io.ByteArrayOutputStream;
import java.io.DataInputStream;
import java.io.File;
import java.io.FileInputStream;
import java.io.FileOutputStream;
import java.io.IOException;
import java.lang.ref.WeakReference;
import java.lang.reflect.Method;
import java.util.ArrayList;
import java.util.Iterator;
import java.util.zip.ZipEntry;
import java.util.zip.ZipInputStream;

import dalvik.system.DexClassLoader;

/**
 * =============================================================================
 * Copyright (c) 2017 yuxin All rights reserved.
 * Packname com.jju.yuxin.reforceapk
 * Created by yuxin.
 * Created time 2017/6/18 0018 下午 5:03.
 * Version   1.0;
 * Describe :
 * History:
 * ==============================================================================
 */
public class ProxyApplication extends Application{

    private static final String appkey = "APPLICATION_CLASS_NAME";
    private  static final String TAG=ProxyApplication.class.getSimpleName();
    private String srcApkFilePath;
    private String odexPath;
    private String libPath;
    //以下是加载资源
    protected AssetManager mAssetManager;
    protected Resources mResources;
    protected Resources.Theme mTheme;

    @Override
    protected void attachBaseContext(Context base) {
        super.attachBaseContext(base);
        Log.d(TAG,"----------onCreate");
        try {

            File odex = this.getDir("payload_odex", MODE_PRIVATE);
            File libs = this.getDir("payload_lib", MODE_PRIVATE);
            //用于存放源apk释放出来的dex
            odexPath = odex.getAbsolutePath();
            //用于存放源Apk用到的so文件
            libPath = libs.getAbsolutePath();
            //用于存放解密后的apk
            srcApkFilePath = odex.getAbsolutePath() + "/payload.apk";

            File srcApkFile= new File(srcApkFilePath);
            Log.i("demo", "apk size:"+srcApkFile.length());

            //第一次加载
            if (!srcApkFile.exists())
            {
                Log.i("demo", "isFirstLoading");
                srcApkFile.createNewFile();
                //拿到dex文件
                byte[] dexdata = this.readDexFileFromApk();
                //取出源APK解密后放置在/payload.apk,及其so文件放置在payload_lib/下
                this.splitPayLoadFromDex(dexdata);
            }

            // 配置动态加载环境
            //反射获取主线程对象,并从中获取所有已加载的package信息,并中找到当前的LoadApk对象的弱引用
            Object currentActivityThread = RefInvoke.invokeStaticMethod(
                    "android.app.ActivityThread", "currentActivityThread",
                    new Class[] {}, new Object[] {});
            String packageName = this.getPackageName();
            ArrayMap mPackages = (ArrayMap) RefInvoke.getFieldOjbect(
                    "android.app.ActivityThread", currentActivityThread,
                    "mPackages");
            WeakReference wr = (WeakReference) mPackages.get(packageName);

            //创建一个新的DexClassLoader用于加载源Apk,
            // 传入apk路径,dex释放路径,so路径,及父节点的DexClassLoader使其遵循双亲委托模型
            DexClassLoader dLoader = new DexClassLoader(srcApkFilePath, odexPath,
                    libPath, (ClassLoader) RefInvoke.getFieldOjbect(
                    "android.app.LoadedApk", wr.get(), "mClassLoader"));

            //getClassLoader()等同于 (ClassLoader) RefInvoke.getFieldOjbect()
            //但是为了替换掉父节点我们需要通过反射来获取并修改其值
            Log.i(TAG,"父classloader:"+(ClassLoader) RefInvoke.getFieldOjbect(
                    "android.app.LoadedApk", wr.get(), "mClassLoader"));
            //将父节点DexClassLoader替换
            RefInvoke.setFieldOjbect("android.app.LoadedApk", "mClassLoader",
                    wr.get(), dLoader);

            Log.i(TAG,"子classloader:"+dLoader);

            try{
                //尝试加载源Apk的MainActivity
                Object actObj = dLoader.loadClass("com.jju.yuxin.sourceproject.MainActivity");

                Log.i(TAG, "SrcApk_MainActivity:"+actObj);
            }catch(Exception e){
                Log.i(TAG, "LoadSrcActivityErr:"+Log.getStackTraceString(e));
            }


        } catch (Exception e) {
            Log.i(TAG, "error:"+Log.getStackTraceString(e));
            e.printStackTrace();
        }
    }


    public void onCreate() {

            //加载源apk资源
            //loadResources(srcApkFilePath);

            Log.i(TAG, "--------onCreate");
            //获取配置在清单文件的源Apk的Application路劲
            String appClassName = null;
            try {
                ApplicationInfo ai = this.getPackageManager()
                        .getApplicationInfo(this.getPackageName(),
                                PackageManager.GET_META_DATA);
                Bundle bundle = ai.metaData;
                if (bundle != null && bundle.containsKey("APPLICATION_CLASS_NAME")) {
                    appClassName = bundle.getString("APPLICATION_CLASS_NAME");//className 是配置在xml文件中的。
                } else {
                    Log.i(TAG, "have no application class name");
                    return;
                }
            } catch (PackageManager.NameNotFoundException e) {
                Log.i(TAG, "error:"+Log.getStackTraceString(e));
                e.printStackTrace();
            }

            //获取当前壳Apk的ApplicationInfo
            Object currentActivityThread = RefInvoke.invokeStaticMethod(
                    "android.app.ActivityThread", "currentActivityThread",
                    new Class[] {}, new Object[] {});
            Object mBoundApplication = RefInvoke.getFieldOjbect(
                    "android.app.ActivityThread", currentActivityThread,
                    "mBoundApplication");
            Object loadedApkInfo = RefInvoke.getFieldOjbect(
                    "android.app.ActivityThread$AppBindData",
                    mBoundApplication, "info");
            //将LoadedApk中的ApplicationInfo设置为null
            RefInvoke.setFieldOjbect("android.app.LoadedApk", "mApplication",
                    loadedApkInfo, null);

            //获取currentActivityThread中注册的Application
            Object oldApplication = RefInvoke.getFieldOjbect(
                    "android.app.ActivityThread", currentActivityThread,
                    "mInitialApplication");

            //获取ActivityThread中所有已注册的Application,并将当前壳Apk的Application从中移除
            ArrayList<Application> mAllApplications = (ArrayList<Application>) RefInvoke
                    .getFieldOjbect("android.app.ActivityThread",
                            currentActivityThread, "mAllApplications");
            mAllApplications.remove(oldApplication);

            ApplicationInfo appinfo_In_LoadedApk = (ApplicationInfo) RefInvoke
                    .getFieldOjbect("android.app.LoadedApk", loadedApkInfo,
                            "mApplicationInfo");

            ApplicationInfo appinfo_In_AppBindData = (ApplicationInfo) RefInvoke
                    .getFieldOjbect("android.app.ActivityThread$AppBindData",
                            mBoundApplication, "appInfo");
            //替换原来的Application
            appinfo_In_LoadedApk.className = appClassName;
            appinfo_In_AppBindData.className = appClassName;

            //注册Application
            Application app = (Application) RefInvoke.invokeMethod(
                    "android.app.LoadedApk", "makeApplication", loadedApkInfo,
                    new Class[] { boolean.class, Instrumentation.class },
                    new Object[] { false, null });

            //替换ActivityThread中的Application
            RefInvoke.setFieldOjbect("android.app.ActivityThread",
                    "mInitialApplication", currentActivityThread, app);

            ArrayMap mProviderMap = (ArrayMap) RefInvoke.getFieldOjbect(
                    "android.app.ActivityThread", currentActivityThread,
                    "mProviderMap");

            Iterator it = mProviderMap.values().iterator();
            while (it.hasNext()) {
                Object providerClientRecord = it.next();
                Object localProvider = RefInvoke.getFieldOjbect(
                        "android.app.ActivityThread$ProviderClientRecord",
                        providerClientRecord, "mLocalProvider");
                RefInvoke.setFieldOjbect("android.content.ContentProvider",
                        "mContext", localProvider, app);
            }

            Log.i(TAG, "Srcapp:"+app);

            app.onCreate();

    }


    private void splitPayLoadFromDex(byte[] shelldexdata) throws IOException {
        int sdlen = shelldexdata.length;
        //取被加壳apk的长度
        byte[] dexlen = new byte[4];
        System.arraycopy(shelldexdata, sdlen - 4, dexlen, 0, 4);
        ByteArrayInputStream bais = new ByteArrayInputStream(dexlen);
        DataInputStream in = new DataInputStream(bais);
        int readInt = in.readInt();
        Log.d(TAG,"Integer.toHexString(readInt):"+Integer.toHexString(readInt));

        //取出apk
        byte[] ensrcapk = new byte[readInt];
        System.arraycopy(shelldexdata, sdlen - 4 - readInt, ensrcapk, 0, readInt);

        //对源程序Apk进行解密
        byte[]  srcapk = decrypt(ensrcapk);

        //写入源apk文件
        File file = new File(srcApkFilePath);
        try {
            FileOutputStream localFileOutputStream = new FileOutputStream(file);
            localFileOutputStream.write(srcapk);
            localFileOutputStream.close();
        } catch (IOException localIOException) {
            throw new RuntimeException(localIOException);
        }

        //分析源apk文件
        ZipInputStream localZipInputStream = new ZipInputStream(
                new BufferedInputStream(new FileInputStream(file)));

        while (true) {
            ZipEntry localZipEntry = localZipInputStream.getNextEntry();
            if (localZipEntry == null) {
                localZipInputStream.close();
                break;
            }
            //依次取出被加壳apk用到的so文件,放到 libPath中(data/data/包名/payload_lib)
            String name = localZipEntry.getName();
            if (name.startsWith("lib/") && name.endsWith(".so")) {
                File storeFile = new File(libPath + "/"
                        + name.substring(name.lastIndexOf('/')));
                storeFile.createNewFile();
                FileOutputStream fos = new FileOutputStream(storeFile);
                byte[] arrayOfByte = new byte[1024];
                while (true) {
                    int i = localZipInputStream.read(arrayOfByte);
                    if (i == -1)
                        break;
                    fos.write(arrayOfByte, 0, i);
                }
                fos.flush();
                fos.close();
            }
            localZipInputStream.closeEntry();
        }
        localZipInputStream.close();
    }


    /**
     * 拿到自己apk文件中的dex文件
     * @return
     * @throws IOException
     */
    private byte[] readDexFileFromApk() throws IOException {
        ByteArrayOutputStream dexByteArrayOutputStream = new ByteArrayOutputStream();

        ZipInputStream localZipInputStream = new ZipInputStream(
                new BufferedInputStream(new FileInputStream(
                        this.getApplicationInfo().sourceDir)));

        while (true) {
            ZipEntry localZipEntry = localZipInputStream.getNextEntry();
            if (localZipEntry == null) {
                localZipInputStream.close();
                break;
            }
            //拿到dex文件
            if (localZipEntry.getName().equals("classes.dex")) {
                byte[] arrayOfByte = new byte[1024];
                while (true) {
                    int i = localZipInputStream.read(arrayOfByte);
                    if (i == -1)
                        break;
                    dexByteArrayOutputStream.write(arrayOfByte, 0, i);
                }
            }
            localZipInputStream.closeEntry();
        }
        localZipInputStream.close();
        return dexByteArrayOutputStream.toByteArray();
    }


    // //直接返回数据,读者可以添加自己解密方法
    private byte[] decrypt(byte[] srcdata) {
        for(int i=0;i<srcdata.length;i++){
            srcdata[i] = (byte)(0xFF ^ srcdata[i]);
        }
        return srcdata;
    }


    protected void loadResources(String srcApkPath) {
        //创建一个AssetManager放置源apk的资源
        try {
            AssetManager assetManager = AssetManager.class.newInstance();
            Method addAssetPath = assetManager.getClass().getMethod("addAssetPath", String.class);
            addAssetPath.invoke(assetManager, srcApkPath);
            mAssetManager = assetManager;
        } catch (Exception e) {
            Log.i(TAG, "inject:loadResource error:"+Log.getStackTraceString(e));
            e.printStackTrace();
        }
        Resources superRes = super.getResources();
        superRes.getDisplayMetrics();
        superRes.getConfiguration();
        mResources = new Resources(mAssetManager, superRes.getDisplayMetrics(),superRes.getConfiguration());
        mTheme = mResources.newTheme();
        mTheme.setTo(super.getTheme());
    }

    @Override
    public AssetManager getAssets() {
        return mAssetManager == null ? super.getAssets() : mAssetManager;
    }

    @Override
    public Resources getResources() {
        return mResources == null ? super.getResources() : mResources;
    }

    @Override
    public Resources.Theme getTheme() {
        return mTheme == null ? super.getTheme() : mTheme;
    }

}
这个文件比较长我们来依次分析:
            //第一次加载
            if (!srcApkFile.exists())
            {
                Log.i("demo", "isFirstLoading");
                srcApkFile.createNewFile();
                //拿到dex文件
                byte[] dexdata = this.readDexFileFromApk();
                //取出源APK解密后放置在/payload.apk,及其so文件放置在payload_lib/下
                this.splitPayLoadFromDex(dexdata);
            }
通过判断用于存放解密后的源Apk文件是否存在来判断是否是第一次加载。第一次加载时通过readDexFileFromApk()来获取当前Apk的Dex文件
    /**
     * 拿到自己apk文件中的dex文件
     * @return
     * @throws IOException
     */
    private byte[] readDexFileFromApk() throws IOException {
        ByteArrayOutputStream dexByteArrayOutputStream = new ByteArrayOutputStream();

        ZipInputStream localZipInputStream = new ZipInputStream(
                new BufferedInputStream(new FileInputStream(
                        this.getApplicationInfo().sourceDir)));

        while (true) {
            ZipEntry localZipEntry = localZipInputStream.getNextEntry();
            if (localZipEntry == null) {
                localZipInputStream.close();
                break;
            }
            //拿到dex文件
            if (localZipEntry.getName().equals("classes.dex")) {
                byte[] arrayOfByte = new byte[1024];
                while (true) {
                    int i = localZipInputStream.read(arrayOfByte);
                    if (i == -1)
                        break;
                    dexByteArrayOutputStream.write(arrayOfByte, 0, i);
                }
            }
            localZipInputStream.closeEntry();
        }
        localZipInputStream.close();
        return dexByteArrayOutputStream.toByteArray();
    }
然后通过this.splitPayLoadFromDex();将当前Dex分解,从中获取源Apk并将其解密,以及源Apk的so库
 private void splitPayLoadFromDex(byte[] shelldexdata) throws IOException {
        int sdlen = shelldexdata.length;
        //取被加壳apk的长度
        byte[] dexlen = new byte[4];
        System.arraycopy(shelldexdata, sdlen - 4, dexlen, 0, 4);
        ByteArrayInputStream bais = new ByteArrayInputStream(dexlen);
        DataInputStream in = new DataInputStream(bais);
        int readInt = in.readInt();
        Log.d(TAG,"Integer.toHexString(readInt):"+Integer.toHexString(readInt));

        //取出apk
        byte[] ensrcapk = new byte[readInt];
        System.arraycopy(shelldexdata, sdlen - 4 - readInt, ensrcapk, 0, readInt);

        //对源程序Apk进行解密
        byte[]  srcapk = decrypt(ensrcapk);

        //写入源apk文件
        File file = new File(srcApkFilePath);
        try {
            FileOutputStream localFileOutputStream = new FileOutputStream(file);
            localFileOutputStream.write(srcapk);
            localFileOutputStream.close();
        } catch (IOException localIOException) {
            throw new RuntimeException(localIOException);
        }

        //分析源apk文件
        ZipInputStream localZipInputStream = new ZipInputStream(
                new BufferedInputStream(new FileInputStream(file)));

        while (true) {
            ZipEntry localZipEntry = localZipInputStream.getNextEntry();
            if (localZipEntry == null) {
                localZipInputStream.close();
                break;
            }
            //依次取出被加壳apk用到的so文件,放到 libPath中(data/data/包名/payload_lib)
            String name = localZipEntry.getName();
            if (name.startsWith("lib/") && name.endsWith(".so")) {
                File storeFile = new File(libPath + "/"
                        + name.substring(name.lastIndexOf('/')));
                storeFile.createNewFile();
                FileOutputStream fos = new FileOutputStream(storeFile);
                byte[] arrayOfByte = new byte[1024];
                while (true) {
                    int i = localZipInputStream.read(arrayOfByte);
                    if (i == -1)
                        break;
                    fos.write(arrayOfByte, 0, i);
                }
                fos.flush();
                fos.close();
            }
            localZipInputStream.closeEntry();
        }
        localZipInputStream.close();
    }
然后通过动态加载机制将加壳程序的ClassLoader替换成他的子ClassLoader这样确保既能加载自己的Class又能加载源Apk的Class
核心代码,如果这段代码不是很懂,你可能需要去了解Java反射,Android中Classloader的双亲委托模型,以及动态加载机制
            DexClassLoader dLoader = new DexClassLoader(srcApkFilePath, odexPath,
                    libPath, (ClassLoader) RefInvoke.getFieldOjbect(
                    "android.app.LoadedApk", wr.get(), "mClassLoader"));
然后在Application的onCreate()中替换LoadApk以及ActivityThread中的Application,希望更清楚的明白这点需要了解下Android中Activity以及Application的启动流程,其中在加壳程序的清单文件中我们配置了源Apk的相关信息以便能找到他们
    <application
        android:allowBackup="true"
        android:icon="@mipmap/ic_launcher"
        android:label="@string/app_name"
        android:supportsRtl="true"
        android:name=".ProxyApplication"
        android:theme="@style/AppTheme">
        <meta-data
            android:name="APPLICATION_CLASS_NAME"
            android:value="com.jju.yuxin.sourceproject.SourceApplication"/>

        <activity android:name="com.jju.yuxin.sourceproject.MainActivity">
            <intent-filter>
                <action android:name="android.intent.action.MAIN"/>

                <category android:name="android.intent.category.LAUNCHER"/>
            </intent-filter>
        </activity>
        <activity android:name="com.jju.yuxin.sourceproject.SubActivity">
        </activity>
    </application>
实现操作流程:
先将源Apk的项目生成Apk,放置到JAVA项目中
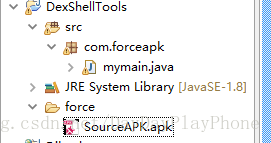
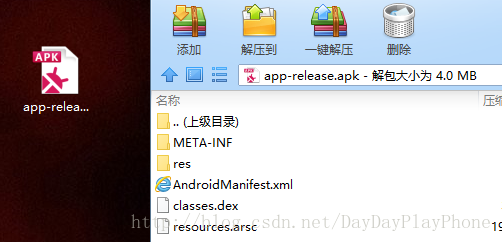
将加壳程序也生成Apk,通过直接将apk后缀名改成zip的方式获取到classes.dex,(最好复制一份,这个后面还要用)。将classes.dex改名成shelldex.dex放置到JAVA项目中
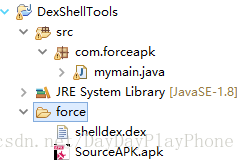
运行JAVA项目,将生成新的Dex文件classes.dex,将新生成的classes.dex替换加壳Apk的classes.dex(通过解压软件直接拖放进去替换即可)
最后cd到apktool的目录下,使用apktool中的jarsigner对应用重新签名即可,重新签名指令
jarsigner -verbose -keystore 签名文件路径 -storepass 密码 -keypass 密码 -sigfile CERT -digestalg SHA1 -sigalg MD5withRSA -signedjar 签名后生成Apk路径 需要签名Apk路径 签名文件别名
//例如:jarsigner -verbose -keystore yuxin.jks -storepass 123456 -keypass 123456 -sigfile CERT -digestalg SHA1 -sigalg MD5withRSA -signedjar ReforceApk_des.apk reforce.apk yuxin这三个项目的Github地址(项目地址)
常见错误:
ClassNotFoundException:
这个错误主要注意:Class路径拼写有没错,加密Apk能否正确的转为源Apk,还有就是ClassLoader有没用错
Class ref in pre-verified class resolved to unexpected
implementation:
这是类被重复加载的错误,需要检查报错的类是否被别的ClassLoder已经加载过了,我的Activity在继承android.support.v7.app.AppCompatActivity时候报了这个错误,改成Activity就好了,原因还没去找。


 2402
2402


 被折叠的 条评论
为什么被折叠?
被折叠的 条评论
为什么被折叠?
 到【灌水乐园】发言


