


 本文详细介绍了OAuth2中令牌颁发的流程与实现机制,包括授权码模式、客户端凭证模式及刷新令牌模式的具体操作过程。
上一篇介绍了客户端认证处理,那是令牌颁发的前提。这篇开始,我们就来研究下令牌颁发。
令牌颁发
授权服务器提供令牌颁发接口(/oauth2/token),由客户端发起请求,授权服务器生成访问令牌(access_token)返回,客户端使用此令牌才能去调用资源服务器的接口。
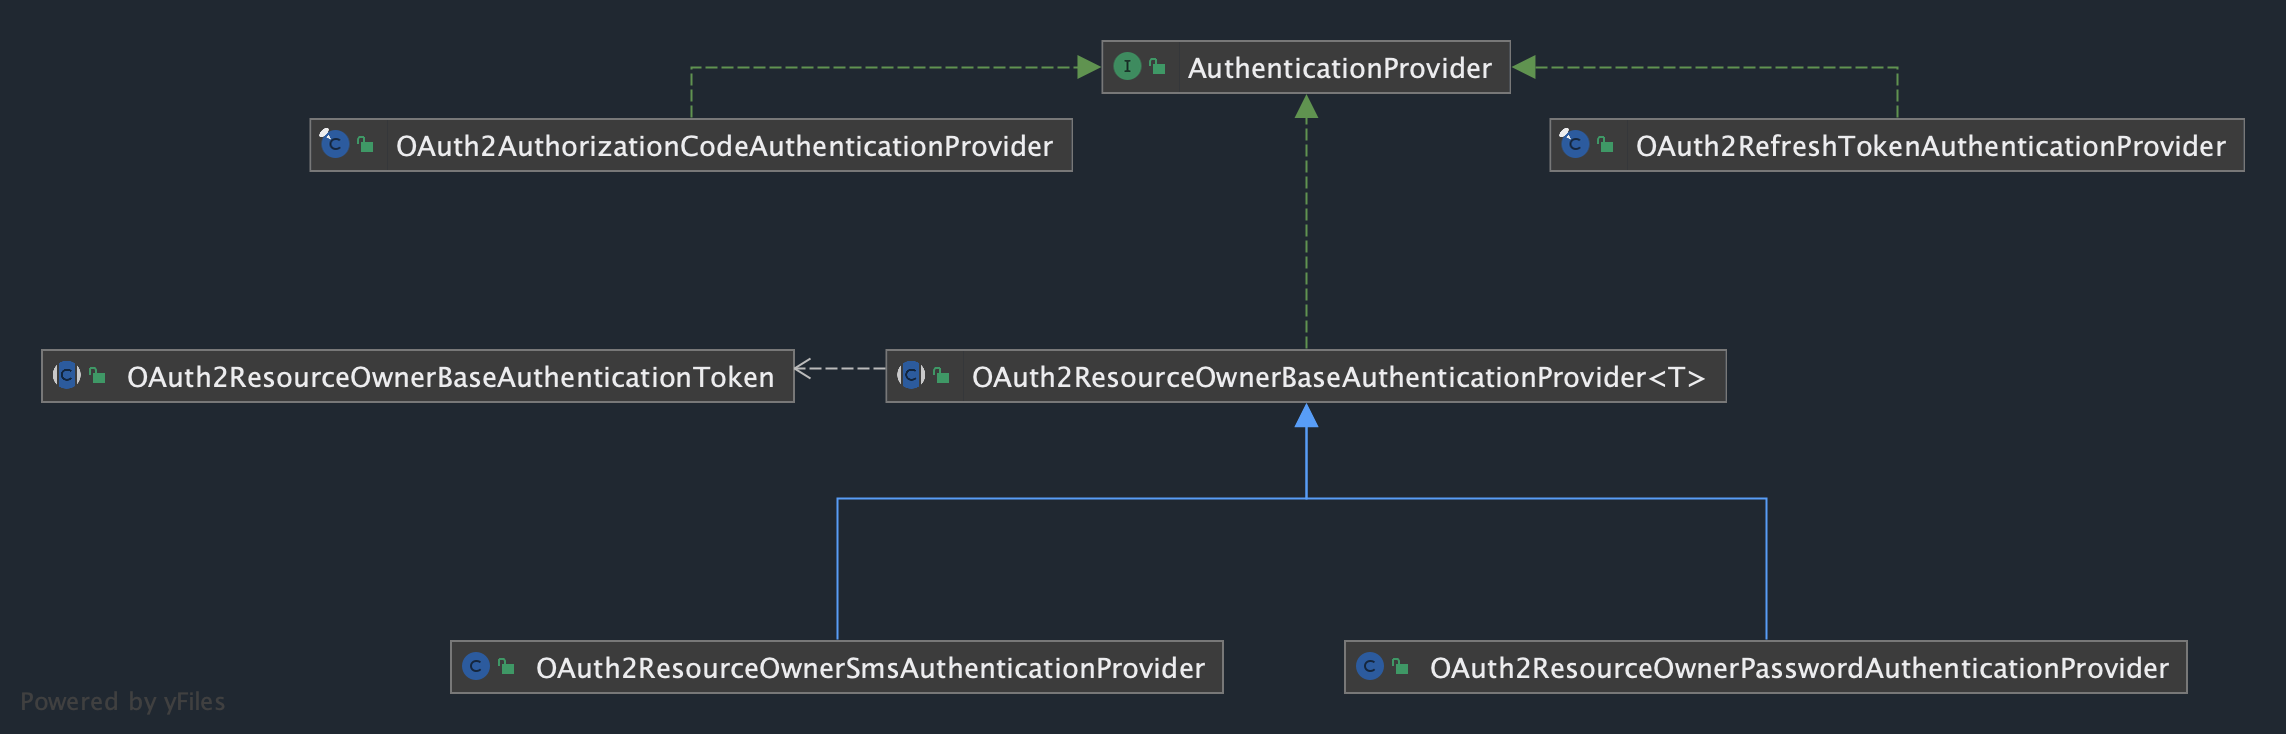
Spring Authorization Server 目前支持如下三种令牌颁发策略:Authorization Code、Client Credentials、Refresh Token,分别对应 授权码模式、客户端凭证模式、刷新令牌模式。
Authorization Code(授权码模式)
客户端访问授权链接,用户授权,客户端获得授权码code,通过code获取令牌
-
传参
- grant_type:固定值 authorization_code
- code:授权码
-
核心类
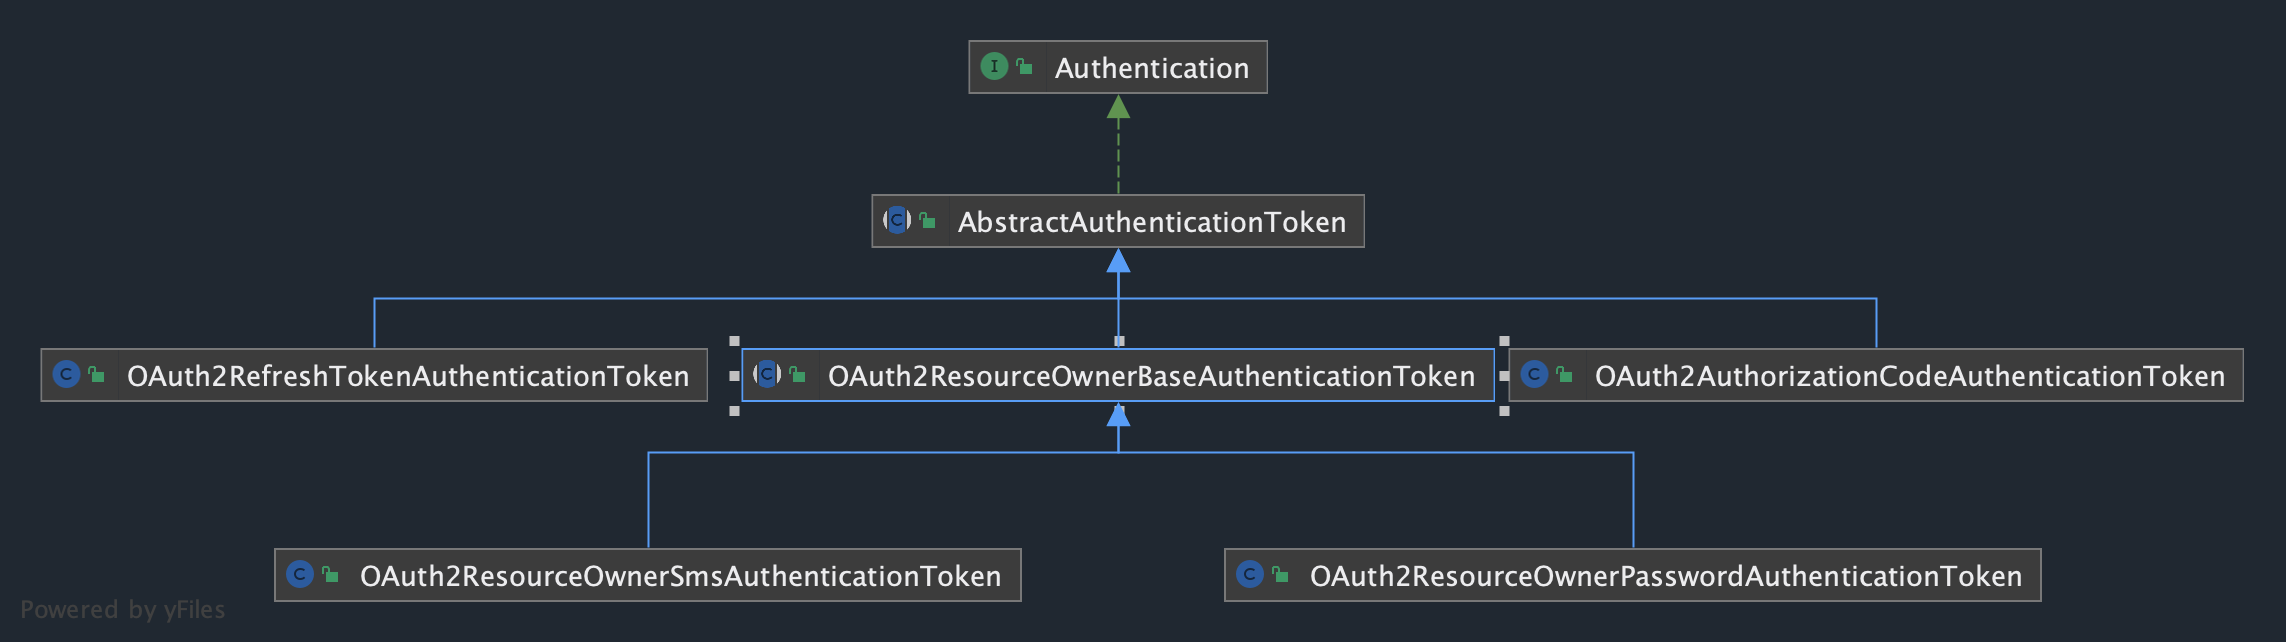
- OAuth2AuthorizationCodeAuthenticationConverter
- OAuth2AuthorizationCodeAuthenticationProvider
Client Credentials(客户端凭证模式)
- 传参
- grant_type:固定值 client_credentials
- 核心类
- OAuth2ClientCredentialsAuthenticationConverter
- OAuth2ClientCredentialsAuthenticationProvider
Refresh Token(刷新令牌模式)
当客户端支持刷新令牌时,授权服务器颁发访问令牌(access_token)时会同时颁发刷新令牌(refresh_token),客户端可以使用刷新令牌重新获取访问令牌。(由于访问令牌时效比较短,刷新令牌时效比较长,通过刷新令牌获取访问令牌,避免多次授权)
- 传参
- grant_type:固定值 refresh_token
- refresh_token:刷新令牌
- 核心类
- OAuth2RefreshTokenAuthenticationConverter
- OAuth2RefreshTokenAuthenticationProvider
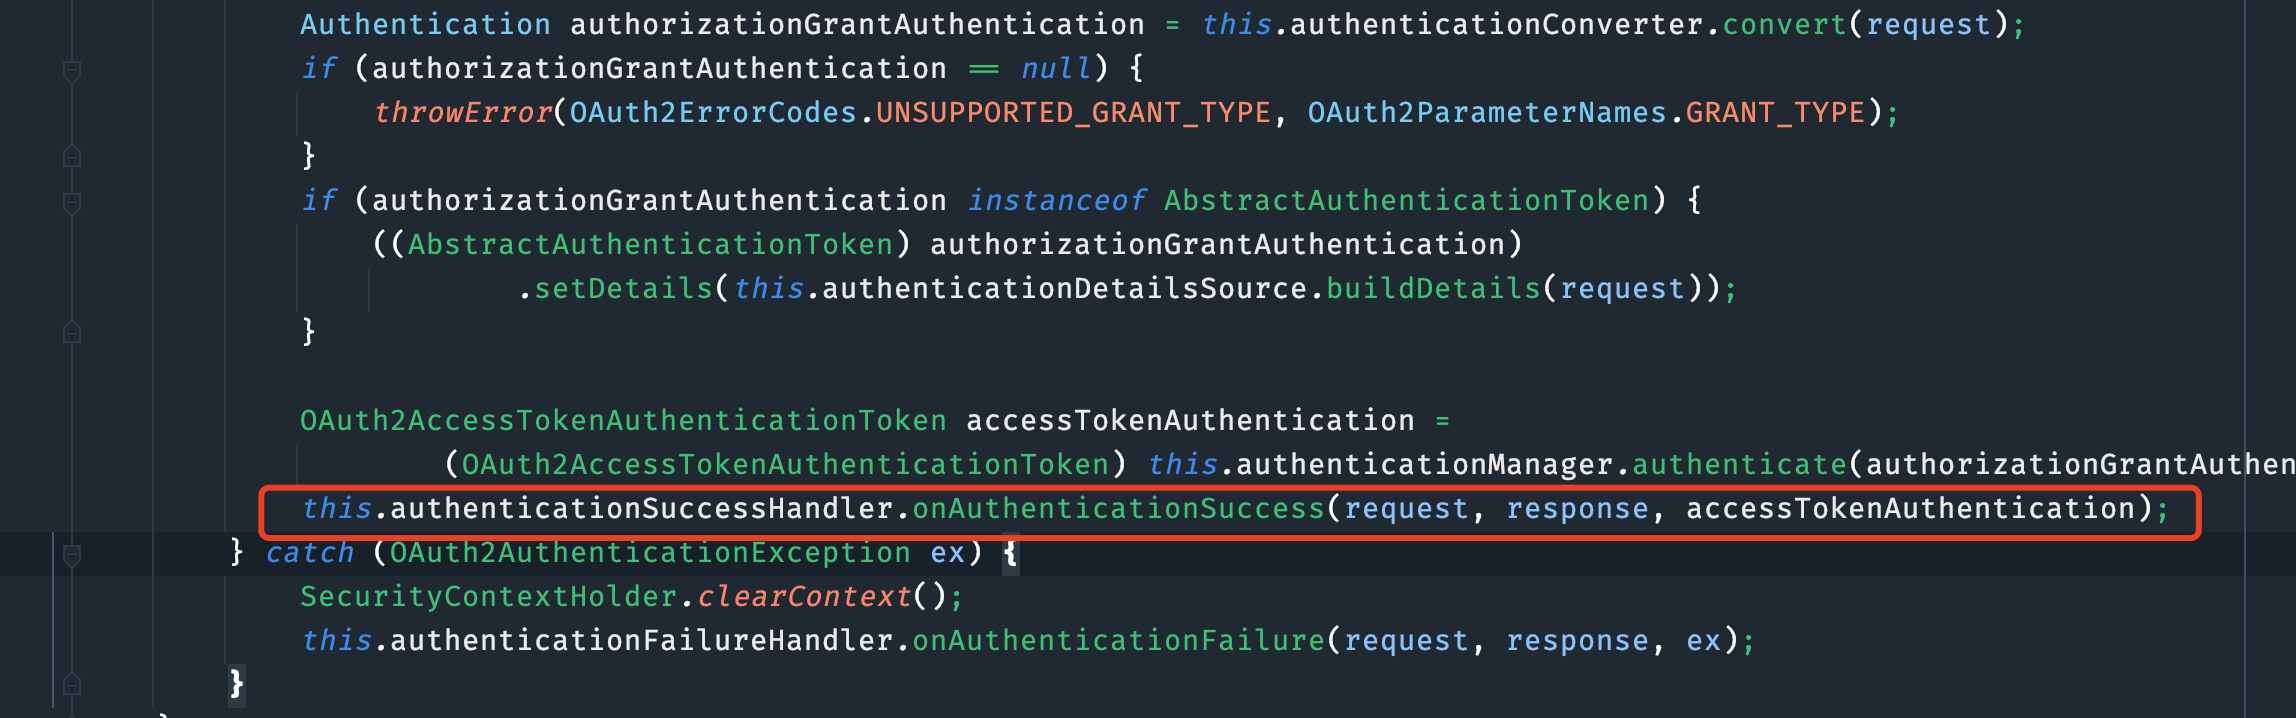
OAuth2TokenEndpointFilter
实现令牌颁发功能的拦截器就是 OAuth2TokenEndpointFilter。OAuth2TokenEndpointFilter 会接收通过上文 OAuth2ClientAuthenticationFilter 客户端认证的请求,其核心代码如下:
@Override
	protected void doFilterInternal(HttpServletRequest request, HttpServletResponse response, FilterChain filterChain)
			throws ServletException, IOException {
        //step1
		if (!this.tokenEndpointMatcher.matches(request)) {
			filterChain.doFilter(request, response);
			return;
		}

		try {
			String[] grantTypes = request.getParameterValues(OAuth2ParameterNames.GRANT_TYPE);
			if (grantTypes == null || grantTypes.length != 1) {
				throwError(OAuth2ErrorCodes.INVALID_REQUEST, OAuth2ParameterNames.GRANT_TYPE);
			}
        //step2
			Authentication authorizationGrantAuthentication = this.authenticationConverter.convert(request);
			if (authorizationGrantAuthentication == null) {
				throwError(OAuth2ErrorCodes.UNSUPPORTED_GRANT_TYPE, OAuth2ParameterNames.GRANT_TYPE);
			}
			if (authorizationGrantAuthentication instanceof AbstractAuthenticationToken) {
				((AbstractAuthenticationToken) authorizationGrantAuthentication)
						.setDetails(this.authenticationDetailsSource.buildDetails(request));
			}
        //step3
			OAuth2AccessTokenAuthenticationToken accessTokenAuthentication =
					(OAuth2AccessTokenAuthenticationToken) this.authenticationManager.authenticate(authorizationGrantAuthentication);
        //step4
			this.authenticationSuccessHandler.onAuthenticationSuccess(request, response, accessTokenAuthentication);
		} catch (OAuth2AuthenticationException ex) {
			SecurityContextHolder.clearContext();
			this.authenticationFailureHandler.onAuthenticationFailure(request, response, ex);
		}
	}
step1.判断此次请求是否是 “令牌颁发” 请求,若是,则继续授权模式检验,否则跳过
step2.解析请求中的参数,构建成一个 Authentication(组装登陆认证对象)
step3.认证管理器对 Authentication 进行认证
step4.到这一步说明access_token生成好了, 将access_token和相关信息响应给请求方。
客户端认证 OAuth2ClientAuthenticationFilter 中也正是用的这种实现套路。将不同实现策略抽象为 AuthenticationConverter 和 AuthenticationProvider 接口。每种策略实际上就是一个 AuthenticationConverter 实现类 加上一个 AuthenticationProvider实现类。
组装认证对象
Authentication authorizationGrantAuthentication = this.authenticationConverter.convert(request);
AuthenticationConverter 会根据请求中的参数和授权类型组装成对应的授权认证对象。
授权认证调用
OAuth2AccessTokenAuthenticationToken accessTokenAuthentication =
					(OAuth2AccessTokenAuthenticationToken) this.authenticationManager.authenticate(authorizationGrantAuthentication);
在OAuth2ResourceOwnerBaseAuthenticationProvider中
认证逻辑
	Authentication usernamePasswordAuthentication = authenticationManager
					.authenticate(usernamePasswordAuthenticationToken);
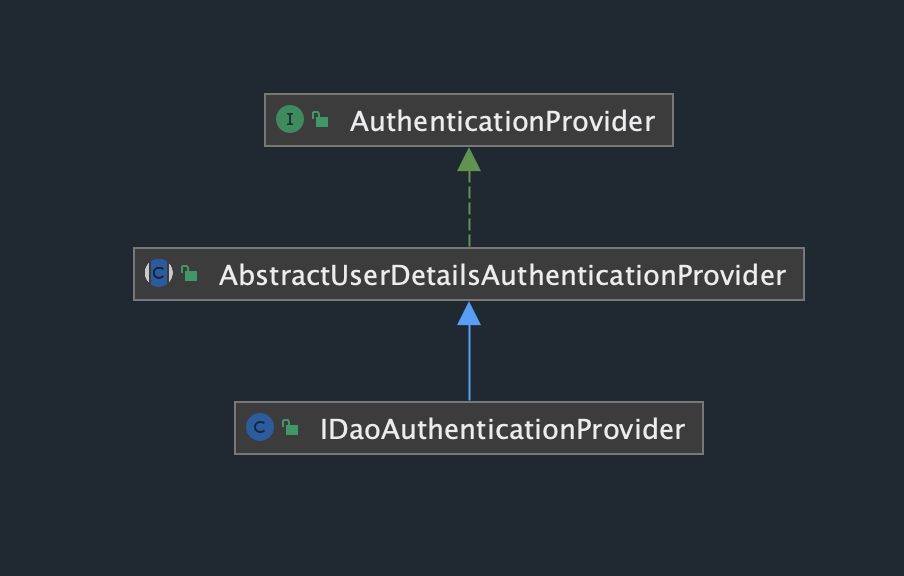
根据认证方法传入的参数判定进入到AbstractUserDetailsAuthenticationProvider
@Override
	public Authentication authenticate(Authentication authentication) throws AuthenticationException {
		Assert.isInstanceOf(UsernamePasswordAuthenticationToken.class, authentication,
				() -> this.messages.getMessage("AbstractUserDetailsAuthenticationProvider.onlySupports",
						"Only UsernamePasswordAuthenticationToken is supported"));
		String username = determineUsername(authentication);
		boolean cacheWasUsed = true;
		UserDetails user = this.userCache.getUserFromCache(username);
		if (user == null) {
			cacheWasUsed = false;
			try {
				user = retrieveUser(username, (UsernamePasswordAuthenticationToken) authentication);
			}
			catch (UsernameNotFoundException ex) {
				this.logger.debug("Failed to find user '" + username + "'");
				if (!this.hideUserNotFoundExceptions) {
					throw ex;
				}
				throw new BadCredentialsException(this.messages
						.getMessage("AbstractUserDetailsAuthenticationProvider.badCredentials", "Bad credentials"));
			}
			Assert.notNull(user, "retrieveUser returned null - a violation of the interface contract");
		}
		try {
			this.preAuthenticationChecks.check(user);
			additionalAuthenticationChecks(user, (UsernamePasswordAuthenticationToken) authentication);
		}
		catch (AuthenticationException ex) {
			if (!cacheWasUsed) {
				throw ex;
			}
			// There was a problem, so try again after checking
			// we're using latest data (i.e. not from the cache)
			cacheWasUsed = false;
			user = retrieveUser(username, (UsernamePasswordAuthenticationToken) authentication);
			this.preAuthenticationChecks.check(user);
			additionalAuthenticationChecks(user, (UsernamePasswordAuthenticationToken) authentication);
		}
		this.postAuthenticationChecks.check(user);
		if (!cacheWasUsed) {
			this.userCache.putUserInCache(user);
		}
		Object principalToReturn = user;
		if (this.forcePrincipalAsString) {
			principalToReturn = user.getUsername();
		}
		return createSuccessAuthentication(principalToReturn, authentication, user);
	}
查询用户信息
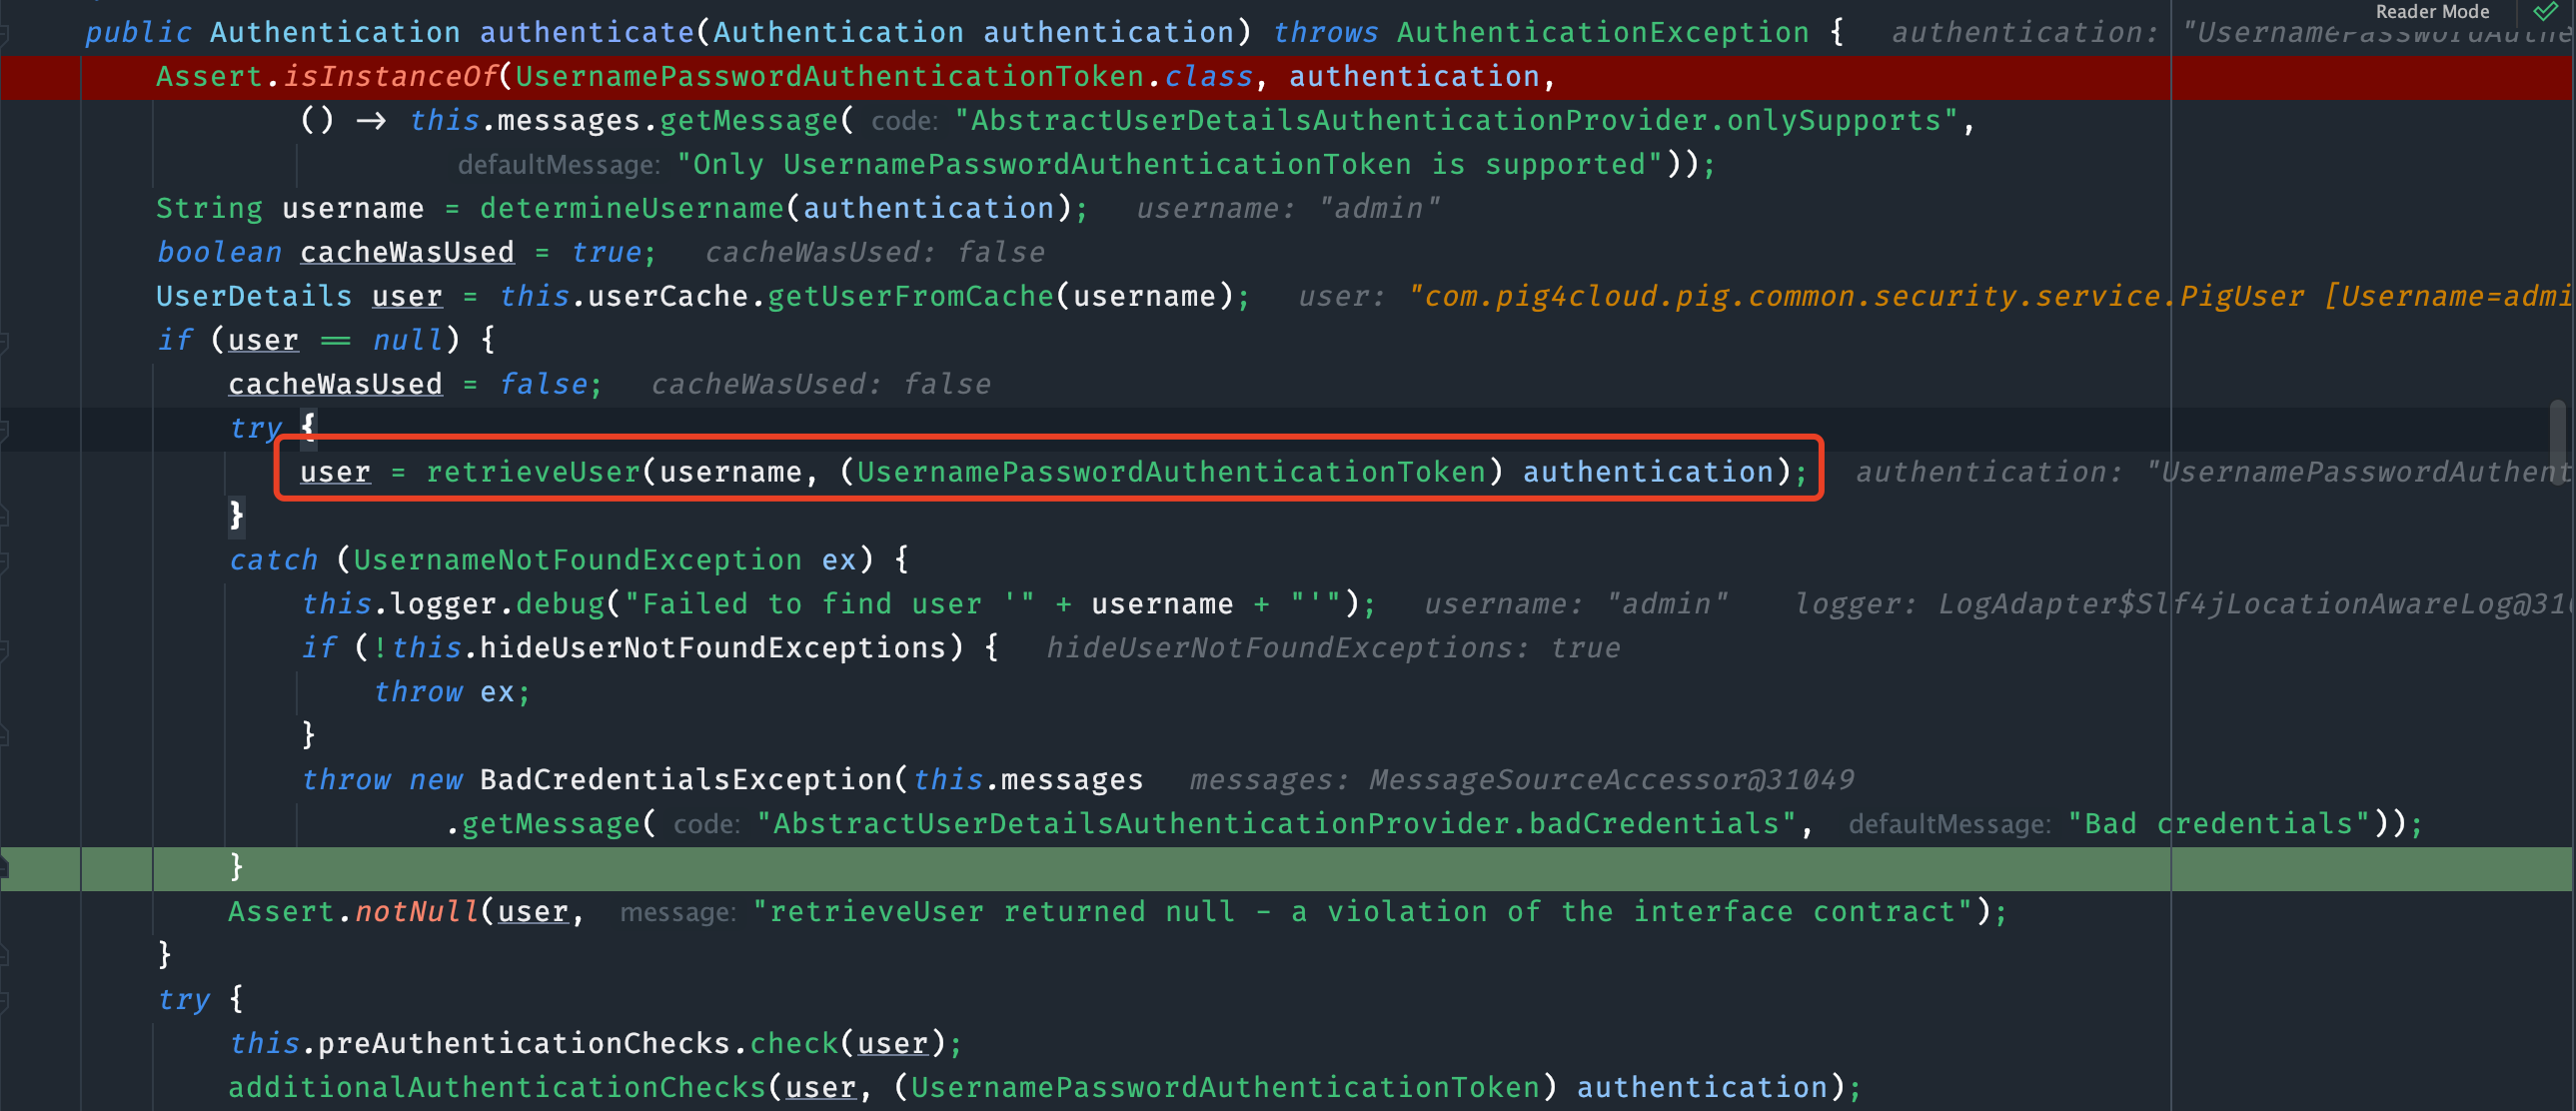
retrieveUser方法
protected abstract UserDetails retrieveUser(String username, UsernamePasswordAuthenticationToken authentication)
			throws AuthenticationException;
PigDaoAuthenticationProvider继承了AbstractUserDetailsAuthenticationProvider并重写
retrieveUser方法。返回值为UserDetails。
用户密码校验
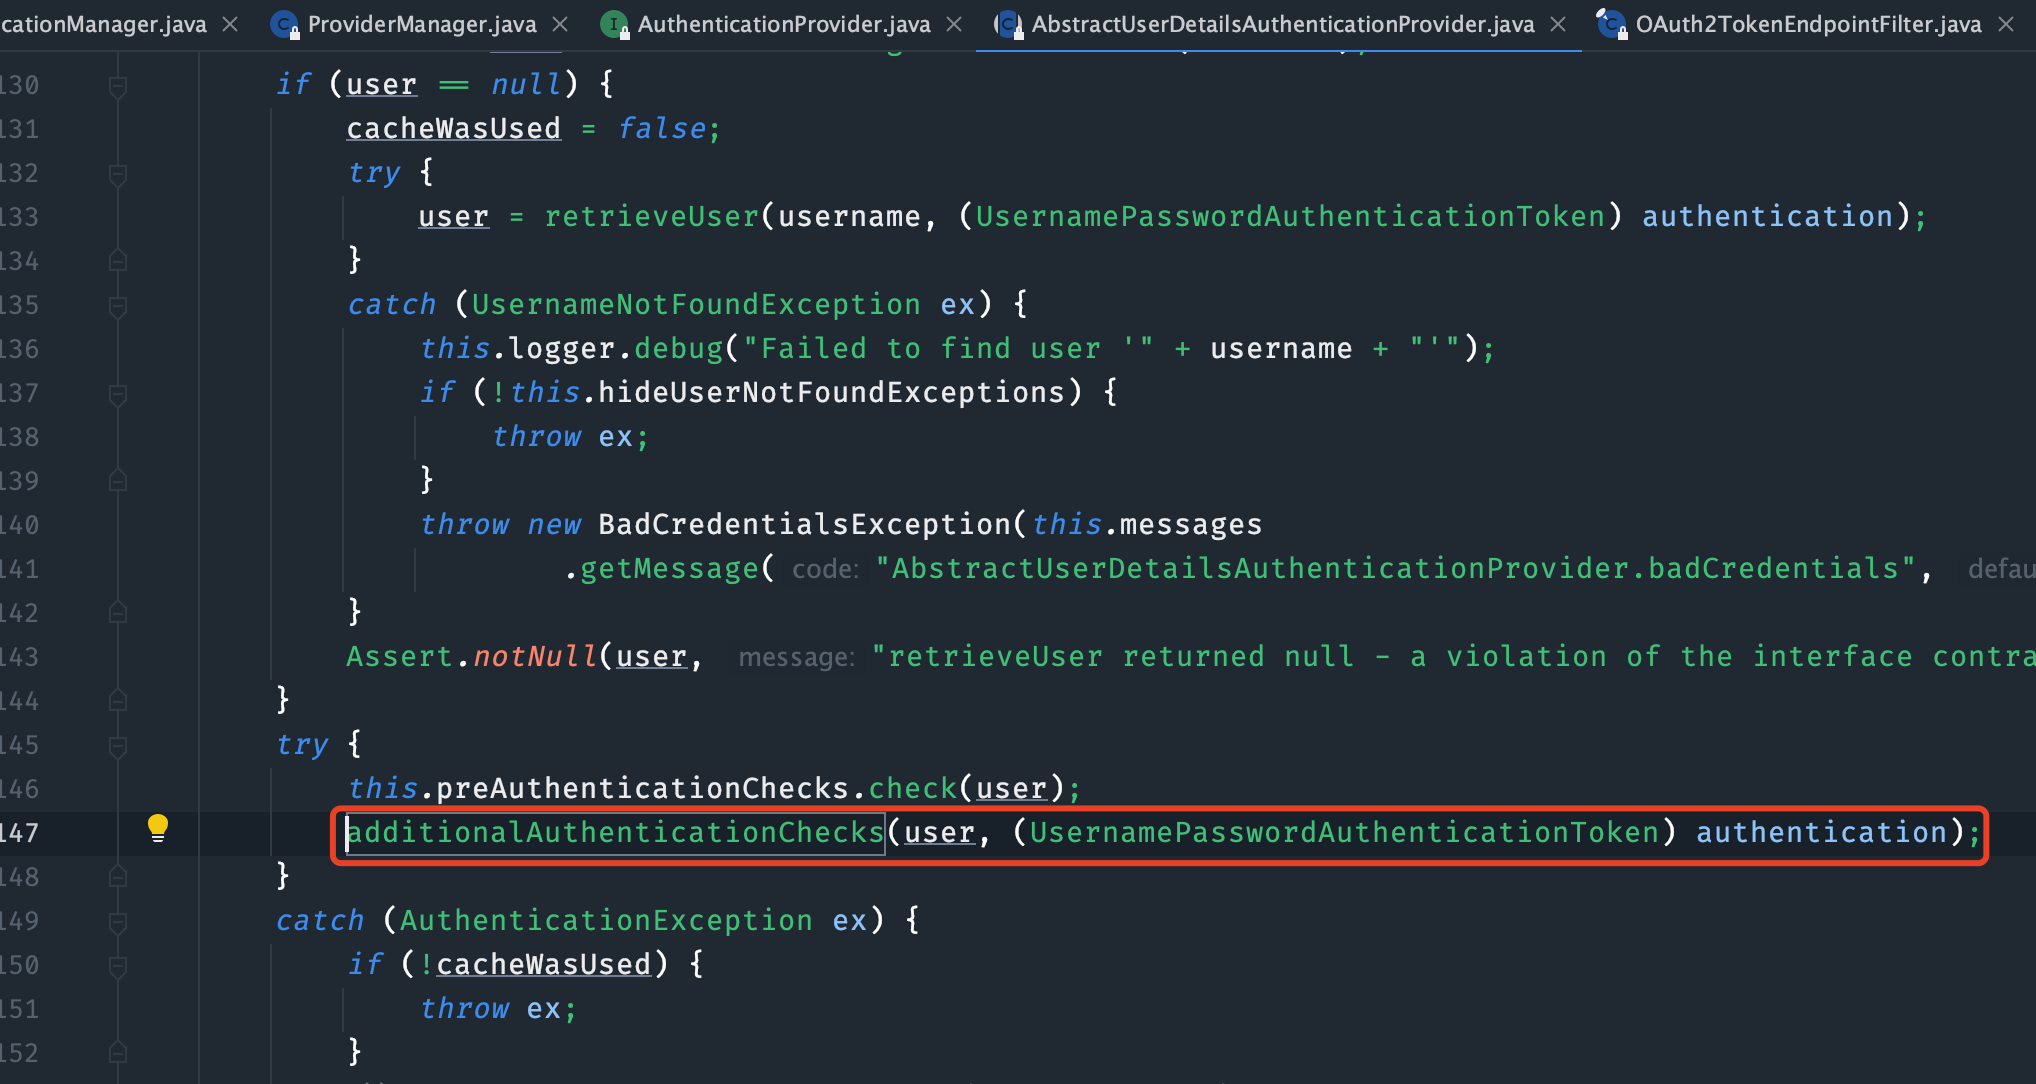
PigDaoAuthenticationProvider继承了AbstractUserDetailsAuthenticationProvider并重写
additionalAuthenticationChecks方法。
@Override
	@SuppressWarnings("deprecation")
	protected void additionalAuthenticationChecks(UserDetails userDetails,
			UsernamePasswordAuthenticationToken authentication) throws AuthenticationException {

		// app 模式不用校验密码
		String grantType = WebUtils.getRequest().get().getParameter(OAuth2ParameterNames.GRANT_TYPE);
		if (StrUtil.equals(SecurityConstants.APP, grantType)) {
			return;
		}

		if (authentication.getCredentials() == null) {
			this.logger.debug("Failed to authenticate since no credentials provided");
			throw new BadCredentialsException(this.messages
					.getMessage("AbstractUserDetailsAuthenticationProvider.badCredentials", "Bad credentials"));
		}
		String presentedPassword = authentication.getCredentials().toString();
		if (!this.passwordEncoder.matches(presentedPassword, userDetails.getPassword())) {
			this.logger.debug("Failed to authenticate since password does not match stored value");
			throw new BadCredentialsException(this.messages
					.getMessage("AbstractUserDetailsAuthenticationProvider.badCredentials", "Bad credentials"));
		}
	}
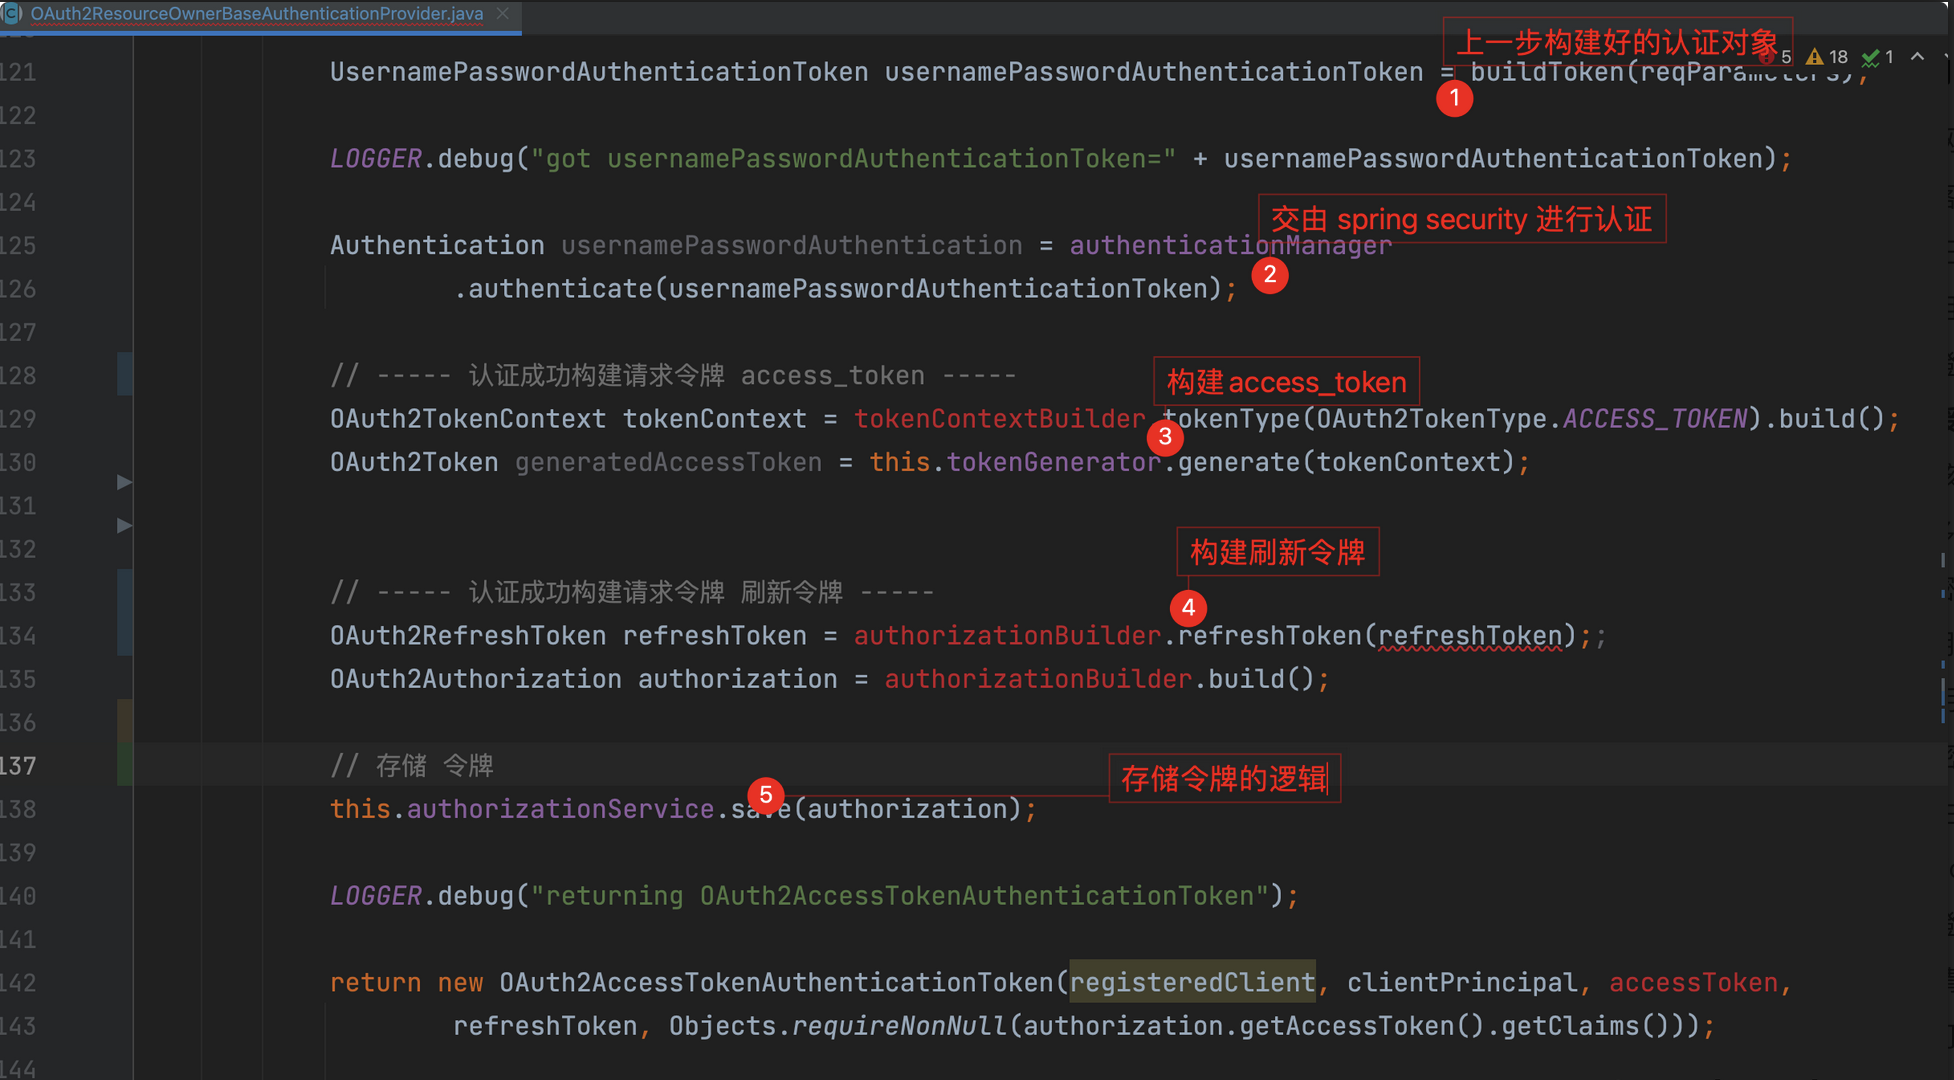
构建token
认证成功后返回OAuth2ResourceOwnerBaseAuthenticationProvider接着看
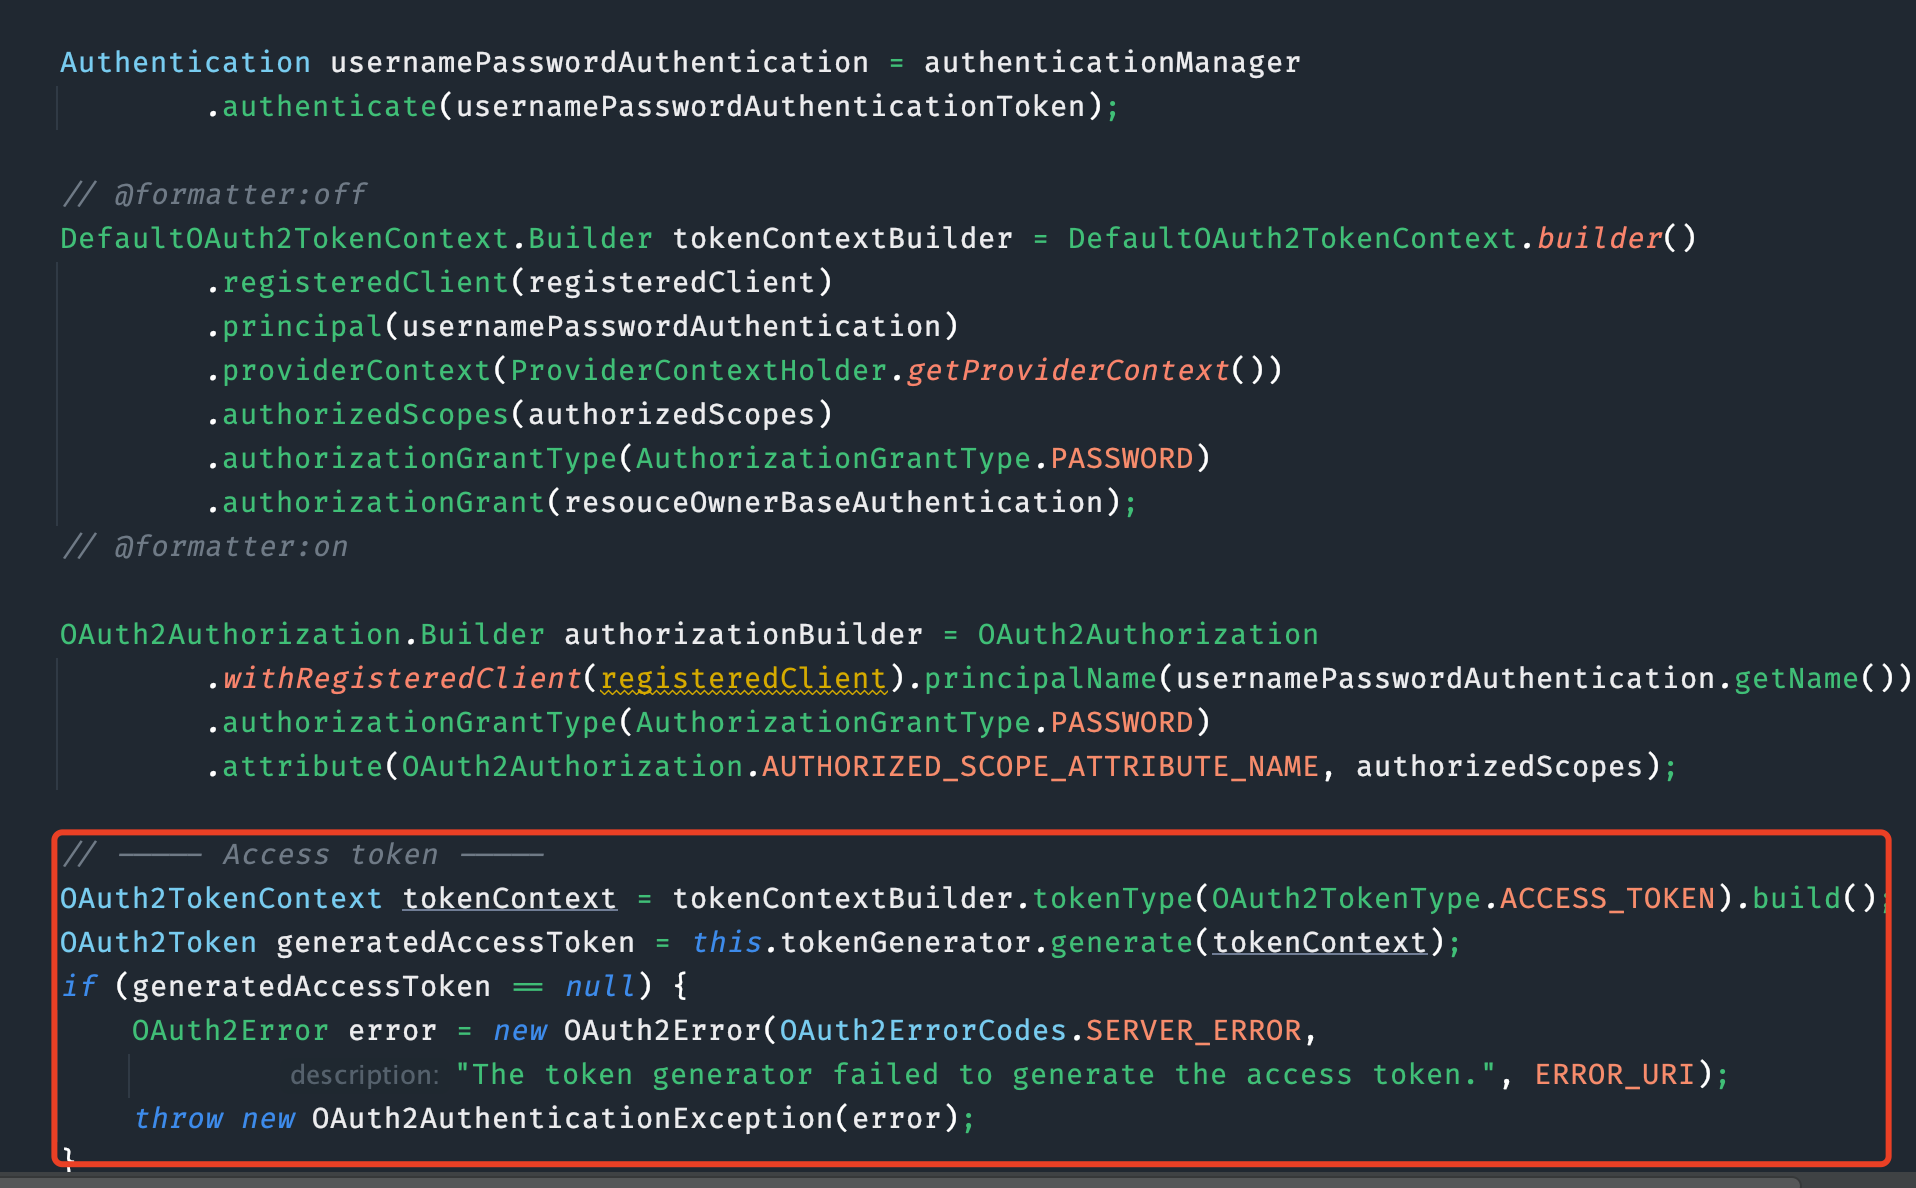
CustomeOAuth2AccessTokenGenerator实现OAuth2TokenGenerator接口.
Token 存储持久化
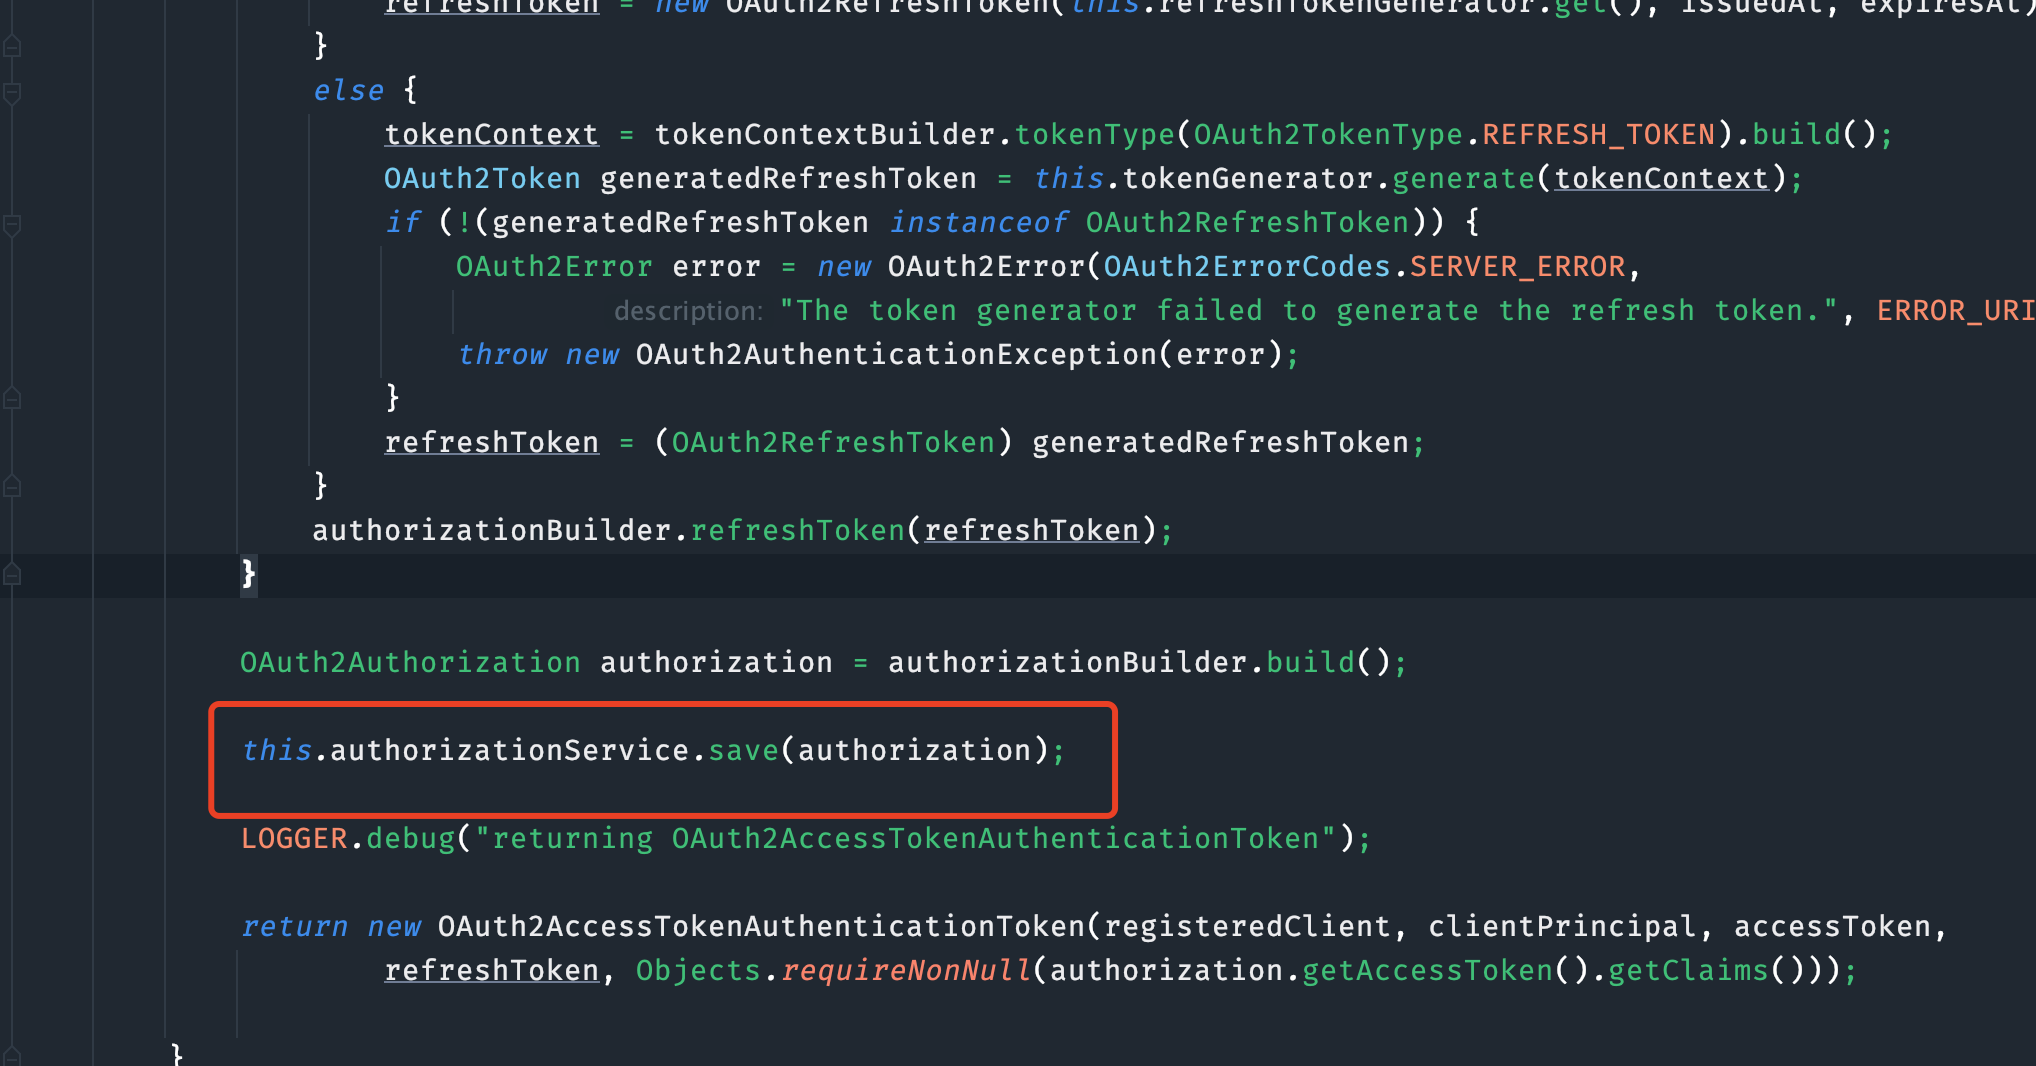
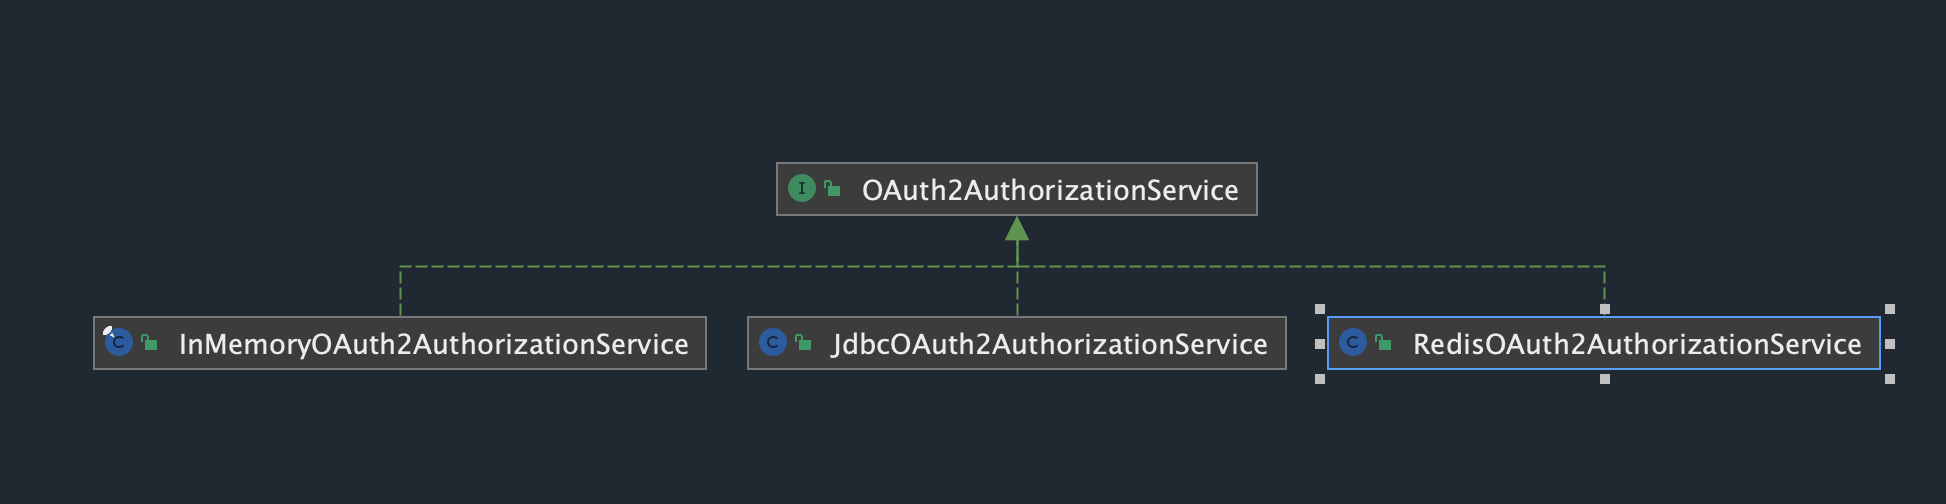
RedisOAuth2AuthorizationService实现OAuth2AuthorizationService
save方法
@Override
	public void save(OAuth2Authorization authorization) {
		Assert.notNull(authorization, "authorization cannot be null");

		if (isState(authorization)) {
			String token = authorization.getAttribute("state");
			redisTemplate.setValueSerializer(RedisSerializer.java());
			redisTemplate.opsForValue().set(buildKey(OAuth2ParameterNames.STATE, token), authorization, TIMEOUT,
					TimeUnit.MINUTES);
		}

		if (isCode(authorization)) {
			OAuth2Authorization.Token<OAuth2AuthorizationCode> authorizationCode = authorization
					.getToken(OAuth2AuthorizationCode.class);
			OAuth2AuthorizationCode authorizationCodeToken = authorizationCode.getToken();
			long between = ChronoUnit.MINUTES.between(authorizationCodeToken.getIssuedAt(),
					authorizationCodeToken.getExpiresAt());
			redisTemplate.setValueSerializer(RedisSerializer.java());
			redisTemplate.opsForValue().set(buildKey(OAuth2ParameterNames.CODE, authorizationCodeToken.getTokenValue()),
					authorization, between, TimeUnit.MINUTES);
		}

		if (isRefreshToken(authorization)) {
			OAuth2RefreshToken refreshToken = authorization.getRefreshToken().getToken();
			long between = ChronoUnit.SECONDS.between(refreshToken.getIssuedAt(), refreshToken.getExpiresAt());
			redisTemplate.setValueSerializer(RedisSerializer.java());
			redisTemplate.opsForValue().set(buildKey(OAuth2ParameterNames.REFRESH_TOKEN, refreshToken.getTokenValue()),
					authorization, between, TimeUnit.SECONDS);
		}

		if (isAccessToken(authorization)) {
			OAuth2AccessToken accessToken = authorization.getAccessToken().getToken();
			long between = ChronoUnit.SECONDS.between(accessToken.getIssuedAt(), accessToken.getExpiresAt());
			redisTemplate.setValueSerializer(RedisSerializer.java());
			redisTemplate.opsForValue().set(buildKey(OAuth2ParameterNames.ACCESS_TOKEN, accessToken.getTokenValue()),
					authorization, between, TimeUnit.SECONDS);
		}
	}
onAuthenticationSuccess
PigAuthenticationSuccessEventHandler实现AuthenticationSuccessHandler
@SneakyThrows
	@Override
	public void onAuthenticationSuccess(HttpServletRequest request, HttpServletResponse response,
			Authentication authentication) {
		OAuth2AccessTokenAuthenticationToken accessTokenAuthentication = (OAuth2AccessTokenAuthenticationToken) authentication;
		Map<String, Object> map = accessTokenAuthentication.getAdditionalParameters();
		if (MapUtil.isNotEmpty(map)) {
			// 发送异步日志事件
			PigUser userInfo = (PigUser) map.get(SecurityConstants.DETAILS_USER);
			log.info("用户:{} 登录成功", userInfo.getName());
			SecurityContextHolder.getContext().setAuthentication(accessTokenAuthentication);
			SysLog logVo = SysLogUtils.getSysLog();
			logVo.setTitle("登录成功");
			String startTimeStr = request.getHeader(CommonConstants.REQUEST_START_TIME);
			if (StrUtil.isNotBlank(startTimeStr)) {
				Long startTime = Long.parseLong(startTimeStr);
				Long endTime = System.currentTimeMillis();
				logVo.setTime(endTime - startTime);
			}
			logVo.setCreateBy(userInfo.getName());
			logVo.setUpdateBy(userInfo.getName());
			SpringContextHolder.publishEvent(new SysLogEvent(logVo));
		}

		// 输出token
		sendAccessTokenResponse(request, response, authentication);
	}
输出token
private void sendAccessTokenResponse(HttpServletRequest request, HttpServletResponse response,
			Authentication authentication) throws IOException {

		OAuth2AccessTokenAuthenticationToken accessTokenAuthentication = (OAuth2AccessTokenAuthenticationToken) authentication;

		OAuth2AccessToken accessToken = accessTokenAuthentication.getAccessToken();
		OAuth2RefreshToken refreshToken = accessTokenAuthentication.getRefreshToken();
		Map<String, Object> additionalParameters = accessTokenAuthentication.getAdditionalParameters();

		OAuth2AccessTokenResponse.Builder builder = OAuth2AccessTokenResponse.withToken(accessToken.getTokenValue())
				.tokenType(accessToken.getTokenType()).scopes(accessToken.getScopes());
		if (accessToken.getIssuedAt() != null && accessToken.getExpiresAt() != null) {
			builder.expiresIn(ChronoUnit.SECONDS.between(accessToken.getIssuedAt(), accessToken.getExpiresAt()));
		}
		if (refreshToken != null) {
			builder.refreshToken(refreshToken.getTokenValue());
		}
		if (!CollectionUtils.isEmpty(additionalParameters)) {
			builder.additionalParameters(additionalParameters);
		}
		OAuth2AccessTokenResponse accessTokenResponse = builder.build();
		ServletServerHttpResponse httpResponse = new ServletServerHttpResponse(response);

		// 无状态 注意删除 context 上下文的信息
		SecurityContextHolder.clearContext();
		this.accessTokenHttpResponseConverter.write(accessTokenResponse, null, httpResponse);
	}


 21万+
21万+

 被折叠的 条评论
为什么被折叠?
被折叠的 条评论
为什么被折叠?
 到【灌水乐园】发言


