


目录
摘要
本周继续了语义分割的学习,主要学习了DeepLabV3+的部分实现思路,即DeepLabV3+的整个模型的预测过程,并通过代码进行了实现。待预测图片首先通过主干网络(MobilenetV2)进行特征提取,得到两个有效特征层,一个有效特征层是输入图片高和宽压缩两次的结果,一个有效特征层是输入图片高和宽压缩四次的结果。然后再通过加强特征提取,最后输出预测结果。
ABSTRACT
This week, We continued learning about semantic segmentation, focusing on the implementation details of DeepLabV3+. Specifically, I studied the prediction process of the entire DeepLabV3+ model and implemented it through code. For the prediction, the input image is first passed through the backbone network (MobileNetV2) for feature extraction, resulting in two effective feature layers. One effective feature layer is obtained by compressing the height and width of the input image twice, while the other is obtained by compressing them four times. Then, enhanced feature extraction is performed, followed by the final output of the prediction results.
1 DeeplabV3+实现思路
预测部分
①主干网络介绍
DeeplabV3+在论文中采用的是Xception系列作为主干特征提取网络,除了Xception主干网络外,还可以使用ResNet和mobilenetv2等。这里主要使用mobilenetv2。
MobileNet模型是Google针对手机等嵌入式设备提出的一种轻量级的深层神经网络。
MobileNetV2是MobileNet的升级版,它具有一个非常重要的特点就是使用了Inverted resblock,整个mobilenetv2都由Inverted resblock组成。
Inverted resblock可以分为两个部分:
左边是主干部分,首先利用1x1卷积进行升维,然后利用3x3深度可分离卷积进行特征提取,然后再利用1x1卷积降维。
右边是残差边部分,输入和输出直接相接。
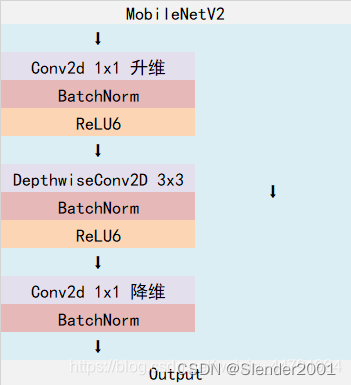
需要注意的是,在DeeplabV3当中,一般不会5次下采样,可选的有3次下采样和4次下采样,这里使用的4次下采样。这里所提到的下采样指的是不会进行五次长和宽的压缩,通常选用三次或者四次长和宽的压缩。
在完成MobilenetV2的特征提取后,我们可以获得两个有效特征层,一个有效特征层是输入图片高和宽压缩两次的结果,一个有效特征层是输入图片高和宽压缩四次的结果。
import math
import os

import torch
import torch.nn as nn
import torch.utils.model_zoo as model_zoo

BatchNorm2d = nn.BatchNorm2d

def conv_bn(inp, oup, stride):
    return nn.Sequential(
        nn.Conv2d(inp, oup, 3, stride, 1, bias=False),
        BatchNorm2d(oup),
        nn.ReLU6(inplace=True)
    )

def conv_1x1_bn(inp, oup):
    return nn.Sequential(
        nn.Conv2d(inp, oup, 1, 1, 0, bias=False),
        BatchNorm2d(oup),
        nn.ReLU6(inplace=True)
    )

class InvertedResidual(nn.Module):
    def __init__(self, inp, oup, stride, expand_ratio):
        super(InvertedResidual, self).__init__()
        self.stride = stride
        assert stride in [1, 2]

        hidden_dim = round(inp * expand_ratio)
        self.use_res_connect = self.stride == 1 and inp == oup

        if expand_ratio == 1:
            self.conv = nn.Sequential(
                # dw
                nn.Conv2d(hidden_dim, hidden_dim, 3, stride, 1, groups=hidden_dim, bias=False),
                BatchNorm2d(hidden_dim),
                nn.ReLU6(inplace=True),
                # pw-linear
                nn.Conv2d(hidden_dim, oup, 1, 1, 0, bias=False),
                BatchNorm2d(oup),
            )
        else:
            self.conv = nn.Sequential(
                # pw
                nn.Conv2d(inp, hidden_dim, 1, 1, 0, bias=False),
                BatchNorm2d(hidden_dim),
                nn.ReLU6(inplace=True),
                # dw
                nn.Conv2d(hidden_dim, hidden_dim, 3, stride, 1, groups=hidden_dim, bias=False),
                BatchNorm2d(hidden_dim),
                nn.ReLU6(inplace=True),
                # pw-linear
                nn.Conv2d(hidden_dim, oup, 1, 1, 0, bias=False),
                BatchNorm2d(oup),
            )

    def forward(self, x):
        if self.use_res_connect:
            return x + self.conv(x)
        else:
            return self.conv(x)

class MobileNetV2(nn.Module):
    def __init__(self, n_class=1000, input_size=224, width_mult=1.):
        super(MobileNetV2, self).__init__()
        block = InvertedResidual
        input_channel = 32
        last_channel = 1280
        interverted_residual_setting = [
            # t, c, n, s
            [1, 16, 1, 1],
            [6, 24, 2, 2],
            [6, 32, 3, 2],
            [6, 64, 4, 2],
            [6, 96, 3, 1],
            [6, 160, 3, 2],
            [6, 320, 1, 1],
        ]

        # building first layer
        assert input_size % 32 == 0
        input_channel = int(input_channel * width_mult)
        self.last_channel = int(last_channel * width_mult) if width_mult > 1.0 else last_channel
        self.features = [conv_bn(3, input_channel, 2)]
        # building inverted residual blocks
        for t, c, n, s in interverted_residual_setting:
            output_channel = int(c * width_mult)
            for i in range(n):
                if i == 0:
                    self.features.append(block(input_channel, output_channel, s, expand_ratio=t))
                else:
                    self.features.append(block(input_channel, output_channel, 1, expand_ratio=t))
                input_channel = output_channel
        # building last several layers
        self.features.append(conv_1x1_bn(input_channel, self.last_channel))
        # make it nn.Sequential
        self.features = nn.Sequential(*self.features)

        # building classifier
        self.classifier = nn.Sequential(
            nn.Dropout(0.2),
            nn.Linear(self.last_channel, n_class),
        )

        self._initialize_weights()

    def forward(self, x):
        x = self.features(x)
        x = x.mean(3).mean(2)
        x = self.classifier(x)
        return x

    def _initialize_weights(self):
        for m in self.modules():
            if isinstance(m, nn.Conv2d):
                n = m.kernel_size[0] * m.kernel_size[1] * m.out_channels
                m.weight.data.normal_(0, math.sqrt(2. / n))
                if m.bias is not None:
                    m.bias.data.zero_()
            elif isinstance(m, BatchNorm2d):
                m.weight.data.fill_(1)
                m.bias.data.zero_()
            elif isinstance(m, nn.Linear):
                n = m.weight.size(1)
                m.weight.data.normal_(0, 0.01)
                m.bias.data.zero_()


def load_url(url, model_dir='./model_data', map_location=None):
    if not os.path.exists(model_dir):
        os.makedirs(model_dir)
    filename = url.split('/')[-1]
    cached_file = os.path.join(model_dir, filename)
    if os.path.exists(cached_file):
        return torch.load(cached_file, map_location=map_location)
    else:
        return model_zoo.load_url(url,model_dir=model_dir)

def mobilenetv2(pretrained=False, **kwargs):
    model = MobileNetV2(n_class=1000, **kwargs)
    if pretrained:
        model.load_state_dict(load_url('http://sceneparsing.csail.mit.edu/model/pretrained_resnet/mobilenet_v2.pth.tar'), strict=False)
    return model
② 加强特征提取结构
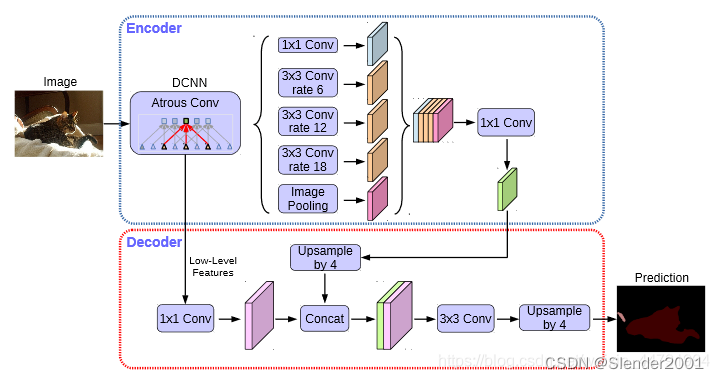
在DeeplabV3+中,加强特征提取网络可以分为两部分:
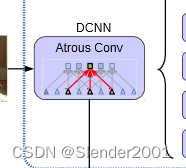
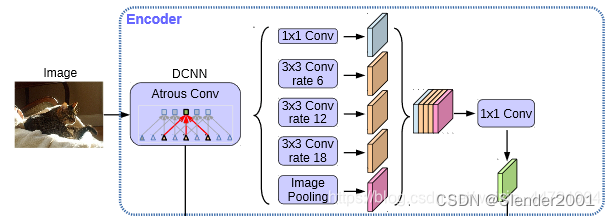
在Encoder中,我们会对压缩四次的初步有效特征层利用并行的Atrous Convolution,分别用不同rate的Atrous Convolution进行特征提取,再进行合并,再进行1x1卷积压缩特征。
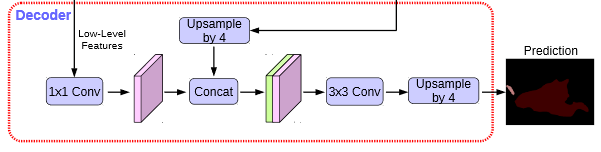
在Decoder中,我们会对压缩两次的初步有效特征层利用1x1卷积调整通道数,再和空洞卷积后的有效特征层上采样的结果进行堆叠,在完成堆叠后,进行两次深度可分离卷积块。
这个时候,我们就获得了一个最终的有效特征层,它是整张图片的特征浓缩。
import torch
import torch.nn as nn
import torch.nn.functional as F
from nets.xception import xception
from nets.mobilenetv2 import mobilenetv2

class MobileNetV2(nn.Module):
    def __init__(self, downsample_factor=8, pretrained=True):
        super(MobileNetV2, self).__init__()
        from functools import partial

        model = mobilenetv2(pretrained)
        self.features = model.features[:-1]

        self.total_idx = len(self.features)
        self.down_idx = [2, 4, 7, 14]

        if downsample_factor == 8:
            for i in range(self.down_idx[-2], self.down_idx[-1]):
                self.features[i].apply(
                    partial(self._nostride_dilate, dilate=2)
                )
            for i in range(self.down_idx[-1], self.total_idx):
                self.features[i].apply(
                    partial(self._nostride_dilate, dilate=4)
                )
        elif downsample_factor == 16:
            for i in range(self.down_idx[-1], self.total_idx):
                self.features[i].apply(
                    partial(self._nostride_dilate, dilate=2)
                )

    def _nostride_dilate(self, m, dilate):
        classname = m.__class__.__name__
        if classname.find('Conv') != -1:
            if m.stride == (2, 2):
                m.stride = (1, 1)
                if m.kernel_size == (3, 3):
                    m.dilation = (dilate//2, dilate//2)
                    m.padding = (dilate//2, dilate//2)
            else:
                if m.kernel_size == (3, 3):
                    m.dilation = (dilate, dilate)
                    m.padding = (dilate, dilate)

    def forward(self, x):
        low_level_features = self.features[:4](x)
        x = self.features[4:](low_level_features)
        return low_level_features, x


#-----------------------------------------#
#   ASPP特征提取模块
#   利用不同膨胀率的膨胀卷积进行特征提取
#-----------------------------------------#
class ASPP(nn.Module):
	def __init__(self, dim_in, dim_out, rate=1, bn_mom=0.1):
		super(ASPP, self).__init__()
		self.branch1 = nn.Sequential(
				nn.Conv2d(dim_in, dim_out, 1, 1, padding=0, dilation=rate,bias=True),
				nn.BatchNorm2d(dim_out, momentum=bn_mom),
				nn.ReLU(inplace=True),
		)
		self.branch2 = nn.Sequential(
				nn.Conv2d(dim_in, dim_out, 3, 1, padding=6*rate, dilation=6*rate, bias=True),
				nn.BatchNorm2d(dim_out, momentum=bn_mom),
				nn.ReLU(inplace=True),
		)
		self.branch3 = nn.Sequential(
				nn.Conv2d(dim_in, dim_out, 3, 1, padding=12*rate, dilation=12*rate, bias=True),
				nn.BatchNorm2d(dim_out, momentum=bn_mom),
				nn.ReLU(inplace=True),
		)
		self.branch4 = nn.Sequential(
				nn.Conv2d(dim_in, dim_out, 3, 1, padding=18*rate, dilation=18*rate, bias=True),
				nn.BatchNorm2d(dim_out, momentum=bn_mom),
				nn.ReLU(inplace=True),
		)
		self.branch5_conv = nn.Conv2d(dim_in, dim_out, 1, 1, 0,bias=True)
		self.branch5_bn = nn.BatchNorm2d(dim_out, momentum=bn_mom)
		self.branch5_relu = nn.ReLU(inplace=True)

		self.conv_cat = nn.Sequential(
				nn.Conv2d(dim_out*5, dim_out, 1, 1, padding=0,bias=True),
				nn.BatchNorm2d(dim_out, momentum=bn_mom),
				nn.ReLU(inplace=True),
		)

	def forward(self, x):
		[b, c, row, col] = x.size()
        #-----------------------------------------#
        #   一共五个分支
        #-----------------------------------------#
		conv1x1 = self.branch1(x)
		conv3x3_1 = self.branch2(x)
		conv3x3_2 = self.branch3(x)
		conv3x3_3 = self.branch4(x)
        #-----------------------------------------#
        #   第五个分支,全局平均池化+卷积
        #-----------------------------------------#
		global_feature = torch.mean(x,2,True)
		global_feature = torch.mean(global_feature,3,True)
		global_feature = self.branch5_conv(global_feature)
		global_feature = self.branch5_bn(global_feature)
		global_feature = self.branch5_relu(global_feature)
		global_feature = F.interpolate(global_feature, (row, col), None, 'bilinear', True)

        #-----------------------------------------#
        #   将五个分支的内容堆叠起来
        #   然后1x1卷积整合特征。
        #-----------------------------------------#
		feature_cat = torch.cat([conv1x1, conv3x3_1, conv3x3_2, conv3x3_3, global_feature], dim=1)
		result = self.conv_cat(feature_cat)
		return result

class DeepLab(nn.Module):
    def __init__(self, num_classes, backbone="mobilenet", pretrained=True, downsample_factor=16):
        super(DeepLab, self).__init__()
        if backbone=="xception":
            #----------------------------------#
            #   获得两个特征层
            #   浅层特征    [128,128,256]
            #   主干部分    [30,30,2048]
            #----------------------------------#
            self.backbone = xception(downsample_factor=downsample_factor, pretrained=pretrained)
            in_channels = 2048
            low_level_channels = 256
        elif backbone=="mobilenet":
            #----------------------------------#
            #   获得两个特征层
            #   浅层特征    [128,128,24]
            #   主干部分    [30,30,320]
            #----------------------------------#
            self.backbone = MobileNetV2(downsample_factor=downsample_factor, pretrained=pretrained)
            in_channels = 320
            low_level_channels = 24
        else:
            raise ValueError('Unsupported backbone - `{}`, Use mobilenet, xception.'.format(backbone))

        #-----------------------------------------#
        #   ASPP特征提取模块
        #   利用不同膨胀率的膨胀卷积进行特征提取
        #-----------------------------------------#
        self.aspp = ASPP(dim_in=in_channels, dim_out=256, rate=16//downsample_factor)

        #----------------------------------#
        #   浅层特征边
        #----------------------------------#
        self.shortcut_conv = nn.Sequential(
            nn.Conv2d(low_level_channels, 48, 1),
            nn.BatchNorm2d(48),
            nn.ReLU(inplace=True)
        )

        self.cat_conv = nn.Sequential(
            nn.Conv2d(48+256, 256, 3, stride=1, padding=1),
            nn.BatchNorm2d(256),
            nn.ReLU(inplace=True),
            nn.Dropout(0.5),

            nn.Conv2d(256, 256, 3, stride=1, padding=1),
            nn.BatchNorm2d(256),
            nn.ReLU(inplace=True),

            nn.Dropout(0.1),
        )
        self.cls_conv = nn.Conv2d(256, num_classes, 1, stride=1)

    def forward(self, x):
        H, W = x.size(2), x.size(3)
        #-----------------------------------------#
        #   获得两个特征层
        #   浅层特征-进行卷积处理
        #   主干部分-利用ASPP结构进行加强特征提取
        #-----------------------------------------#
        low_level_features, x = self.backbone(x)
        x = self.aspp(x)
        low_level_features = self.shortcut_conv(low_level_features)

        #-----------------------------------------#
        #   将加强特征边上采样
        #   与浅层特征堆叠后利用卷积进行特征提取
        #-----------------------------------------#
        x = F.interpolate(x, size=(low_level_features.size(2), low_level_features.size(3)), mode='bilinear', align_corners=True)
        x = self.cat_conv(torch.cat((x, low_level_features), dim=1))
        x = self.cls_conv(x)
        x = F.interpolate(x, size=(H, W), mode='bilinear', align_corners=True)
        return x
③ 利用特征获得预测结果
利用1、2步,我们可以获取输入进来的图片的特征,此时,我们需要利用特征获得预测结果。
利用特征获得预测结果的过程可以分为2步:
1、利用一个1x1卷积进行通道调整,调整成Num_Classes。
2、利用resize进行上采样使得最终输出层,宽高和输入图片一样。

class DeepLab(nn.Module):
    def __init__(self, num_classes, backbone="mobilenet", pretrained=True, downsample_factor=16):
        super(DeepLab, self).__init__()
        if backbone=="xception":
            #----------------------------------#
            #   获得两个特征层
            #   浅层特征    [128,128,256]
            #   主干部分    [30,30,2048]
            #----------------------------------#
            self.backbone = xception(downsample_factor=downsample_factor, pretrained=pretrained)
            in_channels = 2048
            low_level_channels = 256
        elif backbone=="mobilenet":
            #----------------------------------#
            #   获得两个特征层
            #   浅层特征    [128,128,24]
            #   主干部分    [30,30,320]
            #----------------------------------#
            self.backbone = MobileNetV2(downsample_factor=downsample_factor, pretrained=pretrained)
            in_channels = 320
            low_level_channels = 24
        else:
            raise ValueError('Unsupported backbone - `{}`, Use mobilenet, xception.'.format(backbone))

        #-----------------------------------------#
        #   ASPP特征提取模块
        #   利用不同膨胀率的膨胀卷积进行特征提取
        #-----------------------------------------#
        self.aspp = ASPP(dim_in=in_channels, dim_out=256, rate=16//downsample_factor)

        #----------------------------------#
        #   浅层特征边
        #----------------------------------#
        self.shortcut_conv = nn.Sequential(
            nn.Conv2d(low_level_channels, 48, 1),
            nn.BatchNorm2d(48),
            nn.ReLU(inplace=True)
        )

        self.cat_conv = nn.Sequential(
            nn.Conv2d(48+256, 256, 3, stride=1, padding=1),
            nn.BatchNorm2d(256),
            nn.ReLU(inplace=True),
            nn.Dropout(0.5),

            nn.Conv2d(256, 256, 3, stride=1, padding=1),
            nn.BatchNorm2d(256),
            nn.ReLU(inplace=True),

            nn.Dropout(0.1),
        )
        self.cls_conv = nn.Conv2d(256, num_classes, 1, stride=1)

    def forward(self, x):
        H, W = x.size(2), x.size(3)
        #-----------------------------------------#
        #   获得两个特征层
        #   浅层特征-进行卷积处理
        #   主干部分-利用ASPP结构进行加强特征提取
        #-----------------------------------------#
        low_level_features, x = self.backbone(x)
        x = self.aspp(x)
        low_level_features = self.shortcut_conv(low_level_features)

        #-----------------------------------------#
        #   将加强特征边上采样
        #   与浅层特征堆叠后利用卷积进行特征提取
        #-----------------------------------------#
        x = F.interpolate(x, size=(low_level_features.size(2), low_level_features.size(3)), mode='bilinear', align_corners=True)
        x = self.cat_conv(torch.cat((x, low_level_features), dim=1))
        x = self.cls_conv(x)
        x = F.interpolate(x, size=(H, W), mode='bilinear', align_corners=True)
        return x


 被折叠的 条评论
为什么被折叠?
被折叠的 条评论
为什么被折叠?
 到【灌水乐园】发言


