


环境和工具
博客:https://so.csdn.net/so/search?q=yolo&t=blog&u=didiaopao
视频:https://www.bilibili.com/video/BV1f44y187Xg?t=370.7&p=4
环境准备
环境管理工具:anaconda
包管理工具:conda,安装了anaconda即可。
ide:pycharm community
# python
python的运行需要两个东西,一个是解释器,就是安装文件夹里的python.exe,一个是写的.py文件脚本。输出可以是命令行也可以是打开窗口。
python的包管理工具是pip。安装包命令是pip install -i https://pypi.tuna.tsinghua.edu.cn/simple xxx。
# anaconda
anaconda用于创建虚拟工作空间,将可以同时使用默认的基础库,如果特定版本的库只会安装在当前工作空间中,可以使用不同的python版本,实现了环境隔离。anaconda的文件夹中包含了python和python的基本库。
anaconda的包管理工具是conda。安装包命令是conda install xxx。
创建虚拟环境:conda create -n env1 python=3.8
使用特定虚拟环境:conda activate env1


# 创建一个名为env1的虚拟环境。
conda create -n env1 python=3.8
conda env list
conda init
// 打开一个新的shell
conda activate env1
# 设置conda镜像
conda config --add channels https://mirrors.tuna.tsinghua.edu.cn/anaconda/pkgs/free/
conda config --add channels https://mirrors.tuna.tsinghua.edu.cn/anaconda/pkgs/main/
conda config --add channels https://mirrors.tuna.tsinghua.edu.cn/anaconda/cloud/pytorch/
conda config --set show_channel_urls yes
常用库
下载包之前先配置镜像源。
cv2
yolo
pytorch
# 安装opencv读取摄像头视频流
conda activate env1
pip install -i https://pypi.tuna.tsinghua.edu.cn/simple opencv-python
# 笔记本显卡最高支持版本 11.1
nvidia-smi
# 安装pytorch、opencv-Python
conda install pytorch torchvision torchaudio cudatoolkit=11.1
pip install -r requirements.txt -i https://pypi.tuna.tsinghua.edu.cn/simple/
conda install --file requirements.txt
pip config set global.index-url https://mirrors.aliyun.com/pypi/simple/
pip install -i https://pypi.tuna.tsinghua.edu.cn/simple yolov5
使用模块
os
http
thread
更多协议
rtsp视频流协议
rtsp视频流就是图片列表。
python语法
list用法:http://t.csdnimg.cn/tV6GM
版本
python3基本情况。python3的字符串默认存储为unicode,print()要带括号,range()函数可以用来迭代,是一个可迭代对象而不是列表,python2与python3不兼容。
python2基本情况。python2的字符串默认存储为ascii, print 'aa' 不需要括号。
面向对象
# 类定义、属性定义、函数定义、变量定义、函数结构体(if、for、while、switch、continue、break)
class cls1:
    pa = 0 # 定义类的静态变量,一个变所有对象都跟着变

    def __init__(self, pa1, pa2):
        self.pa1 = pa1
        self.pa2 = pa2
        self.pa += 1

	def set_cls1_pa:
        cls1.pa = 1  # 所有对象的get_cls1_pa都从0变成1
    def get_cls1_pa:
        print(cls1.pa)

    def set_obj_pa:
        self.pa = 2  # 对象自己的self.pa变成2,其他对象的self.pa不变
    def get_obj_pa:
        print(self.pa)

    def fn1(self):
        pass

cls2 = cls1  # 为类起别名

obj1 = cls1('dd', 22)  # 创建实例
obj2 = cls2('aa', 33)
print(obj1.pa1)
print(obj2.pa1)

# 面向对象:封装、继承、多态
继承
class A:
	def fn_a():
        print('fn_a')
class B:
    pass
class C(A, B):
    def fn_a():  # 重写
        print('fn_b')
重载,5个通用方法
__init__(self[,args...]) 构造函数 obj = cls1()
__del__(self) 析构方法,删除对象 del obj
__repr__(self) 转化为供解释器读取的形式 s = repr(obj)
__str__(self) 转化为适于人阅读的形式 s = str(obj)
__cmp__(self, x) 对象比较 cmp(obj, x)

__repr__和__str__的区别
s = 'zhangsan'
a = str(s)   # zhangsan,type=str
b = repr(s)  # 'zhangsan',type=str

运算符重载
class Vector:
   def __init__(self, a, b):
      self.a = a
      self.b = b
   def __str__(self):
      return 'Vector (%d, %d)' % (self.a, self.b)
   def __add__(self,other):
      return Vector(self.a + other.a, self.b + other.b)

v1 = Vector(2,10)
v2 = Vector(5,-2)
print(v1 + v2)  # Vector (7, 8)

# 安全/作用域
__fn__() 特殊方法
_fn()、_attra    protected方法属性
__fn()、__attra   private方法属性
实例化对象访问私有方法属性可以通过 obj._cla1__attra,不能直接通过obj.__attra
异常
# 异常
有except捕获就能继续进行,否则直接终止程序。try语句后面必须跟着finally或者except
try:
    print('开始执行')
    f = open('file.txt')
except OSError as err:
    print('触发异常', err)
else:
    print('没有触发异常就执行')
finally:
    print('有没有异常都要执行')
print('sss') # 仍会执行

try:
    f = open('file.txt')
finally:
    print('有没有异常都要执行')
print('sss') # 不会执行

定义异常,自定义异常必须继承自BaseException或其子类,异常按顺序只捕获一个,触发的子类异常会被父类捕获,raise Except可以用来强制触发异常。
class B(Exception):
    pass
class C(B):
    pass
class D(C):
    pass
try:
    raise D
except D:
    print("D")
except C:
    print("C")
except B:
    print("B")

不想处理异常可以直接将异常抛出去,raise,	抛出给外层函数,如果是主函数那么程序就会终止。
def fn1():
    try:
        raise B
    except B:
        print('B异常')
        raise
try:
    fn1()
except:
    print('fn1内部有异常')
print('程序结束')
容器
# python数据结构/迭代类/容器
4种。列表,元组,字典,集合。
# 列表。List。一个有序的数据结构,可以通过索引访问元素。
my_list = [1, 2, 3, 'a', 'b', 'c']
print(my_list[0])  # 输出: 1
my_list.append('d')
del my_list[0]
# 元组。Tuple。一个有序的数据结构,但是不可变(不能修改),通过索引访问元素。
my_tuple = (1, 2, 3, 'a', 'b', 'c')
print(my_tuple[0])  # 输出: 1
# 字典。Dictionary。一个无序的数据结构,使用键值对存储数据,通过键来访问值。
my_dict = {'name': 'Alice', 'age': 25, 'city': 'New York'}
print(my_dict['name'])  # 输出: Alice
my_dict['job'] = 'Engineer'
del my_dict['age']
# 集合。Set。一个无序的不重复元素集合,主要用于去重和关系测试。
my_set = {1, 2, 3, 'a', 'b'}
my_set.add('c')
my_set.remove('a')

# 可迭代对象
class NodeIter:
    def __init__(self, node):
        self.curr_node = node
    def __next__(self):
        if self.curr_node is None:
            raise StopIteration
        node, self.curr_node = self.curr_node, self.curr_node.next
        return node
    def __iter__(self):
        return self

class Node:
    def __init__(self, name):
        self.name = name
        self.next = None
    def __iter__(self):
        return NodeIter(self)

node1 = Node("node1")
node2 = Node("node2")
node3 = Node("node3")
node1.next = node2
node2.next = node3

for node in node1:
    print(node.name)

it = iter(node1)
first = next(it)
for node in it:
    print(node.name)

for i, v in enumerate(obj):
    print(i, v)

# str
name = 'zhang' + 'san'
name = 'zhang %s nihao %s' % ('san', 'lisi')
name = 'zhang {} nihao {}'.format('san', 'lisi')
name = 'zhang {1} nihao {0}'.format('lisi', 'san')
name = 'zhang {first} nihao {second}'.format(first='san', second='lisi')
name = f"{name1} nihao {name2}"
name = 'ci' * 2  # cici
name[0] # 'z'
name[index:index:step] # 前闭后开
name = 'zhang'
name[-2:] # 'ng' 倒数第二个到结尾
name = 'zhangsan '.strip()
# range()
range(start, end, step) # 前闭后开
# print()
print('aa' + 'dd')
print('aa', obj)
threading
threading模块的threading.Thread。4个主要操作。创建线程,启动线程,等待线程完成,以及在某些情况下停止线程。
# 创建和启动线程
   import threading
   def my_function():
       # 这里是线程要执行的任务
       print("线程正在执行...")
   # 创建线程对象
   my_thread = threading.Thread(target=my_function)
   # 启动线程
   my_thread.start()
# 继承/自定义线程
   import threading
   class MyThread(threading.Thread):
       def run(self):
           # 重写run方法,线程开始时会自动调用
           print("从继承的类中执行线程任务...")
   # 创建并启动线程
   my_thread = MyThread()
   my_thread.start()
# 等待线程完成
使用join()方法可以让主线程等待某个子线程完成后再继续执行。
   my_thread.join()
   print("线程已结束")
# 设置守护线程
守护线程会在主线程结束时自动结束,无需手动管理
my_thread.setDaemon(True)  # 在start()之前设置
my_thread.start()
# 停止线程
标准库中没有直接提供安全的线程终止方法,使用标志变量来控制线程的运行逻辑,线程周期性检查此标志以决定是否继续执行或退出。
  import threading
  def stoppable_thread(stop_event):
      while not stop_event.is_set():
          # 执行任务...
          if some_condition_to_stop:  # 自定义停止条件
              stop_event.set()
          else:
              # 线程任务...
  stop_event = threading.Event()
  thread = threading.Thread(target=stoppable_thread, args=(stop_event,))
  thread.start()
  # 在某个时刻停止线程
  stop_event.set()
os
路径操作
# 路径操作
2个库。位于标准库中的os模块,os.path,和更现代和用户友好的pathlib模块提供了面向对象的路径处理方式。
## os.path
拼接路径
   import os
   path = os.path.join('dir1', 'dir2', 'file.txt')
获取当前工作目录
   current_dir = os.getcwd()
判断路径是否存在
   if os.path.exists(path):
       print("路径存在")
   else:
       print("路径不存在")
判断是否为文件或目录
   if os.path.isfile(path):
       print("是文件")
   elif os.path.isdir(path):
       print("是目录")
获取文件大小
   size = os.path.getsize(path)
获取文件或目录的绝对路径
   abs_path = os.path.abspath(path)

## pathlib
pathlib除了下面这些常用操作以外还有其他高级操作,用到了就补充。
创建Path对象
   from pathlib import Path
   path = Path('dir1/dir2/file.txt')
拼接路径
   new_path = path / 'new_subdir' / 'new_file.txt'
读取文件内容
   with path.open('r') as f:
       content = f.read()
判断路径是否存在
   if path.exists():
       print("路径存在")
判断是否为文件或目录
   if path.is_file():
       print("是文件")
   elif path.is_dir():
       print("是目录")
创建目录
   path.mkdir(parents=True, exist_ok=True)  # 父目录不存在时也会创建,且如果目录已存在则不会抛出错误
列出目录内容
   for child in path.iterdir():
       print(child)
绝对路径和相对路径转换
   abs_path = path.resolve()  # 绝对路径
   rel_path = path.relative_to('/some/base/path')  # 相对于某个基路径的相对路径
读写操作
   # 写入
   with path.open('w') as f:
       f.write('Hello, World!')

   # 读取
   with path.open('r') as f:
       content = f.read()
glob搜索模式匹配
    # 查找当前目录下所有 .txt 文件
    for file_path in path.glob('*.txt'):
        print(file_path)
文件操作
# 文件操作
读文件,读完自动关闭。
一次读取全部。
   with open('filename.txt', 'r') as file:
       content = file.read()
逐行读取。
   with open('filename.txt', 'r') as file:
       line = file.readline()  # 读取一行
       while line:
           print(line.strip())  # 处理行并打印
           line = file.readline()
   # 或者使用迭代器
   with open('filename.txt', 'r') as file:
       for line in file:
           print(line.strip())
按块读取。
   with open('filename.txt', 'r') as file:
       chunk_size = 1024  # 1KB
       while True:
           data = file.read(chunk_size)
           if not data:
               break
           process_data(data)
逐字节读取二进制文件。
   with open('binaryfile.bin', 'rb') as file:
       byte = file.read(1)  # 读取一个字节
       while byte:
           process_byte(byte)
           byte = file.read(1)
文件指针移动。必须是可以随机访问的文件,不能是流式文件比如网络流或某些压缩文件。
   with open('filename.txt', 'r') as file:
       file.seek(offset)  # 跳转到文件的某个位置
       line = file.readline()
       new_position = file.tell() # 获取现在指针的位置
使用pandas读取结构化数据。
   import pandas as pd
   df = pd.read_csv('data.csv')
numpy
# numpy.reshape()更改数组的shape
arr.reshape(-1) 改成一行
arr.reshape(-1,1) 改成一列,注意每一行都是一个列表,每个列表只有1个元素
arr.reshape(-1, 5) 改成x行5列
注意:这个函数不改变原来的列表,而是将拷贝修改后的列表返回
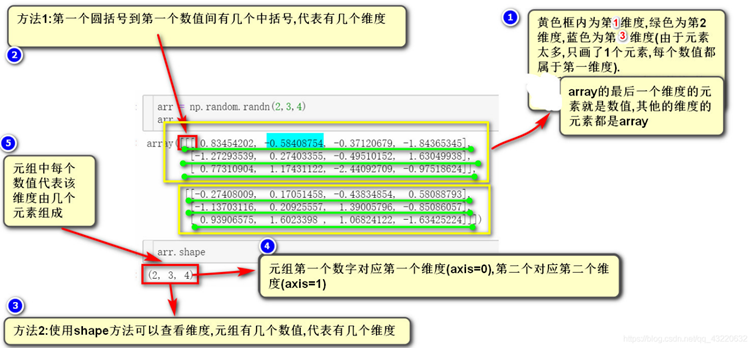
# np.array的维度问题
总结:(1)按照中括号顺序,最外面是第1维,往里面依次是第2维,第3维
(2)最里面的维度1个元素就是1个数值
(3)arr.shape() 返回几个数值就是几个维度,第1个值是维度1(axis=0),第二个值是维度2
(4)灰度图像的数组中,[横的1条] 是 第2维度, 第1维度是图片竖着的一条,即正常思维的形式
matplotlib
# Python的 matplotlib显示中文
将simhei.ttf文件复制到python的字体路径下:
	!cp /home/aistudio/simhei.ttf /opt/conda/envs/python35-paddle120-env/lib/python3.7 \
	/site-packages/matplotlib/mpl-data/fonts/ttf/
删除缓存让python重新加载matplotlib库:!rm -rf .cache/matplotlib
设置显示中文:plt.rcParams['font.sans-serif'] = ['simhei'] # 指定默认字体
opencv
# cv2读取图片
import cv2
cv2.imread(“data/a.img”, falgs) :falgs的值{0,1,-1}表示{彩色,灰度,+透明度}
分别代表3个常量:
cv2.IMREAD_COLOR:加载彩色图片,这个是默认参数,可以直接写1。
cv2.IMREAD_GRAYSCALE:以灰度模式加载图片,可以直接写0。
cv2.IMREAD_UNCHANGED:包括alpha(包括透明度通道),可以直接写-1
注意:(1)默认为彩色读取1
     (2)RGB==255 白色;RGB==0 黑色;R=G=B 灰色
     (3)PIL库中灰度与彩色的转换公式:L = R * 299/1000 + G * 587/1000+ B * 114/100
爬虫
爬取该页面股票信息:
http://quote.eastmoney.com/center/gridlist.html
页面实际获取数据的接口地址
http://99.push2.eastmoney.com/api/qt/clist/get?cb=jQuery112408733409809437476_1623137764048&pn=1&pz=20&po=1&np=1&ut=bd1d9ddb04089700cf9c27f6f7426281&fltt=2&invt=2&fid=f3&fs=m:0+t:80&fields=f1,f2,f3,f4,f5,f6,f7,f8,f9,f10,f12,f13,f14,f15,f16,f17,f18,f20,f21,f23,f24,f25,f22,f11,f62,f128,f136,f115,f152&_=1623137764167:formatted
1. 实现思路
# 1) 创建链路
# 爬取链接的方式
def getHtml(url):
r = requests.get(url,headers={
'User-Agent': UserAgent().random,
})
r.encoding = r.apparent_encoding
return r.text
# 2) 发送请求
# sockUrl为实际获取数据的接口,这里简化了,直接就能返回json
responseText = getHtml(stockUrl)
# 3) 接受返回的数据
responseText数据长这样

# 将返回字符串里json格式段取出来
jsonText = responseText.split("(")[1].split(")")[0]
# 将json字符串转换为字典
resJson = json.loads(jsonText)
# 4) 将数据拆分整理
# 取出所有股票对象列表
datas = resJson["data"]["diff"]
# 取出每支股票的股票代码和公司名称
datalist = []
for data in datas:
# if (str().startswith('6') or str(data["f12"]).startswith('3') or str(data["f12"]).startswith('0')):
row = [data["f12"],data["f14"]]
datalist.append(row)
# 5) 将整理后的数据保存到文件
# 创建并打开文件设置写入权限
f =open('stock.csv','w+',encoding='utf-8',newline="")
# 创建csv写入器
writer = csv.writer(f)
# 写入列名
writer.writerow(('代码', '名称'))
# 写入每一行数据
for data in datalist:
# 写入的格式应该是这样的
writer.writerow((data[0]+"\t",data[1]+"\t"))
f.close()
# 6) 获取个股信息
读取之前爬取的编号和名称列表.csv文件,用来遍历下载
使用多线程实现并发爬取
将每支股票对应的url返回的信息单独保存到一个文件filepath中


 551
551

 被折叠的 条评论
为什么被折叠?
被折叠的 条评论
为什么被折叠?
 到【灌水乐园】发言


