


从Android4.4之后提出了沉浸式状态栏的概念,作为一个菜鸟Android开发者,我特意花了很多时间来研究它。现在初步研究出一点成果,所以打算先一篇博客记录现阶段研究的状况。同时,以后有若是有新的发现,我会即时更新的,因此此篇博客标题被命名为Android沉浸式状态栏(一)。说了这么多废话,非常抱歉,下面就开始我的正题:
Android中各个颜色的介绍如下所示:

一、对沉浸式状态栏的理解
我理解的沉浸式状态栏的效果就是手机屏幕最顶部显示手机信号的状态栏的颜色能够跟随当前Activity的标题栏的颜色变化而变化。
二、编程的环境
本Demo的所有Activity都继承至AppCompatActivity,因此采用的样式文件都继承至Theme.AppCompat.*,并且我采用的是Toolbar来进行沉浸状态栏的适配;
三、沉浸式状态栏的实现
2.1 Android4.4到Android5.0(不包含Android5.0)的沉浸式状态栏
不多说,先上一张Android4.4未实现的图。
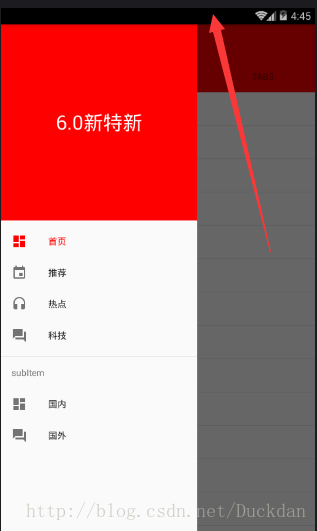
可以看到红色箭头指向的地方就是Android4.4系统手机的状态栏,它此时并没用变成跟应用标题栏颜色一致。
要解决这个问题,我采用的方式在res文件夹下的values文件中的styles.xml文件中添加如下代码:
<item name="android:windowTranslucentStatus">true</item>如果在xml文件中这个属性没有效果,也可以采用在代码中处理的方式,关键代码如下所示:
if(Build.VERSION.SDK_INT>=Build.VERSION_CODES.KITKAT){
  Window window = getWindow();
  window.addFlags(WindowManager.LayoutParams.FLAG_TRANSLUC ENT_STATUS);
}
同时需要在布局文件的根元素下添加
android:fitsSystemWindows="true"这个属性很重要,可以理解为让系统去适配布局。如果不加此属性,那么在使用DrawerLayout的时候,它的侧拉布局部分则不能实现沉浸式的效果。如下图所示:
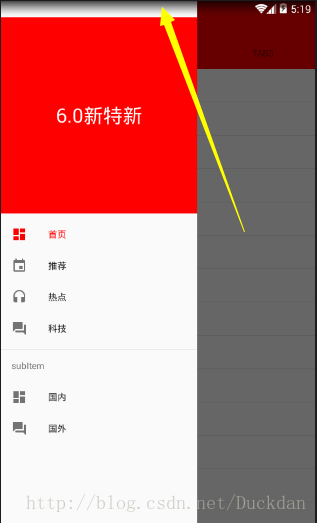
添加完该属性之后,此时还没有完成,因为该属性在Android4.4中存在缺陷,如下图所示:

从图中可以看出应用的标题栏跟状态栏重合了,至于重合的原因就是上面提到的该属性在Android4.4中的缺陷。解决这个问题的方法可以采取在布局文件中给Toolbar设置paddingTop的方式,也可以直接在代码中给Toolbar设置paddingTop的值。同时,在这里我采用了一些Android6.0的新特性(动作协调者CoordinatorLayout+AppBarLayout+Toolbar+TabLayout)来演示沉浸式状态栏的实现。我采用的是在代码中设置,至于原因后面再做解释。关键代码如下所示:
if(Build.VERSION.SDK_INT>=Build.VERSION_CODES.KITKAT&&
Build.VERSION.SDK_INT<=Build.VERSION_CODES.KITKAT_WATCH){
            int padding = DensityUtil.px2dip(this, 25);
            mToobar.setPadding(0,padding,0,0);
            mTl.setPadding(0,padding,0,0);
}
最后效果图如下所示:
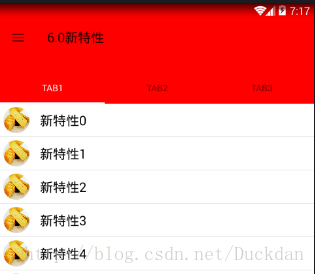
2.2 Android5.0以上实现沉浸式状态栏
在Android5.0以上的系统实现沉浸式状态栏比较简单,除了上面给Toolbar和TabLayout动态添加padding值不用以外,其他的都要保留。在处理Android4.4的沉浸式状态栏时在代码中动态设置Toolbar和TabLayout的padding值也是为不影响Android5.0以上系统的沉浸式状态栏的实现。
同时还有一个重要的地方就是在res的values的colors.xml中的colorPrimaryDark的颜色值一定要设置为透明,关键代码如下所示:
<color name="colorPrimaryDark">@android:color/transparent</color>在values的style.xml中的
<item name="colorPrimaryDark">@color/colorPrimaryDark</item>第一个页面的布局文件代码如下所示:
<?xml version="1.0" encoding="utf-8"?>
<android.support.v4.widget.DrawerLayout
    xmlns:android="http://schemas.android.com/apk/res/android"
    xmlns:app="http://schemas.android.com/apk/res-auto"
    xmlns:tools="http://schemas.android.com/tools"
    android:id="@+id/activity_style6"
    android:layout_width="match_parent"
    android:layout_height="match_parent"
    android:background="@color/colorPrimary"
    android:fitsSystemWindows="true"
    tools:context="com.study.yang.fiveandsixstyleapp.style6.Style6Activity">
    <android.support.design.widget.CoordinatorLayout
        android:layout_width="match_parent"
        android:layout_height="match_parent"
        android:background="#ffffff"
        >
        <android.support.design.widget.AppBarLayout
          android:layout_width="match_parent"
          android:layout_height="wrap_content">
           <android.support.v7.widget.Toolbar
             android:id="@+id/toobar"
             android:layout_width="match_parent"
             android:layout_height="wrap_content"
             android:background="@color/colorPrimary"
             app:layout_scrollFlags="scroll|enterAlways|snap"
             app:title="6.0新特性">
            </android.support.v7.widget.Toolbar>
            <android.support.design.widget.TabLayout
                android:id="@+id/tl"
                android:layout_width="match_parent"
                android:layout_height="wrap_content"
                app:tabIndicatorColor="#FFFFFF"
                app:tabSelectedTextColor="#ffffff"
                >
            </android.support.design.widget.TabLayout>
        </android.support.design.widget.AppBarLayout>
        <android.support.v4.view.ViewPager
            android:id="@+id/vp"
            android:layout_width="match_parent"
            android:layout_height="match_parent"
            app:layout_behavior="@string/appbar_scrolling_view_behavior" >

        </android.support.v4.view.ViewPager>
    </android.support.design.widget.CoordinatorLayout>
    <android.support.design.widget.NavigationView
        android:layout_width="300dp"
        android:layout_height="match_parent"
        android:layout_gravity="left"
        app:headerLayout="@layout/nv_header_layout"
        app:menu="@menu/nv_menu"
        >
    </android.support.design.widget.NavigationView>
</android.support.v4.widget.DrawerLayout>
上面布局代码中根元素的 android:fitsSystemWindows=”true”是必须要添加的,其目的是为了让手机系统自动适配状态栏的布局。
需要强调的是不能给CoordinatorLayout添加android:fitsSystemWindows=”true”,添加之后会出现应用标题栏跟状态栏重
叠的情况,跟上面Android4.4提到的标题栏和状态栏重叠的情况一致,具体原因目前为止我还没有弄明白,所以就暂且让谷歌
背锅吧。
如果给AppBarLayout添加android:fitsSystemWindows=”true”的话,你将会发现填不添加都是一个效果。同时要郑重说明的
是andorid:fitsSystemWindows=”true”有时候会起到android:paddingTop的作用,它可能会影响到Android6.0的新特性,所
以添加的时候要慎重。
四. 附带一点Android6.0新特性的理解
向上一张图看效果,如下所示:
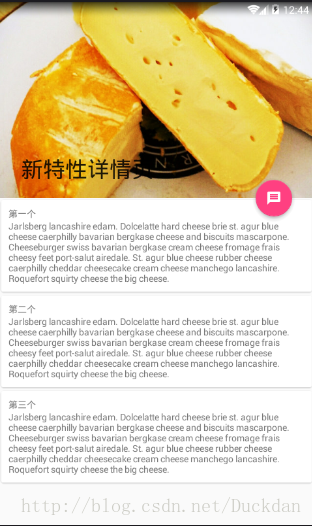
该布局的代码如下所示:
<?xml version="1.0" encoding="utf-8"?>
<android.support.design.widget.CoordinatorLayout
 xmlns:android="http://schemas.android.com/apk/res/android"
 xmlns:app="http://schemas.android.com/apk/res-auto"
 xmlns:tools="http://schemas.android.com/tools"
 android:id="@+id/activity_style6_detail"
 android:layout_width="match_parent"
 android:layout_height="match_parent"
 tools:context="com.study.yang.fiveandsixstyleapp.style6.Style6DetailActivity">

 <android.support.design.widget.AppBarLayout
        android:id="@+id/appBar"
        android:layout_width="match_parent"
        android:layout_height="wrap_content"
        android:fitsSystemWindows="true">
    <android.support.design.widget.CollapsingToolbarLayout
      android:layout_width="match_parent"
      android:layout_height="wrap_content"
      app:contentScrim="@color/colorPrimary"
      app:title="新特性详情页"
      app:layout_scrollFlags="scroll|snap|exitUntilCollapsed">
        <ImageView
         android:layout_width="match_parent"
         android:layout_height="300dp"
         android:src="@drawable/cheese_1"
         android:scaleType="centerCrop"
         android:fitsSystemWindows="true"
         app:layout_collapseMode="parallax"/>
       <android.support.v7.widget.Toolbar
         android:id="@+id/toobar"
         android:layout_width="match_parent"
         android:layout_height="?attr/actionBarSize"
         app:layout_collapseMode="pin">
       </android.support.v7.widget.Toolbar>
    </android.support.design.widget.CollapsingToolbarLayout>
 </android.support.design.widget.AppBarLayout>

 <android.support.v4.widget.NestedScrollView
    android:layout_width="match_parent"
    android:layout_height="match_parent"
    app:layout_behavior="@string/appbar_scrolling_view_behavior">
    <LinearLayout
        android:layout_width="match_parent"
        android:layout_height="match_parent"
        android:orientation="vertical">
        <android.support.v7.widget.CardView
         android:layout_width="match_parent"
         android:layout_height="wrap_content">
         <LinearLayout
          android:layout_width="match_parent"
          android:layout_height="wrap_content"
          android:orientation="vertical"
          android:padding="10dp">
            <TextView
                android:layout_width="match_parent"
                android:layout_height="wrap_content"
                android:text="第一个"/>
            <TextView
             android:layout_width="match_parent"
             android:layout_height="wrap_content"
             android:text="@string/cheese_ipsum"/>
        </LinearLayout>
       </android.support.v7.widget.CardView>
        <android.support.v7.widget.CardView
         android:layout_width="match_parent"
         android:layout_height="wrap_content">
         <LinearLayout
          android:layout_width="match_parent"
          android:layout_height="wrap_content"
          android:orientation="vertical"
          android:padding="10dp">
            <TextView
                android:layout_width="match_parent"
                android:layout_height="wrap_content"
                android:text="第二个"/>
            <TextView
             android:layout_width="match_parent"
             android:layout_height="wrap_content"
             android:text="@string/cheese_ipsum"/>
        </LinearLayout>
       </android.support.v7.widget.CardView>
        <android.support.v7.widget.CardView
         android:layout_width="match_parent"
         android:layout_height="wrap_content">
         <LinearLayout
          android:layout_width="match_parent"
          android:layout_height="wrap_content"
          android:orientation="vertical"
          android:padding="10dp">
            <TextView
                android:layout_width="match_parent"
                android:layout_height="wrap_content"
                android:text="第一个"/>
            <TextView
             android:layout_width="match_parent"
             android:layout_height="wrap_content"
             android:text="@string/cheese_ipsum"/>
        </LinearLayout>
       </android.support.v7.widget.CardView>
     </LinearLayout>
    </android.support.v4.widget.NestedScrollView>
    <android.support.design.widget.FloatingActionButton
        android:layout_width="wrap_content"
        android:layout_height="wrap_content"
        android:layout_margin="20dp"
        android:clickable="true"
        android:src="@drawable/ic_discuss"
        app:fabSize="auto"
        app:layout_anchor="@id/appBar"
        app:layout_anchorGravity="bottom|right"
        />
</android.support.design.widget.CoordinatorLayout>
如果是Android5.0以上的系统,上述布局可以直接实现如上图的效果。
不过在Android4.4到Android5.0的系统上会出现兼容性的问题,我的处理该问题的关键代码如下所示:
 if (Build.VERSION.SDK_INT >= Build.VERSION_CODES.KITKAT &&
   Build.VERSION.SDK_INT<=Build.VERSION_CODES.KITKAT_WATCH) {
            int padding = DensityUtil.px2dip(this, 25);
            ViewGroup.LayoutParams layoutParams = mToobar.getLayoutParams();
            layoutParams.height = layoutParams.height + padding;
            mToobar.setLayoutParams(layoutParams);
            mToobar.setTitleMarginTop(padding);
            mAppBar.setFitsSystemWindows(false);
 }
以上就是我对沉浸式状态栏目前的一点理解,有什么不对的地方请各位指正。
参考文章:
android沉浸式状态栏的实现方法
Demo的源码如下:
https://github.com/Duckdan/SteepDemo


 6133
6133

 被折叠的 条评论
为什么被折叠?
被折叠的 条评论
为什么被折叠?
 到【灌水乐园】发言


