


一、守护进程
我认为学习java的最佳资料就是两个东西,一个是其JDK文档,一个就是源码。我们先来看看JDK文档中对于Thread类的描述,下面摘取一些重要信息,然后逐个展开讲解。
(JDK文档)
线程 是程序中的执行线程。Java 虚拟机允许应用程序并发地运行多个执行线程。
每个线程都有一个优先级,高优先级线程的执行优先于低优先级线程。每个线程都可以或不可以标记为一个守护程序。当某个线程中运行的代码创建一个新 Thread 对象时,该新线程的初始优先级被设定为创建线程的优先级,并且当且仅当创建线程是守护线程时,新线程才是守护程序。
当 Java 虚拟机启动时,通常都会有单个非守护线程(它通常会调用某个指定类的 main 方法)。Java 虚拟机会继续执行线程,直到下列任一情况出现时为止:
调用了 Runtime 类的 exit 方法,并且安全管理器允许退出操作发生。
非守护线程的所有线程都已停止运行,无论是通过从对 run 方法的调用中返回,还是通过抛出一个传播到 run 方法之外的异常。
创建新执行线程有两种方法。一种方法是将类声明为 Thread 的子类。该子类应重写 Thread 类的 run 方法。接下来可以分配并启动该子类的实例。例如,计算大于某一规定值的质数的线程可以写成:
     class PrimeThread extends Thread {
         long minPrime;
         PrimeThread(long minPrime) {
             this.minPrime = minPrime;
         }

         public void run() {
             // compute primes larger than minPrime
              . . .
         }
     }
然后,下列代码会创建并启动一个线程:
     PrimeThread p = new PrimeThread(143);
     p.start();
创建线程的另一种方法是声明实现 Runnable 接口的类。该类然后实现 run 方法。然后可以分配该类的实例,在创建 Thread 时作为一个参数来传递并启动。采用这种风格的同一个例子如下所示:
     class PrimeRun implements Runnable {
         long minPrime;
         PrimeRun(long minPrime) {
             this.minPrime = minPrime;
         }

         public void run() {
             // compute primes larger than minPrime
              . . .
         }
     }
然后,下列代码会创建并启动一个线程:
     PrimeRun p = new PrimeRun(143);
     new Thread(p).start();
每个线程都有一个标识名,多个线程可以同名。如果线程创建时没有指定标识名,就会为其生成一个新名称。
在Java中有两类线程:User Thread(用户线程)、Daemon Thread(守护线程) 。用个比较通俗的比喻,任何一个守护线程都是整个JVM中所有非守护线程的保姆:【只要当前JVM实例中尚存在任何一个非守护线程没有结束,守护线程就全部工作;当最后一个非守护线程结束时,守护线程随着JVM一同结束工作】。Daemon的作用是为其他线程的运行提供便利服务,守护线程最典型的应用就是 GC (垃圾回收器),它就是一个很称职的守护者。
User Thread和Daemon两者几乎没有区别,唯一的不同之处就在于虚拟机的离开:如果 User Thread已经全部退出运行了,只剩下Daemon Thread存在了,虚拟机也就退出了。 因为没有了被守护者,Daemon也就没有工作可做了,也就没有继续运行程序的必要了。
值得一提的是,守护线程并非只有虚拟机内部提供,用户在编写程序时也可以自己设置守护线程。下面的方法就是用来设置守护线程的。
Thread daemonTread = new Thread();

  // 设定 daemonThread 为 守护线程,default false(非守护线程)
 daemonThread.setDaemon(true);

 // 验证当前线程是否为守护线程,返回 true 则为守护线程
 daemonThread.isDaemon();
这里有几点需要注意:
1. thread.setDaemon(true)必须在thread.start()之前设置,否则会跑出一个IllegalThreadStateException异常。你不能把正在运行的常规线程设置为守护线程。
2. 在Daemon线程中产生的新线程也是Daemon的。
3. 不要认为所有的应用都可以分配给Daemon来进行服务,比如读写操作或者计算逻辑。 因为你不可能知道在所有的User完成之前,Daemon是否已经完成了预期的服务任务。一旦User退出了,可能大量数据还没有来得及读入或写出,计算任务也可能多次运行结果不一样。这对程序是毁灭性的。造成这个结果理由已经说过了:一旦所有User Thread离开了,虚拟机也就退出运行了。
下面举一个将I/O 放到守护进程然后失败的例子:
//完成文件输出的守护线程任务
import java.io.*;

class TestRunnable implements Runnable{
    public void run(){
               try{
                  Thread.sleep(1000);//守护线程阻塞1秒后运行
                  File f=new File("daemon.txt");
                  FileOutputStream os=new FileOutputStream(f,true);
                  os.write("daemon".getBytes());
           }
               catch(IOException e1){
          e1.printStackTrace();
               }
               catch(InterruptedException e2){
                  e2.printStackTrace();
           }
    }
}
public class TestDemo2{
    public static void main(String[] args) throws InterruptedException
    {
        Runnable tr=new TestRunnable();
        Thread thread=new Thread(tr);
                thread.setDaemon(true); //设置守护线程
        thread.start(); //开始执行分进程
    }
}
运行结果:文件daemon.txt中没有”daemon”字符串。 原因也很简单,直到主线程完成,守护线程仍处于1秒的阻塞状态。这个时候主线程很快就运行完了,虚拟机退出,Daemon停止服务,输出操作自然失败了。
下面我举一个综合性的代码示例,大家注意注释:
MyUerThread.java
package easy;

// 通过继承 Thread 自定义一个线程类
public class MyUerThread extends Thread {
    private int count = 0;

    @Override
    synchronized public void run() {
        super.run();
        // 注意这里,我让 MyUerThread 只打印5次,5次打印结束,这个线程就结束了
        for (int i = 0; i < 5; i++) {
            count++;
            System.out.printf("MyUserThread 第 %d 次执行。\n", count);
            try {
                // 调用 Thread 的sleep方法,注意,它是类方法
                Thread.sleep(500);
            } catch (InterruptedException e) {
                e.printStackTrace();
            }
        }
    }
}
MyDaemon.java
package easy;

// 通过实现 Runnable 接口自定义一个线程类
public class MyDaemon implements Runnable {
    private int count = 0;

    // 用synchronized保证run 方法线程安全
    synchronized public void run() {
        // 这里我让 MyDaemon 打印 100 次
        for (int i = 0; i < 100; i++) {
            count++;
            System.out.printf("MyDaemon 第 %d 次执行。\n", count);
            try {
                Thread.sleep(500);
            } catch (InterruptedException e) {
                e.printStackTrace();
            }
        }
    }
}
Main.java
package easy;

public class Main {

    public static void main(String[] args) {
        // Thread 子类的创建步骤
        MyThread userThread = new MyThread();
        userThread.start();

        // 通过 Runnable 定义的线程类的创建步骤
        MyDaemon myDaemon = new MyDaemon();
        Thread daemon = new Thread(myDaemon);
        daemon.setDaemon(true);
        daemon.start();
    }
}
输出
MyUserThread 第 1 次执行。
MyDaemon 第 1 次执行。
MyDaemon 第 2 次执行。
MyUserThread 第 2 次执行。
MyUserThread 第 3 次执行。
MyDaemon 第 3 次执行。
MyDaemon 第 4 次执行。
MyUserThread 第 4 次执行。
MyUserThread 第 5 次执行。
MyDaemon 第 5 次执行。
MyDaemon 第 6 次执行。
我们发现,MyUserThread保证全部5次打印全部执行,但是 MyDaemon 原计划打印100次的,却只打印了6次。这就如同上面介绍的,用户进程全部结束,守护进程也就没有必要继续存在了,它就在合适的时间结束了,而不管内部任务是否已经完全。
总结
本文介绍了线程类的定义和创建过程,然后着重分析了一下Java中的“守护线程”又或者称之为“后天线程”的特点。
二、停止与中断
我们知道线程的start方法,那么,很自然地会想到停止一个线程使用stop,然而stop方法是“过时的”,“不安全”。stop()方法,直接终止线程,释放线程所获的资源,但是在释放过程中会造成对象状态不一致,从而使程序进入未知的境地,已经很久不推荐使用了。所以,Java没有提供一种安全直接的方法来停止某个线程,但是Java提供了中断机制。在这里要着重介绍的是Thread.interrupt() 方法,也就是要分析清楚java的中断机制。先来看看JDK怎么描述的:
中断线程。
1. 如果当前线程没有中断它自己(这在任何情况下都是允许的),则该线程的 checkAccess 方法就会被调用,这可能抛出 SecurityException。
2. 如果线程在调用 Object 类的 wait()、wait(long) 或 wait(long, int) 方法,或者Thread类的 join()、join(long)、join(long, int)、sleep(long) 或 sleep(long, int) 方法过程中受阻,则其中断状态将被清除,它还将收到一个 InterruptedException。
3. 如果该线程在可中断的通道上的 I/O 操作中受阻,则该通道将被关闭,该线程的中断状态将被设置并且该线程将收到一个 ClosedByInterruptException。
4. 如果该线程在一个 Selector 中受阻,则该线程的中断状态将被设置,它将立即从选择操作返回,并可能带有一个非零值,就好像调用了选择器的 wakeup 方法一样。
5. 如果以前的条件都没有保存,则该线程的中断状态将被设置。
6. 中断一个不处于活动状态的线程不需要任何作用。
7. 抛出:SecurityException - 如果当前线程无法修改该线程
上述文档详细介绍了在各种情况下调用interrupt方法的结果,所以看不明白不要紧,有些知识会在另外的博文里介绍,这里我先介绍一些基础。
1 中断标志
Java中断机制是一种协作机制,也就是说通过中断并不能直接终止另一个线程,而需要被中断的线程自己处理中断。这好比是家里的父母叮嘱在外的子女要注意身体,但子女是否注意身体,怎么注意身体则完全取决于自己。
Java中断模型也是这么简单,每个线程对象里都有一个boolean类型的标识(不一定就要是Thread类的字段,实际上也的确不是,这几个方法最终都是通过native方法来完成的),代表着是否有中断请求(该请求可以来自所有线程,包括被中断的线程本身)。例如,当线程t1想中断线程t2,只需要在线程t1中将线程t2对象的中断标识置为true,然后线程2可以选择在合适的时候处理该中断请求,甚至可以不理会该请求,就像这个线程没有被中断一样。
2 interrupt() 不会中断一个正在运行的线程
在此我先介绍另外两个方法,这两个方法有助于我们利用程序分析interrupt():
(1)public static boolean interrupted:注意,它是一个静态方法,是一个类方法,测试当前线程是否已经中断。线程的中断状态 由该方法清除。换句话说,如果连续两次调用该方法,则第二次调用将返回 false(在第一次调用已清除了其中断状态之后,且第二次调用检验完中断状态前,当前线程再次中断的情况除外)。源码为:
    public static boolean interrupted() {
        return currentThread().isInterrupted(true);
    }
所以,这是一个命名很不恰当,很有迷惑性的方法,它不仅仅测试了当前线程的是否已经中断,而且会把中断状态清除。
(2)public boolean isInterrupted():注意,这是一个成员方法,是对象的方法。测试线程是否已经中断。线程的中断状态不受该方法的影响。
public class MyThread extends Thread {
    private int count = 0;

    @Override
    synchronized public void run() {
        super.run();
        // 注意这里,我让 MyThread 只打印5次,5次打印结束,这个线程就结束了
        for (int i = 0; i < 5; i++) {
            count++;
            System.out.printf(this.getName() + " 第 %d 次打印。\n", count);
        }
    }

    public static void main(String[] args) {
        MyThread myThread = new MyThread();
        myThread.start();
        myThread.interrupt();
        System.out.println("线程的中断状态是:"+myThread.isInterrupted());
    }
}线程的中断状态是:true
Thread-0 第 1 次打印。
Thread-0 第 2 次打印。
Thread-0 第 3 次打印。
Thread-0 第 4 次打印。
Thread-0 第 5 次打印。可见,线程myThread的中断状态已经被设置为true,但是它并没有被停止,好像interrupt()没有起到任何作用。这也就是上面介绍的,主线程main想让myThread中断,但是它没有理会,依然执行。这也是JDK文档中提到的第一种情况。
所以,interrupt() 方法只是将目标线程的中断状态设置为true,至于是否对这种中断进行处理,完全看这个线程本身,也就是我们的代码是否处理这种情况。上述实例代码我们做一点点修改,增加一个判断中断状态的步骤:
public class MyThread extends Thread {
    private int count = 0;

    @Override
    synchronized public void run() {
        super.run();
        System.out.println("线程已经开始执行了!");
        // 注意这里,我让 MyThread 只打印5次,5次打印结束,这个线程就结束了
        for (int i = 0; i < 5; i++) {
            if(interrupted()){
                System.out.println("线程已经被中断,我们不往下执行了!");
                break;
            }
            count++;
            System.out.printf(this.getName() + " 第 %d 次打印。\n", count);
        }
    }

    public static void main(String[] args) {
        MyThread myThread = new MyThread();
        myThread.start();
        myThread.interrupt();
        System.out.println("线程的中断状态是:"+myThread.isInterrupted());
    }
}线程的中断状态是:true
线程已经开始执行了!
线程已经被中断,我们不往下执行了!讲到这里,相信大家对于interrupt()方法已经有了一个基本的了解,那么,JDK中提到的第二种情况是什么意思呢?其实很简单,往下看。
3 InterruptedException
当我想使用Thread.sleep() 方法的时候,IDE就会提醒我要用try/catch包裹:
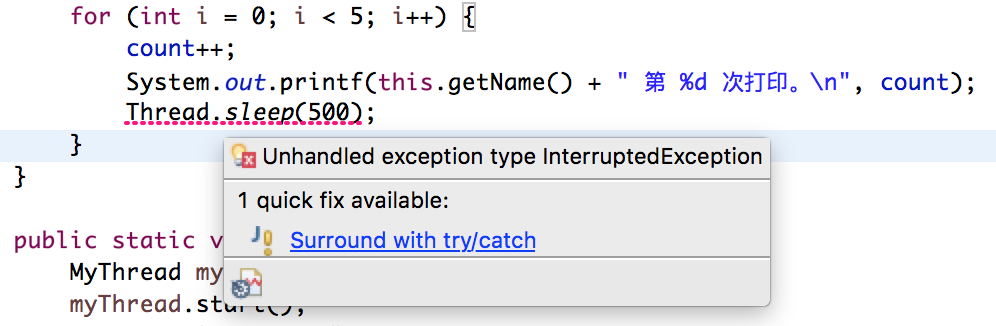
这是因为sleep方法本身就会去检查线程的中断状态,如果现在的中断状态为true,它会抛出InterruptedException。关于这个异常我们来看看JDK文档:
当线程在活动之前或活动期间处于正在等待、休眠或占用状态且该线程被中断时,抛出该异常。有时候,一种方法可能希望测试当前线程是否已被中断,如果已被中断,则立即抛出此异常。下列代码可以达到这种效果:
  if (Thread.interrupted())  // Clears interrupted status!
      throw new InterruptedException();
这个代码好眼熟,不就是section 2 中给出的示例代码吗?对的,在java中有很多方法是自带对中断状态的判断的,不用我们像section 2中那样自己去写。比如除了sleep(),wait()和join()等也是一样。还是上面的例子做一点点修改:
public class MyThread1 extends Thread {

    @Override
    public void run() {
        super.run();
        System.out.println("线程已经开始执行了!");
        // 注意这里,我让 MyThread 只打印5次,5次打印结束,这个线程就结束了
        for (int i = 0; i < 6; i++) {
            System.out.printf(this.getName() + " 第 %d 次打印。\n", i+1);
            try {
                System.out.printf("即将开始第 %d 次sleep\n",i+1);
                Thread.sleep(500);
            } catch (InterruptedException e) {
                e.printStackTrace();
                System.out.println("线程已经被中断,不能进入sleep!");
            }
        }
    }

    public static void main(String[] args) {
        MyThread1 myThread = new MyThread1();
        myThread.start();
        myThread.interrupt();
    }
}
线程已经开始执行了!
Thread-0 第 1 次打印。
即将开始第 1 次sleep
线程已经被中断,不能进入sleep!
java.lang.InterruptedException: sleep interrupted
Thread-0 第 at java.lang.Thread.sleep(Native Method)
at easy.MyThread1.run(MyThread1.java:15)
2 次打印。
即将开始第 2 次sleep
Thread-0 第 3 次打印。
即将开始第 3 次sleep
Thread-0 第 4 次打印。
即将开始第 4 次sleep
Thread-0 第 5 次打印。
即将开始第 5 次sleep
Thread-0 第 6 次打印。
即将开始第 6 次sleep也就是:
1. main在启动 myThread 之后,立刻将其中断状态设置为true;
2. 结果,在第一次调用sleep方法时,该方法去检查线程的中断状态,发现为true,就抛出了InterruptedException异常;
3. 然后该方法还将 myThread 的中断状态改为false,所以接下来的运行没有任何问题。
(再次强调一点,这里的“中断状态”只是为了讲解方便的一种形象的说法,真正的原理在native方法中,我们不去深究。)
而文章的前面贴出的JDK文档的第二种情况是指在sleep、wait、join的状态下调用interrupt方法的情形,也就是说interrupt方法实际上会触发这三个方法中的InterruptedException异常机制。
public class MyThread2 extends Thread {

    @Override
    public void run() {
        super.run();
        System.out.printf("线程 %s 已经启动!接下来进入sleep状态", this.getName());
        try {
            Thread.sleep(30*1000);
        } catch (InterruptedException e) {
            e.printStackTrace();
            System.out.println("\n我睡觉被吵醒会咬人的!");
        }
    }

    public static void main(String[] args) {
        final MyThread2 myThread = new MyThread2();
        myThread.start();
        Timer timer = new Timer();
        timer.schedule(new TimerTask() {
            public void run() {
                System.out.println("\n中断它!");
                myThread.interrupt();
            }
        }, 2000);// 设定指定的时间time,此处为2000毫秒
    }
}
线程 Thread-0 已经启动!接下来进入sleep状态
中断它!
java.lang.InterruptedException: sleep interrupted
我睡觉被吵醒会咬人的!
at java.lang.Thread.sleep(Native Method)
at easy.MyThread2.run(MyThread2.java:13)
4 停止一个线程的技巧
section 2 中的代码其实我故意忽略了一个问题,那就是我用interrupted判断后结束进程看似已经结束了,其实不然,该代码只是结束了for循环:break。如果for循环的底下还有代码,该代码会继续执行:
public class MyThread1 extends Thread {
    private int count = 0;

    @Override
    synchronized public void run() {
        super.run();
        System.out.println("线程已经开始执行了!");
        // 注意这里,我让 MyThread 只打印5次,5次打印结束,这个线程就结束了
        for (int i = 0; i < 5; i++) {
            if(interrupted()){
                System.out.println("线程已经被中断,我们不往下执行了!");
                break;
            }
            count++;
            System.out.printf(this.getName() + " 第 %d 次打印。\n", count);
        }

        System.out.println("快看,我在for循环的底下");
    }

    public static void main(String[] args) {
        MyThread1 myThread = new MyThread1();
        myThread.start();
        myThread.interrupt();
    }
}
线程已经开始执行了!
线程已经被中断,我们不往下执行了!
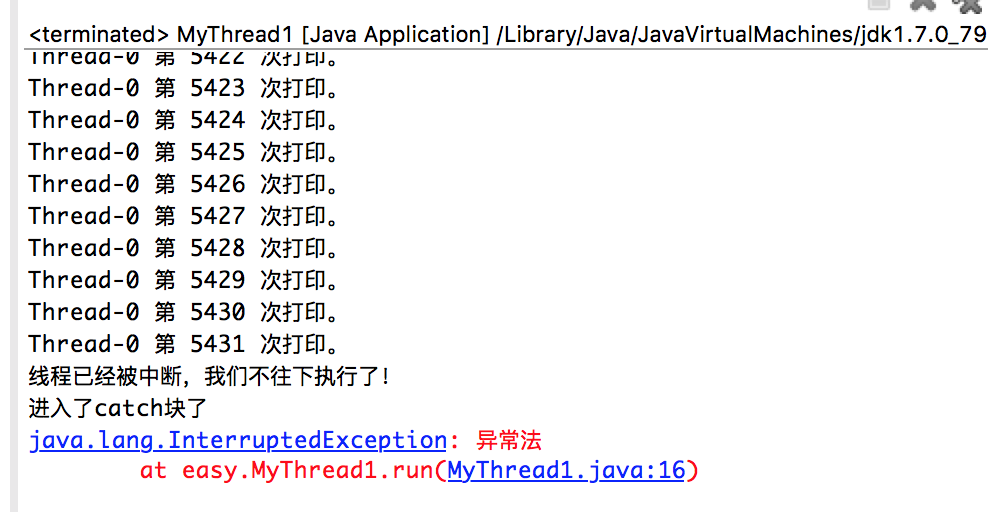
快看,我在for循环的底下解决办法1:异常法
用try/catch包裹代码,逻辑代码放入try中,通过interrupted判断中断,一旦发现则主动抛出异常,从而进入了catch块中,for循环以下的代码不会执行。
public class MyThread1 extends Thread {
    private int count = 0;

    @Override
    synchronized public void run() {
        super.run();
        System.out.println("线程已经开始执行了!");
        // 注意这里,我让 MyThread 只打印5次,5次打印结束,这个线程就结束了
        try {
            for (int i = 0; i < 50000; i++) {
                if(interrupted()){
                    System.out.println("线程已经被中断,我们不往下执行了!");
                    //break;
                    throw new InterruptedException("异常法"); // 主动抛出异常,throw关键字不要忘记
                }
                count++;
                System.out.printf(this.getName() + " 第 %d 次打印。\n", count);
            }

            System.out.println("快看,我在for循环的底下");
        } catch (InterruptedException e) {
            System.out.println("进入了catch块了");
            e.printStackTrace();
        }

    }

    public static void main(String[] args) {
        MyThread1 myThread = new MyThread1();
        myThread.start();
        try {
            Thread.sleep(500);
        } catch (InterruptedException e) {
            e.printStackTrace();
        }
        myThread.interrupt();
    }
}
结果:
解决办法2:return
将break改为return
三、线程的状态及几个简单方法
1 线程状态类型
- 新建状态(New):新创建了一个线程对象。
- 就绪状态(Runnable):线程对象创建后,其他线程调用了该对象的start()方法。该状态的线程位于可运行线程池中,变得可运行,等待获取CPU的使用权。
- 运行状态(Running):就绪状态的线程获取了CPU,执行程序代码。
- 阻塞状态(Blocked):阻塞状态是线程因为某种原因放弃CPU使用权,暂时停止运行。直到线程进入就绪状态,才有机会转到运行状态。阻塞的情况分三种:
(一)、等待阻塞:运行的线程执行wait()方法,JVM会把该线程放入等待池中。
(二)、同步阻塞:运行的线程在获取对象的同步锁时,若该同步锁被别的线程占用,则JVM会把该线程放入锁池中。
(三)、其他阻塞:运行的线程执行sleep()或join()方法,或者发出了I/O请求时,JVM会把该线程置为阻塞状态。当sleep()状态超时、join()等待线程终止或者超时、或者I/O处理完毕时,线程重新转入就绪状态。 - 死亡状态(Dead):线程执行完了或者因异常退出了run()方法,该线程结束生命周期。
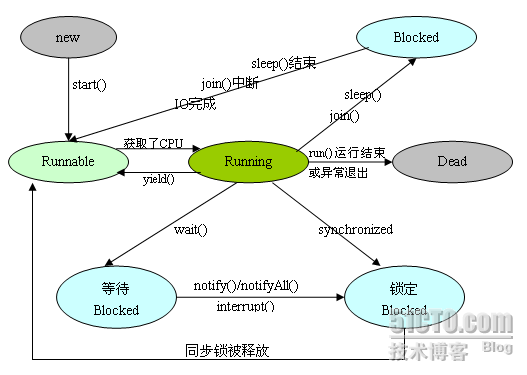
图中涉及的方法主要来至于两个类。
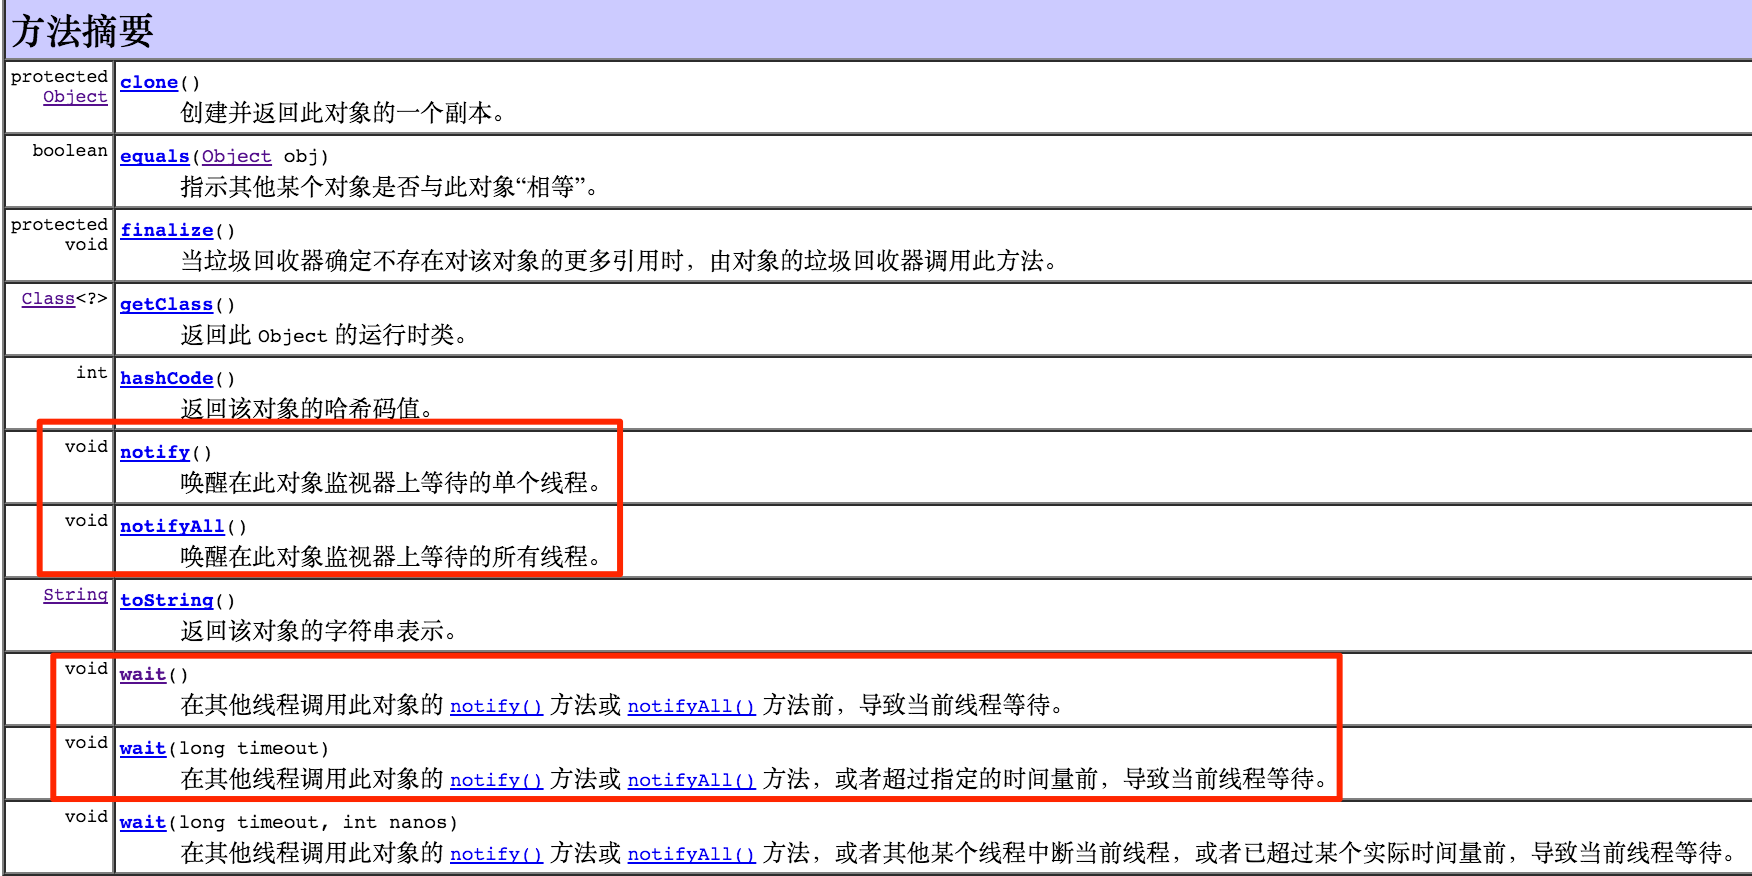
(1)Object类
- notify() :唤醒在此对象监视器上等待的单个线程。
- notifyAll() :唤醒在此对象监视器上等待的所有线程。
- wait() :在其他线程调用此对象的 notify() 方法或 notifyAll() 方法前,导致当前线程等待。
- wait(long timeout) :在其他线程调用此对象的 notify() 方法或 notifyAll() 方法,或者超过指定的时间量前,导致当前线程等待。
(2)Thread类
- interrupt():中断线程。
- join() :等待该线程终止。
- join(long millis) :等待该线程终止的时间最长为
millis毫秒。 - sleep(long millis) :在指定的毫秒数内让当前正在执行的线程休眠(暂停执行),此操作受到系统计时器和调度程序精度和准确性的影响。该线程不丢失任何监视器的所属权。
- yield() :让出CPU,回到可执行状态。
2 锁池和等待池
在java中,每个对象都有两个池,锁池(监视器monitor)和等待池。wait() ,notifyAll(),notify() 三个方法都是Object类中的方法。
锁池
假设线程A已经拥有了某个对象(注意:不是类)的锁,而其它的线程想要调用这个对象的某个synchronized方法(或者synchronized块),由于这些线程在进入对象的synchronized方法之前必须先获得该对象的锁的拥有权,但是该对象的锁目前正被线程A拥有,所以这些线程就进入了该对象的锁池中。
等待池
假设一个线程A调用了某个对象的wait()方法,线程A就会释放该对象的锁(因为wait()方法必须出现在synchronized中,这样自然在执行wait()方法之前线程A就已经拥有了该对象的锁),同时线程A就进入到了该对象的等待池中。如果另外的一个线程调用了相同对象的notifyAll()方法,那么处于该对象的等待池中的线程就会全部进入该对象的锁池中,准备争夺锁的拥有权。如果另外的一个线程调用了相同对象的notify()方法,那么仅仅有一个处于该对象的等待池中的线程(随机)会进入该对象的锁池。
3 sleep
Thread类的静态方法。在指定的毫秒数内让当前正在执行的线程休眠(暂停执行),此操作受到系统计时器和调度程序精度和准确性的影响。该线程不丢失任何监视器的所属权。
4 yield
Thread类的静态方法。Thread.yield()方法作用是:暂停当前正在执行的线程对象,并执行其他线程。yield()应该做的是让当前运行线程回到可运行状态,以允许具有相同优先级的其他线程获得运行机会。因此,使用yield()的目的是让相同优先级的线程之间能适当的轮转执行。但是,实际中无法保证yield()达到让步目的,因为让步的线程还有可能被线程调度程序再次选中。
结论:yield()从未导致线程转到等待/睡眠/阻塞状态。在大多数情况下,yield()将导致线程从运行状态转到可运行状态,但有可能没有效果。
5 join
Thread类的普通方法。在很多情况下,主线程生成并起动了子线程,如果子线程里要进行大量的耗时的运算,主线程往往将于子线程之前结束,但是如果主线程处理完其他的事务后,需要用到子线程的处理结果,也就是主线程需要等待子线程执行完成之后再结束,这个时候怎么办?
想博主第一次接触多线程的时候,还不知有join()这个方法,用的办法是让主线程sleep 10秒种嘛,估摸着那个时候子线程已经结束计算了。是不是很傻,很没有效率?这个时候join()出马了。

“等待该线程终止”,这里需要理解的就是该线程是指的主线程等待子线程的终止。也就是在子线程调用了join()方法后面的代码,只有等到子线程结束了才能执行。来个对比的例子:
代码1:
public class MyThread1 extends Thread {

    @Override
    public void run() {
        super.run();
        String name = this.getName();
        for (int i = 0; i < 6; i++) {
            System.out.println(name);
            try {
                Thread.sleep(500);
            } catch (InterruptedException e) {
                e.printStackTrace();
            }
        }
    }

    public static void main(String[] args) {
        MyThread1 t1 = new MyThread1();
        MyThread1 t2 = new MyThread1();
        t1.start();
        t2.start();
    }

}
输出
Thread-0
Thread-1
Thread-0
Thread-1
Thread-0
Thread-1
Thread-0
Thread-1
Thread-0
Thread-1
Thread-0
Thread-1
代码2:
      …… ……
        t1.start();
        try {
            t1.join();
        } catch (InterruptedException e) {
            e.printStackTrace();
        }
        t2.start();
      …… ……
输出
Thread-0
Thread-0
Thread-0
Thread-0
Thread-0
Thread-0
Thread-1
Thread-1
Thread-1
Thread-1
Thread-1
Thread-1
6 不用suspend
要说线程的暂停,那么就像上一篇博文里讲线程的停止一样,过时的方法咱不用:Thread.suspend 和 Thread.resume。这两个方法是一对,其中suspend有死锁倾向,所以已经“过时”了。为什么呢? 看看源码注释:
     * If the thread is alive, it is suspended and makes no further
     * progress unless and until it is resumed.
也就是说,一旦调用suspend,线程会被立刻冻结,而且【不会有任何后续步骤】,这就是问题所在:如果目标线程挂起时在保护关键系统资源的监视器上保持有锁,则在目标线程重新开始以前任何线程都不能访问该资源。如果重新开始目标线程的线程想在调用 resume 之前锁定该监视器,则会发生死锁。这类死锁通常会证明自己是“冻结”的进程。
四、线程的优先级
先来瞄一瞄源码。
    /**
     * The minimum priority that a thread can have.
     */
    public final static int MIN_PRIORITY = 1;

   /**
     * The default priority that is assigned to a thread.
     */
    public final static int NORM_PRIORITY = 5;

    /**
     * The maximum priority that a thread can have.
     */
    public final static int MAX_PRIORITY = 10;
所以线程的优先级,最小1,最大10,一般5。这个一般的含义体现在哪呢? 接着看我截取的源码,该源码是新建一个线程的初始化程序中的几步:
        Thread parent = currentThread();

        this.daemon = parent.isDaemon();
        this.priority = parent.getPriority();

        setPriority(priority);
这几行代码总结为一句话就是:
优先级的继承性:如果A线程新建的B线程,则B线程的优先级与A线程一样。
然后,main线程的优先级默认是5,所以一般不去setPriority,线程的优先级就都是5。
优先级有什么用呢? 一般来讲,高优先级的线程总是大部分先执行完,但不代表高优先级的线程总是全部先执行完。这是因为线程的调用具有随机性。
五、synchronized的基本用法
1 为什么要使用synchronized
我们首先编写一个非常简单的多线程的程序,是模拟银行中的多个线程同时对同一个储蓄账户进行存款、取款操作的。
在程序中我们使用了一个简化版本的Account类,代表了一个银行账户的信息。在主程序中我们首先生成了1000个线程,然后启动它们,每一个线程都对John的账户进行存100元,然后马上又取出100元。这样,对于John的账户来说,最终账户的余额应该是还是1000元才对。然而运行的结果却超出我们的想像,首先来看看我们的演示代码:
Account.java
package medium;

class Account {
    String name;
    float amount;

    public Account(String name, float amount) {
        this.name = name;
        this.amount = amount;
    }

    /**
     * 存钱
     * 之所以要把对amount的运算使用一个临时变量首先存储,sleep一段时间,然后,再赋值给amount,
     * 是为了模拟真实运行时的情况。因为在真实系统中,账户信息肯定是存储在持久媒介中,
     * 比如RDBMS中,此处的睡眠的时间相当于比较耗时的数据库操作,
     * 最后把临时变量tmp的值赋值给amount相当于把amount的改动写入数据库中。
     * */
    public void deposit(float amt) {
        float tmp = amount;
        tmp += amt;

        try {
            Thread.sleep(100);// 模拟其它处理所需要的时间,比如刷新数据库等
        } catch (InterruptedException e) {
            e.printStackTrace();
        }

        amount = tmp;
    }

    /**
     * 取钱
     * */
    public void withdraw(float amt) {
        float tmp = amount;
        tmp -= amt;

        try {
            Thread.sleep(100);// 模拟其它处理所需要的时间,比如刷新数据库等
        } catch (InterruptedException e) {
            e.printStackTrace();
        }

        amount = tmp;
    }

    /**
     * 查询账户余额
     * */
    public float getBalance() {
        return amount;
    }
}
AccountTest.java
package medium;

public class AccountTest {

    // 线程的数量
    private static int NUM_OF_THREAD = 8888;
    static Thread[] threads = new Thread[NUM_OF_THREAD];

    public static void main(String[] args) {
        // 账户名为 John,里面有1000元
        final Account acc = new Account("John", 1000.0f);
        // 用for循环新建 NUM_OF_THREAD 个线程,每个线程都是一新建就立刻启动,然后run都是存100再取100
        for (int i = 0; i < NUM_OF_THREAD; i++) {
            threads[i] = new Thread(new Runnable() {
                public void run() {
                    acc.deposit(100.0f);
                    acc.withdraw(100.0f);
                }
            });
            threads[i].start();
        }

        // 主线程等 NUM_OF_THREAD 个线程全部运行完才去查询余额,我们期待的是1000
        for (int i = 0; i < NUM_OF_THREAD; i++) {
            try {
                threads[i].join(); // 等待所有线程运行结束
            } catch (InterruptedException e) {
                e.printStackTrace();
            }
        }
        System.out.println("Finally, John's balance is:" + acc.getBalance());
    }

}
运行结果:每次都不一样
Finally, John's balance is:1500.0

Finally, John's balance is:1600.0

Finally, John's balance is:2100.0

……为什么会出现这样的问题?这就是多线程中的同步的问题。在我们的程序中,Account中的amount会同时被多个线程所访问,这就是一个竞争资源,通常称作竞态条件。对于这样的多个线程共享的资源我们必须进行同步,以避免一个线程的改动被另一个线程所覆盖。
2 给对象加锁
再详细一点解释。上面的 deposit 和 withdraw 都是三个步骤:
1. 从数据库读数据(读amount)保存到临时变量;
2. 利用零时变量进行操作,比如用户存100元,整个操作过程花了5分钟;
3. 将新的 amount 存入数据库。
实际上,上面三个步骤都是要花一定时间的。举个形象一点的例子:
1. 如果线程A(手机端)和B(PC端)现在几乎同时读取了amount ,amount 为1000;
2. A向账户转账100元,此时tmp = 1100,然后写入了数据库,amount变为 1100;
3. 接着,B向账户转账200元,此时tmp = 1200,然后写入数据库,amount变为 1200。但是实际上,我们都知道amount应该变为1300才正确。
那么我们对deposit 和 withdraw 进行同步,也就是加synchronized原语,也就是让一个线程在调用这个Account对象时,其他所有的线程都不能调用该对象, 它将所有线程串行化。所以,【synchronized加锁的是对象,而不是代码】。我们来测试一下:
        ……

//   public void deposit(float amt) {
    synchronized public void deposit(float amt) {
        float tmp = amount;
        tmp += amt;

        try {
            Thread.sleep(100);// 模拟其它处理所需要的时间,比如刷新数据库等
        } catch (InterruptedException e) {
            e.printStackTrace();
        }

        amount = tmp;
    }

    /**
     * 取钱
     * */
//   public void withdraw(float amt) {
    synchronized public void withdraw(float amt) {
        float tmp = amount;
        tmp -= amt;

        try {
            Thread.sleep(100);// 模拟其它处理所需要的时间,比如刷新数据库等
        } catch (InterruptedException e) {
            e.printStackTrace();
        }

        amount = tmp;
    }

        ……
输出:
Finally, John's balance is:1000.0但是我们有一个明显的感受,就是程序的执行变得很慢,而且一开始还有内存的溢出的错误,我不得不将线程数量从我喜欢的 8888 改成了 100 !它还运行了好一会儿。(博主的本本是Macbook Pro 8G/256G 2.7 GHz Intel Core i5 )。所以,解决办法肯定不是这么简单的,后面会讲到。
3 给类加锁
如果两个线程,分别访问两个不同的对象实例,则它们之间没法同步的,所以这里介绍一下给类加同步的方法: 对公共成员加锁。例如给一个类添加一个静态成员,两个实例都可以同步这个对象而达到线程安全。下面举一个对比的例子。
非类同步的代码,新建两个线程,则两个线程并发执行:
public class Test1 extends Thread{
    private int val;
    private static Object object = new Object();

    public Test1(int val) {
        this.val = val;
    }

    public void printVal() {
        // 非 类同步的方法
        for(int i = 0; i<20; i++){
            System.out.println(val + "");
            try {
                Thread.sleep(50);
            } catch (InterruptedException e) {
                e.printStackTrace();
            }
        }
    }

    @Override
    public void run() {
        super.run();
        printVal();
    }


    public static void main(String[] args) {
        Test1 t1 = new Test1(6);
        Test1 t2 = new Test1(8);
        t1.start();
        t2.start();
    }

}
输出
6886866868866868686886866868688686686868类同步的代码,所以两个线程是串行执行的:
public class Test1 extends Thread{
    private int val;
    private static Object object = new Object();

    public Test1(int val) {
        this.val = val;
    }

    public void printVal() {
        // 类同步的方法
        synchronized (object) {
            // 非 类同步的方法
            for(int i = 0; i<20; i++){
                System.out.print(val + "");
                try {
                    Thread.sleep(50);
                } catch (InterruptedException e) {
                    e.printStackTrace();
                }
            }
        }
    }

    @Override
    public void run() {
        super.run();
        printVal();
    }


    public static void main(String[] args) {
        Test1 t1 = new Test1(6);
        Test1 t2 = new Test1(8);
        t1.start();
        t2.start();
    }

}
输出
6666666666666666666688888888888888888888六、synchronized的原理
1 synchronized原理
每个对象有一个锁(在HotSpot JVM实现中,锁有个专门的名字:对象监视器monitor)。当monitor被占用时就会处于锁定状态,线程执行monitorenter指令时尝试获取monitor的所有权,过程如下:
(1)如果monitor的进入数为0,则该线程进入monitor,然后将进入数设置为1,该线程即为monitor的所有者。
(2)如果线程已经占有该monitor,只是重新进入,则进入monitor的进入数加1。
(3)如果其他线程已经占用了monitor,则该线程进入阻塞状态,直到monitor的进入数为0,再重新尝试获取monitor的所有权。
monitorexit指令的作用:
(1)执行monitorexit的线程必须是objectref所对应的monitor的所有者。
(2)指令执行时,monitor的进入数减1,如果减1后进入数为0,那线程退出monitor,不再是这个monitor的所有者。其他被这个monitor阻塞的线程可以尝试去获取这个 monitor 的所有权。
通过这两段描述,我们应该能很清楚的看出Synchronized的实现原理,Synchronized的语义底层是通过一个monitor的对象来完成,其实wait/notify等方法也依赖于monitor对象,这就是为什么只有在同步的块或者方法中才能调用wait/notify等方法,否则会抛出java.lang.IllegalMonitorStateException的异常的原因。
synchronized有三种用法:
(1)修饰普通方法
我们使用同一个对象实例去调用synchronized method1和synchronized method1实现同步,因为调用之前都需要先去竞争同一个对象上的锁(monitor),也就只能互斥的获取到锁,因此,method1和method2只能顺序的执行。
(2)修饰静态方法
首先需要知道的一点是,每个类都关联一个Class对象,这个对象是实实在在存在的。静态方法是属于类的,而不是实例,所以synchronized修饰的静态方法不要求由同一个实例调用就可以实现同步,因为它们竞争同一个Class对象上的monitor。
(3)修饰代码块
对于代码块的同步实质上需要获取Synchronized关键字后面括号中对象的monitor,我们一般使用的是this,所以进入同步块之前需要去竞争同一个对象上的锁,因此需要由同一个实例调用。
2 synchronized锁重入
我们结合示例代码来看:
public class Son extends Father {

    public static void main(String[] args) {
        Son lw = new Son();
        lw.doSomething();
    }

    public synchronized void doSomething() {
        System.out.println(Thread.currentThread().getName() + ": Son->doSomething()");
        doAnotherThing(); // 调用自己类中其他的synchronized方法
        super.doSomething(); // 调用父类的synchronized方法
    }

    private synchronized void doAnotherThing() {
        System.out.println(Thread.currentThread().getName() + ": Son->doAnotherThing()");
    }
}

class Father {
    public synchronized void doSomething() {
        System.out.println(Thread.currentThread().getName() + ": Father->doSomething()");
    }
}
我们从main方法看起,lw是一个对象实例,lw.doSomething()调用了son的synchronized doSomething()方法,所以这个时候线程main需要获得对象lw的锁。结果son 的doSomething() 要调用另一个synchronized的方法:doAnotherThing(),这个时候,main线程得再次获取lw对象的锁。如果synchronized 的锁是不可重入的,那么因为这个锁已经被占有了(被它自己),所以第二获得失败;而且根据这个代码的逻辑,这个程序陷入死锁了。我们来运行一下,看看结果:
main: Son->doSomething()
main: Son->doAnotherThing()
main: Father->doSomething()
由这个结果我们可以做出如下总结:
1. synchronized的锁是可重入的。
2. 锁重入是指:一个线程在获取了一个锁而且还持有的情况下,再次请求这个锁,它是可以再次获得这个锁的。
3. 锁是否可以重入,是跟它的实现逻辑相关的。这里重进入的实现是通过为每个锁关联一个请求计数和一个占有它的线程。
3 synchronized(this)与synchronized方法
这一小节要讲的问题其实在博主的上一篇博文中就埋下了伏笔:【Thread详解5:synchronized的使用(一)(http://blog.csdn.net/cds86333774/article/details/50995063)】。
synchronized方法与synchronized(this)比较的弊端其实没有那么明显,为什么呢? 因为不过是更灵活一些。如果一个方法“很大”,比如要执行很多东西,耗时很长,如果你直接给这么一个“大的”方法加上synchronized修饰,那么程序的效率无疑很低。这个情况下,如果我把这个“大”方法再细分一下,一些资源(代码)是需要同步的,一些不需要,我们就可以在这个“大”方法的内部有选择地添加synchronized(this)代码块,从而起到一定的优化作用,然而在本质上还是一样的,都是给对象实例加锁。我们如果把一个“大”方法分成几个“小”方法,然后有选择地给这些“小”方法添加synchronized,再用一个方法把几个方法包装一下,其实和synchronized(this)一样嘛。所以我觉得一些书中和博客上说“synchronized(this) 比synchronized方法好”,其实是欠妥的。
下面,我用代码来证明一下自己的理论:
package medium;

public class PrintClass {
    /**
     * 大方法中调用小方法,小方法中有一个是synchronized方法
     */
    public void print1() {
        for (int i = 0; i < 10; i++) {
            System.out.println(Thread.currentThread().getName() + "的【一般的代码】在打印");
            try {
                Thread.sleep(50);
            } catch (InterruptedException e) {
                e.printStackTrace();
            }
        }
        printSynchronizedMethod();
    }

    /**
     * 一个大方法,其中有一段代码是同步代码块
     */
    public void print2() {
        for (int i = 0; i < 10; i++) {
            System.out.println(Thread.currentThread().getName() + "的【一般的代码】在打印");
            try {
                Thread.sleep(50);
            } catch (InterruptedException e) {
                e.printStackTrace();
            }
        }

        // 同步代码块
        synchronized (this) {
            for (int i = 0; i < 10; i++) {
                System.out.printf("                  %s的【同步的*代码块*】在打印\n", Thread.currentThread().getName());
                try {
                    Thread.sleep(50);
                } catch (InterruptedException e) {
                    e.printStackTrace();
                }
            }
        }
    }

    /**
     * 同步方法
     */
    synchronized public void printSynchronizedMethod() {
        for (int i = 0; i < 10; i++) {
            System.out.printf("                  %s的【同步的*方法*】在打印\n", Thread.currentThread().getName());
            try {
                Thread.sleep(50);
            } catch (InterruptedException e) {
                e.printStackTrace();
            }
        }
    }
}
首先,调用“大方法中调用一般小方法 + synchronized小方法”来编写的print1 并记录输出:
package medium;

public class Test3 extends Thread{
    private PrintClass pClass;
    private String name;

    public Test3(PrintClass pClass, String name) {
        this.pClass = pClass;
        this.name = name;
    }

    @Override
    public void run() {
        super.run();
        if(name.equals("syn-method")){
            pClass.print1();;
        }
        else {
            pClass.print2();;
        }
    }

    public static void main(String[] args) {
        PrintClass pClass = new PrintClass();
        Test3 thread1 = new Test3(pClass, "syn-method");
        thread1.start();
        Test3 thread2 = new Test3(pClass, "syn-method");
        thread2.start();
    }

}
输出为:
Thread-0的【一般的代码】在打印
Thread-1的【一般的代码】在打印
Thread-0的【一般的代码】在打印
Thread-1的【一般的代码】在打印
Thread-0的【一般的代码】在打印
Thread-1的【一般的代码】在打印
Thread-1的【一般的代码】在打印
Thread-0的【一般的代码】在打印
Thread-1的【一般的代码】在打印
Thread-0的【一般的代码】在打印
Thread-0的【一般的代码】在打印
Thread-1的【一般的代码】在打印
Thread-0的【一般的代码】在打印
Thread-1的【一般的代码】在打印
Thread-1的【一般的代码】在打印
Thread-0的【一般的代码】在打印
Thread-0的【一般的代码】在打印
Thread-1的【一般的代码】在打印
Thread-1的【一般的代码】在打印
Thread-0的【一般的代码】在打印
                  Thread-1的【同步的*方法*】在打印
                  Thread-1的【同步的*方法*】在打印
                  Thread-1的【同步的*方法*】在打印
                  Thread-1的【同步的*方法*】在打印
                  Thread-1的【同步的*方法*】在打印
                  Thread-1的【同步的*方法*】在打印
                  Thread-1的【同步的*方法*】在打印
                  Thread-1的【同步的*方法*】在打印
                  Thread-1的【同步的*方法*】在打印
                  Thread-1的【同步的*方法*】在打印
                  Thread-0的【同步的*方法*】在打印
                  Thread-0的【同步的*方法*】在打印
                  Thread-0的【同步的*方法*】在打印
                  Thread-0的【同步的*方法*】在打印
                  Thread-0的【同步的*方法*】在打印
                  Thread-0的【同步的*方法*】在打印
                  Thread-0的【同步的*方法*】在打印
                  Thread-0的【同步的*方法*】在打印
                  Thread-0的【同步的*方法*】在打印
                  Thread-0的【同步的*方法*】在打印
将main方法中的”syn-method”改为其他字符串,从而执行使用代码块编写的print2方法:
    public static void main(String[] args) {
        PrintClass pClass = new PrintClass();
        Test3 thread1 = new Test3(pClass, "XXX");
        thread1.start();
        Test3 thread2 = new Test3(pClass, "XXX");
        thread2.start();
    }
输出:
Thread-0的【一般的代码】在打印
Thread-1的【一般的代码】在打印
Thread-1的【一般的代码】在打印
Thread-0的【一般的代码】在打印
Thread-0的【一般的代码】在打印
Thread-1的【一般的代码】在打印
Thread-1的【一般的代码】在打印
Thread-0的【一般的代码】在打印
Thread-1的【一般的代码】在打印
Thread-0的【一般的代码】在打印
Thread-1的【一般的代码】在打印
Thread-0的【一般的代码】在打印
Thread-1的【一般的代码】在打印
Thread-0的【一般的代码】在打印
Thread-1的【一般的代码】在打印
Thread-0的【一般的代码】在打印
Thread-1的【一般的代码】在打印
Thread-0的【一般的代码】在打印
Thread-1的【一般的代码】在打印
Thread-0的【一般的代码】在打印
                  Thread-1的【同步的*代码块*】在打印
                  Thread-1的【同步的*代码块*】在打印
                  Thread-1的【同步的*代码块*】在打印
                  Thread-1的【同步的*代码块*】在打印
                  Thread-1的【同步的*代码块*】在打印
                  Thread-1的【同步的*代码块*】在打印
                  Thread-1的【同步的*代码块*】在打印
                  Thread-1的【同步的*代码块*】在打印
                  Thread-1的【同步的*代码块*】在打印
                  Thread-1的【同步的*代码块*】在打印
                  Thread-0的【同步的*代码块*】在打印
                  Thread-0的【同步的*代码块*】在打印
                  Thread-0的【同步的*代码块*】在打印
                  Thread-0的【同步的*代码块*】在打印
                  Thread-0的【同步的*代码块*】在打印
                  Thread-0的【同步的*代码块*】在打印
                  Thread-0的【同步的*代码块*】在打印
                  Thread-0的【同步的*代码块*】在打印
                  Thread-0的【同步的*代码块*】在打印
                  Thread-0的【同步的*代码块*】在打印
结论
输出一致,效果一样。
4 synchronized(this)的用法
当两个并发线程访问同一个对象object中的这个synchronized(this)同步代码块时,一个时间内只能有一个线程得到执行。当一个线程访问object的一个synchronized(this)同步代码块时,其他线程对object中所有其它synchronized(this)同步代码块的访问将被阻塞。另一个线程必须等待当前线程执行完这个代码块以后才能执行该代码块。
然而我更想强调的一点是,【当一个线程访问object的一个synchronized(this)同步代码块时,另一个线程仍然可以访问该object中的非synchronized(this)同步代码块。】
public class PrintClass {

    /**
     * 一般的代码
     */
    public void printNormally(String s) {
        for (int i = 0; i < 10; i++) {
            System.out.println(s + "的【一般的代码】在打印");
            try {
                Thread.sleep(50);
            } catch (InterruptedException e) {
                e.printStackTrace();
            }
        }

    }

    /**
     * 同步代码块
     */
    public void printSynchronizedCode(String s) {
        synchronized (this) {
            for (int i = 0; i < 10; i++) {
                System.out.printf(" %s的【同步的*代码块*】在打印\n", s);
                try {
                    Thread.sleep(50);
                } catch (InterruptedException e) {
                    e.printStackTrace();
                }
            }
        }
    }
}
package medium;
public class Test3 extends Thread{
private PrintClass pClass;
private String name;
public Test3(PrintClass pClass, String name) {
this.pClass = pClass;
this.name = name;
}
@Override
public void run() {
super.run();
if(name.equals("syn")){
pClass.printSynchronizedCode(name);
}
else {
pClass.printNormally(name);
}
}
public static void main(String[] args) {
PrintClass pClass = new PrintClass();
Test3 synThread = new Test3(pClass, "syn");
Test3 asynThread = new Test3(pClass, "asyn");
synThread.start();
asynThread.start();
}
}输出
                  syn的【同步】的代码块在打印
asyn的【非同步】的代码块在打印
                  syn的【同步】的代码块在打印
asyn的【非同步】的代码块在打印
                  syn的【同步】的代码块在打印
asyn的【非同步】的代码块在打印
                  syn的【同步】的代码块在打印
asyn的【非同步】的代码块在打印
                  syn的【同步】的代码块在打印
asyn的【非同步】的代码块在打印
                  syn的【同步】的代码块在打印
asyn的【非同步】的代码块在打印
                  syn的【同步】的代码块在打印
asyn的【非同步】的代码块在打印
                  syn的【同步】的代码块在打印
asyn的【非同步】的代码块在打印
                  syn的【同步】的代码块在打印
asyn的【非同步】的代码块在打印
                  syn的【同步】的代码块在打印
asyn的【非同步】的代码块在打印
可以明显看出,syn线程在调用pClass的同步代码块的时候,asyn线程依然可以调用pClass的非同步的代码。这一点很重要。
5 volatile
volatile的作用
volatile只能修饰变量,修饰的变量每次被访问的时候都强制从公共堆中去取;
而不是从线程的私有数据栈中取得变量的值
这里补充说明一点。每个线程都有自己的私用栈,栈内的数据是其他线程不能访问的;堆是所有线程共享的,对象实例都是保存在堆中(当然,严格来讲并不是“所有”)。所以,每当线程要处理一个对象的时候,会先去堆中取到自己的栈中,然后进行运算,再写入到堆中。我暂且把上面的过程称为一个周期。
在这个周期当中,比如线程处理的变量是 value ,那么它在取过一次value之后,在一个周期中会多次用到value的值,但是它不会重复去取。如果在这个周期还没有结束的时候,别的程序改变了堆中value的值,那么往往会造成问题。如果我们用volatile修饰value,那么在一个周期中,每次要用到value的值了,线程都会去堆中取一次value,而不是像一般情况下,直接使用本地副本。
synchronized与volatile
- volatile是线程同步的轻量级实现,所以性能更好。
- volatile只能修饰变量,synchronized的功能强大得多。
- 多线程访问volatile不会阻塞,但是synchronized会。
- volatile保证数据的可见性,但是不能保证原子性;synchronized可以保证原子行操作,也可以间接地保证数据的可见性,因为它串行化线程,让私用内存和公共内存中的数据同步。
- java线程安全就是围绕可见性和原子性这两点展开的。
七、JVM对锁的优化
1 线程状态及状态转换

当多个线程同时请求某个对象监视器时,对象监视器会设置几种状态用来区分请求的线程:
- Contention List:竞争队列,所有请求锁的线程首先被放在这个竞争队列中;
Entry List:Contention List中那些有资格成为候选资源的线程被移动到Entry List中;
Wait Set:哪些调用wait方法被阻塞的线程被放置在这里;
OnDeck:队列中只有一个线程正在竞争锁资源,该线程被成为OnDeck,其他未进入队列的线程可以通过自旋竞争锁,所以不是很公平;
Owner:当前已经获取到所资源的线程被称为Owner;
!Owner:当前释放锁的线程。
JVM每次从队列的尾部取出一个数据用于锁竞争候选者(OnDeck),但是并发情况下,ContentionList会被大量的并发线程进行CAS访问,为了降低对尾部元素的竞争,JVM会将一部分线程移动到EntryList中作为候选竞争线程。Owner线程会在unlock时,将ContentionList中的部分线程迁移到EntryList中,并指定EntryList中的某个线程为OnDeck线程(一般是最先进去的那个线程)。Owner线程并不直接把锁传递给OnDeck线程,而是把锁竞争的权利交给OnDeck,OnDeck需要重新竞争锁。这样虽然牺牲了一些公平性,但是能极大的提升系统的吞吐量,在JVM中,也把这种选择行为称之为“竞争切换”。
OnDeck线程获取到锁资源后会变为Owner线程,而没有得到锁资源的仍然停留在EntryList中。如果Owner线程被wait方法阻塞,则转移到WaitSet队列中,直到某个时刻通过notify或者notifyAll唤醒,会重新进去EntryList中。
处于ContentionList、EntryList、WaitSet中的线程都处于阻塞状态,该阻塞是由操作系统来完成的(Linux内核下采用pthread_mutex_lock内核函数实现的)。
Synchronized是非公平锁。 Synchronized在线程进入ContentionList时,等待的线程会先尝试自旋获取锁,如果获取不到就进入ContentionList,这明显对于已经进入队列的线程是不公平的,还有一个不公平的事情就是自旋获取锁的线程还可能直接抢占OnDeck线程的锁资源。
2 自旋锁
2.1 自旋锁的意义
那些处于ContetionList、EntryList、WaitSet中的线程均处于阻塞状态,阻塞操作由操作系统完成(在Linxu下通过pthread_mutex_lock函数)。线程被阻塞后便进入内核(Linux)调度状态,这个会导致系统在用户态与内核态之间来回切换,严重影响锁的性能。
缓解上述问题的办法便是自旋,其原理是:当发生争用时,若Owner线程能在很短的时间内释放锁,则那些正在争用线程可以稍微等一等自旋,在Owner线程释放锁后,争用线程可能会立即得到锁,从而避免了系统阻塞。但Owner运行的时间可能会超出了临界值,争用线程自旋一段时间后还是无法获得锁,这时争用线程则会停止自旋进入阻塞状态后退。基本思路就是自旋,不成功再阻塞,尽量降低阻塞的可能性,这对那些执行时间很短的代码块来说有非常重要的性能提高。自旋锁有个更贴切的名字:自旋-指数后退锁,也即复合锁。很显然,自旋在多处理器上才有意义。
2.2 自旋锁周期
对自旋锁周期的选择上,HotSpot认为最佳时间应是一个线程上下文切换的时间,但目前并没有做到。经过调查,目前只是通过汇编暂停了几个CPU周期,除了自旋周期选择,HotSpot还进行许多其他的自旋优化策略,具体如下:
- 如果平均负载小于CPUs则一直自旋
- 如果有超过(CPUs/2)个线程正在自旋,则后来线程直接阻塞
- 如果正在自旋的线程发现Owner发生了变化则延迟自旋时间(自旋计数)或进入阻塞
- 如果CPU处于节电模式则停止自旋
- 自旋时会适当放弃线程优先级之间的差异
适应性自旋(Adaptive Spinning):简单来说就是线程如果自旋成功了,则下次自旋的次数会更多,如果自旋失败了,则自旋的次数就会减少。
3 偏向锁
现在几乎所有的锁都是可重入的,也即已经获得锁的线程可以多次锁住/解锁监视对象,按照之前的HotSpot设计,每次加锁/解锁都会涉及到一些CAS操作(比如对等待队列的CAS操作),CAS操作会延迟本地调用,因此偏向锁的想法是一旦线程第一次获得了监视对象,之后让监视对象“偏向”这个线程,之后的多次调用则可以避免CAS操作,说白了就是置个变量,如果发现为true则无需再走各种加锁/解锁流程。
偏向锁,简单的讲,就是在锁对象的对象头中有个ThreaddId字段,这个字段如果是空的,第一次获取锁的时候,就将自身的ThreadId写入到锁的ThreadId字段内,将锁头内的是否偏向锁的状态位置1。这样下次获取锁的时候,直接检查ThreadId是否和自身线程Id一致,如果一致,则认为当前线程已经获取了锁,因此不需再次获取锁,略过了轻量级锁和重量级锁的加锁阶段。
4 轻量锁
轻量级锁所适应的场景是线程交替执行同步块的情况,线程之间的锁的切换由CAS操作来完成,如果存在同一时间访问同一锁的情况,就会导致轻量级锁膨胀为重量级锁。
5 其他优化
锁粗化(Lock Coarsening)
锁粗化的概念应该比较好理解,就是将多次连接在一起的加锁、解锁操作合并为一次,将多个连续的锁扩展成一个范围更大的锁。举个例子:
public class StringBufferTest {
    StringBuffer stringBuffer = new StringBuffer();

    public void append(){
        stringBuffer.append("a");
        stringBuffer.append("b");
        stringBuffer.append("c");
    }
}
这里每次调用stringBuffer.append方法都需要加锁和解锁,如果虚拟机检测到有一系列连串的对同一个对象加锁和解锁操作,就会将其合并成一次范围更大的加锁和解锁操作,即在第一次append方法时进行加锁,最后一次append方法结束后进行解锁。
锁消除(Lock Elimination)
锁消除即删除不必要的加锁操作。根据代码逃逸技术,如果判断到一段代码中,堆上的数据不会逃逸出当前线程,那么可以认为这段代码是线程安全的,不必要加锁。看下面这段程序:
    public static void main(String[] args) {
        SynchronizedTest02 test02 = new SynchronizedTest02();
        //启动预热
        for (int i = 0; i < 10000; i++) {
            i++;
        }
        long start = System.currentTimeMillis();
        for (int i = 0; i < 100000000; i++) {
            test02.append("abc", "def");
        }
        System.out.println("Time=" + (System.currentTimeMillis() - start));
    }

    public void append(String str1, String str2) {
        StringBuffer sb = new StringBuffer();
        sb.append(str1).append(str2);
    }
虽然StringBuffer的append是一个同步方法,但是这段程序中的StringBuffer属于一个局部变量,并且不会从该方法中逃逸出去,所以其实这过程是线程安全的,可以将锁消除。
八、wait/notify机制
我通过一个问题来引入这篇博文里要介绍的知识点。现在有这样一个需求,内存中有一个容器,容量为5,线程 AddOne 每隔一段时间就往这个容器里反复一个单位的货物,放11个就结束。线程 Supervisor 就是用来监控这个容器的,一旦容器满了,它就将这个容器清空。你的解决方案是什么?
1 利用while循环
AddOne.java:
package medium2;

import java.util.ArrayList;

public class AddOne extends Thread {
    private ArrayList<Integer> aList;

    public AddOne(ArrayList<Integer> aList) {
        super("AddOne");
        this.aList = aList;
    }

    @Override
    public void run() {
        super.run();
        // 往容器中放11个货物
        for (int i = 0; i < 11; i++) {
            aList.add(i);
            System.out.printf(Thread.currentThread().getName() + " puts %d-th object into the container!\n", i + 1);
            // 每隔1秒放一个
            try {
                Thread.sleep(1000);
            } catch (InterruptedException e) {
                e.printStackTrace();
            }
        }

        // 完成任务后退出
        System.out.println(Thread.currentThread().getName() + " finished!");
        System.exit(NORM_PRIORITY);
    }
}
Supervisor.java:
package medium2;

import java.util.ArrayList;

public class Supervisor extends Thread {
    private ArrayList<Integer> aList;

    public Supervisor(ArrayList<Integer> aList) {
        super("Supervisor");
        this.aList = aList;
    }

    @Override
    public void run() {
        super.run();
        while (true) {
            // 一旦监测到容器已经满了就将其清空
            if (aList.size() == 5) {
                aList.clear();
                System.out.println(Thread.currentThread().getName() + " has emptied the container");
            } else {
                System.out.println("The size is " + aList.size());
            }

            // 每隔300ms检查一次
            try {
                Thread.sleep(300);
            } catch (InterruptedException e) {
                e.printStackTrace();
            }
        }
    }

    public static void main(String[] args) {
        ArrayList<Integer> aList = new ArrayList<>();
        AddOne thread1 = new AddOne(aList);
        Supervisor thread2 = new Supervisor(aList);
        thread1.start();
        thread2.start();
    }
}
输出:
The size is 0
AddOne puts 1-th object into the container!
The size is 1
The size is 1
The size is 1
AddOne puts 2-th object into the container!
The size is 2
The size is 2
The size is 2
AddOne puts 3-th object into the container!
The size is 3
The size is 3
The size is 3
AddOne puts 4-th object into the container!
The size is 4
The size is 4
The size is 4
The size is 4
AddOne puts 5-th object into the container!
Supervisor has emptied the container
The size is 0
The size is 0
AddOne puts 6-th object into the container!
The size is 1
The size is 1
The size is 1
AddOne puts 7-th object into the container!
The size is 2
The size is 2
The size is 2
The size is 2
AddOne puts 8-th object into the container!
The size is 3
The size is 3
The size is 3
AddOne puts 9-th object into the container!
The size is 4
The size is 4
The size is 4
AddOne puts 10-th object into the container!
Supervisor has emptied the container
The size is 0
The size is 0
The size is 0
AddOne puts 11-th object into the container!
The size is 1
The size is 1
The size is 1
AddOne finished!
上面这种做法的缺点在于:Supervisor按照既定的时间间隔去扫描容器状态,这样会消耗CPU资源;如果轮询的时间间隔很小,会更消耗CPU资源;如果轮询时间间隔过大,有可能错过了时机,造成了错误。比如容器已经满了,还往里面塞东西,结果溢出。
有没有一种更好的解决方案呢? 我在这里就不卖关子了,有的,常见的解决方案就是【等待/通知】机制。AddOne自己放货物到容器的时机就可以随便关注一下一下容器的状态,如果它发现容器已经满了,就通知Supervisor你把容器清空吧,我下次还要用。这种机制在Java中就对应与两个方法:wait和notify。下面我对它们的使用做一个入门级的介绍。
2 wait / notify
首先强调的一点是,这两个方法不在Thread下,而在java.lang.Object类下,换句话说,所有的类都有这两个方法。
另外,关于等待/通知,要记住的关键点是:
1. 必须从同步环境内调用wait()、notify()、notifyAll()方法。线程不能调用对象上等待或通知的方法,除非它拥有那个对象的锁。
2. 与每个对象具有锁一样,每个对象可以有一个线程列表,他们等待来自该对象的通知。线程通过执行对象上的wait()方法获得这个等待列表。从那时候起,它不再执行任何其他指令,直到得到对象的notify()信号为止。
3. 如果多个线程在同一个对象上等待,则将只选择一个线程(不保证以何种顺序)继续执行。如果没有线程等待,则不采取任何特殊操作。
下面我用通知等待机制编写Section 1中提出的问题的解决方案。
AddOne2.java:
package medium2;

import java.util.ArrayList;

public class AddOne2 extends Thread {
    private ArrayList<Integer> aList;

    public AddOne2(ArrayList<Integer> aList) {
        super("AddOne2");
        this.aList = aList;
    }

    @Override
    public void run() {
        super.run();
        synchronized (aList) {
            for(int i=0; i<11; i++){
                aList.add(i);
                System.out.printf(Thread.currentThread().getName() + " puts %d-th object into the container!\n", i + 1);
                // 每隔1秒放一个
                try {
                    Thread.sleep(1000);
                } catch (InterruptedException e) {
                    e.printStackTrace();
                }

                if(aList.size() == 5){
                    aList.notify();
                    System.out.println("AddOne2 已经通知 Supervisor 了");
                }
            }
        }
    }
}
Supervisor2.java:
package medium2;

import java.util.ArrayList;

public class Supervisor2 extends Thread {
    private ArrayList<Integer> aList;

    public Supervisor2(ArrayList<Integer> aList) {
        super("Supervisor");
        this.aList = aList;
    }

    @Override
    public void run() {
        super.run();
        System.out.println("Supervisor has started running");
        synchronized (aList) {
            System.out.println("Supervisor has got the lock");
            try {
                // 等待通知
                aList.wait();
            } catch (InterruptedException e) {
                e.printStackTrace();
            }

            aList.clear();
            System.out.println(Thread.currentThread().getName() + " has emptied the container");

        }
    }

    public static void main(String[] args) {
        ArrayList<Integer> aList = new ArrayList<>();
        Supervisor2 thread2 = new Supervisor2(aList);
        thread2.start();
        // sleep是为了保证 Supervisor2 先wait,不然AddOne先notify了,wait就没有意义
        try {
            Thread.sleep(50);
        } catch (InterruptedException e) {
            e.printStackTrace();
        }
        AddOne2 thread1 = new AddOne2(aList);
        thread1.start();
    }
}
输出:
Supervisor has started running
Supervisor has got the lock
AddOne2 puts 1-th object into the container!
AddOne2 puts 2-th object into the container!
AddOne2 puts 3-th object into the container!
AddOne2 puts 4-th object into the container!
AddOne2 puts 5-th object into the container!
AddOne2 已经通知 Supervisor 了
Supervisor has emptied the container
咦!怎么回事!?输出和预想的不一样!看来上面的代码有点问题,但是这个代码的意义比正确的代码更重要!因为好好分析一下,可以发现很多重要的性质。
- 首先,最先运行的是Supervisor,它先获得了aList对象的锁,然后执行到wait,立刻就放弃了锁,这样AddOne才可以执行同步代码块内的代码。
- AddOne添加5个货物后就通知了Supervisor,可是从输出我们看出,AddOne还在继续执行,直到AddOne的同步代码块内的代码执行完,Supervisor才执行,也才输出了 “Supervisor has emptied the container”,而这个时候容器早就爆了。
- 另外一个值得注意的地方就是,在执行AddOne的for循环中我用了sleep,可是,即使在AddOne sleep的时间内,被唤醒的Supervisor还是没能得到锁,没能执行,为什么? 这也证明了sleep虽然让线程进入了阻塞状态,但是即使在sleep,该线程也不会释放所持有的锁,这一知识点很重要。
所以我再来补充强调Java 等待/通知 机制的几个特性:
1. wait之后,该线程会立即释放同步Object的锁,并转入阻塞状态。
2. 但是,**一个线程调用了notify之后,并不会放弃同步Object的锁,而是继续执行同步代码块内的代码**。又因为都加了synchronized,线程串行执行,所以只有当这个线程执行完同步代码块内的代码,被成功唤醒的线程才能执行。
3. 一个notify只能随机唤醒一个wait的线程(这个提一下,就不写代码证明了)
这问题分析完了,可上面的问题还没有解决啊。为了一篇博文的篇幅不要过长,这篇博文我就写到这里。下一篇博文直接介绍【消费者/生产者模式】,可以满足此处提出的需求,也是等待/通知机制的经典应用案例。
3 生产者/消费者模式
生产者是一堆线程,消费者是另一堆线程,内存缓冲区可以使用List数组队列,数据类型只需要定义一个简单的类就好。关键是如何处理多线程之间的协作。这其实也是多线程通信的一个范例。在这个模型中,最关键就是内存缓冲区为空的时候消费者必须等待,而内存缓冲区满的时候,生产者必须等待。其他时候可以是个动态平衡。值得注意的是多线程对临界区资源的操作时候必须保证在读写中只能存在一个线程,所以需要设计锁的策略。
下面的代码中核心的部分是Storage.java仓库的实现,用一个LinkedList对象作为临界资源池,生产操作和消费操作都用synchronized修饰,list.wait()都包含在一个带有判断仓库容量的while循环中。这样做的好处是每当该线程收到notifyAll通知的时候都会判断容量是否足够消费(消费者)或者生产太多会不会爆仓(生产者)。每完成一次生产/消费操作都用list.notifyAll()通知大家。
Storage.java:
import java.util.LinkedList;

/**
 * 仓库类Storage实现缓冲区
 */
public class Storage {
    // 仓库最大存储量
    private final int MAX_SIZE = 100;

    // 仓库存储的载体
    private LinkedList<Object> list = new LinkedList<Object>();

    // 生产num个产品
    public void produce(int num) {
        // 同步代码段
        synchronized (list) {
            // 如果仓库剩余容量不足
            while (list.size() + num > MAX_SIZE) {
                System.out.println("【要生产的产品数量】:" + num + "/t【库存量】:"
                        + list.size() + "/t暂时不能执行生产任务!");
                try {
                    // 由于条件不满足,生产阻塞
                    list.wait();
                } catch (InterruptedException e) {
                    e.printStackTrace();
                }
            }

            // 生产条件满足情况下,生产num个产品
            for (int i = 1; i <= num; ++i) {
                list.add(new Object());
            }

            System.out.println("【已经生产产品数】:" + num + "/t【现仓储量为】:" + list.size());

            list.notifyAll();
        }
    }

    // 消费num个产品
    public void consume(int num) {
        // 同步代码段
        synchronized (list) {
            // 如果仓库存储量不足
            while (list.size() < num) {
                System.out.println("【要消费的产品数量】:" + num + "/t【库存量】:"
                        + list.size() + "/t暂时不能执行生产任务!");
                try {
                    // 由于条件不满足,消费阻塞
                    list.wait();
                } catch (InterruptedException e) {
                    e.printStackTrace();
                }
            }

            // 消费条件满足情况下,消费num个产品
            for (int i = 1; i <= num; ++i) {
                list.remove();
            }

            System.out.println("【已经消费产品数】:" + num + "/t【现仓储量为】:" + list.size());

            list.notifyAll();
        }
    }

    // get/set方法
    public LinkedList<Object> getList() {
        return list;
    }

    public void setList(LinkedList<Object> list) {
        this.list = list;
    }

    public int getMAX_SIZE() {
        return MAX_SIZE;
    }
}
Producer.java:
/**
 * 生产者类Producer继承线程类Thread
 */
public class Producer extends Thread {
    // 每次生产的产品数量
    private int num;

    // 所在放置的仓库
    private Storage storage;

    // 构造函数,设置仓库
    public Producer(Storage storage) {
        this.storage = storage;
    }

    // 线程run函数
    public void run() {
        produce(num);
    }

    // 调用仓库Storage的生产函数
    public void produce(int num) {
        storage.produce(num);
    }

    // get/set方法
    public int getNum() {
        return num;
    }

    public void setNum(int num) {
        this.num = num;
    }

    public Storage getStorage() {
        return storage;
    }

    public void setStorage(Storage storage) {
        this.storage = storage;
    }
}
Consumer.java:
/**
 * 消费者类Consumer继承线程类Thread
 */
public class Consumer extends Thread {
    // 每次消费的产品数量
    private int num;

    // 所在放置的仓库
    private Storage storage;

    // 构造函数,设置仓库
    public Consumer(Storage storage) {
        this.storage = storage;
    }

    // 线程run函数
    public void run() {
        consume(num);
    }

    // 调用仓库Storage的生产函数
    public void consume(int num) {
        storage.consume(num);
    }

    // get/set方法
    public int getNum() {
        return num;
    }

    public void setNum(int num) {
        this.num = num;
    }

    public Storage getStorage() {
        return storage;
    }

    public void setStorage(Storage storage) {
        this.storage = storage;
    }
}
测试类Test:
/**
 * 测试类Test
 *
 */
public class Test
{
    public static void main(String[] args)
    {
        // 仓库对象
        Storage storage = new Storage();

        // 生产者对象
        Producer p1 = new Producer(storage);
        Producer p2 = new Producer(storage);
        Producer p3 = new Producer(storage);
        Producer p4 = new Producer(storage);
        Producer p5 = new Producer(storage);
        Producer p6 = new Producer(storage);
        Producer p7 = new Producer(storage);

        // 消费者对象
        Consumer c1 = new Consumer(storage);
        Consumer c2 = new Consumer(storage);
        Consumer c3 = new Consumer(storage);

        // 设置生产者产品生产数量
        p1.setNum(10);
        p2.setNum(10);
        p3.setNum(10);
        p4.setNum(10);
        p5.setNum(10);
        p6.setNum(10);
        p7.setNum(80);

        // 设置消费者产品消费数量
        c1.setNum(50);
        c2.setNum(20);
        c3.setNum(30);

        // 线程开始执行
        c1.start();
        c2.start();
        c3.start();
        p1.start();
        p2.start();
        p3.start();
        p4.start();
        p5.start();
        p6.start();
        p7.start();
    }
}
输出:
【要消费的产品数量】:50   【库存量】:0 暂时不能执行生产任务!
【要消费的产品数量】:30   【库存量】:0 暂时不能执行生产任务!
【要消费的产品数量】:20   【库存量】:0 暂时不能执行生产任务!
【已经生产产品数】:10    【现仓储量为】:10
【要消费的产品数量】:20   【库存量】:10    暂时不能执行生产任务!
【要消费的产品数量】:30   【库存量】:10    暂时不能执行生产任务!
【要消费的产品数量】:50   【库存量】:10    暂时不能执行生产任务!
【已经生产产品数】:10    【现仓储量为】:20
【要消费的产品数量】:50   【库存量】:20    暂时不能执行生产任务!
【要消费的产品数量】:30   【库存量】:20    暂时不能执行生产任务!
【已经消费产品数】:20    【现仓储量为】:0
【已经生产产品数】:10    【现仓储量为】:10
【已经生产产品数】:10    【现仓储量为】:20
【已经生产产品数】:80    【现仓储量为】:100
【要生产的产品数量】:10   【库存量】:100   暂时不能执行生产任务!
【已经消费产品数】:30    【现仓储量为】:70
【已经消费产品数】:50    【现仓储量为】:20
【已经生产产品数】:10    【现仓储量为】:30
【已经生产产品数】:10    【现仓储量为】:40
九、用管道进行线程间通信
1 字节流管道
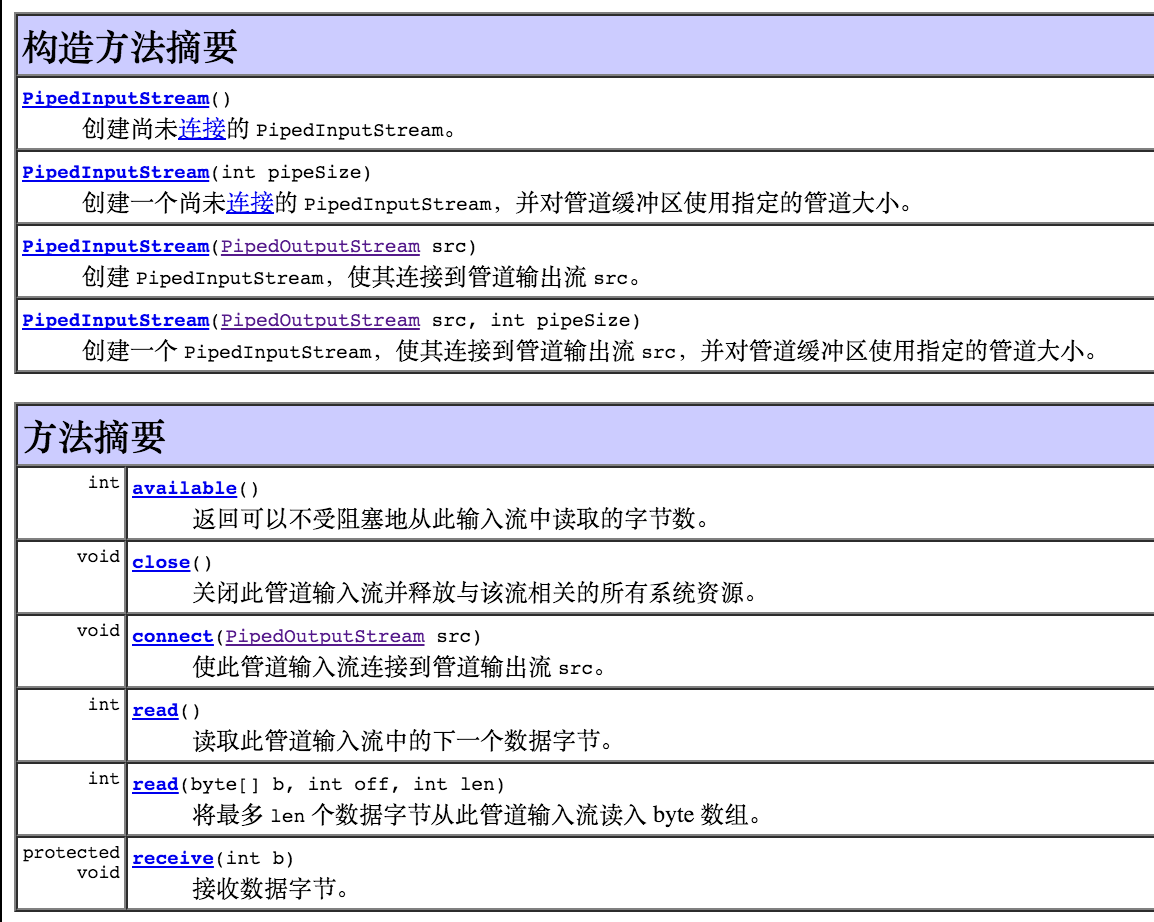
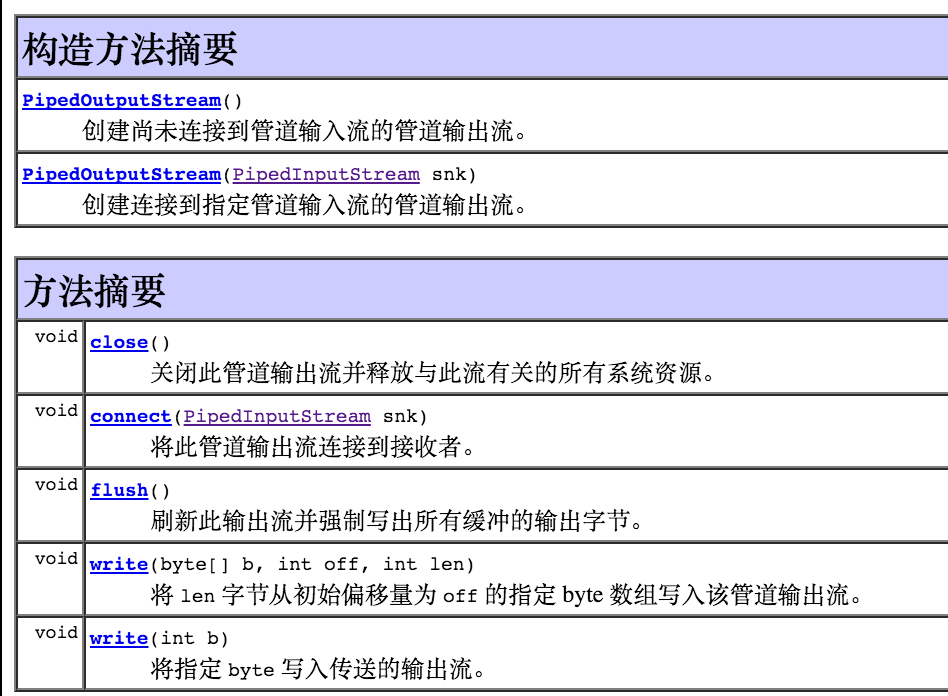
通常,数据由某个线程从 PipedInputStream 对象读取,并由其他线程将其写入到相应的 PipedOutputStream。不建议对这两个对象尝试使用单个线程,因为这样可能死锁线程。管道输入流包含一个缓冲区,可在缓冲区限定的范围内将读操作和写操作分离开。 如果向连接管道输出流提供数据字节的线程不再存在,则认为该管道已损坏。
1.1 PipedInputStream
1.2 PipedOutputStream
1.3 使用字节流管道进行线程间的通信
WriteData.java:
package pipe;

import java.io.IOException;
import java.io.PipedOutputStream;

public class WriteData extends Thread {
    private PipedOutputStream pipedOS;
    private String data;

    public WriteData(PipedOutputStream pipedOS, String data) {
        super("Writer");
        this.pipedOS = pipedOS;
        this.data = data;
    }

    @Override
    public void run() {
        super.run();
        try {
            String tmp;
            for (int i = 0; i < 6; i++) {
                tmp = data + i + " ";
                System.out.println(Thread.currentThread().getName() + " writed " + tmp + " into the pipe.");
                pipedOS.write(tmp.getBytes());
            }
            pipedOS.flush();
            pipedOS.close();
        } catch (IOException e) {
            e.printStackTrace();
        }
    }
}
ReadData.java
package pipe;

import java.io.IOException;
import java.io.PipedInputStream;
import java.io.PipedOutputStream;

public class ReadData extends Thread {
    private PipedInputStream pipedIS;

    public ReadData(PipedInputStream pipedIS) {
        super("Reader");
        this.pipedIS = pipedIS;
    }

    @Override
    public void run() {
        super.run();
        try {
            System.out.println(Thread.currentThread().getName() + " begined reading the data from the pipe.");
            byte[] bytes = new byte[20];
            int readLen = -1;
            readLen = pipedIS.read(bytes);
            while (readLen != -1) {
                String s = new String(bytes, 0, readLen);
                System.out.println(s);
                try {
                    readLen = pipedIS.read(bytes);
                } catch (IOException e) {
                    e.printStackTrace();
                }
            }
            System.out.println();
            pipedIS.close();
        } catch (IOException e) {
            e.printStackTrace();
        }
    }

    public static void main(String[] args) {
        PipedInputStream pipedInputStream = new PipedInputStream();
        PipedOutputStream pipedOutputStream = new PipedOutputStream();
        try {
            pipedInputStream.connect(pipedOutputStream);
        } catch (IOException e) {
            e.printStackTrace();
        }

        WriteData writeData = new WriteData(pipedOutputStream, "ABC");
        ReadData readData = new ReadData(pipedInputStream);

        writeData.start();
        readData.start();
    }
}
输出
Reader begined reading the data from the pipe.
Writer writed ABC0  into the pipe.
Writer writed ABC1  into the pipe.
Writer writed ABC2  into the pipe.
Writer writed ABC3  into the pipe.
Writer writed ABC4  into the pipe.
Writer writed ABC5  into the pipe.
ABC0 ABC1 ABC2 ABC3
ABC4 ABC5
2 字符流通道
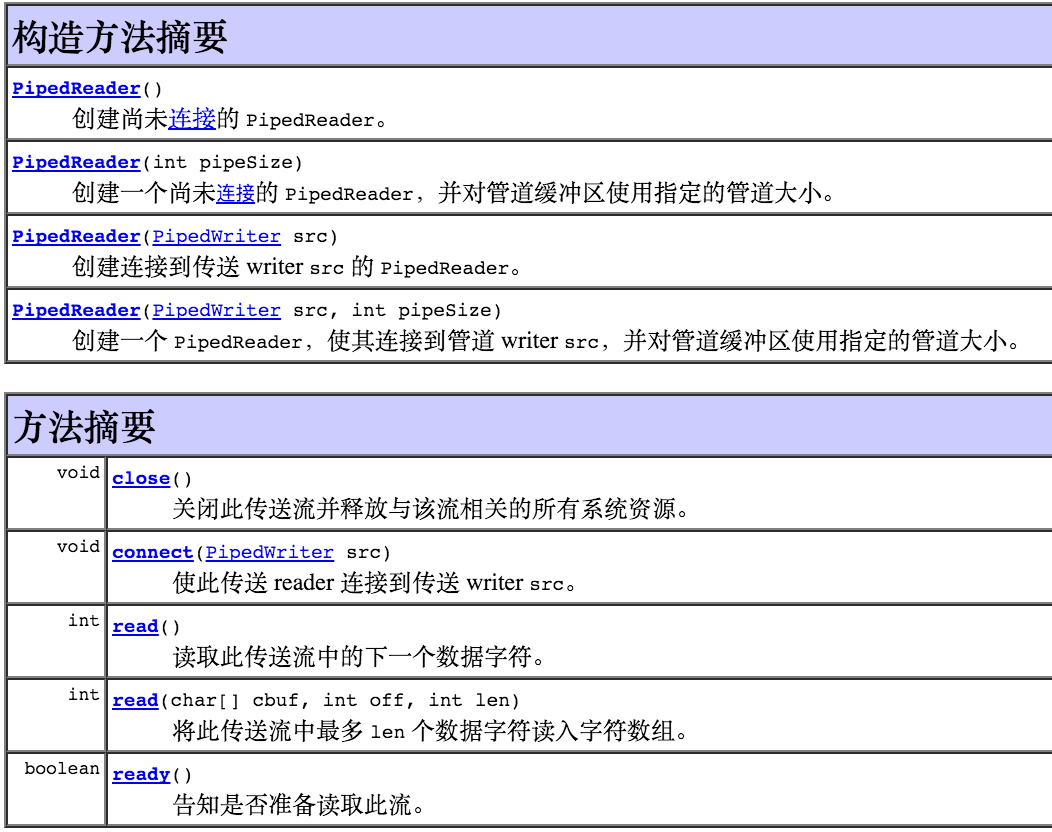
2.1 PipedReader
2.2 PipedWriter
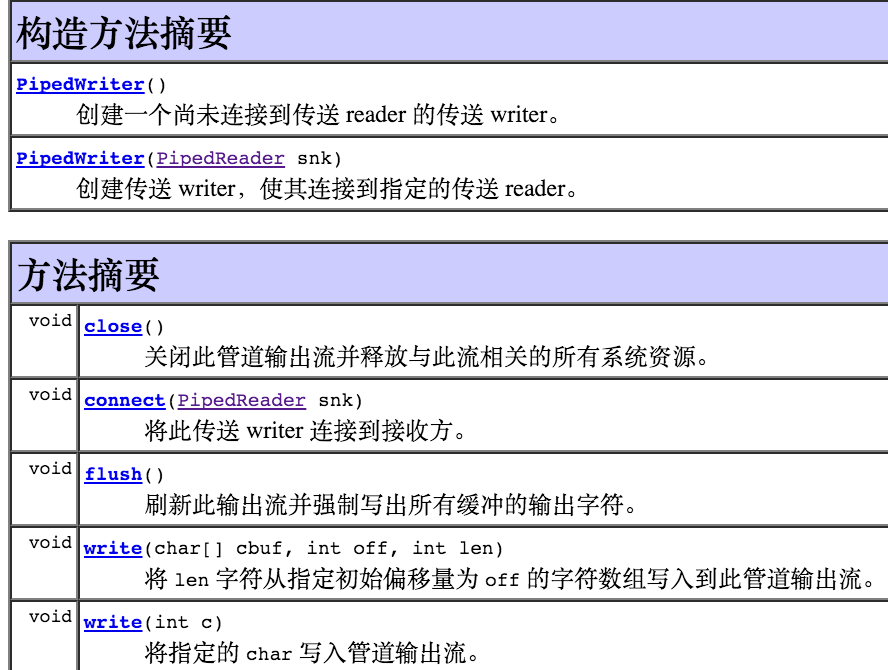
由于管道通信的原理是一样的,不过一个是处理字节流,一个是处理字符流,区别不大,所以这里代码就不再编写了。
十、ThreadLocal的使用
首先,我们看看JDK文档是怎么描述这个类的:
该类提供了线程局部 (thread-local) 变量。这些变量不同于它们的普通对应物,因为访问某个变量(通过其 get 或 set 方法)的每个线程都有自己的局部变量,它独立于变量的初始化副本。ThreadLocal 实例通常是类中的 private static 字段,它们希望将状态与某一个线程(例如,用户 ID 或事务 ID)相关联。每个线程都保持对其线程局部变量副本的隐式引用,只要线程是活动的并且 ThreadLocal 实例是可访问的;在线程消失之后,其线程局部实例的所有副本都会被垃圾回收(除非存在对这些副本的其他引用)。
好吧,看完之后我还是不知道它是干什么的。为了讲解的需要,我先直接给出 ThreadLocal 的概述,再一点点分析证明。
ThreadLocal主要解决的问题是给每个线程绑定自己的值,这个值是和线程绑定的,是线程的局部变量,是其他线程没法访问的。所以,博主的【Thread详解系列1-10】讲的基本上都是并发访问的问题,这一篇11却不是讲并发。我们可以把 ThreadLocal 类比喻成全局存放数据的盒子,这个盒子中每个线程往里面放数据,那这个数据就是它私有的,程序员也就不用自己去维护这个对应关系。这就是 ThreadLocal 的价值所在。
原理:
- 每个线程都有一个
ThreadLocalMap类型的threadLocals属性。 - ThreadLocalMap 类相当于一个Map,key 是 ThreadLocal 本身(this),value 就是我们的值。
- 当我们通过set方法设置值时 ,我们就会在这个线程中的 threadLocals 属性中放入一个键值对。
- 当我们通过 threadlocal.get() 方法的时候,首先会根据这个线程得到这个线程的 threadLocals 属性,然后由于这个属性放的是键值对,我们就可以根据键 threadlocal 拿到值。 注意,这时候这个键 threadlocal 和 我们 set 方法的时候的那个键 threadlocal 是一样的,所以我们能够拿到相同的值。
先来看看 ThreadLocal 的API,再结合我的示例代码去了解它做了什么,后面我再证明它的价值。
1 用法示例
- T get() :返回此线程局部变量的当前线程副本中的值。
- void set(T value) :将此线程局部变量的当前线程副本中的值设置为指定值。
- protected T initialValue() :返回此线程局部变量的当前线程的“初始值”。
- void remove():移除此线程局部变量当前线程的值。
UniqueThreadIdGenerator.java
package threadLocalTest;

import java.util.concurrent.atomic.AtomicInteger;

public class UniqueThreadIdGenerator {

    private static AtomicInteger uniqueId = new AtomicInteger(0);

    private static ThreadLocal<Integer> uniqueNum = new ThreadLocal<Integer>() {
        @Override
        // 如果当前线程是第一次请求id的分配则给它赋一个初始值
        protected Integer initialValue() {
            return uniqueId.getAndIncrement();
        }
    };

    // 给当前线程返回它的id
    public static int getCurrentThreadId() {
        return uniqueNum.get();
    }

    // 设置当前线程的id
    public static void setCurrentThreadId(int id) {
        uniqueNum.set(id);
    }

}
Thread1.java
package threadLocalTest;

public class Thread1 implements Runnable {

    @Override
    public void run() {
        // 线程的id是在它第一次run的时候才分配的,它run,它请求分配id,系统给它一个id
        int id = UniqueThreadIdGenerator.getCurrentThreadId();
        System.out.println(Thread.currentThread().getName() + " is running, its ID is: " + id);

        // 三次向系统请求数据
        for (int i = 0; i < 3; i++) {
            try {
                Thread.sleep(1000);
            } catch (InterruptedException e) {
                e.printStackTrace();
            }
            System.out.println(Thread.currentThread().getName() + " is asking for data, my ID is:" + id);
        }
        System.out.println(Thread.currentThread().getName() + " is over!----------");
    }

    public static void main(String[] args) {
        // 新建3个线程
        Thread tA = new Thread(new Thread1(), "A");
        Thread tB = new Thread(new Thread1(), "B");
        Thread tC = new Thread(new Thread1(), "C");
        tA.start();
        tB.start();
        tC.start();
    }
}
输出
第一次运行:
B is running, its ID is: 0
A is running, its ID is: 2
C is running, its ID is: 1
A is asking for data, my ID is:2
B is asking for data, my ID is:0
C is asking for data, my ID is:1
C is asking for data, my ID is:1
B is asking for data, my ID is:0
A is asking for data, my ID is:2
B is asking for data, my ID is:0
C is asking for data, my ID is:1
C is over!----------
A is asking for data, my ID is:2
B is over!----------
A is over!----------
第N次运行:
C is running, its ID is: 0
A is running, its ID is: 1
B is running, its ID is: 2
C is asking for data, my ID is:0
A is asking for data, my ID is:1
B is asking for data, my ID is:2
A is asking for data, my ID is:1
C is asking for data, my ID is:0
B is asking for data, my ID is:2
A is asking for data, my ID is:1
C is asking for data, my ID is:0
A is over!----------
C is over!----------
B is asking for data, my ID is:2
B is over!----------
上面的例子我提醒大家注意一点:
Thread1类没有一个 private id 这样一个成员变量,从而也没有在构造方法中用一个参数传入一个id,它的id是在run的时候才由外部逻辑生成的,而且不需要程序员主动去维护。
2 典型应用
最典型的应用就是在连接数据库的时候,线程与数据库连接的session是由数据库/服务器分配的,不是线程本身维护的,但是线程在编写一些对数据库的操作的时候却要用到session。那怎么办呢?
一种常规的做法可能是每次线程要连接数据库的时候就向数据库请求session,然后以参数的形式传入线程。而且对于session的分配还要做好并发处理,你不能给两个线程分配了同一个session,这样会造成很多混乱。而使用ThreadLocal就不用考虑这么多,减轻了程序员的负担。
    public class HibernateUtil {
        private static Log log = LogFactory.getLog(HibernateUtil.class);
        private static final SessionFactory sessionFactory;     //定义SessionFactory

        static {
            try {
                // 通过默认配置文件hibernate.cfg.xml创建SessionFactory
                sessionFactory = new Configuration().configure().buildSessionFactory();
            } catch (Throwable ex) {
                log.error("初始化SessionFactory失败!", ex);
                throw new ExceptionInInitializerError(ex);
            }
        }

        //创建线程局部变量session,用来保存Hibernate的Session
        public static final ThreadLocal session = new ThreadLocal();

        /**
         * 获取当前线程中的Session
         * @return Session
         * @throws HibernateException
         */
        public static Session currentSession() throws HibernateException {
            Session s = (Session) session.get();
            // 如果Session还没有打开,则新开一个Session
            if (s == null) {
                s = sessionFactory.openSession();
                session.set(s);         //将新开的Session保存到线程局部变量中
            }
            return s;
        }

        public static void closeSession() throws HibernateException {
            //获取线程局部变量,并强制转换为Session类型
            Session s = (Session) session.get();
            session.set(null);
            if (s != null)
                s.close();
        }
    }
3 get 与 null
如果线程是第一次调用ThreadLocal的get方法,请求一个数据,那么get 返回的值一定是null。这个时候有两种等效的处理方式。
1. 自己显示地增加一个逻辑:如果get 返回null,则new 一个对象,再调用set 方法把这个值放到ThreadLocal里面去。
2. 像section1中的示例代码一样, override ThreadLocal 的 initialValue 方法
4 InheritableThreadLocal的使用
ThreadLocal的用法可以参考上一篇博文: http://blog.csdn.net/cds86333774/article/details/51020819,InheritableThreadLocal是ThreadLocal的子类。该类扩展了 ThreadLocal,为子线程提供从父线程那里继承的值:在创建子线程时,子线程会接收所有可继承的线程局部变量的值作为初始值,之后父子线程的ThreadLocal再无瓜葛。
通常,子线程的值与父线程的值是一致的;但是,通过重写这个类中的 childValue 方法,子线程的值可以作为父线程值的一个任意函数。当必须将变量(如用户 ID 和 事务 ID)中维护的每线程属性(per-thread-attribute)自动传送给创建的所有子线程时,应尽可能地采用可继承的线程局部变量,而不是采用普通的线程局部变量。示例代码如下:用法和ThreadLocal几乎一样,但是效果不一样。
ThreadLocalTest.java
package threadLocalTest;

import java.util.Random;

public class ThreadLocalTest {
    private static ThreadLocal<Integer> familyFortunes = new ThreadLocal<Integer>() {
        @Override
        protected Integer initialValue() {
            Random random = new Random();
            return random.nextInt(1000);
        }
    };

    public static int get() {
        return familyFortunes.get();
    }

    public static void set(int value) {
        familyFortunes.set(value);
    }

}
InheritableThreadLocalTest.java
package threadLocalTest;

import java.util.Random;

public class InheritableThreadLocalTest {
    private static InheritableThreadLocal<Integer> familyFortunes = new InheritableThreadLocal<Integer>() {
        @Override
        protected Integer initialValue() {
            Random random = new Random();
            return random.nextInt(1000);
        }
    };

    public static int get() {
        return familyFortunes.get();
    }

    public static void set(int value) {
        familyFortunes.set(value);
    }

}
Thread2.java
package threadLocalTest;

public class Thread2 extends Thread {

    public Thread2(String name) {
        super(name);
    }

    @Override
    public void run() {
        super.run();
        System.out.printf("%s 从 ThreadLocal 取数据:%d\n", Thread.currentThread().getName(), ThreadLocalTest.get());
        System.out.printf("%s 从 InheritableThreadLocal 取数据:%d\n", Thread.currentThread().getName(),
                InheritableThreadLocalTest.get());
    }

    public static void main(String[] args) {
        System.out.printf("%s 从 ThreadLocal 取数据:%d\n", Thread.currentThread().getName(), ThreadLocalTest.get());
        System.out.printf("%s 从 InheritableThreadLocal 取数据:%d\n", Thread.currentThread().getName(),
                InheritableThreadLocalTest.get());
        Thread2 t1 = new Thread2("Child1");
        t1.start();
    }
}
输出
main 从 ThreadLocal 取数据:444
main 从 InheritableThreadLocal 取数据:401
Child1 从 ThreadLocal 取数据:513
Child1 从 InheritableThreadLocal 取数据:401
分析
1. 不同的线程去 ThreadLocal get 数据,得到的是和自己绑定的数据。
2. 如果是子线程去 InheritableThreadLocal get 数据,得到的是和父线程一样的数据,也就是子线程继承了父线程在 InheritableThreadLocal 里面的数据,这个数据变成了“家族数据”
重写childValue
看完childValue方法的说明,我还是不知道它怎么用,我们来看看源码:
    /**
     * Computes the child's initial value for this inheritable thread-local
     * variable as a function of the parent's value at the time the child
     * thread is created.  This method is called from within the parent
     * thread before the child is started.
     * <p>
     * This method merely returns its input argument, and should be overridden
     * if a different behavior is desired.
     *
     * @param parentValue the parent thread's value
     * @return the child thread's initial value
     */
    protected T childValue(T parentValue) {
        return parentValue;
    }
原来这个方法返回的是子线程在第一次get的时候的初始值,如果不重写,默认就是返回父线程的值,所以出现上面示例代码的输出。在形式上和ThreadLocal的initialValue类似。
下面我重写childValue,使子线程的初始值为父线程的值+1:
package threadLocalTest;

import java.util.Random;

public class InheritableThreadLocalTest {
    private static InheritableThreadLocal<Integer> familyFortunes = new InheritableThreadLocal<Integer>() {
        @Override
        protected Integer initialValue() {
            Random random = new Random();
            return random.nextInt(1000);
        }

        @Override
        protected Integer childValue(Integer parentValue) {
            return parentValue+1;
        }


    };

    public static int get() {
        return familyFortunes.get();
    }

    public static void set(int value) {
        familyFortunes.set(value);
    }
}
输出
main 从 ThreadLocal 取数据:506
main 从 InheritableThreadLocal 取数据:570
Child1 从 ThreadLocal 取数据:953
Child1 从 InheritableThreadLocal 取数据:571
十一、ReentrantLock
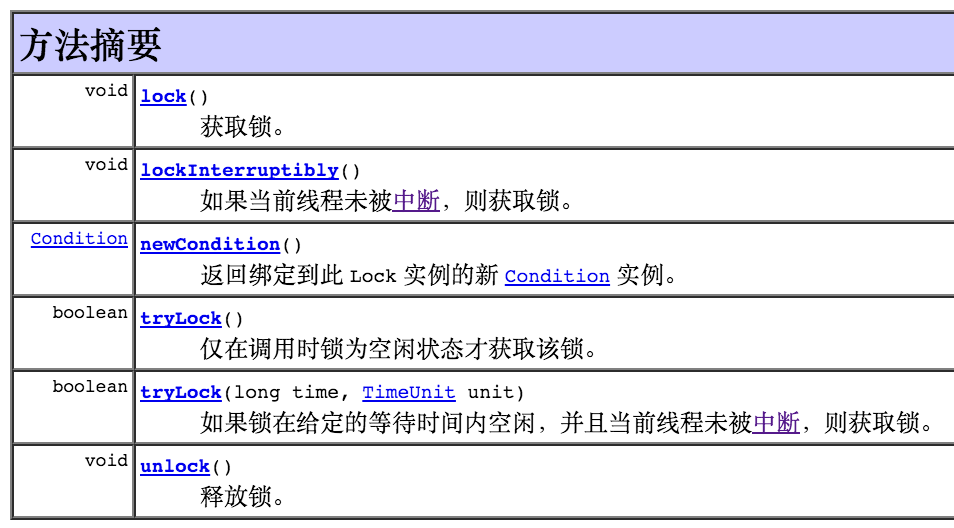
Java里面提供了比synchronized更加灵活丰富的锁机制,它们有一个共同的接口Lock,我们先来学习这个接口,了解其协议和功能。下面是JDK文档,总结得非常精炼,包含的知识点非常多,所以一开始可能看不懂,不过没关系,后面一点点弄懂。
public interface LockLock 实现提供了比使用 synchronized 方法和语句可获得的更广泛的锁定操作。此实现允许更灵活的结构,可以具有差别很大的属性,可以支持多个相关的 Condition 对象。
锁是控制多个线程对共享资源进行访问的工具。通常,锁提供了对共享资源的独占访问。一次只能有一个线程获得锁,对共享资源的所有访问都需要首先获得锁。不过,某些锁可能允许对共享资源并发访问,如 ReadWriteLock 的读取锁。
虽然 synchronized 方法和语句的范围机制使得使用监视器锁编程方便了很多,而且还帮助避免了很多涉及到锁的常见编程错误,但有时也需要以更为灵活的方式使用锁。例如,某些遍历并发访问的数据结果的算法要求使用 “hand-over-hand” 或 “chain locking”:获取节点 A 的锁,然后再获取节点 B 的锁,然后释放 A 并获取 C,然后释放 B 并获取 D,依此类推。Lock 接口的实现允许锁在不同的作用范围内获取和释放,并允许以任何顺序获取和释放多个锁,从而支持使用这种技术。
随着灵活性的增加,也带来了更多的责任。不使用块结构锁就失去了使用 synchronized 方法和语句时会出现的锁自动释放功能。在大多数情况下,应该使用以下语句:
     Lock l = ...;
     l.lock();
     try {
         // access the resource protected by this lock
     } finally {
         l.unlock();
     }
锁定和取消锁定出现在不同作用范围中时,必须谨慎地确保保持锁定时所执行的所有代码用 try-finally 或 try-catch 加以保护,以确保在必要时释放锁。
Lock 实现提供了使用 synchronized 方法和语句所没有的其他功能,包括提供了一个非块结构的获取锁尝试 (tryLock())、一个获取可中断锁的尝试 (lockInterruptibly()) 和一个获取超时失效锁的尝试 (tryLock(long, TimeUnit))。
Lock 类还可以提供与隐式监视器锁完全不同的行为和语义,如保证排序、非重入用法或死锁检测。如果某个实现提供了这样特殊的语义,则该实现必须对这些语义加以记录。
注意,Lock 实例只是普通的对象,其本身可以在 synchronized 语句中作为目标使用。获取 Lock 实例的监视器锁与调用该实例的任何 lock() 方法没有特别的关系。为了避免混淆,建议除了在其自身的实现中之外,决不要以这种方式使用 Lock 实例。除非另有说明,否则为任何参数传递 null 值都将导致抛出 NullPointerException。
1 使用ReentrantLock进行同步
一个可重入的互斥锁 Lock,它具有与使用 synchronized 方法和语句所访问的隐式监视器锁相同的一些基本行为和语义,但功能更强大。
ReentrantLock 将由最近成功获得锁,并且还没有释放该锁的线程所拥有。当锁没有被另一个线程所拥有时,调用 lock 的线程将成功获取该锁并返回。如果当前线程已经拥有该锁,此方法将立即返回。可以使用 isHeldByCurrentThread() 和 getHoldCount() 方法来检查此情况是否发生。
- ReentrantLock持有一个所计数器,当已持有所的线程再次获得该锁时计数器值加1,每调用一次lock.unlock()时所计数器值减一,直到所计数器值为0,此时线程释放锁。
建议总是使用 finally释放lock,在之前/之后的构造中,最典型的代码如下:
 class X {
   private final ReentrantLock lock = new ReentrantLock();
   // ...

   public void m() {
     lock.lock();  // block until condition holds
     try {
       // ... method body
     } finally {
       lock.unlock()
     }
   }
 }
除了实现 Lock 接口,此类还定义了 isLocked 和 getLockQueueLength 方法,以及一些相关的 protected 访问方法,这些方法对检测和监视可能很有用。
此锁最多支持同一个线程发起的 2147483648 个递归锁。试图超过此限制会导致由锁方法抛出的 Error。
首先,我们先不管它有多牛逼,我们先使用它来代替synchronized实现常规的同步,也就是串行化,然后调用其中的一些方法看一看是什么效果:
Service.java
package testReentrantLock;

import java.util.concurrent.locks.ReentrantLock;

public class Service {
    private ReentrantLock lock = new ReentrantLock();

    public void testMethod() {
        lock.lock();
        try {
            for (int i = 0; i < 3; i++) {
                System.out.println("******  " + Thread.currentThread().getName() + " is printing " + i + "  ******");
                // 查询当前线程保持此锁的次数
                int holdCount = lock.getHoldCount();

                // 返回正等待获取此锁的线程估计数
                int queuedLength = lock.getQueueLength();

                // 如果此锁的公平设置为 true,则返回 true
                boolean isFair = lock.isFair();

                System.out.printf("---holdCount: %d;\n---queuedLength:%d;\n---isFair: %s\n\n", holdCount, queuedLength,
                        isFair);

                try {
                    Thread.sleep(500);
                } catch (InterruptedException e) {
                    e.printStackTrace();
                }
            }
        } finally {
            lock.unlock();
        }
    }
}
Thread1.java
package testReentrantLock;

public class Thread1 extends Thread {
    private Service service;

    public Thread1(Service service, String name) {
        super(name);
        this.service = service;
    }

    @Override
    public void run() {
        super.run();
        service.testMethod();
    }

    public static void main(String[] args) {
        Service service = new Service();
        Thread1 tA = new Thread1(service, "Thread-A");
        Thread1 tB = new Thread1(service, "Thread-B");
        Thread1 tC = new Thread1(service, "Thread-C");
        tA.start();
        tB.start();
        tC.start();
    }

}
输出
******  Thread-A is printing 0  ******
---holdCount: 1;
---queuedLength:2;
---isFair: false

******  Thread-A is printing 1  ******
---holdCount: 1;
---queuedLength:2;
---isFair: false

******  Thread-A is printing 2  ******
---holdCount: 1;
---queuedLength:2;
---isFair: false

******  Thread-B is printing 0  ******
---holdCount: 1;
---queuedLength:1;
---isFair: false

******  Thread-B is printing 1  ******
---holdCount: 1;
---queuedLength:1;
---isFair: false

******  Thread-B is printing 2  ******
---holdCount: 1;
---queuedLength:1;
---isFair: false

******  Thread-C is printing 0  ******
---holdCount: 1;
---queuedLength:0;
---isFair: false

******  Thread-C is printing 1  ******
---holdCount: 1;
---queuedLength:0;
---isFair: false

******  Thread-C is printing 2  ******
---holdCount: 1;
---queuedLength:0;
---isFair: false
公平和非公平锁的队列都基于锁内部维护的一个双向链表,表结点Node的值就是每一个请求当前锁的线程。公平锁则在于每次都是依次从队首取值。非公平锁在等待锁的过程中, 如果有任意新的线程妄图获取锁,都是有很大的几率通过自旋直接获取到锁。
我稍微啰嗦地解释一下getHoldCount,它返回的是查询当前线程保存此lock的个数,也就是在此线程代码内,代用lock.lock() 的次数。一般一个线程内每个需要同步的代码块就会使用锁定嘛:
 lock.lock();  // block until condition holds
     try {
       // ... method body
     } finally {
       lock.unlock()
     }
2 使用Condition实现等待/通知
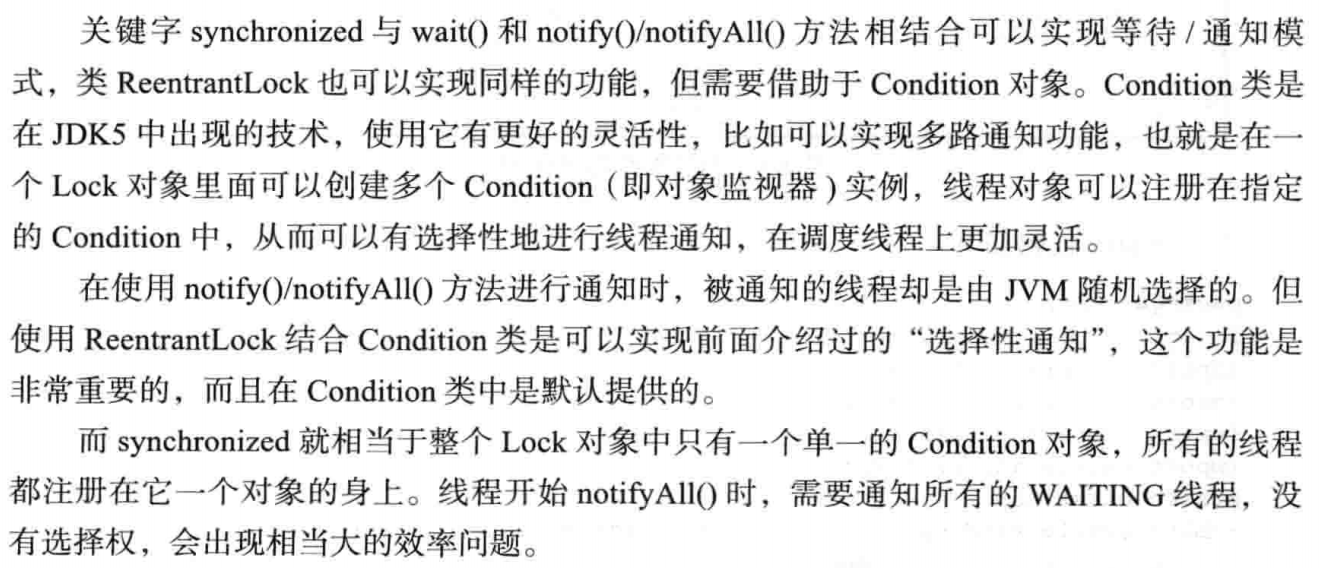
Condition 将 Object 监视器方法(wait、notify 和 notifyAll)分解成截然不同的对象,以便通过将这些对象与任意 Lock 实现组合使用,为每个对象提供多个等待 set(wait-set)。其中,Lock 替代了 synchronized 方法和语句的使用,Condition 替代了 Object 监视器方法的使用。
拿上面的消费者/生产者的代码举例,使用wait/notifyAll实现的最大问题是,每次通知会同时唤醒所有的生产以及消费者,使用Condition对线程进行分组了之后,可以有选择地唤醒生产者组或者消费者组。当然,Condition 实例实质上还是被绑定到一个锁上。
要为特定 Lock 实例获得 Condition 实例,请使用其 newCondition() 方法。看完下面的这个例子你就会使用Condition了。
BoundedBuffer.java
package testReentrantLock;

import java.util.concurrent.locks.Condition;
import java.util.concurrent.locks.ReentrantLock;

public class BoundedBuffer {
    final ReentrantLock lock = new ReentrantLock();
    // notFull才能put,put线程在notFull队列中等待,成功put了之后通过notEmpty中的线程你们可以take了
    final Condition notFull = lock.newCondition();
    // notEmpty才能take,take线程在notEmpty队列中等待,成功take了之后通过notFull中的线程你们可以put了
    final Condition notEmpty = lock.newCondition();

    final int[] items = new int[2];
    int putptr, takeptr, count;

    public void put(int x) throws InterruptedException {
        // 每次put之前线程得获得这个锁才行
        lock.lock();
        try {
            // 如果是full,则让这个企图put的线程等待
            while (count == items.length) {
                System.out.printf("----FULL---- The buffer is full!  %s has to wait.\n",
                        Thread.currentThread().getName());
                notFull.await();
            }

            // 每次只要put成功,则通知一下 notEmpty,如果存在等待take的线程,则唤醒一个让它取
            items[putptr] = x;
            if (++putptr == items.length)
                putptr = 0;
            ++count;
            notEmpty.signal();
        } finally {
            lock.unlock();
        }
    }

    public int take() throws InterruptedException {
        lock.lock();
        try {
            while (count == 0) {
                System.out.printf("----EMPTY---- The buffer is empty!  %s has to wait.\n",
                        Thread.currentThread().getName());
                notEmpty.await();
            }
            // 每次take成功,则通知 notFull,如果有等待put的线程,则让它放
            int x = items[takeptr];
            if (++takeptr == items.length)
                takeptr = 0;
            --count;
            notFull.signal();
            return x;
        } finally {
            lock.unlock();
        }
    }
}
BufferThread.java
package testReentrantLock;

public class BufferThread extends Thread {

    private BoundedBuffer boundedBuffer = new BoundedBuffer();
    private String name;

    public BufferThread(BoundedBuffer boundedBuffer, String name) {
        super(name);
        this.boundedBuffer = boundedBuffer;
        this.name = name;
    }

    @Override
    public void run() {
        super.run();
        System.out.println(Thread.currentThread().getName() + " is running!");
        if (name.startsWith("PUT")) {
            for (int i = 1; i < 4; i++) {
                try {
                    boundedBuffer.put(i);
                    System.out.printf("--PUT-- %s has put %d into the buffer.\n", Thread.currentThread().getName(), i);
                    Thread.sleep(500);
                } catch (InterruptedException e) {
                    e.printStackTrace();
                }
            }
        } else if (name.startsWith("TAKE")) {
            for (int i = 1; i < 4; i++) {
                try {
                    int value = boundedBuffer.take();
                    System.out.printf("--TAK-- %s has took %d from the buffer.\n", Thread.currentThread().getName(),
                            value);
                    Thread.sleep(400);
                } catch (InterruptedException e) {
                    e.printStackTrace();
                }
            }

        }
    }

    public static void main(String[] args) {
        BoundedBuffer boundedBuffer = new BoundedBuffer();
        // 创建3个put线程,每个往Buffer里put 3次
        BufferThread put1 = new BufferThread(boundedBuffer, "PUT1");
        BufferThread put2 = new BufferThread(boundedBuffer, "PUT2");
        BufferThread put3 = new BufferThread(boundedBuffer, "PUT3");

        // 创建2个take线程,每个从Buffer里take 3次
        BufferThread take1 = new BufferThread(boundedBuffer, "TAKE1");
        BufferThread take2 = new BufferThread(boundedBuffer, "TAKE2");

        put1.start();
        put2.start();
        put3.start();
        take1.start();
        take2.start();
    }
}
输出
PUT2 is running!
TAKE1 is running!
TAKE2 is running!
----EMPTY---- The buffer is empty!  TAKE2 has to wait.
PUT1 is running!
PUT3 is running!
--PUT-- PUT3 has put 1 into the buffer.
--PUT-- PUT2 has put 1 into the buffer.
--TAK-- TAKE1 has took 1 from the buffer.
--TAK-- TAKE2 has took 1 from the buffer.
--PUT-- PUT1 has put 1 into the buffer.
--TAK-- TAKE2 has took 1 from the buffer.
----EMPTY---- The buffer is empty!  TAKE1 has to wait.
--PUT-- PUT3 has put 2 into the buffer.
----FULL---- The buffer is full!  PUT2 has to wait.
--PUT-- PUT1 has put 2 into the buffer.
--PUT-- PUT2 has put 2 into the buffer.
--TAK-- TAKE1 has took 2 from the buffer.
--TAK-- TAKE2 has took 2 from the buffer.
--TAK-- TAKE1 has took 2 from the buffer.
--PUT-- PUT3 has put 3 into the buffer.
--PUT-- PUT1 has put 3 into the buffer.
----FULL---- The buffer is full! PUT2 has to wait.使用Condition的优越性就在于,它把等待的线程分类了,利用同一个lock创建不同的Condition,你想把等待的线程分成几类你就创建多少个Condition就好了,在特定条件下,唤醒不同类别的等待线程,多么方便。如果这样说你还是不明白Condition的优越性,那么看看同样的功能使用synchronized编写是怎么样的:
对BoundedBuffer.java的改写:
package testReentrantLock;

public class BoundedBufferSyn {

    final int[] items = new int[2];
    int putptr, takeptr, count;

    synchronized public void put(int x) throws InterruptedException {
        // 如果是full,则让这个企图put的线程等待
        while (count == items.length) {
            System.out.printf("----FULL---- The buffer is full!  %s has to wait.\n", Thread.currentThread().getName());
            // 这里的wait和Condition的await在功能上没有什么区别,重点在唤醒
            wait();
        }

        // 每次只要put成功,则通知一下 notEmpty,如果存在等待take的线程,则唤醒一个让它取
        items[putptr] = x;
        if (++putptr == items.length)
            putptr = 0;
        ++count;

        // 唤醒所有等待线程,让它们再去抢一次锁,而无法只通知特性的线程
        notifyAll();
    }

    synchronized public int take() throws InterruptedException {
        while (count == 0) {
            System.out.printf("----EMPTY---- The buffer is empty!  %s has to wait.\n",
                    Thread.currentThread().getName());
            wait();
        }
        // 每次take成功,则通知 notFull,如果有等待put的线程,则让它放
        int x = items[takeptr];
        if (++takeptr == items.length)
            takeptr = 0;
        --count;
        notifyAll();
        return x;
    }
}
3 公平锁
ReentrantLock的公平锁是个啥? 先来看看JDK文档的解释:
此类的构造方法接受一个可选的公平 参数。当设置为 true 时,在多个线程的争用下,这些锁【倾向于】将访问权授予等待时间最长的线程。否则此锁将无法保证任何特定访问顺序。与采用默认设置(使用不公平锁)相比,使用公平锁的程序在许多线程访问时【表现为很低的总体吞吐量(即速度很慢,常常极其慢)】,但是在获得锁和保证锁分配的均衡性时差异较小。
【不过要注意的是,公平锁不能保证线程调度的公平性。】因此,使用公平锁的众多线程中的一员可能获得多倍的成功机会,这种情况发生在其他活动线程没有被处理并且目前并未持有锁时。还要注意的是,未定时的 tryLock 方法并没有使用公平设置。因为即使其他线程正在等待,只要该锁是可用的,此方法就可以获得成功。
4 lockInterruptibly()
如果当前线程未被中断,则获取锁;如果已经被中断则抛出异常。
package testReentrantLock;

import java.util.concurrent.locks.ReentrantLock;

public class TestlockInterruptibly extends Thread {
    private ReentrantLock lock;
    private String name;

    public TestlockInterruptibly(String name, ReentrantLock lock) {
        super(name);
        this.name = name;
        this.lock = lock;

    }

    @Override
    public void run() {
        super.run();
        try {
            if (name.equals("T-lock")) {
                lock.lock();
            } else {
                lock.lockInterruptibly();
            }

            for (int i = 0; i < 3; i++) {
                System.out.println(Thread.currentThread().getName() + " printed " + i);
                Thread.sleep(1000);
            }

        } catch (InterruptedException e) {
            e.printStackTrace();
            System.out.println("----- catch region -----");
        } finally {
            System.out.println(Thread.currentThread().getName() + " released the lock!");
            lock.unlock();
        }
    }

    public static void main(String[] args) {
        ReentrantLock lock = new ReentrantLock();
        TestlockInterruptibly t1 = new TestlockInterruptibly("T-interruptibly", lock);
        TestlockInterruptibly t2 = new TestlockInterruptibly("T-lock", lock);

        t1.start();
        t2.start();

        // interrupt一定要在start之后,不然没有意义
        t1.interrupt();
        t1.interrupt();
    }

}
输出
T-lock printed 0
java.lang.InterruptedException
    at java.util.concurrent.locks.AbstractQueuedSynchronizer.acquireInterruptibly(AbstractQueuedSynchronizer.java:1219)
    at java.util.concurrent.locks.ReentrantLock.lockInterruptibly(ReentrantLock.java:340)
    at testReentrantLock.TestlockInterruptibly.run(TestlockInterruptibly.java:23)
Exception in thread "T-interruptibly" java.lang.IllegalMonitorStateException
    at java.util.concurrent.locks.ReentrantLock$Sync.tryRelease(ReentrantLock.java:155)
    at java.util.concurrent.locks.AbstractQueuedSynchronizer.release(AbstractQueuedSynchronizer.java:1260)
    at java.util.concurrent.locks.ReentrantLock.unlock(ReentrantLock.java:460)
    at testReentrantLock.TestlockInterruptibly.run(TestlockInterruptibly.java:36)
----- catch region -----
T-interruptibly released the lock!
T-lock printed 1
T-lock printed 2
T-lock released the lock!
可见,给一个线程打上 interrupt 的标记,对于它用 lock() 获取锁是没有影响的;但是对于一个用 lockInterruptibly() 获取锁的线程是有影响的,它会抛出异常。
5 tryLock()
- 仅在调用时锁未被另一个线程保持的情况下,才获取该锁。
- 如果该锁没有被另一个线程保持,并且立即返回 true 值,则将锁的保持计数设置为 1。即使已将此锁设置为使用公平排序策略,但是调用 tryLock() 仍将 立即获取锁(如果有可用的),而不管其他线程当前是否正在等待该锁。
- 在某些情况下,此“闯入”行为可能很有用,即使它会打破公平性也如此。如果希望遵守此锁的公平设置,则使用 tryLock(0, TimeUnit.SECONDS) ,它几乎是等效的(也检测中断)。
- 如果当前线程已经保持此锁,则将保持计数加 1,该方法将返回 true.如果锁被另一个线程保持,则此方法将立即返回 false 值。
所以,tryLock() 的特性是闯入和立即返回 ,至于它有个boolen返回值但是无所谓,因为ReentrantLock 中有个 isHeldByCurrentThread() 方法也可以判断它是否获得了锁。
package testReentrantLock;

import java.util.concurrent.locks.ReentrantLock;

public class TestlockInterruptibly extends Thread {
    private ReentrantLock lock;
    private String name;

    public TestlockInterruptibly(String name, ReentrantLock lock) {
        super(name);
        this.name = name;
        this.lock = lock;

    }

    @Override
    public void run() {
        super.run();
        try {
            boolean ret = lock.tryLock();
            if (!ret) {
                System.out.println(Thread.currentThread().getName() + " failed to get the lock!");
            } else {
                for (int i = 0; i < 3; i++) {
                    System.out.println(Thread.currentThread().getName() + " printed " + i);
                    Thread.sleep(1000);
                }
            }

        } catch (InterruptedException e) {
            e.printStackTrace();
            System.out.println("----- catch region -----");
        } finally {
            if (lock.isHeldByCurrentThread()) {
                System.out.println(Thread.currentThread().getName() + " released the lock!");
                lock.unlock();
            }

        }
    }

    public static void main(String[] args) {
        ReentrantLock lock = new ReentrantLock();
        TestlockInterruptibly t1 = new TestlockInterruptibly("T-A", lock);
        TestlockInterruptibly t2 = new TestlockInterruptibly("T-B", lock);
        t1.start();
        t2.start();
    }
}
输出
T-A printed 0
T-B failed to get the lock!
T-A printed 1
T-A printed 2
T-A released the lock!
6 tryLock(long timeout, TimeUnit unit)
如果锁在给定等待时间内没有被另一个线程保持,且当前线程未被 中断,则获取该锁。如果该锁没有被另一个线程保持,并且立即返回 true 值,则将锁的保持计数设置为 1。如果为了使用公平的排序策略,已经设置此锁,并且其他线程都在等待该锁,则不会 获取一个可用的锁。这与 tryLock() 方法相反。如果想使用一个允许闯入公平锁的定时 tryLock,那么可以将定时形式和不定时形式组合在一起:
if (lock.tryLock() || lock.tryLock(timeout, unit) ) { ... }十二、ReentrantReadWriteLock
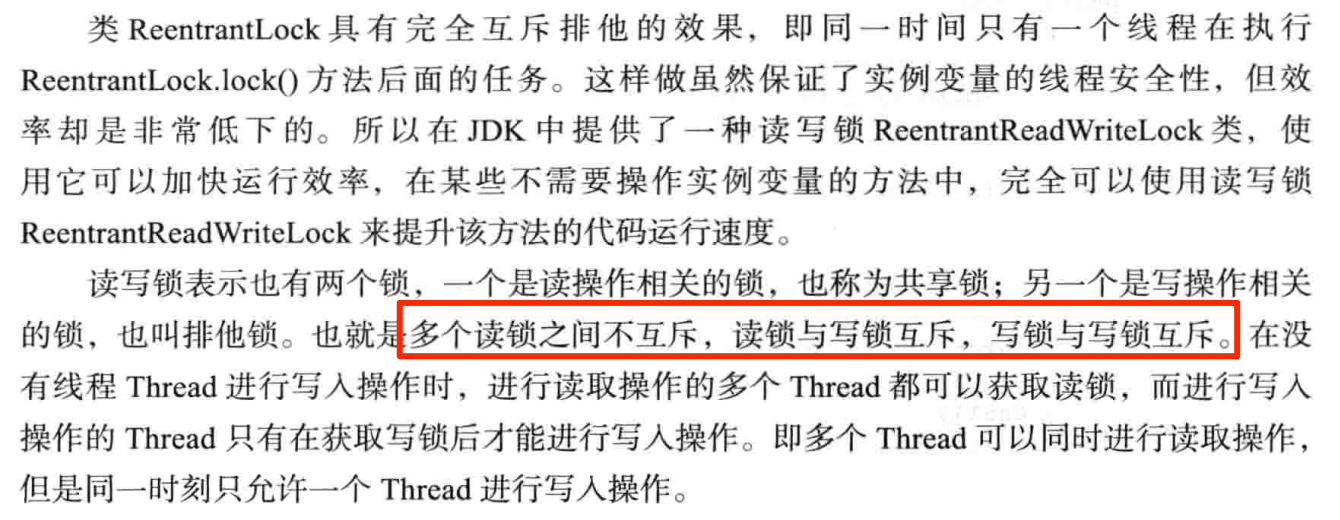
import java.util.ArrayList;
import java.util.Random;
import java.util.concurrent.locks.ReentrantReadWriteLock;

public class TestReentrantReadWriteLock extends Thread {
    private ReentrantReadWriteLock readWriteLock;
    private ArrayList<Integer> aList;
    private String name;

    public TestReentrantReadWriteLock(ReentrantReadWriteLock readWriteLock, ArrayList<Integer> aList, String name) {
        super(name);
        this.readWriteLock = readWriteLock;
        this.aList = aList;
        this.name = name;
    }

    @Override
    public void run() {
        super.run();

        if (name.startsWith("Read")) {
            readWriteLock.readLock().lock();
            try {
                for (int i = 0; i < 3; i++) {
                    System.out.printf(Thread.currentThread().getName() + " red: [%d];\n", aList.get(0));
                    Thread.sleep(1000);
                }
            } catch (InterruptedException e) {
                e.printStackTrace();
            } finally {
                readWriteLock.readLock().unlock();
            }
        }
        if (name.startsWith("Write")) {
            readWriteLock.writeLock().lock();
            try {
                for (int i = 0; i < 3; i++) {
                    Random random = new Random();
                    int value = random.nextInt(100);
                    aList.set(0, value);
                    System.out.println(Thread.currentThread().getName() + " wrote: " + value);
                    Thread.sleep(1000);
                }
            } catch (InterruptedException e) {
                e.printStackTrace();
            } finally {
                readWriteLock.writeLock().unlock();
            }
        }
    }

    public static void main(String[] args) {
        ArrayList<Integer> aList = new ArrayList<>();
        aList.add(0);
        ReentrantReadWriteLock readWriteLock = new ReentrantReadWriteLock();

        TestReentrantReadWriteLock r1 = new TestReentrantReadWriteLock(readWriteLock, aList, "Read1");
        TestReentrantReadWriteLock r2 = new TestReentrantReadWriteLock(readWriteLock, aList, "Read2");
        TestReentrantReadWriteLock w1 = new TestReentrantReadWriteLock(readWriteLock, aList, "Write1");
        TestReentrantReadWriteLock w2 = new TestReentrantReadWriteLock(readWriteLock, aList, "Write2");
        r1.start();
        r2.start();
        w1.start();
        w2.start();
    }

}
输出
Read1 red: [0];
Read2 red: [0];
Read2 red: [0];
Read1 red: [0];
Read2 red: [0];
Read1 red: [0];
Write1 wrote: 58
Write1 wrote: 63
Write1 wrote: 64
Write2 wrote: 23
Write2 wrote: 13
Write2 wrote: 70
可见,确实是读锁是并发的,交叉地在执行;写锁是同步的,串行化地在执行。然后读锁和写锁是互斥的,在同一时间,要么读,要么写,不能一边写一边读。
十三、Timer
Timer类的主要作用就是设置计划任务,但封装任务逻辑的却是TimerTask类,准确的说是TimerTask的子类,因为它是一个抽象类。

import java.util.Timer;
import java.util.TimerTask;

public class M {
    public static void main(String[] args) {
        // TODO todo.generated by zoer
        Timer timer = new Timer();
        timer.schedule(new MyTask(), 1000, 2000);
    }
}

class MyTask extends TimerTask {
    @Override
    public void run() {
        System.out.println("dddd");
    }
}
十四、ThreadGroup线程组
线程组表示一个线程的集合。此外,线程组也可以包含其他线程组。线程组构成一棵树,在树中,除了初始线程组外,每个线程组都有一个父线程组。允许线程访问有关自己的线程组的信息,但是不允许它访问有关其线程组的父线程组或其他任何线程组的信息。
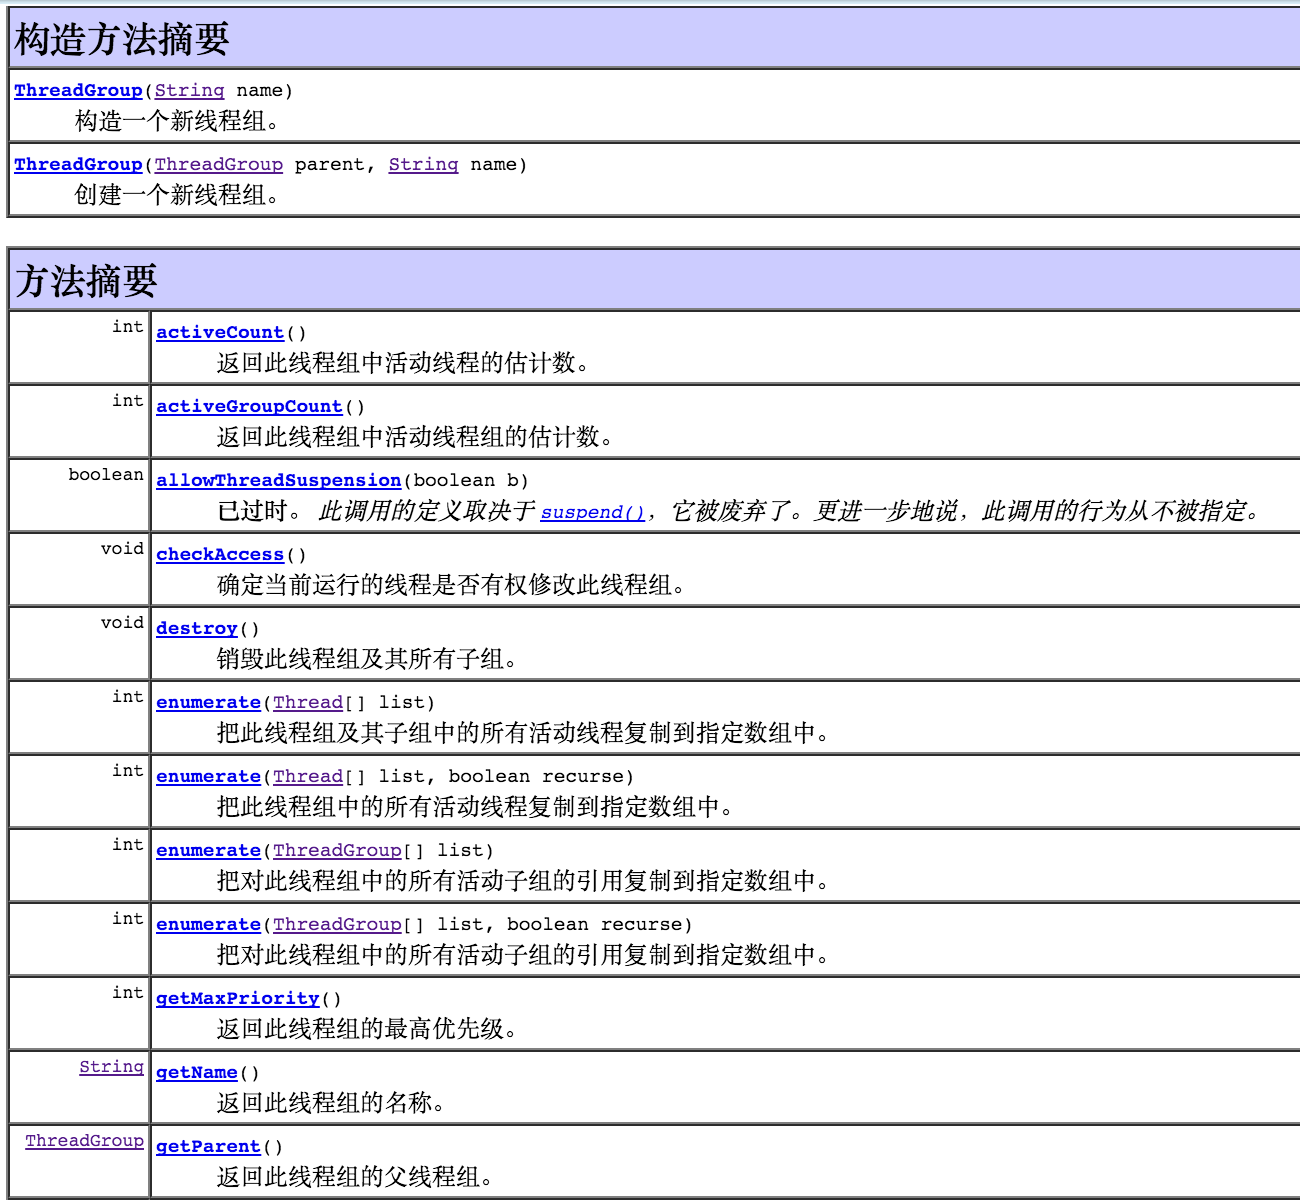
以及Thread的构造方法我们回顾一下:
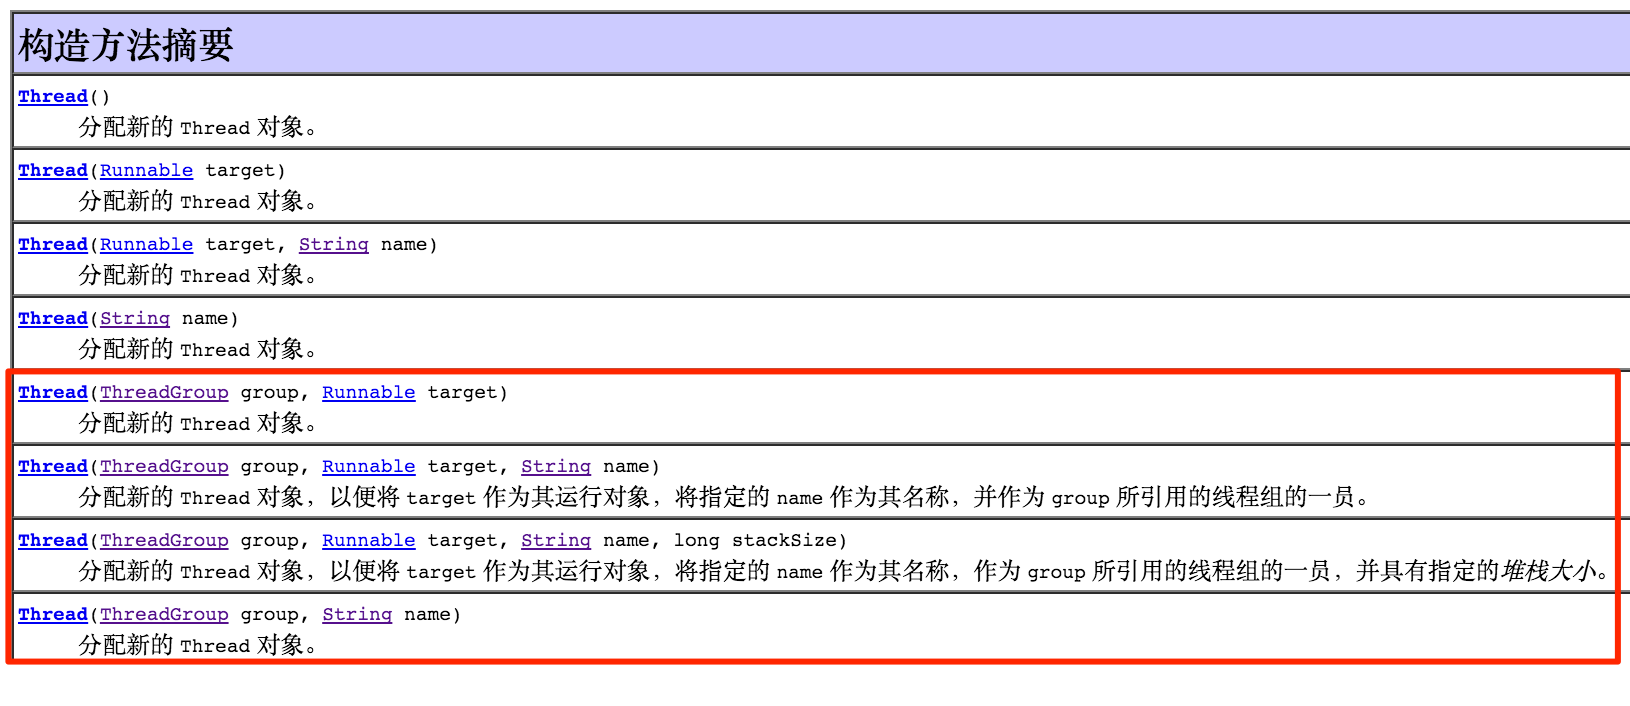
当创建了好几个线程的时候,很多线程的工作任务是类似或者一致的,这样我们就可以使用ThreadGroup来管理他们,ThreadGroup可以随时的获取在他里面的线程的运行状态,信息,或者一条命令关闭掉这个group里面的所有线程。线程组的特点:
1. 在实例化一个线程组时,如果不显示地指明它的线程组,那么就是默认归为创建这个线程组的线程的线程组。
2. JVM的根线程组就是system。
3. 活用线程组的interrupt() 方法,它可以中断此线程组中的所有线程。
代码示例:
import java.util.Date;
import java.util.Random;
import java.util.concurrent.TimeUnit;

public class SearchTask implements Runnable {

    public SearchTask(Result result) {
        this.result = result;
    }

    private Result result;

    @Override
    public void run() {
        String name = Thread.currentThread().getName();
        System.out.println("Thread Start " + name);
        try {
            doTask();
            result.setName(name);
        } catch (InterruptedException e) {
            System.out.printf("Thread %s: Interrupted\n", name);
            return;
        }
        System.out.println("Thread end " + name);
    }

    private void doTask() throws InterruptedException {
        Random random = new Random((new Date()).getTime());
        int value = (int) (random.nextDouble() * 100);
        System.out.printf("Thread %s: %d\n", Thread.currentThread().getName(),
                value);
        TimeUnit.SECONDS.sleep(value);
    }

    public static void main(String[] args) {
        //创建5个线程,并入group里面进行管理
        ThreadGroup threadGroup = new ThreadGroup("Searcher");
        Result result = new Result();
        SearchTask searchTask = new SearchTask(result);
        for (int i = 0; i < 5; i++) {
            Thread thred = new Thread(threadGroup, searchTask);
            thred.start();
            try {
                TimeUnit.SECONDS.sleep(1);
            } catch (InterruptedException e) {
                e.printStackTrace();
            }
        }
        //通过这种方法可以看group里面的所有信息
        System.out.printf("Number of Threads: %d\n", threadGroup.activeCount());
        System.out.printf("Information about the Thread Group\n");
        threadGroup.list();

        //这样可以复制group里面的thread信息
        Thread[] threads = new Thread[threadGroup.activeCount()];
        threadGroup.enumerate(threads);
        for (int i = 0; i < threadGroup.activeCount(); i++) {
            System.out.printf("Thread %s: %s\n", threads[i].getName(),
                    threads[i].getState());
        }

        waitFinish(threadGroup);
        //将group里面的所有线程都给interpet
        threadGroup.interrupt();
    }

    private static void waitFinish(ThreadGroup threadGroup) {
        while (threadGroup.activeCount() > 9) {
            try {
                TimeUnit.SECONDS.sleep(1);
            } catch (InterruptedException e) {
                e.printStackTrace();
            }
        }
    }

} 


 5049
5049

 被折叠的 条评论
为什么被折叠?
被折叠的 条评论
为什么被折叠?
 到【灌水乐园】发言


