


在上一篇文章《spring源码扩展点》,我们简单的介绍了 spring 的几个常用扩展点,了解了 BeanPostProcessor, BeanFactoryPostProcessor, BeanDefinitionRegistryPostProcessor, ApplicationListener, ApplicationContextInitializer 的作用,接下来主要介绍下在项目中的实际应用
dubbo 服务改造
在某某省移动的支付项目里面,沿用原有的 dubbo 框架,开发工作已经完成 80% 了,但是有一天和 boss 系统开会,要求统一对接 esb(消息总线),consumer 端的调用统统走 esb,由 esb 统一调用 dubbo 的 provider 服务,并且这个 dubbo 服务的接口必须是 String 入参、出参的。当时一万只泥马在奔腾,但是必须得搞啊,谁让人家是 boss。同时,也不能改造原有代码,否则这个版本在其他省份就无法落地了,因为只有该省份才有这个特殊的需求,因此只能通过组件增强的方式来实现该需求,难度也是不小的,当时做完这个改造点,感觉掉了很多头发。相关代码,已上传到gitee,https://gitee.com/huangxfchn/dubbo-service-adapter
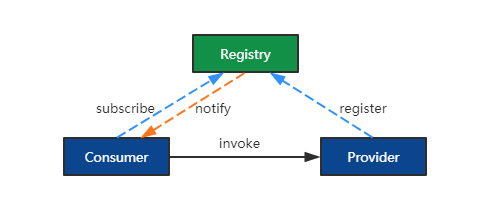
原有的 dubbo 架构如下图所示,Consumer 通过注册中心发现 Provider 服务,并进行调用
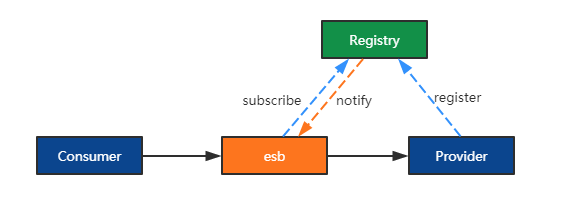
而现在需要进行改造,由 Consumer 通过 esb 完成对 Provider 端的调用,如下图所示:
我们来思考下解决方案,首先解决 dubbo 接口的问题,要求是注册的接口必须是 String 入参、出参的接口(方便 esb 进行泛化调用),这个还比较好弄,只要按照原来定义的接口,利用 asm 生成一个新的接口即可。下面是一个简单的示例,我们注册到 zookeeper 的是 PaymentServiceStringFacade 接口,该接口实现类采用动态代理实现,主要是负责数据解析,并且调用 PaymentService 实现类对应的方法,这一块的代码就不贴出来了,有兴趣的童鞋可以在下方留言
public interface PaymentService {
	public PayOffResponse payOff( PayOffRequest payOff );
	public ConfirmPayResp confirmPay( ConfirmPayRequest confirmRequest );
}

public interface PaymentServiceStringFacade {
	public String payOff( String payOff );
	public String confirmPay( String confirmRequest );
}
针对 consumer 端,我们需要注入自己的实现类,而不再是 dubbo 默认的动态代理类,接下来,我们看看如何解决 consumer 端注入的 PaymentService 实现类问题。由于我们的项目中使用的是 xml,因此这里以 xml 为例。我们知道,dubbo 会根据 xml 的 <dubbo:reference interface="xxx" /> 配置创建 ReferenceBean 的 BeanDefinition,那么我需要定义一个 BeanDefinitionRegistryPostProcessor 的实现类,把原来的 dubbo 的 BeanDefinition 从 spring 容器中移除,然后根据这个 BeanDefinition 创建动态代理类,现在 spring 容器中没有对应的实现类,肯定是没法注入的,我们还需要通过这种调用方式 beanFactory.registerSingleton( ref.getBeanName(), proxy ) 把该动态代理类注册到 spring 容器中。这样 consumer 端注入的便是我们自己的定义的动态代理类了,而这个动态代理类要做的事情就是负责调用 esb(走http协议),并且把 esb 返回的结果反序列化成对象。关键的代码如下所示:
public class DubboConsumerAdapterSupport implements BeanDefinitionRegistryPostProcessor, InitializingBean {

	public void postProcessBeanFactory(ConfigurableListableBeanFactory beanFactory) throws BeansException {	// do nothing }

	public void postProcessBeanDefinitionRegistry(BeanDefinitionRegistry registry) throws BeansException {

		String[] names = registry.getBeanDefinitionNames();
		for ( String name : names ) {

			BeanDefinition definition = registry.getBeanDefinition( name );

			// dubbo reference 对应的 bean
			String beanClassName = definition.getBeanClassName();
			if ( ReferenceBean.class.getName().equals( beanClassName ) ) {
				registry.removeBeanDefinition( name );	// 从 spring 容器中移除
				Object proxy = ......; // 生成动态代理类
				String sourceBeanName = StringUtils.uncapitalize( beanClassName ) + "$Adapter";
				beanFactory.registerSingleton( sourceBeanName, proxy );	// 往 spring 容器中注册动态代理类
			}
		}

	}

}
spring-task 动态任务
有一个定时任务的需求,需要支持动态地修改调度时间,我们知道使用
@Scheduled,或者基于 xml 的标签<scheduled-tasks>...</scheduled-tasks>,这种方式一旦指定cron表达式,是不能修改的,并且 spring 也没有提供 操作的 API
针对 @Scheduled, <scheduled-tasks>...</scheduled-tasks>,spring 分别使用了 ScheduledAnnotationBeanPostProcessor, ContextLifecycleScheduledTaskRegistrar 来处理定时任务的,并且这俩 bean 都是被注册到 spring 容器中的。既然他们不支持动态地修改 cron 时间,我们可以写个子类扩展下功能就可以了,这个比较简单。另外就是需要替换 spring 中的实现类,也不难,可以用 BeanFactoryPostProcessor 修改实现类。下面我以 <scheduled-tasks>...</scheduled-tasks> 这种 xml 配置为例,阐述下是如何实现扩展 spring task,让它支持动态修改调度时间,基于注解的配置也是同样的思路,这里只列出一个例子。
首先,写个类继承 ContextLifecycleScheduledTaskRegistrar,添加方法 modifyCronTask 用于修改定时任务的 cron 表达式,关键代码如下所示,完整代码请查看我的 github 。其中 ScheduledTask 是 spring 对定时任务的封装,由于是私有字段,因此使用了反射修改 cron 表达式,并且在修改之后重新执行 schedule 方法,确保修改后的 cron 表达式生效。关于修改 cron 表达式的过程有点繁锁,这里不做讲解,我们主要来看看对 spring task 源码扩展的思路
public class DynamicScheduledTaskRegistrar extends ContextLifecycleScheduledTaskRegistrar {

	/**
	 * 动态修改Cron表达式,在运行的时候改变其执行时机
	 */
	public void modifyCronTask( Method method, String newCronExpression ) {

		CronTask task = findCronTaskByMethod( method );
		if ( task == null ) {
			throw new IllegalArgumentException( "找不到对应的定时任务!" );
		}
		ScheduledTask scheduledTask = cronTaskToScheduledTask.get( task );
		if ( scheduledTask == null ) {
			throw new IllegalArgumentException( "找不到对应的定时任务!" );
		}

		//构造方法里面会判断cron表达式是否正确
		CronTrigger trigger = new CronTrigger( newCronExpression );

		//使用反射的方法修改表达式的值,因为future对象都是protected的,不能直接操作
		this.doMofidyCronIfSupported( scheduledTask, trigger );
		logger.info( "Modify cron task success! Old cron:{}, new cron:{}", task.getExpression(), newCronExpression );

	}
}
上面我们实现了动态定时任务的逻辑,现在需要替换 spring task 的实现类,我们借助 BeanFactoryPostProcessor 来个移花接木,神不知鬼不觉地替换了默认的实现类,关键代码如下,完整代码同样参考我的 github。实现思路很简单,遍历 BeanFactory 内部注册的所有 BeanDefinition,并且找到 ContextLifecycleScheduledTaskRegistrar 的 bean 定义,然后调用 BeanDefinition#setBeanClassName() 修改具体的实现类
/**
 * 改变Spring的{@link ContextLifecycleScheduledTaskRegistrar},实现对定时任务的动态操作
 * @author huangxf
 * @date 2017年5月1日
 */
public class DynamicScheduledTaskRegistrarSupport implements BeanFactoryPostProcessor {

	/**
	 * 改变Spring默认注册Task的任务Bean
	 */
	public void postProcessBeanFactory(
			ConfigurableListableBeanFactory beanFactory) throws BeansException {
		for ( String bfName : beanFactory.getBeanDefinitionNames() ) {
			BeanDefinition bf = beanFactory.getBeanDefinition( bfName );

			// 在容器中可能有多个ContextLifecycleScheduledTaskRegistrar
			if ( ContextLifecycleScheduledTaskRegistrar.class.getName().equals( bf.getBeanClassName() ) ) {
				// 改变默认的BeanClassName,改成自定义的DynamicScheduledTaskRegistrar实现对Task的操作扩展
				bf.setBeanClassName( DynamicScheduledTaskRegistrar.class.getName() );
			}
		}
	}
}
接下来,只需要把这个 DynamicScheduledTaskRegistrarSupport 注册到 spring 容器中即可,有很多种方式,这里只介绍下注解的方式
- 使用
@Bean注解
@Configuration
public class AppConfig {
	@Bean
	public BeanFactoryPostProcessor dynamicScheduledTaskRegistrarSupport() {
		return new DynamicScheduledTaskRegistrarSupport();
	}
}
- 模仿 spring 的
@EnableXXX注解,这种方式看上去比较洋气,其实道理都是一样的,不过是利用 spring 提供的@Import注解引入 bean 而已。可以在框架层面编写@EnableDynamicTask注解,利用@Import导入需要的类,然后在AppConfig配置类上面使用@EnableDynamicTask注解即可
@Target(ElementType.TYPE)
@Retention(RetentionPolicy.RUNTIME)
@Documented
@Import(DynamicScheduledTaskRegistrarSupport.class)
public @interface EnableDynamicTask {

}

@Configuration
@EnableDynamicTask
public class AppConfig {

}
Spring IoC
在某些场景,比如与 resteasy 框架集成,我们需要在 spring 容器启动前,提前把某些对象 new 出来,但是我们又希望利用 spring 容器的 IoC 对 new 出来的对象进行依赖注入。
这种场景下,我们需要借助 ApplicationListener 来完成这个任务。首先,想办法往 ConfigurableWebApplicationContext 注册 ApplicationListener<ContextRefreshedEvent> 的实现类,可以重写 ContextLoaderListener 的 customizeContext 方法,或者往web容器中添加 ApplicationContextInitializer。而这个 ApplicationListener<ContextRefreshedEvent> 的实现类里面要做的事情是在 onApplicationEvent(event) 方法里面,调用 AutowireCapableBeanFactory().autowireBean( bean ),我们便可以对自己实例化的类进行依赖注入了。
下面,我们以扩展 resteasy 功能的代码为例,我们要达到的目的是简化 spring 与 resteasy 的集成,并且扩展 resteasy 的注入功能,因此 PaymentInjectorFactory 重写了 InjectorFactoryImpl,但是 PaymentInjectorFactory 需要注入 spring 容器中的 bean,并且 PaymentInjectorFactory 对象需要在 spring 容器之前创建。关键代码如下所示,PaymentInjectorFactory 实现了 ApplicationListener<ContextRefreshedEvent> 接口,在接到 spring 的 ContextRefreshedEvent 事件之后,会对自己、以及它创建的 PaymentMethodInjector 对象进入依赖注入,以下完整代码请查看 github
public class PaymentInjectorFactory extends InjectorFactoryImpl implements ApplicationListener<ContextRefreshedEvent> {

	// 由spring完成依赖注入
	@Resource
	private PartnerSignService partnerSignService;

	private Set<PaymentMethodInjector> providerProxySet = Collections.newSetFromMap(new ConcurrentHashMap<PaymentMethodInjector, Boolean>());

	/**
	 * 返回{@link PaymentMethodInjector}
	 */
	@Override
	public MethodInjector createMethodInjector(ResourceLocator method,
			ResteasyProviderFactory factory) {
		PaymentMethodInjector paymentMethodInjector = new PaymentMethodInjector( method, factory );
		providerProxySet.add(paymentMethodInjector);
		return paymentMethodInjector;
	}

	@Override
	public void onApplicationEvent(ContextRefreshedEvent event) {
		ApplicationContext application = event.getApplicationContext();

		// 对创建的PaymentMethodInjector进行依赖注入
		for ( PaymentMethodInjector injector : providerProxySet ) {
			application.getAutowireCapableBeanFactory().autowireBean( injector );
		}

		// 注入 PartnerSignService
		application.getAutowireCapableBeanFactory().autowireBean( this );
	}

}
现在还要做的事情,是想办法把该 PaymentInjectorFactory 作为一个 ApplicationListener 注册到 spring 容器中。我们可以重写 ContextLoaderListener#customizeContext() 方法,通过调用 ConfigurableWebApplicationContext#addApplicationListener(),从而往 ApplicationContext 注册 ApplicationListener,关键代码如下所示
public class SpringResteasyBootstrap extends ContextLoaderListener implements ServletContextListener {

	private SpringContextLoaderSupport springContextLoaderSupport = new SpringContextLoaderSupport();

	private static final PaymentInjectorFactory injectorFactory = new PaymentInjectorFactory();

	public void contextInitialized( ServletContextEvent event ) {
		// 完成 spring 与 resteasy的集成
	}

	/**
	 * 主要目的是将SpringBeanProcessor注册到Spring容器中
	 * @see SpringContextLoaderListener
	 */
	@Override
	protected void customizeContext( ServletContext servletContext, ConfigurableWebApplicationContext webContext ) {
		webContext.addApplicationListener( injectorFactory );
	}

}
于是,只要把该 SpringResteasyBootstrap 配置到 web.xml 中即可
<context-param>
	<param-name>contextConfigLocation</param-name>
	<param-value>classpath*:spring-config/applicationContext.xml</param-value>
</context-param>
<!-- 同时集成spring和resteasy,并且加入自定义注解的支持 -->
<listener>
	<listener-class>net.dwade.plugins.rest.SpringResteasyBootstrap</listener-class>
</listener>
上面说的是,web 环境的 spring 容器,在非 web 容器中又怎样处理呢?在这种情况下,可以借助 InitializingBean。实现 InitializingBean、BeanFactoryAware 接口,命名为 AutowiredSupport,在 afterPropertiesSet 方法里面,对需要依赖注入的 A、B、C 对象进行依赖注入。通过 BeanFactoryAware 注入的是 BeanFactory,需要 instance of 判断为 AutowireCapableBeanFactory。注意,像这样的情况,只能通过静态方法往这个类里面添加需要依赖注入对象的引用。


 1233
1233

 被折叠的 条评论
为什么被折叠?
被折叠的 条评论
为什么被折叠?
 到【灌水乐园】发言


