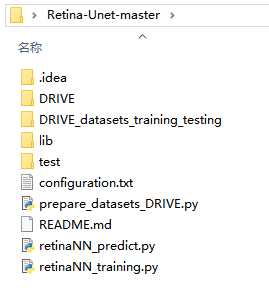
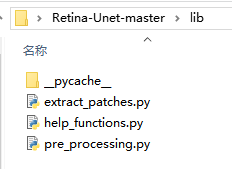
项目源代码:


configuration.txt
#数据路径 以及 训练集 测试集的名字
[data paths]
path_local =  ./DRIVE_datasets_training_testing/
train_imgs_original = DRIVE_dataset_imgs_train.hdf5
train_groundTruth = DRIVE_dataset_groundTruth_train.hdf5
train_border_masks = DRIVE_dataset_borderMasks_train.hdf5
test_imgs_original = DRIVE_dataset_imgs_test.hdf5
test_groundTruth = DRIVE_dataset_groundTruth_test.hdf5
test_border_masks = DRIVE_dataset_borderMasks_test.hdf5

[experiment name]
name = test

[data attributes]
#Dimensions of the patches extracted from the full images
patch_height = 72
patch_width = 72

[training settings]
#number of total patches:
N_subimgs = 38000
#if patches are extracted only inside the field of view:
inside_FOV = False
#Number of training epochs
N_epochs = 20
batch_size = 32
#if running with nohup
nohup = False

[testing settings]
#Choose the model to test: best==epoch with min loss, last==last epoch
best_last = best
#number of full images for the test (max 20)
full_images_to_test = 20
#How many original-groundTruth-prediction images are visualized in each image
N_group_visual = 1
#Compute average in the prediction, improve results but require more patches to be predicted
average_mode = True
#Only if average_mode==True. Stride for patch extraction, lower value require more patches to be predicted
stride_height = 20
stride_width = 20
#if running with nohup
nohup = False
prepare_datasets_DRIVE.py
#==========================================================
#
#  This prepare the hdf5 datasets of the DRIVE database
#
#============================================================
import os
import h5py
import numpy as np
from PIL import Image

def write_hdf5(arr,outfile): # arr:数据  outfile:数据保存文件位置
  with h5py.File(outfile,"w") as f:
    f.create_dataset("image", data=arr, dtype=arr.dtype)

#------------Path of the images --------------------------------------------------------------
#train
# 训练数据位置:图像 金标准 掩膜
original_imgs_train = "./DRIVE/training/images/"
groundTruth_imgs_train = "./DRIVE/training/1st_manual/"
borderMasks_imgs_train = "./DRIVE/training/mask/"
#test
# 测试数据位置:图像 金标准 掩膜
original_imgs_test = "./DRIVE/test/images/"
groundTruth_imgs_test = "./DRIVE/test/1st_manual/"
borderMasks_imgs_test = "./DRIVE/test/mask/"
#---------------------------------------------------------------------------------------------
Nimgs = 20
channels = 3
height = 584
width = 565
# 封装数据保存位置
dataset_path = "./DRIVE_datasets_training_testing/"

def get_datasets(imgs_dir,groundTruth_dir,borderMasks_dir,train_test="null"):
    imgs = np.empty((Nimgs,height,width,channels))
    groundTruth = np.empty((Nimgs,height,width))  # 二值图像 channels=1
    border_masks = np.empty((Nimgs,height,width)) # 二值图像 channels=1
    for path, subdirs, files in os.walk(imgs_dir): #list all files, directories in the path # path=当前路径 subdirs=子文件夹 files=文件夹内所有的文件
        for i in range(len(files)):  # len(files) 所有图像的数量
            #original
            print("original image: " +files[i])
            img = Image.open(imgs_dir+files[i]) # 读取图像到内存
            imgs[i] = np.asarray(img)           # 转换成numpy数据格式
            #corresponding ground truth
            groundTruth_name = files[i][0:2] + "_manual1.gif"
            print("ground truth name: " + groundTruth_name)
            g_truth = Image.open(groundTruth_dir + groundTruth_name)
            groundTruth[i] = np.asarray(g_truth)
            #corresponding border masks
            border_masks_name = ""
            if train_test=="train":
                border_masks_name = files[i][0:2] + "_training_mask.gif"
            elif train_test=="test":
                border_masks_name = files[i][0:2] + "_test_mask.gif"
            else:
                print("specify if train or test!!")
                exit()
            print("border masks name: " + border_masks_name)
            b_mask = Image.open(borderMasks_dir + border_masks_name)
            border_masks[i] = np.asarray(b_mask)

    print("imgs max: " +str(np.max(imgs)))
    print("imgs min: " +str(np.min(imgs)))
    assert(np.max(groundTruth)==255 and np.max(border_masks)==255)
    assert(np.min(groundTruth)==0 and np.min(border_masks)==0)
    print("ground truth and border masks are correctly withih pixel value range 0-255 (black-white)")
    #reshaping for my standard tensors
    # 调整张量格式 [Nimg, channels, height, width]
    imgs = np.transpose(imgs,(0,3,1,2))
    assert(imgs.shape == (Nimgs,channels,height,width))
    groundTruth = np.reshape(groundTruth,(Nimgs,1,height,width))
    border_masks = np.reshape(border_masks,(Nimgs,1,height,width))
    # 检查张量格式
    assert(groundTruth.shape == (Nimgs,1,height,width))
    assert(border_masks.shape == (Nimgs,1,height,width))
    return imgs, groundTruth, border_masks

if not os.path.exists(dataset_path):
    os.makedirs(dataset_path)
#getting the training datasets
# 封装训练数据集
imgs_train, groundTruth_train, border_masks_train = get_datasets(original_imgs_train,groundTruth_imgs_train,borderMasks_imgs_train,"train")
print("saving train datasets")
write_hdf5(imgs_train, dataset_path + "DRIVE_dataset_imgs_train.hdf5")
write_hdf5(groundTruth_train, dataset_path + "DRIVE_dataset_groundTruth_train.hdf5")
write_hdf5(border_masks_train,dataset_path + "DRIVE_dataset_borderMasks_train.hdf5")

#getting the testing datasets
# 封装测试数据集
imgs_test, groundTruth_test, border_masks_test = get_datasets(original_imgs_test,groundTruth_imgs_test,borderMasks_imgs_test,"test")
print("saving test datasets")
write_hdf5(imgs_test,dataset_path + "DRIVE_dataset_imgs_test.hdf5")
write_hdf5(groundTruth_test, dataset_path + "DRIVE_dataset_groundTruth_test.hdf5")
write_hdf5(border_masks_test,dataset_path + "DRIVE_dataset_borderMasks_test.hdf5")
retinaNN_training.py
###################################################
#
#   Script to:
#   - Load the images and extract the patches
#   - Define the neural network
#   - define the training
#
##################################################
import numpy as np
import configparser # Python 3.6中 configparser全使用小写
import os # os模块中主要用于处理文件和目录
from keras.models import Model
from keras.layers import Input, concatenate, Conv2D, MaxPooling2D, UpSampling2D, Reshape, core, Dropout #core内部定义了一系列常用的网络层,包括全连接、激活层等
from keras.optimizers import Adam
from keras.callbacks import ModelCheckpoint, LearningRateScheduler
from keras import backend as K
from keras.utils.vis_utils import plot_model as plot
from keras.optimizers import SGD
import sys
sys.path.insert(0, './lib/') # 加载指向脚本文件目录
from help_functions import * # 导入help_functions脚本文件中的所有函数

#function to obtain data for training/testing (validation)
from extract_patches import get_data_training # 导入extract_patches 脚本中的 get_data_training函数

#Define the neural network
def get_unet(n_ch,patch_height,patch_width):
    inputs = Input(shape=(n_ch,patch_height,patch_width))
    #data_format:字符串,“channels_first”或“channels_last”之一,代表图像的通道维的位置。
    #以128x128的RGB图像为例,“channels_first”应将数据组织为(3,128,128),而“channels_last”应将数据组织为(128,128,3)。该参数的默认值是~/.keras/keras.json中设置的值,若从未设置过,则为“channels_last”。
    conv1 = Conv2D(32, (3, 3), activation='relu', padding='same',data_format='channels_first')(inputs)
    conv1 = Dropout(0.2)(conv1)
    conv1 = Conv2D(32, (3, 3), activation='relu', padding='same',data_format='channels_first')(conv1)
    pool1 = MaxPooling2D((2, 2))(conv1)
    #
    conv2 = Conv2D(64, (3, 3), activation='relu', padding='same',data_format='channels_first')(pool1)
    conv2 = Dropout(0.2)(conv2)
    conv2 = Conv2D(64, (3, 3), activation='relu', padding='same',data_format='channels_first')(conv2)
    pool2 = MaxPooling2D((2, 2))(conv2)
    #
    conv3 = Conv2D(128, (3, 3), activation='relu', padding='same',data_format='channels_first')(pool2)
    conv3 = Dropout(0.2)(conv3)
    conv3 = Conv2D(128, (3, 3), activation='relu', padding='same',data_format='channels_first')(conv3)

    up1 = UpSampling2D(size=(2, 2))(conv3)
    up1 = concatenate([conv2,up1],axis=1)
    conv4 = Conv2D(64, (3, 3), activation='relu', padding='same',data_format='channels_first')(up1)
    conv4 = Dropout(0.2)(conv4)
    conv4 = Conv2D(64, (3, 3), activation='relu', padding='same',data_format='channels_first')(conv4)
    #
    up2 = UpSampling2D(size=(2, 2))(conv4)
    up2 = concatenate([conv1,up2], axis=1)
    conv5 = Conv2D(32, (3, 3), activation='relu', padding='same',data_format='channels_first')(up2)
    conv5 = Dropout(0.2)(conv5)
    conv5 = Conv2D(32, (3, 3), activation='relu', padding='same',data_format='channels_first')(conv5)
    #
    #1×1的卷积的作用
	#大概有两个方面的作用:1. 实现跨通道的交互和信息整合2. 进行卷积核通道数的降维和升维。
    conv6 = Conv2D(2, (1, 1), activation='relu',padding='same',data_format='channels_first')(conv5)
    conv6 = core.Reshape((2,patch_height*patch_width))(conv6)
    conv6 = core.Permute((2,1))(conv6)
    ############
    conv7 = core.Activation('softmax')(conv6)

    model = Model(inputs=inputs, outputs=conv7)

    # sgd = SGD(lr=0.01, decay=1e-6, momentum=0.3, nesterov=False)
    model.compile(optimizer=Adam(lr=0.001), loss='categorical_crossentropy',metrics=['accuracy'])
    return model

    '''
    模型Model的compile方法:
	compile(self, optimizer, loss, metrics=None, loss_weights=None, sample_weight_mode=None, weighted_metrics = None, target_tensors=None)
	本函数编译模型以供训练,参数有
	optimizer:         优化器,为预定义优化器名或优化器对.可以在调用model.compile()之前初始化一个优化器对象,然后传入该函数。
	loss:              损失函数,为预定义损失函数名或一个目标函数
	metrics:           列表,包含评估模型在训练和测试时的性能的指标,典型用法是metrics=['accuracy']如果要在多输出模型中为不同的输出指定不同的指标,可像该参数传递一个字典,例如metrics={'ouput_a': 'accuracy'}
	sample_weight_mode:如果需要按时间步为样本赋权(2D权矩阵),将该值设为“temporal”。默认为“None”,代表按样本赋权(1D权)。如果模型有多个输出,可以向该参数传入指定sample_weight_mode的字典或列表。在下面fit函数的解释中有相关的参考内容。
	weighted_metrics:   metrics列表,在训练和测试过程中,这些metrics将由sample_weight或clss_weight计算并赋权
	target_tensors:     默认情况下,Keras将为模型的目标创建一个占位符,该占位符在训练过程中将被目标数据代替。如果你想使用自己的目标张量(相应的,Keras将不会在训练时期望为这些目标张量载入外部的numpy数据),你可以通过该参数手动指定。目标张量可以是一个单独的张量(对应于单输出模型),也可以是一个张量列表,或者一个name->tensor的张量字典。
	kwargs:            使用TensorFlow作为后端请忽略该参数,若使用Theano/CNTK作为后端,kwargs的值将会传递给 K.function。如果使用TensorFlow为后端,这里的值会被传给tf.Session.run
	在Keras中,compile主要完成损失函数和优化器的一些配置,是为训练服务的。
    '''
#========= Load settings from Config file
#加载配置文件中的训练参数和训练数据
config = configparser.RawConfigParser()
config.read('configuration.txt')
#patch to the datasets
path_data = config.get('data paths', 'path_local') #数据文件封装后的文件路径
#Experiment name
name_experiment = config.get('experiment name', 'name')
#training settings
N_epochs = int(config.get('training settings', 'N_epochs')) #迭代的次数
batch_size = int(config.get('training settings', 'batch_size')) #训练的批量大小

#============ Load the data and divided in patches
patches_imgs_train, patches_masks_train = get_data_training(
    DRIVE_train_imgs_original=path_data + config.get('data paths', 'train_imgs_original'),
    DRIVE_train_groudTruth=path_data + config.get('data paths', 'train_groundTruth'),  #masks
    patch_height=int(config.get('data attributes', 'patch_height')),
    patch_width=int(config.get('data attributes', 'patch_width')),
    N_subimgs=int(config.get('training settings', 'N_subimgs')),
    inside_FOV=config.getboolean('training settings', 'inside_FOV') #select the patches only inside the FOV  (default == True)
)
#========= Save a sample of what you're feeding to the neural network ==========
#显示示例数据:
N_sample = min(patches_imgs_train.shape[0],40)
#visualize(group_images(patches_imgs_train[0:N_sample,:,:,:],5),'./'+name_experiment+'/'+"sample_input_imgs")#.show()
#visualize(group_images(patches_masks_train[0:N_sample,:,:,:],5),'./'+name_experiment+'/'+"sample_input_masks")#.show()

#=========== Construct and save the model arcitecture =====
#调用网络 及 保存网络模型
n_ch = patches_imgs_train.shape[1]
patch_height = patches_imgs_train.shape[2]
patch_width = patches_imgs_train.shape[3]
#U-net 网络 [batchsize, channels, patch_heigh, patch_width]
model = get_unet(n_ch, patch_height, patch_width)  #the U-net model
print("Check: final output of the network:")
print(model.output_shape)
#os.environ["PATH"] += os.pathsep + 'C:/Program Files (x86)/Graphviz2.38/bin/'
#调用pydot显示模型
#plot(model, to_file='./'+name_experiment+'/'+name_experiment + '_model.png')   #check how the model looks like
#保存模型
json_string = model.to_json()
open('./'+name_experiment


 最低0.47元/天 解锁文章


 4309
4309


 被折叠的 条评论
为什么被折叠?


