


 本文详细介绍了如何使用Python和Spire.DocforPython库在Word文档中创建表格,填充数据,插入图片,以及设置表格样式。通过示例代码展示了如何操作Word表格,包括数据的输入和图片的添加,适合开发者进行文档处理和数据分析应用。
在Word中,表格是一个强大的工具,它可以帮助你更好地组织、呈现和分析信息。本文将介绍如何使用Python在Word中创建表格并填入数据、图片,以及设置表格样式等。
Python Word库:
要使用Python在Word中创建或操作表格,需要先将Spire.Doc for Python这个第三方库安装到项目中.
pip install Spire.Doc示例代码1:使用Python在Word中创建表格并填充数据
import math
from spire.doc import *
from spire.doc.common import *
# 创建Document对象
doc = Document()
# 添加一节
section = doc.AddSection()
# 创建一个表格
table = section.AddTable()
# 指定表格数据
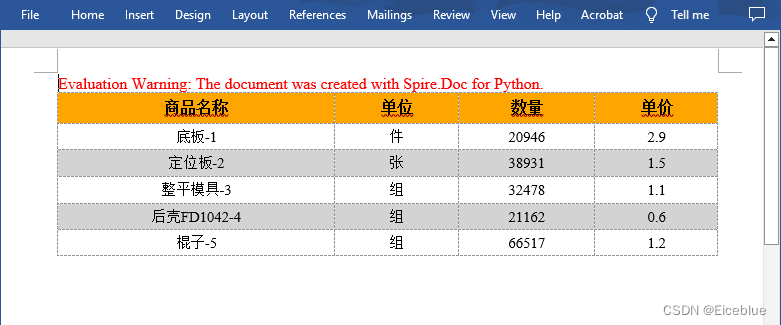
header_data = ["商品名称", "单位", "数量", "单价"]
row_data = [ ["底板-1","件","20946","2.9"],
["定位板-2","张","38931","1.5"],
["整平模具-3","组","32478","1.1"],
["后壳FD1042-4","组","21162","0.6"],
["棍子-5","组","66517","1.2"]]
# 设置表格的行数和列数
table.ResetCells(len(row_data) + 1, len(header_data))
# 设置表格自适应窗口
table.AutoFit(AutoFitBehaviorType.AutoFitToWindow)
# 设置标题行
headerRow = table.Rows[0]
headerRow.IsHeader = True
headerRow.Height = 23
headerRow.RowFormat.BackColor = Color.get_Orange()
# 在标题行填充数据并设置文本格式
i = 0
while i < len(header_data):
headerRow.Cells[i].CellFormat.VerticalAlignment = VerticalAlignment.Middle
paragraph = headerRow.Cells[i].AddParagraph()
paragraph.Format.HorizontalAlignment = HorizontalAlignment.Center
txtRange = paragraph.AppendText(header_data[i])
txtRange.CharacterFormat.Bold = True
txtRange.CharacterFormat.FontSize = 12
i += 1
# 将数据填入其余各行并设置文本格式
r = 0
while r < len(row_data):
dataRow = table.Rows[r + 1]
dataRow.Height = 20
dataRow.HeightType = TableRowHeightType.Exactly
c = 0
while c < len(row_data[r]):
dataRow.Cells[c].CellFormat.VerticalAlignment = VerticalAlignment.Middle
paragraph = dataRow.Cells[c].AddParagraph()
paragraph.Format.HorizontalAlignment = HorizontalAlignment.Center
txtRange = paragraph.AppendText(row_data[r][c])
txtRange.CharacterFormat.FontSize = 11
c += 1
r += 1
# 设置交替行颜色
for j in range(1, table.Rows.Count):
if math.fmod(j, 2) == 0:
row2 = table.Rows[j]
for f in range(row2.Cells.Count):
row2.Cells[f].CellFormat.BackColor = Color.get_LightGray()
# 保存文件
doc.SaveToFile("Word表格.docx", FileFormat.Docx2016)
以上示例通过Section.AddTable() 方法在Word文档中添加了一个表格,然后将列表中的数据填充到了指定的单元格。此外Spire.Doc for Python库还提供了接口设置单元格样式等。
输出结果:
代码示例2:使用Python在Word表格中插入图片
from spire.doc import *
from spire.doc.common import *
inputFile = "表格示例.docx"
outputFile = "插入图片到表格.docx"
# 创建Document对象
doc = Document()
# 加载Word文档
doc.LoadFromFile(inputFile)
# 获取文档中第一个表格
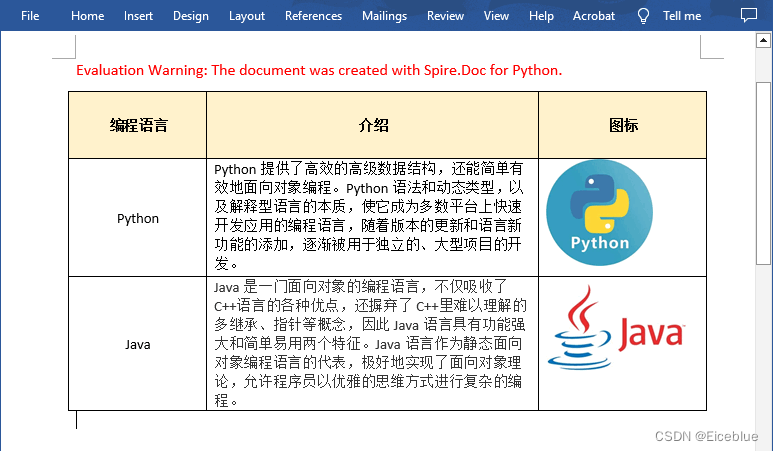
table = doc.Sections[0].Tables[0]
# 将图片添加到指定单元格并设置图片大小
cell = table.Rows[1].Cells[1]
picture = cell.Paragraphs[0].AppendPicture("python.png")
picture.Width = 80
picture.Height = 80
cell = table.Rows[2].Cells[1]
picture = cell.Paragraphs[0].AppendPicture("java.jpg")
picture.Width = 80
picture.Height = 80
# 保存结果文件
doc.SaveToFile(outputFile, FileFormat.Docx)
doc.Close()
从以上代码可以看出,要在Word表格中插入图片,需要先获取指定的单元格,然后使用TableCell.Paragraphs[index].AppendPicture() 方法插入图片。
输出结果:
Spire.Doc for Python库还支持对Word中的表格进行其他操作,如添加、删除、复制行或列、合并或拆分单元格等。更多示例demo可查看:
对于水印问题,可以点击申请临时授权移除,或者发送邮件到sales@e-iceblue.com。


 400
400

 被折叠的 条评论
为什么被折叠?
被折叠的 条评论
为什么被折叠?
 到【灌水乐园】发言


