


很多小白包括我自己在学习spring框架的时候都会被眼花缭乱的注解给晕住,所以在这里结合自己的学习及实践来出一期spring注解讲解系列。
这一期我们来讲解@ComponentScan注解,首先我们需要理解在springboot框架中我们似乎很少见到了@ComponentScan注解,这是因为springBoot项目帮我们做了包装并引入自动装配所以"弱化"了@ComponentScan,但是我们深究还是可以看到@ComponentScan的身影这里不做展开。我们仅在spring框架中去讲解@ComponentScan作用毕竟越原始越清晰。
(1)为什么需要@ComponentScan注解
很多同学一开始也奇怪@ComponentScan注解到底有什么作用,为了方便大家理解我会从最基础开始讲解并逐步引入@ComponentScan。
在spring框架中最核心的概念之一是IOC容器,而IOC容器就是帮助我们管理Bean的。@component、@Service、@Controller、@bean等注解是表示标识方法或类成为bean,但是也仅仅是标识即表明可以被spring管理,但是并不能注册到IOC容器中,如果想要注册到IOC容器中还需要其他操作,当前基于注解的方式有两种注册方案。
方案一 手动注册bean到IOC容器
(1)下述我们创建了一个Student类,并加入了@Component这表明Student可以被spring管理了。
package com.hello;
import org.springframework.stereotype.Component;

@Component
public class Student {
}
(2)我们讲当前的Student类注册到IOC容器中,并打印出当前IOC容器中的bean
import com.hello.Student;
import org.springframework.context.annotation.AnnotationConfigApplicationContext;
public class Test {
    @org.junit.Test
    public void test(){
        //1.将Student的bean注册到Ioc容器
        AnnotationConfigApplicationContext ioc1 = new AnnotationConfigApplicationContext(Student.class);
        //2.获取Ioc的Id
        String id = ioc1.getId();
        System.out.println("IOC的id:"+id);
        //3.从IOC容器中获取所有bean的name
        String[] beanDefinitionNames = ioc1.getBeanDefinitionNames();
        for (String beanName: beanDefinitionNames){
            System.out.println(beanName);
        }
    }
}
下面是打印结果,我们看到了student的名字,这里@component如果不设置name,它默认是Student类的第一个字母小写作为bean的名称即student。
IOC的id:org.springframework.context.annotation.AnnotationConfigApplicationContext@7b1d7fff
org.springframework.context.annotation.internalConfigurationAnnotationProcessor
org.springframework.context.annotation.internalAutowiredAnnotationProcessor
org.springframework.context.annotation.internalCommonAnnotationProcessor
org.springframework.context.event.internalEventListenerProcessor
org.springframework.context.event.internalEventListenerFactory
student

Process finished with exit code 0
我们可以看到student的bean已经加载到IOC容器中了,只要有需要就可以在其他地方注入和使用,但每次有bean的时候都要按上述方法注册是不是非常麻烦和不方便维护,实际项目中我们可能会有成百上千的bean如果都要这样一个个的写并手动写代码会非常繁琐,所@conmponentScan就孕育而生了,它的作用是可以批量一次性注册bean到IOC容器中的,无需你自己手动写代码。
方案二 手动注册bean到IOC容器
方案二我也可以提前和大家说,和方案一一样也是繁琐和麻烦在注册到IOC中需要手动写代码,但是方案二有个特别之处在于它可以引入额外的第三方bean如jdbc和datasource,这些即使后续引入@componenscan也是无法替代的这里不做展开。
(1)还是以student为例
package com.hello;
import org.springframework.stereotype.Component;

@Component
public class Student {
}
(2)第二种注册方式我们需要在配置类中实现并配合@bean注解注册到IOC容器中:
package config;

import com.hello.Student;
import org.springframework.context.annotation.Bean;
import org.springframework.context.annotation.Configuration;
@Configuration
public class MyConfig {

    @Bean(name = "student")
    public Student Student(){
        Student student = new Student();
        return student;
    }
}
假如我们有一堆bean同样要写一堆@Bean方法这比较繁琐和不方便维护,下面我们加载一下配置类看看输出。
import config.MyConfig;
import org.springframework.context.annotation.AnnotationConfigApplicationContext;
public class Test {
    @org.junit.Test
    public void test(){
        //1.将Student的bean注册到Ioc容器
        AnnotationConfigApplicationContext ioc1 = new AnnotationConfigApplicationContext(MyConfig.class);
        //2.获取Ioc的Id
        String id = ioc1.getId();
        System.out.println("IOC的id:"+id);
        //3.从IOC容器中获取所有bean的name
        String[] beanDefinitionNames = ioc1.getBeanDefinitionNames();
        for (String beanName: beanDefinitionNames){
            System.out.println(beanName);
        }
    }
}
运行结果如下:
IOC的id:org.springframework.context.annotation.AnnotationConfigApplicationContext@7b1d7fff
org.springframework.context.annotation.internalConfigurationAnnotationProcessor
org.springframework.context.annotation.internalAutowiredAnnotationProcessor
org.springframework.context.annotation.internalCommonAnnotationProcessor
org.springframework.context.event.internalEventListenerProcessor
org.springframework.context.event.internalEventListenerFactory
myConfig
student

Process finished with exit code 0
综上所述,无论是方案一还是方案二都比较繁琐和不便于维护,当在一个包下有很多bean的时候我们需要手动注册写很多重复代码,所以这里就体现出了@ComponentScan的作用了,通过@ComponentScan我们可以一次性加载一堆bean并自动注册到IOC容器中。下面我举出具体案例
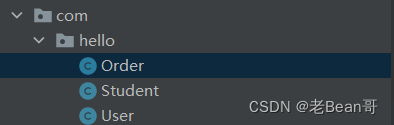
假设在com.hello包下有好几个被标识的bean【即被@Component标识了】,实际开发中可能更多但我们现在这里拿三个举例子,如果我们想一次性把这个包下所有的bean注册到IOC容器中,前面说的方案一和方案二都很繁琐,相同的代码需要写好几次。
因此我们可以采用@ComponentScan,但@ComponentScan需要基于方案二,因为@ComponentScan主要是和配置类一起使用的,具体如下。
import com.hello.Student;
import org.springframework.context.annotation.Bean;
import org.springframework.context.annotation.ComponentScan;
import org.springframework.context.annotation.Configuration;
@Configuration
@ComponentScan("com.hello")
public class MyConfig {

    @Bean(name = "student")
    public Student Student(){
        Student student = new Student();
        return student;
    }
}
@ComponentScan("com.hello")的作用是将com.hello及其子包下被@component、@Service、@Controller等注解标识的类统一注册到IOC容器中,这里是自动的即不需要你自己手动写一些代码,只需要把配置类加载一下就行@ComponentScan("com.hello")就会生效。
import config.MyConfig;
import org.springframework.context.annotation.AnnotationConfigApplicationContext;
public class Test {
    @org.junit.Test
    public void test(){
        //1.将Student的bean注册到Ioc容器
        AnnotationConfigApplicationContext ioc1 = new AnnotationConfigApplicationContext(MyConfig.class);
        //2.获取Ioc的Id
        String id = ioc1.getId();
        System.out.println("IOC的id:"+id);
        //3.从IOC容器中获取所有bean的name
        String[] beanDefinitionNames = ioc1.getBeanDefinitionNames();
        for (String beanName: beanDefinitionNames){
            System.out.println(beanName);
        }
    }
}
结果如下:
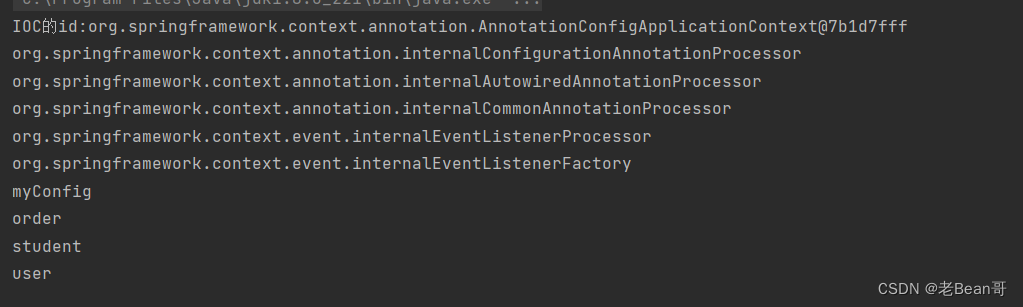
备注:为什么myconfig也会加载到bean中,因为默认被@Configuration注解过的类是配置类,配置类也会自动装配到IOC容器中。
(2)@ComponentScan的使用参数
假如我不止想自动注册com.hello包下的bean,我还想注册com.service包下bean怎么办?
打开@ComponentScan的源码。

我们可以看到它是数组的形式即当引入多个同级包时我们只需要按如下操作即可。
import com.hello.Student;
import org.springframework.context.annotation.Bean;
import org.springframework.context.annotation.ComponentScan;
import org.springframework.context.annotation.Configuration;
@Configuration
@ComponentScan({"com.hello","com.service"})
public class MyConfig {

    @Bean(name = "student")
    public Student Student(){
        Student student = new Student();
        return student;
    }
}
除此之外,@ComponentScan 注解提供了 includeFilters 和 excludeFilters 属性,你可以使用这些过滤器来精确控制哪些组件会被扫描和注册到 Spring 容器中。下面是一个示例,演示如何在 @ComponentScan 中使用过滤器:
@Configuration
@ComponentScan(basePackages = "com.example.package",
    includeFilters = {
        @ComponentScan.Filter(type = FilterType.ANNOTATION, classes = MyAnnotation.class),
        @ComponentScan.Filter(type = FilterType.REGEX, pattern = ".*ServiceImpl")
    },
    excludeFilters = @ComponentScan.Filter(type = FilterType.ASSIGNABLE_TYPE, value = ExcludeComponent.class)
)
public class MyConfig {
    // 其他配置
}
在上述示例中,我们使用 @ComponentScan 注解的 includeFilters 属性添加了两个过滤器:
第一个过滤器使用 FilterType.ANNOTATION 类型和 MyAnnotation.class 注解类,它将只包含带有 MyAnnotation 注解的组件。
第二个过滤器使用 FilterType.REGEX 类型和正则表达式 ".*ServiceImpl",它将只包含名称以 “ServiceImpl” 结尾的组件。
同时,我们还使用 @ComponentScan 注解的 excludeFilters 属性添加了一个过滤器:
这个过滤器使用 FilterType.ASSIGNABLE_TYPE 类型和 ExcludeComponent.class 类,它将排除继承或实现了 ExcludeComponent 类的组件。


 1万+
1万+

 被折叠的 条评论
为什么被折叠?
被折叠的 条评论
为什么被折叠?
 到【灌水乐园】发言


