


入门:狂神老师
源码讲解:鲁班大叔
它们都是良心UP,我很菜,别问我是不是收广告费了[doge]
学习目标:
	能够熟悉使用mybatis提供的功能
	了解mybatis底层原理(可能需要回去复习一下原生的jdbc)

推荐视频:狂神说Java的MyBatis视频,鲁班大叔的源码讲解
自己:
	通过springboot创建项目,这样就无需关系静态资源等问题了,可以直接使用springboot自动装配来获取操作对象,无需sqlSession

	源码学习建议还是跟着鲁班大叔敲一次,然后做笔记

最后的最后,年轻人,不要太着急,时间还早。
-
Mybatis官方文档 : http://www.mybatis.org/mybatis-3/zh/index.html
-
MyBatis 避免了几乎所有的 JDBC 代码和手动设置参数以及获取结果集的过程
-
MyBatis 可以使用简单的 XML 或注解来配置和映射原生信息,将接口和 Java 的 实体类 【Plain
Old Java Objects,普通的 Java对象】映射成数据库中的记录。
第一个MyBatis程序
1. 简单使用mybatis
- 创建数据库
CREATE DATABASE `mybatis`;
USE `mybatis`;
DROP TABLE IF EXISTS `user`;
CREATE TABLE `user` (
    `id` int(20) NOT NULL,
	`name` varchar(30) DEFAULT NULL,
    `pwd` varchar(30) DEFAULT NULL,
    PRIMARY KEY (`id`)
) ENGINE=InnoDB DEFAULT CHARSET=utf8;

insert into `user`(`id`,`name`,`pwd`)
values
(1,'随风','123456'),(2,'随风的叶子','abcdef'),(3,'王霸','987654');
- 需要的jar包
<dependency>
    <groupId>org.mybatis</groupId>
    <artifactId>mybatis</artifactId>
    <version>3.5.2</version>
</dependency>

<dependency>
    <groupId>mysql</groupId>
    <artifactId>mysql-connector-java</artifactId>
    <version>5.1.47</version>
</dependency>
- 核心配置文件
<?xml version="1.0" encoding="UTF-8" ?>
<!DOCTYPE configuration PUBLIC "-//mybatis.org//DTD Config 3.0//EN" "http://mybatis.org/dtd/mybatis-3-config.dtd">
<configuration>
<environments default="development">
<environment id="development">
<transactionManager type="JDBC"/>
<dataSource type="POOLED">
<property name="driver" value="com.mysql.jdbc.Driver"/>
<property name="url" value="jdbc:mysql://localhost:3306/xxx? useSSL=true&useUnicode=true&characterEncoding=utf8"/>
<property name="username" value=""/>
<property name="password" value=""/>
</dataSource>
</environment>
</environments>
<mappers>
<mapper resource=""/>
</mappers>
</configuration>
- 静态资源过滤
<resources>
    <resource>
        <directory>src/main/java</directory>
        <includes>
            <include>**/*.properties</include>
            <include>**/*.xml</include>
        </includes>
        <filtering>false</filtering>
    </resource>
    <resource>
        <directory>src/main/resources</directory>
        <includes>
            <include>**/*.properties</include>
            <include>**/*.xml</include>
        </includes>
        <filtering>false</filtering>
    </resource>
</resources>
- 创建sqlSession编写工具类
import	org.apache.ibatis.io.Resources;
import	org.apache.ibatis.session.SqlSession;
import	org.apache.ibatis.session.SqlSessionFactory;
import	org.apache.ibatis.session.SqlSessionFactoryBuilder;
import	java.io.IOException;
import java.io.InputStream;

public class MybatisUtils {

    private static SqlSessionFactory sqlSessionFactory;

    static {
        try {
            String resource = "mybatis-config.xml";
            InputStream inputStream = Resources.getResourceAsStream(resource);
            sqlSessionFactory = new SqlSessionFactoryBuilder().build(inputStream);
        } catch (IOException e) {
            e.printStackTrace();
        }
    }

    //获取SqlSession连接
    public static SqlSession getSession(){
        return sqlSessionFactory.openSession();
    }
}

- 和接口一一对应的xml模板(每次创建新的要注入到mybatis-config.xml中)
<?xml version="1.0" encoding="UTF-8" ?>
<!DOCTYPE mapper
PUBLIC "-//mybatis.org//DTD Mapper 3.0//EN" "http://mybatis.org/dtd/mybatis-3-mapper.dtd">
<mapper namespace="com.kuang.dao.UserMapper">
    <select id="selectUser" resultType="com.kuang.pojo.User"> select * from user
    </select>
</mapper>
- 使用步骤
public class MyTest {
    @Test
    public void selectUser() {
        SqlSession sqlSession = MybatisUtils.getSession();
        //方法一:
        //List<User> users = sqlSession.selectList("com.kuang.mapper.UserMapper.selectUser");
        //方法二:
        UserMapper mapper = sqlSession.getMapper(UserMapper.class);//推荐这种,底层大概是用反射来实现的
        List<User> users = mapper.selectUser();

        for (User user: users){
            System.out.println(user);
        }

        session.close();//每次结束之后都要关闭sqlSession
    }
}
2. springboot整合mybatis
- 配置文件模板
# 数据库连接地址
spring:
  datasource:
    username: root
    password: 429208
    url: jdbc:mysql://localhost:3306/student?serverTimezone=UTC&useUnicode=true&characterEncoding=UTF-8
    driver-class-name: com.mysql.cj.jdbc.Driver

# 程序运行端口
server:
  port: 9090

# mybatis 给包里面的类开启别名,map-underscore-to-camel-case:开启驼峰命名法,mapper文件所在之处
mybatis:
  type-aliases-package: com.lin.pojo
  configuration:
    map-underscore-to-camel-case: true
  mapper-locations: classpath:mapping/*.xml

# 日志信息

logging:
  level:
    com:
      lin:
        mybatis01:
          dao: debug
2. 整合所需依赖
<dependency>
    <groupId>org.mybatis.spring.boot</groupId>
    <artifactId>mybatis-spring-boot-starter</artifactId>
    <version>2.1.4</version>
</dependency>

<dependency>
    <groupId>mysql</groupId>
    <artifactId>mysql-connector-java</artifactId>
    <scope>runtime</scope>
</dependency>
3. mybatis所需xml文件
<?xml version="1.0" encoding="UTF-8"?>
<!DOCTYPE mapper PUBLIC "-//mybatis.org//DTD Mapper 3.0//EN" "http://mybatis.org/dtd/mybatis-3-mapper.dtd">
<mapper namespace="">
    <!-- 通过namespace和xxxMapper接口进行绑定   -->
</mapper>
- 通过@Mapper就可以将xxxMapper接口注入到spring容器中,通过@Autowired就可以进行注解的自动注入
- 简单的sql语句,springboot也可以使用注解的方式来写
CRUD操作
1. select
-
id
- 命名空间中唯一的标识符
- 接口中的方法名与映射文件中的SQL语句id一一对应
-
paramterType
-
传入sql语句的参数类型,配置了别名可以直接写类名
-
基本数据类型:只有一个参数的可以不写
-
复杂数据类型:Map,在parameter上面写上Map的全类名
-
如何传多个不同类型的参数
- @Param,然后就可以不写parameter了
<select id="getByAgeName" resultType="Student">
    select * from student where name=#{name} and age=#{age}
</select>
Student getByAgeName(@Param("age") int age,@Param("name") String name);- arg0,arg1,arg2,…来表示传入的参数
<select id="getByAgeName2" resultType="Student">
    select * from student where age=#{arg0} and name=#{arg1}
</select>
Student getByAgeName2(int age,String name);- Map封装
- List封装
<select id="getByAgeName3" resultType="Student">
    select * from student where name in
    <foreach collection="list" index="index" item="item" open="(" separator="," close=")">
        #{item}
    </foreach>
</select>
Student getByAgeName3(List<String> list);
-
-
resultType
- sql语句返回值类型。(完整的类名或者别名)
2. insert
<insert id="addUser" parameterType="com.kuang.pojo.User">
    insert into user (id,name,pwd) values (#{id},#{name},#{pwd})
</insert>
3. update
<update id="updateUser" parameterType="com.kuang.pojo.User">
    update user set name=#{name},pwd=#{pwd} where id = #{id}
</update>
4. delete
<delete id="deleteUser" parameterType="int">
    delete from user where id = #{id}
</delete>
5. 模糊查询
- 在Java代码中添加sql通配符
<select id="getByName" resultType="Student">
    select * from student where name like #{likeName};
</select>
@Test
void test05() {
    studentMapper.getByName("%张%").forEach(item -> System.out.println(item));
}
- 在sql语句中拼接通配符,会引起sql注入
<select id="getByName2" resultType="Student">
    select * from student where name like "%"#{likeName}"%";
</select>
@Test
void test06() {
	studentMapper.getByName2("张").forEach(item -> System.out.println(item));
}
结果集映射
1. resultType
-
映射字段要和类属性字段一一对应
-
public class User { private int age; private String name; } -
create table user ( `age` `name` ) -
要一一对应
2. resultMap
-
我们可以手动配置
-
<?xml version="1.0" encoding="UTF-8"?> <!DOCTYPE mapper PUBLIC "-//mybatis.org//DTD Mapper 3.0//EN" "http://mybatis.org/dtd/mybatis-3-mapper.dtd"> <mapper namespace="com.lin.mybatis01.dao.TeacherMapper"> <resultMap id="TeacherMap" type="Teacher"> <!--id: 主键--> <id column="id" property="TId"></id> <!--列名--> <result column="name" property="TName"></result> <result column="age" property="TAge"></result> </resultMap> <select id="getAllTeachers" resultMap="TeacherMap"> select * from teacher </select> </mapper> -
@Test void test07() { //得出结论就是:没有使用缓存,应该是使用了SimpleExecutor的doQueue() //如果使用了ReuseExecutor就只会一次预处理,后面同样的会被复用 teacherMapper.getAllTeachers(); teacherMapper.getAllTeachers().forEach(item -> System.out.println(item)); } -
顺便复习一下今天学习的源码知识
Log4J
1. 导入依赖
2. 配置mybatis-config.xml
3. 配置log4j.properties初始化文件
- 百度就能解决问题,我就不详细记录了
limit实现分页
1. 为什么要分页
- 减轻数据库的负担
2. 分页小知识
#语法
SELECT * FROM table LIMIT stratIndex,pageSize SELECT * FROM table LIMIT 5,10; // 检索记录行 6-15

#为了检索从某一个偏移量到记录集的结束所有的记录行,可以指定第二个参数为 -1:
SELECT * FROM table LIMIT 95,-1; // 检索记录行 96-last. #如果只给定一个参数,它表示返回最大的记录行数目:

SELECT * FROM table LIMIT 5; //检索前 5 个记录行 #换句话说,LIMIT n 等价于 LIMIT 0,n。
3. 实践一下
-
<select id="getSomeTeachers" resultMap="TeacherMap"> select * from teacher limit #{arg0},#{arg1}; </select> -
@Test
void test08() {
    teacherMapper.getSomeTeachers(0,2).forEach(item -> System.out.println(item));
    teacherMapper.getSomeTeachers(1,2).forEach(item -> System.out.println(item));
}
RowBounds分页
1. 代码实现分页
-
我们除了使用Limit在SQL层面实现分页,也可以使用RowBounds在Java代码层面实现分页,当然此种方
式作为了解即可。我们来看下如何实现的!
2. 代码实现
-
@Test void test09() { int currentPage = 1;//第几页 int pageSize = 2;//每页显示几个 RowBounds rowBounds = new RowBounds((currentPage-1)*pageSize,pageSize); session .selectList("com.lin.mybatis01.dao.TeacherMapper.getAllTeachers",null,rowBounds)//null:表示无参 .forEach(item -> System.out.println(item)); } -

-
盲猜底层使用了反射来获取TeacherMapper
3. 分页插件PageHelper
使用注解开发
1. 面向接口编程
-
根本原因 : 解耦 , 可拓展 , 提高复用 , 分层开发中 , 上层不用管具体的实现 , 大家都遵守共同的标准
, 使得开发变得容易 , 规范性更好
-
深层理解:是定义(规范,约束)与实现(名实分离的原则)的分离
-
接口应有两类:
-
第一类是对一个个体的抽象,它可对应为一个抽象体(abstract class);
-
第二类是对一个个体某一方面的抽象,即形成一个抽象面(interface)
-
2. 三个面向的区别
- 面向对象是指,我们考虑问题时,以对象为单位,考虑它的属性及方法 .
- 面向过程是指,我们考虑问题时,以一个具体的流程(事务过程)为单位,考虑它的实现 .
- 接口设计与非接口设计是针对复用技术而言的,与面向对象(过程)不是一个问题.更多的体现就是对系统整体的架构
3. 四个常用注解
- mybatis的注解开发十分有限
- @Select
- @Update
- @Delete
- @Insert
4. 我看不懂的
- 执行过程本质上利用了JVM的动态代理模式
#和$的区别
1. #{}
- 推荐使用
- 作用:主要是替换预编译语句PrepareStatement中的占位符
2. ${}
- 作用:直接进行字符串替换
- ‘${}’,sprintboot的@Value("${xxx}")还是用这个东西的
多对一的处理
1. 按查询嵌套处理
-
按照查询进行嵌套处理就像SQL中的子查询
-
association详细说明
2. association使用
-
<select id="getAllStudents2" resultMap="StudentTeacher"> select * from student </select> <resultMap id="StudentTeacher" type="Student"> <association column="tid" property="teacher" javaType="Teacher" select="getTeacherById"/> </resultMap> <select id="getTeacherById" resultMap="TeacherMap"> select * from teacher where id = #{TId} </select> <resultMap id="TeacherMap" type="Teacher"> <id column="id" property="TId"></id> <result column="name" property="TName"></result> <result column="age" property="TAge"></result> </resultMap> -
<select id="getAllStudents2" resultMap="StudentTeacher"> select * from student as s left join teacher as t on s.`tid` = t.`id` </select> <resultMap id="StudentTeacher" type="Student"> <id column="id" property="id"></id> <result column="name" property="name"></result> <result column="age" property="age"></result> <association property="teacher" column="tid" javaType="Teacher"> <!--不要column也行,毕竟用不上--> <id column="id" property="TId"></id> <result column="name" property="TName"></result> <result column="age" property="TAge"></result> </association> </resultMap> -
小小总结一下:第一种展示association
- column:这个值是student中的对应的tid,忙盲猜最后会给到getTeacherById的参数列表里面,然后就是column没有大小写区分
- 我们使用第一种方式,然后有需要传多个参数,那么我们就可以使用column="{key=value,key=value,…}",其中
- key : 是传给下一个sql的取值名称
- value : 片段中sql的查询字段,例子:student(id,name,age,tid),value就可以是id,name,age,tid
- 只有一个参数,可以随意写
-
<select id="getAllStudents2" resultMap="StudentTeacher"> select * from student </select> <resultMap id="StudentTeacher" type="Student"> <association column="{aaa=tid,name=id}" property="teacher" javaType="Teacher" select="getTeacherById"/> </resultMap> <select id="getTeacherById" resultMap="TeacherMap"> select * from teacher where id = #{aaa} </select> <resultMap id="TeacherMap" type="Teacher"> <id column="id" property="TId"></id> <result column="name" property="TName"></result> <result column="age" property="TAge"></result> </resultMap> -
上面这次测试我想告诉大家的是
-
id对应的名字不一定非要在xxxMapper.java里面有的方法
-
然后就是{key:value},key是我们想取的值,value是sql查询出来的值
-
最后就是测试一下column处理单个参数的情况:xxx随便写,column要对应我们表数据
-
<resultMap id="StudentTeacher" type="Student">
    <association column="tid" property="teacher" javaType="Teacher" select="getTeacherById"/>
</resultMap>
<select id="getTeacherById" resultMap="TeacherMap">
    select * from teacher where id = #{xxx}
</select>
-
2. 按结果嵌套处理
- 按照结果进行嵌套处理就像SQL中的联表查询
- 抱歉,在上面写了
一对多的处理
1. collection处理联表查询结果(有误,解决)
-
<resultMap id="TeacherStudent" type="Teacher"> <id column="id" property="TId"></id> <result column="name" property="TName"></result> <result column="age" property="TAge"></result> <collection property="students" javaType="List" ofType="Student" resultMap="Student"> <!-- <id column="id" property="id"></id>--> <!-- <result column="age" property="age"></result>--> <!-- <result property="name" column="name"></result>--> </collection> </resultMap> <resultMap id="Student" type="Student"> <!-- <id column="id" property="id"></id>--> <!-- <result column="age" property="age"></result>--> <!-- <result property="name" column="name"></result>--> </resultMap> <!--============================================================--> <!--联表查询--><!--避免重名,所以我们要起别名--> <select id="getTeachers" resultMap="TeacherStudent"> select t.id id,t.name name ,t.age age, s.id sid ,s.name sname,s.age sage,s.tid from teacher t,student s where s.tid = t.id </select> <resultMap id="TeacherStudent" type="Teacher"> <id column="id" property="TId"></id> <result column="name" property="TName"></result> <result column="age" property="TAge"></result> <collection property="students" ofType="Student"> <id column="sid" property="id"></id> <result column="sage" property="age"></result> <result column="sname" property="name"></result> </collection> </resultMap> -
经过测试:上面这种情形,
- javaType可以不写,如果写那就需要对应我们接口函数返回值那个东西,不然就会报错
- ofType: 表示集合里面的元素类型
- 如果是自定义类型,那就一定要再写一次一一对应关系,可以直接在里面写,或者写个resultMap,然后再将resultMap引入
- 如果不的话,就会查出为空列表
- 我推荐直接在里面写好一点
2. collection处理子查询结果
-
下面#{xxx}就是为了提醒你,这个可以随便写,column里面要对应数据库表中的字段
-
<select id="getTeachers" resultMap="TeacherStudent"> select * from teacher </select> <resultMap id="TeacherStudent" type="Teacher"> <id column="id" property="TId"></id> <result column="name" property="TName"></result> <result column="age" property="TAge"></result> <collection property="students" column="id" ofType="Student" select="getStudentsByTid"> <id column="id" property="id"></id> <result column="age" property="age"></result> <result property="name" column="name"></result> </collection> </resultMap> <select id="getStudentsByTid" resultType="Student"> select * from student where tid = #{xxx} </select> -
你看这里我就没有使用javaType
3. 小结
-
关联-association
-
集合-collection
-
所以association是用于一对一和多对一,而collection是用于一对多的关系
-
JavaType和ofType都是用来指定对象类型的
-
JavaType: 是用来指定pojo中属性的类型
o ofType: 指定的是映射到list集合属性中pojo的类型。
-
动态SQL
- 什么是动态SQL:动态SQL指的是根据不同的查询条件 , 生成不同的Sql语句
- 这就要使用 mybatis 动态SQL,通过 if, choose, when, otherwise,trim, where, set, foreach等标签,可组合成非常灵活的SQL语句从而在提高 SQL 语句的准确性的同时,也大大提高了开发人员的效率。
1. 创建一个要用的表
CREATE TABLE `blog` (
    `id` varchar(50) NOT NULL COMMENT '博客id',
    `title` varchar(100) NOT NULL COMMENT '博客标题',
    `author` varchar(30) NOT NULL COMMENT '博客作者',
    `create_time` datetime NOT NULL COMMENT '创建时间',
    `views` int(30) NOT NULL COMMENT '浏览量'
) ENGINE=InnoDB DEFAULT CHARSET=utf8
-
不建议uuid字符串蛤 主键id索引底层是b+树 字符串会造成b+树的频繁分裂 影响性能
2. if
-
使用说明
-
<select id="getBlog" resultType="Blog"> select * from blog where <if test="author!=null"> author = #{author} </if> <if test="author!=null and title!=null"> and </if> <if test="title!=null"> title = #{title} </if> </select> -
if会一条一条执行
-
test里面的逻辑词可以是and,or
3. Where
-
使用说明:
- 你再也不用担心and或者or在你不想加入的时候加入了
-
<select id="getBlog2" resultType="Blog"> select * from blog <where> <if test="title!=null"> title = #{title} </if> <if test="author!=null"> and author = #{author} </if> </where> </select> -
不写and、or,到时候就出现出现两个拼接就完蛋了
4. Set
-
这个对应update的
-
<update id="updateBlogById" parameterType="Blog"> update blog <set> <if test="author!=null"> author = #{author} </if> <if test="author!=null and title!=null"> , </if> <if test="title!=null"> title = #{title} </if> </set> where id = #{id} </update> -
要处理逗号问题
5. choose语句
-
就好像我们java的switch语句
-
<select id="getBlog3" resultType="Blog"> select * from blog <where> <choose> <when test="author==null and title!=null"> title = #{title} </when> <when test="author!=null and title==null"> author = #{author} </when> <when test="author==null and title==null"></when> <otherwise> author=#{author} and title=#{title} </otherwise> </choose> </where> </select> -
好玩,确实
6. SQL片段
<select id="getBlog4" resultType="Blog">
    select * from blog
    <include refid="xxx"></include>
</select>
<sql id="xxx">
    <where>
        <choose>
            <when test="author==null and title!=null">
                title = #{title}
            </when>
            <when test="author!=null and title==null">
                author = #{author}
            </when>
            <when test="author==null and title==null"></when>
            <otherwise>
                author=#{author} and title=#{title}
            </otherwise>
        </choose>
    </where>
</sql>
1. sql提取
- 提取使用标签
- sql
- 记得取好id
2.sql引用
- 引用使用标签
- include
- 写好sql标签refid
7. ForEach
-
CRUD操作的select的List封装我提过
-
<select id="getByAgeName3" resultType="Student"> select * from student where name in <foreach collection="list" index="index" item="item" open="(" separator="," close=")"> #{item} </foreach> </select> -
标签里面属性
- collection: 指定输入对象中的集合属性,说人话就是一个集合
- item: 给集合里面每个元素在遍历到时取的名字
- open: 开始时拼接的字符串
- close: 结束时拼接的字符串
- separator: 遍历对象之间,需要拼接的字符串
- index: 下标
-
<select id="getBlog5" parameterType="list" resultType="blog"> select * from blog <where> <include refid="foreach"></include> </where> </select> <sql id="foreach"> <foreach collection="ids" item="id" index="idx" separator="or" open="(" close=")"> id=#{id} </foreach> </sql> -
说明一个问题:这里你使用了parameterType=“list”,但是接口处你还是要用@Params(“ids”),不然你就不要在xml里面写ids
-
List<Blog> getBlog5(@Param("ids") List<String> ids);//可以省略parameterType="list"
/*=============================================================================================*/
List<Blog> getBlog5( List<String> ids); //list
缓存
-
PS: 学完这个,入门就算结束了,下一步就是应用起来,然后阅读源码了
-
Mybatis系统中默认定义了两种缓存:一级缓存和二级缓存
-
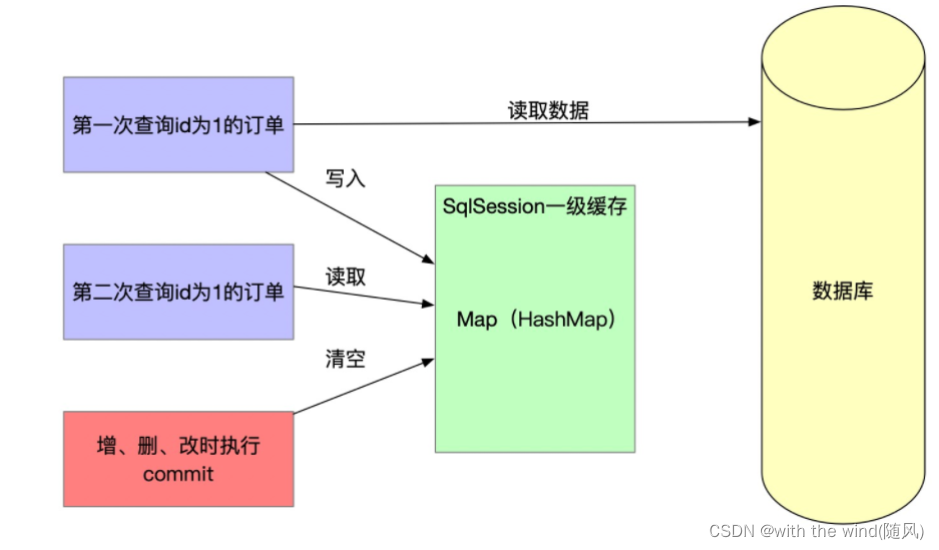
默认情况下,只有开启一级缓存。(sqlsession级别的缓存,也称本地缓存)
-
二级缓存需要手动开启和配制,他是基于namespace级别缓存
-
为了提高扩展性,Mybatis定义了缓存接口Cache,我们可以通过实现Cache接口来自定义二级缓存
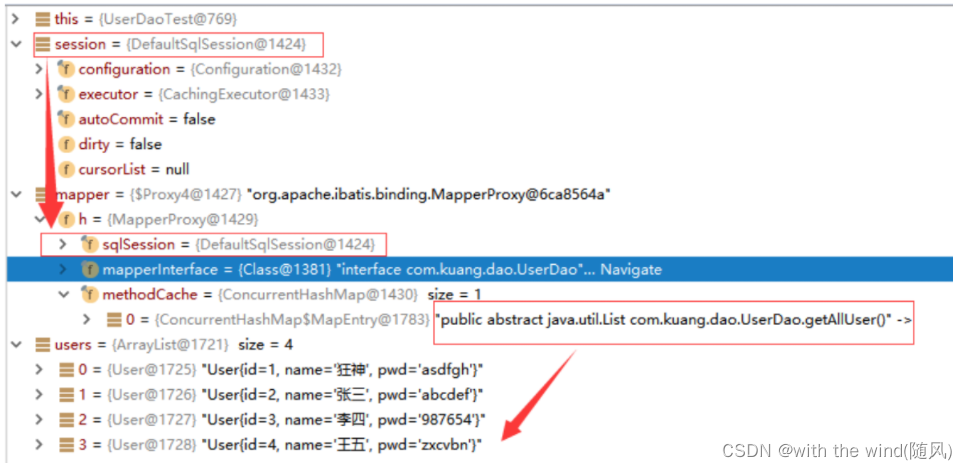
1. 一级缓存
-
-
@Autowired SqlSessionFactory sqlSessionFactory; @Test //这样就走一级缓存了 void test24() { SqlSession sqlSession = sqlSessionFactory.openSession(); BlogMapper mapper = sqlSession.getMapper(BlogMapper.class); System.out.println(mapper); Blog blog1 = mapper.getBlogById("fdc3ffc172644c728933700258d9c8a2"); System.out.println(blog1); System.out.println(mapper); Blog blog2 = mapper.getBlogById("fdc3ffc172644c728933700258d9c8a2"); System.out.println(blog2); System.out.println(blog1 == blog2); } -
xxx大佬,springboot为什么用前面两种进行了两次预编译,最后面这种又可以走一级缓存,一次预编译就行了,一级缓存不是默认开启,作用域在session的吗? -
一级缓存失效的情况:
- sqlSession不同
- sqlSession相同,查询条件不同
- sqlSession相同,两次查询之间执行了增删改操作
- sqlSession相同,手动清除一级缓存
- session.clearCache();//SqlSession session …;
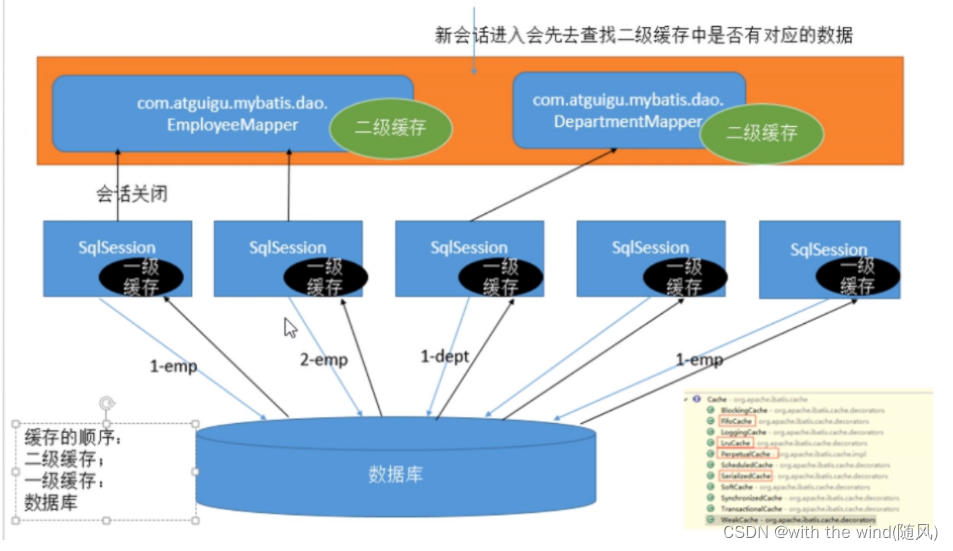
2. 二级缓存
-
二级缓存需要手动开启和配置,他是基于namespace级别的缓存。
-
-
只要开启了二级缓存,我们在同一个Mapper中的查询,可以在二级缓存中拿到数据
-
查出的数据都会被默认先放在一级缓存中
-
只有会话(session)提交或者关闭以后,一级缓存中的数据才会转到二级缓存中
-
新会话进入会先去查询二级缓存中是否有对应数据
源码学习
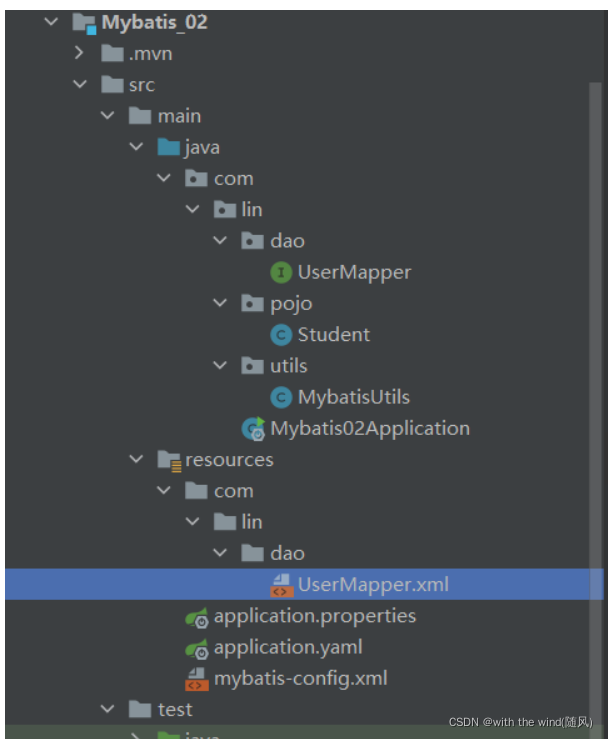
1. 环境配置
- 我直接在springboot项目里面使用原生的Mybatis
- 注意的点:静态资源过滤问题:全部静态资源放在resources里面
- xxxMapper接口的目录要和xxxMapper.xml文件对应
- 记得起个别名
2. 深入理解Executor执行器
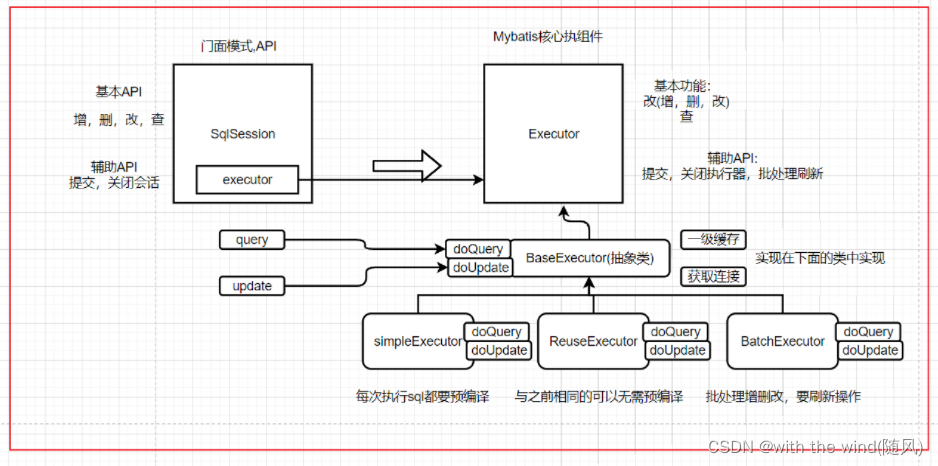
1. SimpleExecutor
- 案例展示

- 代码展示
package com.lin;

import com.lin.utils.JDBC;
import com.lin.utils.MybatisUtils;
import org.apache.ibatis.executor.SimpleExecutor;
import org.apache.ibatis.mapping.MappedStatement;
import org.apache.ibatis.session.Configuration;
import org.apache.ibatis.session.RowBounds;
import org.apache.ibatis.session.SqlSessionFactory;
import org.apache.ibatis.transaction.jdbc.JdbcTransaction;
import org.junit.jupiter.api.Test;
import org.springframework.boot.test.context.SpringBootTest;

import java.io.IOException;
import java.sql.Connection;
import java.sql.DriverManager;
import java.sql.SQLException;
import java.util.List;

@SpringBootTest
public class Test01 {
    private Configuration configuration;
    private Connection connection;
    private JdbcTransaction transaction;

    private void init() throws IOException {
        SqlSessionFactory sqlSessionFactory = MybatisUtils.getSqlSessionFactory();
        configuration = sqlSessionFactory.getConfiguration();
        System.out.println(configuration);
        try {
            connection = DriverManager.getConnection(JDBC.URL,JDBC.USERNAME,JDBC.PASSWORD);
        } catch (SQLException e) {
            e.printStackTrace();
        }
        transaction = new JdbcTransaction(connection);
    }

    @Test
    void test_SimpleExecutor() throws SQLException, IOException {

        init();

        SimpleExecutor simpleExecutor = new SimpleExecutor(configuration,transaction);
        MappedStatement ms = configuration.getMappedStatement("com.lin.dao.UserMapper.getAllStudents");
        List<Object> list = simpleExecutor.doQuery(ms, null, RowBounds.DEFAULT,
                SimpleExecutor.NO_RESULT_HANDLER, ms.getBoundSql(null));

        simpleExecutor.doQuery(ms, null, RowBounds.DEFAULT,
                SimpleExecutor.NO_RESULT_HANDLER, ms.getBoundSql(null));

        list.forEach(item -> System.out.println(item));
    }
}
2. ReuseExecutor
- 案例展示

- 代码展示
@Test
void test_ReuseExecutor() throws SQLException, IOException {

    init();

    ReuseExecutor reuseExecutor = new ReuseExecutor(configuration,transaction);
    MappedStatement ms = configuration.getMappedStatement("com.lin.dao.UserMapper.getAllStudents");
    List<Object> list = reuseExecutor.doQuery(ms, null, RowBounds.DEFAULT,
                                              ReuseExecutor.NO_RESULT_HANDLER, ms.getBoundSql(null));

    reuseExecutor.doQuery(ms, null, RowBounds.DEFAULT,
                          ReuseExecutor.NO_RESULT_HANDLER, ms.getBoundSql(null));

    list.forEach(item -> System.out.println(item));
}
3. BatchExecutor
- 案例展示1(查询情况)

- 代码展示1(查询情况)
@Test//批处理执行器
void test_BatchExecutor() throws SQLException, IOException {

    init();

    BatchExecutor batchExecutor = new BatchExecutor(configuration,transaction);
    MappedStatement ms = configuration.getMappedStatement("com.lin.dao.UserMapper.getAllStudents");
    List<Object> list = batchExecutor.doQuery(ms, null, RowBounds.DEFAULT,
                                              BatchExecutor.NO_RESULT_HANDLER, ms.getBoundSql(null));

    batchExecutor.doQuery(ms, null, RowBounds.DEFAULT,
                          BatchExecutor.NO_RESULT_HANDLER, ms.getBoundSql(null));

    list.forEach(item -> System.out.println(item));
}
- 案例展示2(update)

-
代码展示2(update)
@Test//批处理执行器 void test_BatchExecutor02() throws SQLException, IOException { init(); BatchExecutor batchExecutor = new BatchExecutor(configuration,transaction); MappedStatement ms = configuration.getMappedStatement("com.lin.dao.UserMapper.setName"); Map<String,Object> param = new HashMap<>(); param.put("arg0",1); param.put("arg1","lyr111"); batchExecutor.doUpdate(ms,param);//设置 batchExecutor.doUpdate(ms,param);//设置 batchExecutor.flushStatements(false); } -
出现了一个小插曲,就是如果字符串里面含有中文,写入数据库里面会乱码
-
最后一定要刷新,不然不会到数据库里面
4. BaseExecutor
-
一级缓存,SimpleExecutor,ReuseExecutor,BatchExecutor都继承了BaseExecutor
-
代码测试
@Test
void test_BaseExecutor() throws Exception {
    init();
    Executor executor = new SimpleExecutor(configuration,transaction);
    MappedStatement ms = configuration
        .getMappedStatement("com.lin.dao.UserMapper.getAllStudents");
    executor.query(ms,null,RowBounds.DEFAULT,Executor.NO_RESULT_HANDLER);
    executor.query(ms,null,RowBounds.DEFAULT,Executor.NO_RESULT_HANDLER);
}
-
案例展图

-
原因解释:最终走的是缓存策略,因为之前已经执行过一次,所以后面就直接走缓存策略,没有在执行sql语句,直接从缓存获取结果
-
判断在这里
if (list != null) { //存在缓存了就走这里 this.handleLocallyCachedOutputParameters(ms, key, parameter, boundSql); } else { //不存在就走这里,最后走doQuery方法(被SimpleExecutor或者ReuseExecutor或者BatchExecutor实现) list = this.queryFromDatabase(ms, parameter, rowBounds, resultHandler, key, boundSql); }我是随风,一个正在和你们一起变强的菜鸟程序猿,共勉!


 1092
1092


 被折叠的 条评论
为什么被折叠?
被折叠的 条评论
为什么被折叠?
 到【灌水乐园】发言


