


整合 Sentinel 与现有主从架构的完整步骤
一、配置修正说明
您当前的配置存在概念混淆:cluster.nodes 是用于 Redis Cluster 模式 的配置,而主从架构 + Sentinel 需要使用 Sentinel 专用配置。以下是正确的整合方案:
二、正确配置方案
1. 修改 application.yml
spring:
  redis:
    # 删除 cluster 配置段
    # 新增 sentinel 配置段
    sentinel:
      master: mymaster  # 主节点名称(需与哨兵配置一致) 创建 Sentinel 配置文件 第二句里面的 这个 sentinel monitor mymaster 127.0.0.1 6379 2
      nodes:
        - 127.0.0.1:26379  # Sentinel 节点1
        - 127.0.0.1:26380  # Sentinel 节点2
        - 127.0.0.1:26381  # Sentinel 节点3
    # 保留原有配置
    lettuce:
      pool:
        max-active: 8
        max-idle: 8
        min-idle: 2
      read-from: REPLICA_PREFERRED # 开启读写分离
    # 密码配置(按需)
    password: your_redis_password  # Redis节点密码
    # Sentinel节点密码(如果哨兵有密码)
    sentinel:
      password: sentinel_password
配置写好之后无需关心内部是如何来处理的,写业务代码和之前的一个Redis是一样的。
三、Sentinel 服务端配置
1. 创建 Sentinel 配置文件
# 创建配置目录
mkdir -p /etc/redis/sentinel/{26379,26380,26381}

# Sentinel 1 (26379)
cat > /etc/redis/sentinel/26379/sentinel.conf <<EOF
port 26379
sentinel monitor mymaster 127.0.0.1 6379 2
sentinel down-after-milliseconds mymaster 5000
sentinel failover-timeout mymaster 60000
sentinel auth-pass mymaster your_redis_password
sentinel parallel-syncs mymaster 1
daemonize yes
logfile "/var/log/redis/sentinel_26379.log"
EOF

# Sentinel 2 (26380) 和 Sentinel 3 (26381) 配置类似,修改 port 和 logfile 路径
Sentinel 配置文件第二句这个 sentinel monitor mymaster 127.0.0.1 6379 2 指定了Redis主节点然后就需要其配置Redis的地址了,需要注意你配置的主节点的地址和端口号,上面这个只是一个例子而已。
2. 启动 Sentinel 服务
redis-sentinel /etc/redis/sentinel/26379/sentinel.conf
redis-sentinel /etc/redis/sentinel/26380/sentinel.conf
redis-sentinel /etc/redis/sentinel/26381/sentinel.conf
四、验证整合效果
1. 检查 Sentinel 拓扑发现
# 连接任意 Sentinel 节点
redis-cli -p 26379
127.0.0.1:26379> sentinel master mymaster
预期输出包含:
num-slaves 2 # 从节点数量
2. 客户端连接验证
@SpringBootTest
public class SentinelIntegrationTest {

    @Autowired
    private RedisConnectionFactory connectionFactory;

    @Test
    void testSentinelConnection() {
        LettuceConnectionFactory lettuceFactory = (LettuceConnectionFactory) connectionFactory;
        RedisSentinelConfiguration sentinelConfig = lettuceFactory.getSentinelConfiguration();

        System.out.println("当前主节点: " + lettuceFactory.getHostName() + ":" + lettuceFactory.getPort());
        System.out.println("哨兵节点列表: " + sentinelConfig.getSentinels());
    }
}
五、故障转移测试
1. 模拟主节点宕机
# 停止主节点 Redis 服务
redis-cli -p 6379 shutdown
2. 观察故障转移过程
# 查看 Sentinel 日志
tail -f /var/log/redis/sentinel_26379.log
预期日志内容:
+sdown master mymaster 127.0.0.1 6379
+vote-for-leader XXXX 1
+switch-master mymaster 127.0.0.1 6379 127.0.0.1 6380
3. 验证客户端自动切换
重新运行测试用例,观察主节点地址是否变为新选举的主节点(如 6380)
六、生产环境优化配置
1. 安全加固
spring:
  redis:
    ssl: true  # 启用 TLS 加密
    lettuce:
      sentinel:
        password: $SENTINEL_PASSWORD  # 从环境变量读取
2. 连接池调优
spring:
  redis:
    lettuce:
      pool:
        max-wait: 1000ms  # 最大等待时间
        time-between-eviction-runs: 30s  # 空闲连接检查间隔
3. 监控配置
management:
  endpoints:
    web:
      exposure:
        include: health,metrics,redis
  metrics:
    export:
      prometheus:
        enabled: true
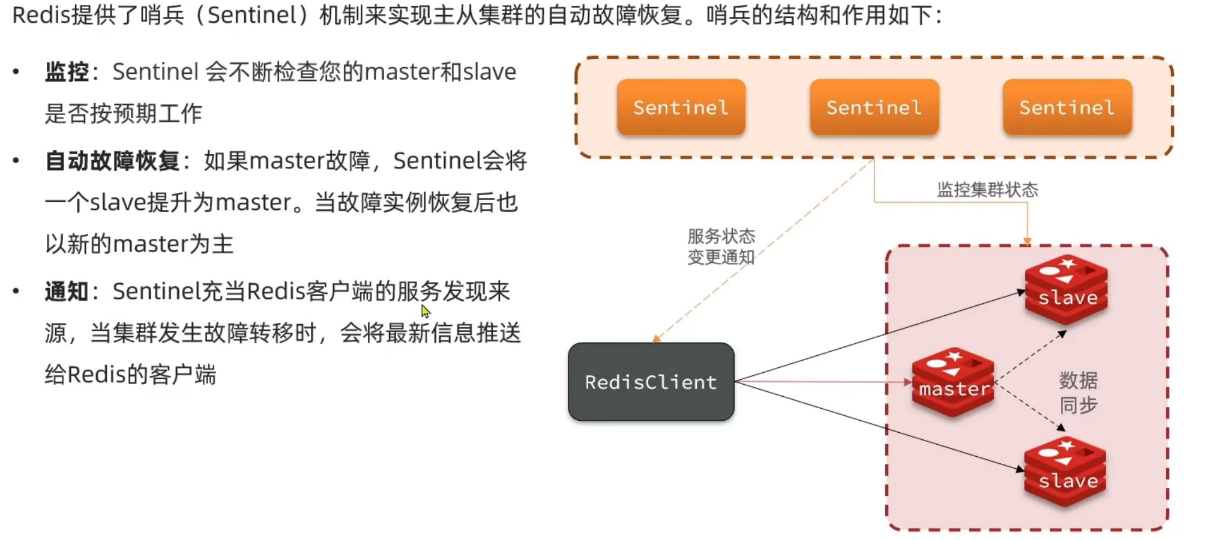
七、架构示意图
八、关键配置对照表
| 组件 | 原配置 | 新配置 | 作用变化 |
|---|---|---|---|
| Spring Boot | cluster.nodes | sentinel.nodes | 从直连节点改为通过哨兵发现 |
| Redis | 独立主从 | 主从 + Sentinel 监控 | 实现自动故障转移能力 |
| 客户端路由 | 硬编码节点地址 | 动态获取拓扑信息 | 支持自动切换主节点 |
九、常见问题解决
问题1:客户端无法连接 Sentinel
现象:RedisConnectionFailureException: Unable to connect to Sentinel
解决方案:
- 检查 Sentinel 端口是否开放:
netstat -tulnp | grep 26379 - 验证 Sentinel 认证密码是否正确
- 查看 Sentinel 日志:
tail -f /var/log/redis/sentinel_26379.log
问题2:读写分离失效
现象:所有请求都路由到主节点
排查步骤:
- 确认
read-from: REPLICA_PREFERRED配置生效 - 检查从节点复制状态:
redis-cli -p 6380 info replication - 查看 Lettuce 拓扑发现结果:
((LettuceConnectionFactory) redisTemplate.getConnectionFactory()).getTopology()
通过以上配置,您的 Spring Boot 应用将实现:
- 自动故障转移:主节点宕机时自动切换
- 读写分离:读操作优先分发到从节点
- 动态拓扑感知:客户端实时感知集群状态变化
- 生产级可靠性:通过连接池和 SSL 确保稳定安全


 2138
2138

 被折叠的 条评论
为什么被折叠?
被折叠的 条评论
为什么被折叠?
 到【灌水乐园】发言


