


1. 仿真?#
安装仿真器驱动
仿真器型号是:XDS510PLUS,下载一个驱动。进行安装:
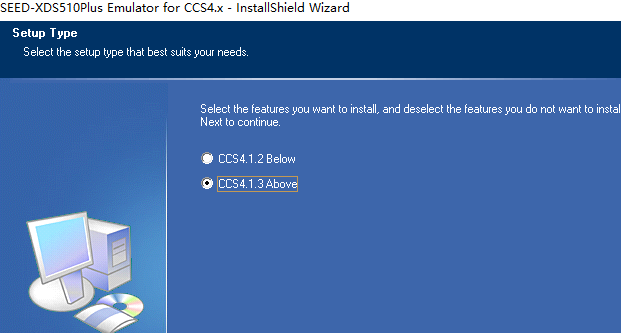
选CCS版本,> 4.1.3 选下面
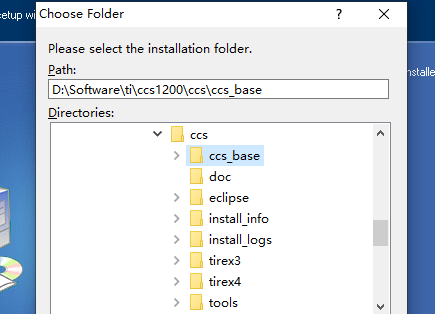
这里选择CCS的安装目录

我安装完之后,在设备管理器中设备还是显示未知设备,我右击更新驱动提醒:已找到驱动但是未安装成功(因为INF签名)。
![]()
需要进入特殊的模式安装:(开始>设置>更新和安全>恢复>高级启动下的立即重新启动,之后选择 疑难解答>高级选项>启动),重启后进入蓝屏的选择界面,选择(禁用驱动程序强制签名)菜单进入系统。之后再安装驱动。
参考:
SEED-XDS510PLUS 在CCS5.5.0中的配置问题
接下来怎么仿真呢?
1.1 目标配置文件CCXML#
添加好并保存后。测试连接,出错。
也可以不添加直接在项目属性 > General 下配置好仿真器后点验证(Verify)。但也都也报同样的错

-----[Print the reset-command software log-file]----------------------------- This utility has selected a 100/110/510 class product. This utility will load the adapter 'seedjca8990isa.dll'. An error occurred while soft opening the controller. -----[An error has occurred and this utility has aborted]-------------------- This error is generated by TI's USCIF driver or utilities. The value is '-600' (0xfffffda8). The title is 'SC_ERR_LIB_ANY_LOCATE'. The explanation is: A required dynamic library could not be located. The library isn't on the search path. [End]
最后重新装了下从官网SEED-XDS510PLUS下的驱动就好了(看网上的讨论,差点以为XDS510只支持到CCS5,其实可以的)
[Start] Execute the command: %ccs_base%/common/uscif/dbgjtag.exe -f %boarddatafile% -rv -o -F inform,logfile=yes -S pathlength -S integrity [Result] [End]
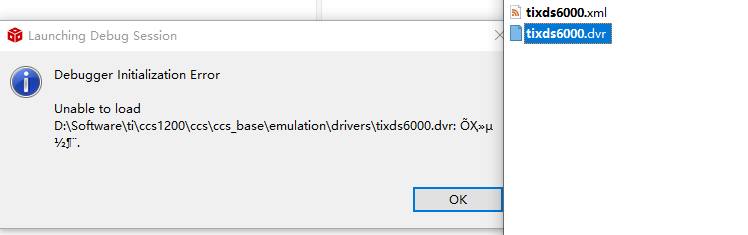
又报错: Debugger Initialization Error: tixds6000.vdr
8.1. General — Code Composer Studio 12.5.0 Documentation
The last release to support the XDS510USB debug probe is CCSv8.3.
换软件版本了。
2. CCSV3.3 安装#
默认目录不变,其他一路忽略即可。
安装完成并配置仿真器后,点 Debug > Connect 报错
Error connecting to the target: Error 0x80000200/-141 Fatal Error during: OCS, This error was generated by TI's USCIF driver. SC_ERR_KNL_OPEN <-141> This utility has failed to open its kernel mode driver. Either it has been disabled or an install/un-install failed. I/O Port = 0 Board Name: C671x XDS510 Emulator Cpu Name: TMS320C6710_0 Abort: Close Code Composer Studio. Retry: Try to connect to the target again. Cancel: Remain disconnected from the target Diagnostic: Run diagnostic utility. Error connecting to the target: Error 0x80000200/-171 Fatal Error during: OCS, This error was generated by TI's USCIF driver. SC_ERR_REG_DETECT_CTLR <-171> The wrong controller address value has been used. A controller cannot be detected even though the selected port does match the hardware configuration. The standard XDS560 ports are 0x0, 0x1, 0x2 and 0x3. The standard XDS100usb ports are 0x0, 0x1, 0x2 and 0x3. The standard XDS100pp ports are 0x378, 0x278 and 0x3BC. The standard XDS510 ports are 0x240, 0x280, 0x320 and 0x340. I/O Port = 0 Board Name: C671x XDS510 Emulator Cpu Name: TMS320C6710_0 Abort: Close Code Composer Studio. Retry: Try to connect to the target again. Cancel: Remain disconnected from the target Diagnostic: Run diagnostic utility.
重新安装 c6713的驱动,(参考4节中的在安全模式下安装驱动)。
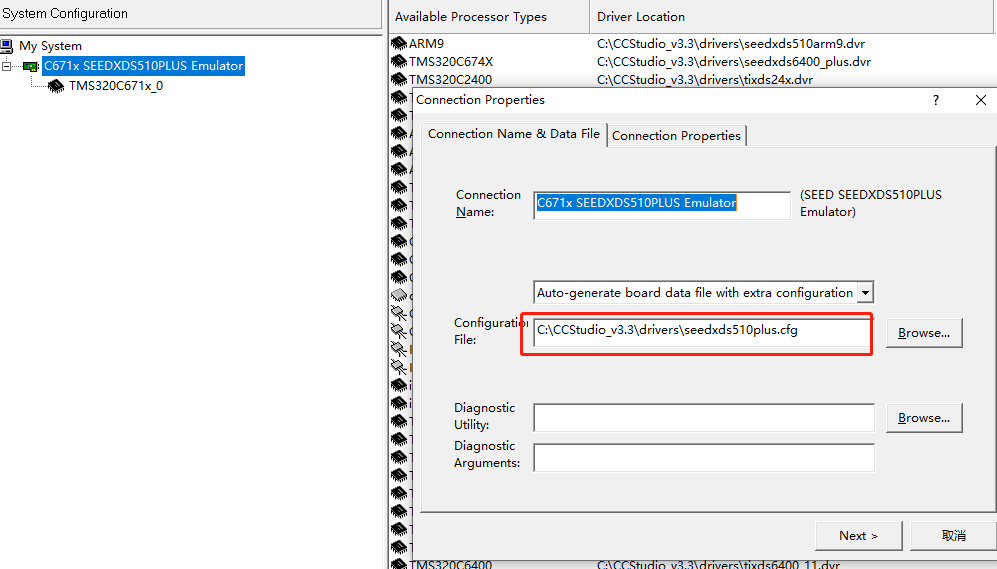
配置的时候看到属性已经自动填上了,感觉会成功
保存后,设备上电,连接成功。😃


 1163
1163

 被折叠的 条评论
为什么被折叠?
被折叠的 条评论
为什么被折叠?
 到【灌水乐园】发言


