


Srping Security网上也有很多例子,但基本都是所资源直接配置在XML文件里,限制太大,不够灵活。我们需要的是可以在后台修改资源访问权限,实时生效,才能符合现在大多数系统的需求。
需要引入的依赖
    <!-- Spring security -->
    <dependency>
        <groupId>org.springframework.security</groupId>
        <artifactId>spring-security-web</artifactId>
        <version>4.2.2.RELEASE</version>
    </dependency>
    <dependency>
        <groupId>org.springframework.security</groupId>
        <artifactId>spring-security-config</artifactId>
        <version>4.2.2.RELEASE</version>
    </dependency>
    <!--Spring Security end-->
用户身份认证
我们自定义一个实现类MUserDetailsService 来实现UserDetailsService接口。
其中需要实现一个loadUserByUsername方法,用来读取用户的角色。
在这里需要从数据库中通过用户名来查询用户的信息和用户所属的角色
其中MGrantedAuthority实现了GrantedAuthority接口,用于构建用户权限。
MUserDeatils实现了UserDeatils接口,用于存放用户信息与权限
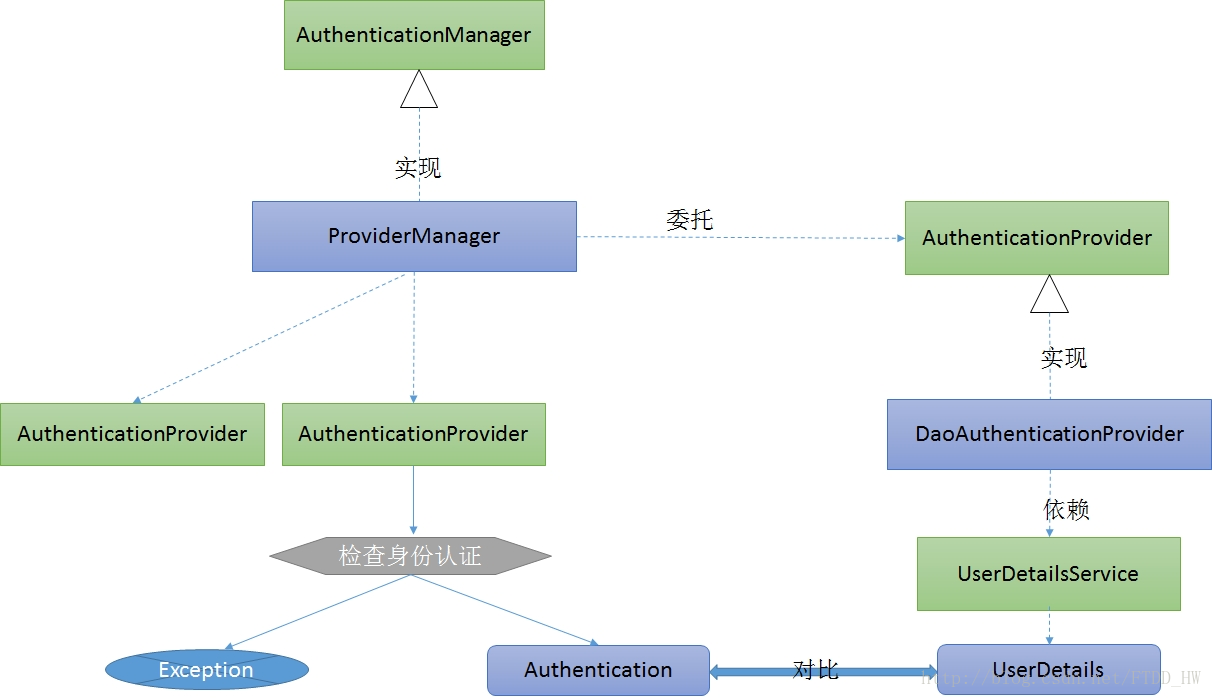
UserDetailsService在身份认证中的作用
Spring Security中进行身份验证的是AuthenticationManager接口,ProviderManager是它的一个默认实现,但它并不用来处理身份认证,而是委托给配置好的AuthenticationProvider,每个AuthenticationProvider会轮流检查身份认证。检查后或者返回Authentication对象或者抛出异常。验证身份就是加载响应的UserDetails,看看是否和用户输入的账号、密码、权限等信息匹配。此步骤由实现AuthenticationProvider的DaoAuthenticationProvider(它利用UserDetailsService验证用户名、密码和授权)处理。包含 GrantedAuthority 的 UserDetails对象在构建 Authentication对象时填入数据。
MUserDetailsService.class中的loadUserByUsername方法
    /**
     * 根据用户名加载用户密码与权限信息
     * @param username
     * @return
     * @throws UsernameNotFoundException
     */
    @Override
    public UserDetails loadUserByUsername(String username) throws UsernameNotFoundException {

        //查询用户信息
        User user = userMapper.selectByName(username);
        List<Role> roleList = null;
        MUserDeatils userDeatils = null;
        if (user != null){
            //查询用户的角色
            roleList = roleMapper.queryByUser(user.getId());
            System.out.println("user" + user.getUsername() + "----" + user.getPassword());
            // 构建权限
            Set<MGrantedAuthority> authorities = new HashSet<MGrantedAuthority>();
            if (roleList.size() != 0){
                for (Role role: roleList){
                    authorities.add(new MGrantedAuthority(role.getName()));
                    System.out.println(role.getName());
                }
                userDeatils = new MUserDeatils(user.getUsername(),user.getPassword(),authorities);

            }
        }
        return userDeatils;

    }
MGrantedAuthority.class
public class MGrantedAuthority implements GrantedAuthority {

    private String authority;

    public MGrantedAuthority(String authority){
        this.authority = authority;
    }

    @Override
    public String getAuthority() {
        return authority;
    }
}
MUserDeatils.class
实现UserDetails接口定义好变量即可
读取资源与所属角色
需要自定义实现类实现FilterInvocationSecurityMetadataSource接口。通过loadResourceDefine方法可以实现资源与权限的对应关系。
要使我们自定义的MFilterInvocationSecurityMetadataSource生效,我们还需要定义一个MyFilterSecurityInterceptor类。
这里的数据需要从数据库中取得。另外自定义接口UrlMatcher,实现类为AntUrlPathMatcher。
坑
网上有教程是把loadResourceDefine方法放在了构造函数里。但我经过多次试验均出现service,mapper无法注入的问题,然后就会报一个空指针的导异常,经debug发现是service没有注入。经多次查询得知:原因是构造方法会先于注入执行,所以loadResourceDefine方法放入构造中执行时函数内的service与mapper还未执行注入,因此报 java.lang.NullPointerException的异常。解决方法是将loadResourceDefine方法放在getAttributes方法中执行。
MFilterInvocationSecurityMetadataSource.class
    @Component
    public class MFilterInvocationSecurityMetadataSource implements FilterInvocationSecurityMetadataSource {
    @Autowired
    public IRescAndRoleService iRescAndRoleService ;
    @Autowired
    private IUserService iUserService ;
    private UrlMatcher urlMatcher = new AntUrlPathMatcher();
    // 资源权限集合
    private static Map<String, Collection<ConfigAttribute>> resourceMap = null;
    public void loadResourceDefine(){
        resourceMap = new HashMap<String, Collection<ConfigAttribute>>();
        //取得用户信息
        List<User> userList = iUserService.query();
       //取得资源与角色列表
        List<RescAndRole> resourceList = iRescAndRoleService.query();
        System.out.println(resourceList);
        for (RescAndRole resource : resourceList) {
            Collection<ConfigAttribute> atts = new ArrayList<ConfigAttribute>();
            atts.add(new SecurityConfig(resource.getRoleName() ));
            resourceMap.put(resource.getResString(), atts);
        }
    }
    @Override
    public Collection<ConfigAttribute> getAttributes(Object o) throws IllegalArgumentException {
        loadResourceDefine();//防止无法注入问题
        // guess object is a URL.
        String url = ((FilterInvocation) o).getRequestUrl();
        Iterator<String> ite = resourceMap.keySet().iterator();
        while (ite.hasNext()) {
            String resURL = ite.next();
            if (urlMatcher.pathMatchesUrl(resURL, url)) {
                return resourceMap.get(resURL);
            }
        }
        return null;
    }
    @Override
    public Collection<ConfigAttribute> getAllConfigAttributes() {
        return null;
    }
    @Override
    public boolean supports(Class<?> aClass) {
        return true;
    }
}
AntUrlPathMatcher.class
public class AntUrlPathMatcher implements UrlMatcher {

    private boolean requiresLowerCaseUrl;
    private PathMatcher pathMatcher;

    public AntUrlPathMatcher() {
        this(true);
    }

    public AntUrlPathMatcher(boolean requiresLowerCaseUrl) {
        this.requiresLowerCaseUrl = true;
        this.pathMatcher = new AntPathMatcher();

        this.requiresLowerCaseUrl = requiresLowerCaseUrl;
    }

    public Object compile(String path) {
        if (this.requiresLowerCaseUrl) {
            return path.toLowerCase();
        }
        return path;
    }

    public void setRequiresLowerCaseUrl(boolean requiresLowerCaseUrl) {
        this.requiresLowerCaseUrl = requiresLowerCaseUrl;
    }

    public boolean pathMatchesUrl(Object path, String url) {
        if (("/**".equals(path)) || ("**".equals(path))) {
            return true;
        }
        return this.pathMatcher.match((String) path, url);
    }

    public String getUniversalMatchPattern() {
        return "/**";
    }

    public boolean requiresLowerCaseUrl() {
        return this.requiresLowerCaseUrl;
    }

    public String toString() {
        return super.getClass().getName() + "[requiresLowerCase='"
                + this.requiresLowerCaseUrl + "']";
    }
}
MyFilterSecurityInterceptor.class
public class MyFilterSecurityInterceptor extends AbstractSecurityInterceptor
        implements Filter {
    private FilterInvocationSecurityMetadataSource securityMetadataSource;

    public void doFilter(ServletRequest request, ServletResponse response,
                         FilterChain chain) throws IOException, ServletException {
        FilterInvocation fi = new FilterInvocation(request, response, chain);
        invoke(fi);
    }

    public FilterInvocationSecurityMetadataSource getSecurityMetadataSource() {
        return this.securityMetadataSource;
    }

    public Class<? extends Object> getSecureObjectClass() {
        return FilterInvocation.class;
    }

    public void invoke(FilterInvocation fi) throws IOException,
            ServletException {
        InterceptorStatusToken token = super.beforeInvocation(fi);
        try {
            fi.getChain().doFilter(fi.getRequest(), fi.getResponse());
        } finally {
            super.afterInvocation(token, null);
        }
    }

    public SecurityMetadataSource obtainSecurityMetadataSource() {
        return this.securityMetadataSource;
    }

    public void setSecurityMetadataSource(
            FilterInvocationSecurityMetadataSource newSource) {
        this.securityMetadataSource = newSource;
    }

    public void destroy() {
    }

    public void init(FilterConfig arg0) throws ServletException {
    }

}
决策管理器
自定义一个决策管理器MyAccessDecisionManager实现AccessDecisionManager接口。其中的decide方法,决定某一个用户是否有权限访问某个url
/* (non-Javadoc)
     * @see org.springframework.security.access.AccessDecisionManager#decide(org.springframework.security.core.Authentication, java.lang.Object, java.util.Collection)
     * 该方法决定该权限是否有权限访问该资源,其实object就是一个资源的地址,authentication是当前用户的
     * 对应权限,如果没登陆就为游客,登陆了就是该用户对应的权限
     */
    @Override
    public void decide(Authentication authentication, Object object,
                       Collection<ConfigAttribute> configAttributes)
            throws AccessDeniedException, InsufficientAuthenticationException {
        if(configAttributes == null) {
            return;
        }
        System.out.println(object.toString()); // object is a URL.
        //所请求的资源拥有的权限(一个资源对多个权限)
        Iterator<ConfigAttribute> iterator = configAttributes.iterator();
        while(iterator.hasNext()) {
            ConfigAttribute configAttribute = iterator.next();
            //访问所请求资源所需要的权限
            String needPermission = configAttribute.getAttribute();
            System.out.println("访问"+object.toString()+"需要的权限是:" + needPermission);
            //用户所拥有的权限authentication
            Collection<? extends GrantedAuthority> authorities = authentication.getAuthorities();
            for(GrantedAuthority ga : authorities) {
                if(needPermission.equals(ga.getAuthority())) {
                    return;
                }
            }
        }
        //没有权限
        throw new AccessDeniedException(" 没有权限访问! ");
    }

    @Override
    public boolean supports(ConfigAttribute attribute) {
        // TODO Auto-generated method stub
        return true;
    }

    @Override
    public boolean supports(Class<?> clazz) {
        // TODO Auto-generated method stub
        return true;
    }
配置XML
web.xml
添加Seucrity的过滤器,将拦截所有资源访问
注意
只能配置成 /*
    <!--加载Security配置文件与mybatis配置文件-->
    <context-param>
        <param-name>contextConfigLocation</param-name>
        <param-value>
            WEB-INF/config/security.xml
            WEB-INF/config/spring-mybatis.xml
        </param-value>
    </context-param>

    <!-- spring security 的过滤器配置 -->
    <filter>
        <filter-name>springSecurityFilterChain</filter-name>
        <filter-class>org.springframework.web.filter.DelegatingFilterProxy</filter-class>
    </filter>
    <filter-mapping>
        <filter-name>springSecurityFilterChain</filter-name>
        <url-pattern>/*</url-pattern>
    </filter-mapping>
spring-security.xml
<b:beans xmlns="http://www.springframework.org/schema/security"
         xmlns:b="http://www.springframework.org/schema/beans" xmlns:xsi="http://www.w3.org/2001/XMLSchema-instance"
         xsi:schemaLocation="http://www.springframework.org/schema/beans http://www.springframework.org/schema/beans/spring-beans.xsd
                        http://www.springframework.org/schema/security http://www.springframework.org/schema/security/spring-security.xsd">


    <!--登陆页面不验证-->
    <http pattern="/userLogin.html" security="none" />
    <!--静态文件请求不验证-->
    <http pattern="/js/**" security="none" />
    <http pattern="/css/**" security="none" />
    <!--restful请求-->
    <http pattern="/login" security="none" />
    <http pattern="/getGrid" security="none" />
    <!--浏览器会自动请求网站图标:favicon.ico -不验证  -->
    <http pattern="/favicon.ico" security="none" />
    <http >

        <!--自定义权限不足时显示的页面-->
        <access-denied-handler error-page="/accessHint.html"></access-denied-handler>
        <!-- 自定义登录界面 -->
        <form-login
                authentication-failure-url="/userLogin.html?error=true"
                login-page="/userLogin.html"
                default-target-url="/index.html"
                login-processing-url="/j_spring_security_check" />
        <logout invalidate-session="true"
                logout-success-url="/userLogin.html"
                logout-url="/j_spring_security_logout"/>
        <!-- 通过配置custom-filter来增加过滤器,before="FILTER_SECURITY_INTERCEPTOR"表示在SpringSecurity默认的过滤器之前执行。 -->
        <custom-filter ref="filterSecurityInterceptor" before="FILTER_SECURITY_INTERCEPTOR" />
        <csrf disabled="true" />

    </http>

    <!-- 认证过滤器 -->
    <b:bean id="filterSecurityInterceptor"
                class="com.hand.security.utils.MyFilterSecurityInterceptor">
        <b:property name="rejectPublicInvocations" value="true"/>
        <!-- 用户拥有的权限 -->
        <b:property name="accessDecisionManager" ref="accessDecisionManager" />
        <!-- 用户是否拥有所请求资源的权限 -->
        <b:property name="authenticationManager" ref="authenticationManager" />
        <!-- 资源与权限对应关系 -->
        <b:property name="securityMetadataSource" ref="securityMetadataSource" />
    </b:bean>

    <!-- 2、更改验证信息加载方式 -->
    <authentication-manager alias="authenticationManager">
        <authentication-provider
                user-service-ref="mUserDetailsService">
            <!--如果用户的密码采用加密的话 <password-encoder hash="md5" /> -->
        </authentication-provider>
    </authentication-manager>

    <!-- 1、配置自定义类MUserDetailsService -->
    <b:bean id="mUserDetailsService" class="com.hand.security.service.impl.MUserDetailsService" />

    <!--访问决策器,决定某个用户具有的角色,是否有足够的权限去访问某个资源 -->
    <b:bean id="accessDecisionManager" class="com.hand.security.utils.MyAccessDecisionManager"></b:bean>

    <!--资源源数据定义,将所有的资源和权限对应关系建立起来,即定义某一资源可以被哪些角色访问 -->
    <b:bean id="securityMetadataSource" class="com.hand.security.utils.MFilterInvocationSecurityMetadataSource" ></b:bean>

</b:beans>


 5万+
5万+

 被折叠的 条评论
为什么被折叠?
被折叠的 条评论
为什么被折叠?
 到【灌水乐园】发言


