


svbadmin学习日志
本学习日志是使用Springboot和Vue来搭建的后台管理系统:
演示地址:http://118.31.68.110:8081/index.html
账号:root
密码:123
所有代码可以在gitbub上找到,切换到相应分支即可。【代码传送门】
正篇
第一节 spring boot 模块化构建项目
第二节 整合mybatisplus完成用户增删改查
第三节 整合springsecurity实现基于RBAC的用户登录
第四节 springsecurity结合jwt实现前后端分离开发
第五节 使用ResponseBodyAdvice格式化接口输出
第六节 springboot结合redis实现缓存策略
第七节 springboot结合rabbitmq实现队列消息
第八节 springboot结合rabbitmq实现异步邮件发送
第九节 利用springboot的aop实现行为日志管理
第十节 利用Quartz实现数据库定时备份
第十一节 springboot配置log输出到本地文件
第十二节 使用flyway对数据库进行版本管理
第十三节 springboot配合VbenAdmin实现前端登录
第十四节 springboot配合VbenAdmin实现用户CURD
第十五节 基于RBAC的权限管理VbenAdmin前端实现
第十六节 springboot 打包vue代码实现前后端统一部署
番外
2.1 数据库设计原则
3.1 配置apifox自动获取登录的token
13.1 springboot 全局捕捉filter中的异常
14.1 springsecurity整合mybatisplus出现isEnable的问题和解决方案
前言
mybatis 确实比较灵活,可以让你直接写原生sql,再复杂的查询也能很好解决。当然基础的CURD要写的代码比较多,所以配合mybatisplus,就完美了。
一、mybatis和mybatis-plus?
mybatis的优点,支持定制化SQL,存储过程以及高级映射。个人认为的麻烦的地方,新增修改要写的xml太繁琐,字段一多就累的够呛;
mybatis-plus,帮你注入了基本的CURD,同时你也可以继续使用原来xml编写方式
二、使用步骤
1.数据库连接
先建一个sbvadmin的数据库, utf8mb4
再建一个用户:
mysql -uroot -p
create user sbvadminuser@'localhost' identified by 'Sbvadmin';
grant all privileges on sbvadmin.* to sbvadminuser@'localhost';
flush privileges;
admin-web 中的application.properties
# database
spring.datasource.type=com.alibaba.druid.pool.DruidDataSource
spring.datasource.driver-class-name=com.mysql.cj.jdbc.Driver
spring.datasource.url=jdbc:mysql:///sbvadmin
spring.datasource.username=root
spring.datasource.password=xxxxxxxxx
admin-web 的pom中加入
<dependency>
    <groupId>mysql</groupId>
    <artifactId>mysql-connector-java</artifactId>
    <scope>runtime</scope>
    <version>8.0.29</version>
</dependency>
admin-mapper的pom中加入
<dependency>
    <groupId>com.alibaba</groupId>
    <artifactId>druid-spring-boot-starter</artifactId>
    <version>1.2.11</version>
</dependency>
admin-model的pom中加入
<dependency>
    <groupId>com.baomidou</groupId>
    <artifactId>mybatis-plus-boot-starter</artifactId>
    <version>3.5.2</version>
</dependency>
尝试运行下,如果报错,记得更新下依赖
2.建立user表
建个查询,代码如下。加入三个示例用户,root定位为超级管理员
/*Table structure for table `user` */

DROP TABLE IF EXISTS `user`;

CREATE TABLE `user`
(
    `id` bigint UNSIGNED NOT NULL AUTO_INCREMENT,
    `name`      varchar(32)  DEFAULT NULL COMMENT '姓名',
    `phone`     char(11)     DEFAULT NULL COMMENT '手机号码',
    `email`     varchar(64)  DEFAULT NULL COMMENT '邮箱',
    `enabled`   tinyint(1)   DEFAULT '1' COMMENT '激活状态:1为启用,0位禁用',
    `username`  varchar(255) DEFAULT NULL COMMENT '用户名',
    `password`  varchar(255) DEFAULT NULL COMMENT '密码',
    `avatar`    varchar(255) DEFAULT NULL COMMENT '头像',
    `last_login_at` timestamp NULL DEFAULT NULL COMMENT '最后登录时间',
    `last_login_ip` varchar(20) NOT NULL DEFAULT '' COMMENT '最后登录ip',
    `created_at` timestamp NULL DEFAULT NULL,
    `updated_at` timestamp NULL DEFAULT NULL,
    `mp_open_id` varchar(64) NOT NULL DEFAULT '' COMMENT '微信open_id',
    `union_id` varchar(64) NOT NULL DEFAULT '' COMMENT '微信union_id',
    PRIMARY KEY (`id`)
) ENGINE=InnoDB DEFAULT CHARSET=utf8mb4 COLLATE=utf8mb4_unicode_ci;

/*Data for the table `user` */
insert into `user` (`id`, `name`, `phone`, `email`, `enabled`, `username`, `password`, `avatar`, `last_login_at`,
                   `last_login_ip`, `created_at`, `updated_at`, `mp_open_id`, `union_id`)
values (1, '超级管理员', '13912341234', 'likeboat@163.com',  1, 'root',
        '$2a$10$ySG2lkvjFHY5O0./CPIE1OI8VJsuKYEzOYzqIa7AJR6sEgSzUFOAm',
        'https://img-home.csdnimg.cn/images/20201124032511.png', NULL,'',NULL,NULL,'',''),
       (2, '管理员', '13812341234', 'likeboat@126.com',  1, 'admin',
        '$2a$10$ySG2lkvjFHY5O0./CPIE1OI8VJsuKYEzOYzqIa7AJR6sEgSzUFOAm',
        'https://img-home.csdnimg.cn/images/20201124032511.png', NULL,'',NULL,NULL,'',''),
       (3, '普通用户', '13712341234', 'likeboat@sina.com',  1, 'user',
        '$2a$10$ySG2lkvjFHY5O0./CPIE1OI8VJsuKYEzOYzqIa7AJR6sEgSzUFOAm',
        'https://img-home.csdnimg.cn/images/20201124032511.png', NULL,'',NULL,NULL,'','');
3.编码
- 在admin-model新建User
@Data
public class User {
    @TableId(type = IdType.AUTO)
    private BigInteger id;
    private String name;
    private String phone;
    private String email;
    private Boolean enabled;
    private String username;
    private String password;
    private String avatar;
    private Date last_login_at;
    private String last_login_ip;
    private Date created_at;
    private Date updated_at;
    private String mp_open_id;
    private String union_id;
//    private Boolean locked;

}
- 在admin-mapper中建立UserMapper
@Mapper
public interface UserMapper extends BaseMapper<User> {
}
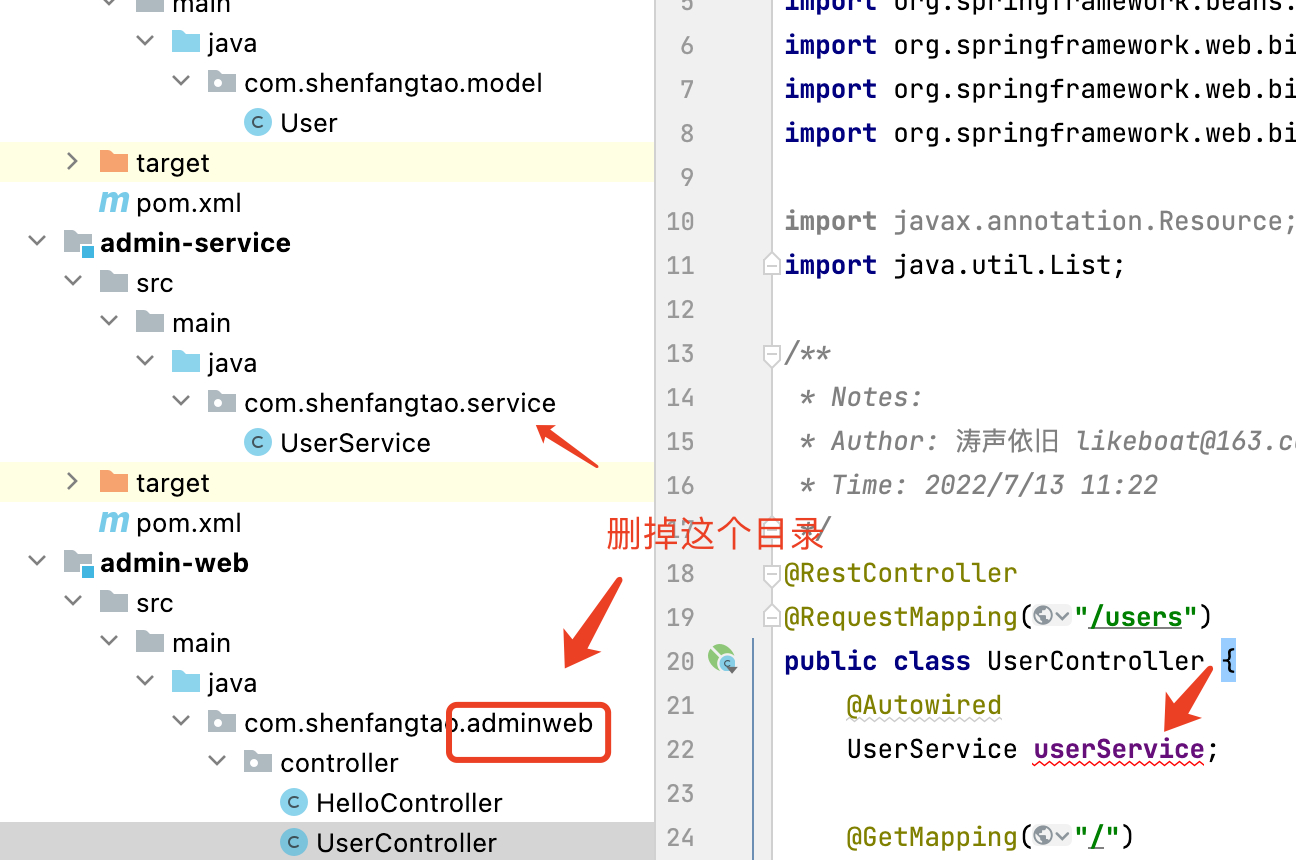
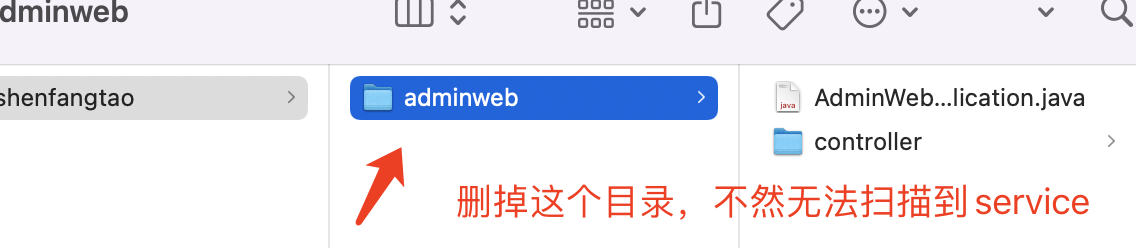
- 在admin-sevice中建立UserService和UserServiceImpl
public interface UserService extends IService<User> {
}

@Service
public class UserServiceImpl extends ServiceImpl<UserMapper, User> implements UserService {
}
- 在admin-web中建立UserController
@RestController
@RequestMapping("/users")
public class UserController {
    @Autowired
    UserServiceImpl userService;

    @GetMapping("")
    public List<User> getUsers(){
        return userService.list();
    }

    @PostMapping("")
    public boolean addUser(@RequestBody User user){
        return userService.save(user);
    }

    @PutMapping("/{id}")
    public boolean editUser(@RequestBody User user, @PathVariable BigInteger id) {
        user.setId(id);
        return userService.updateById(user);
    }
    @DeleteMapping("/{id}")
    public boolean delUser(@PathVariable BigInteger id) {
        return userService.removeById(id);
    }
}
3.测试
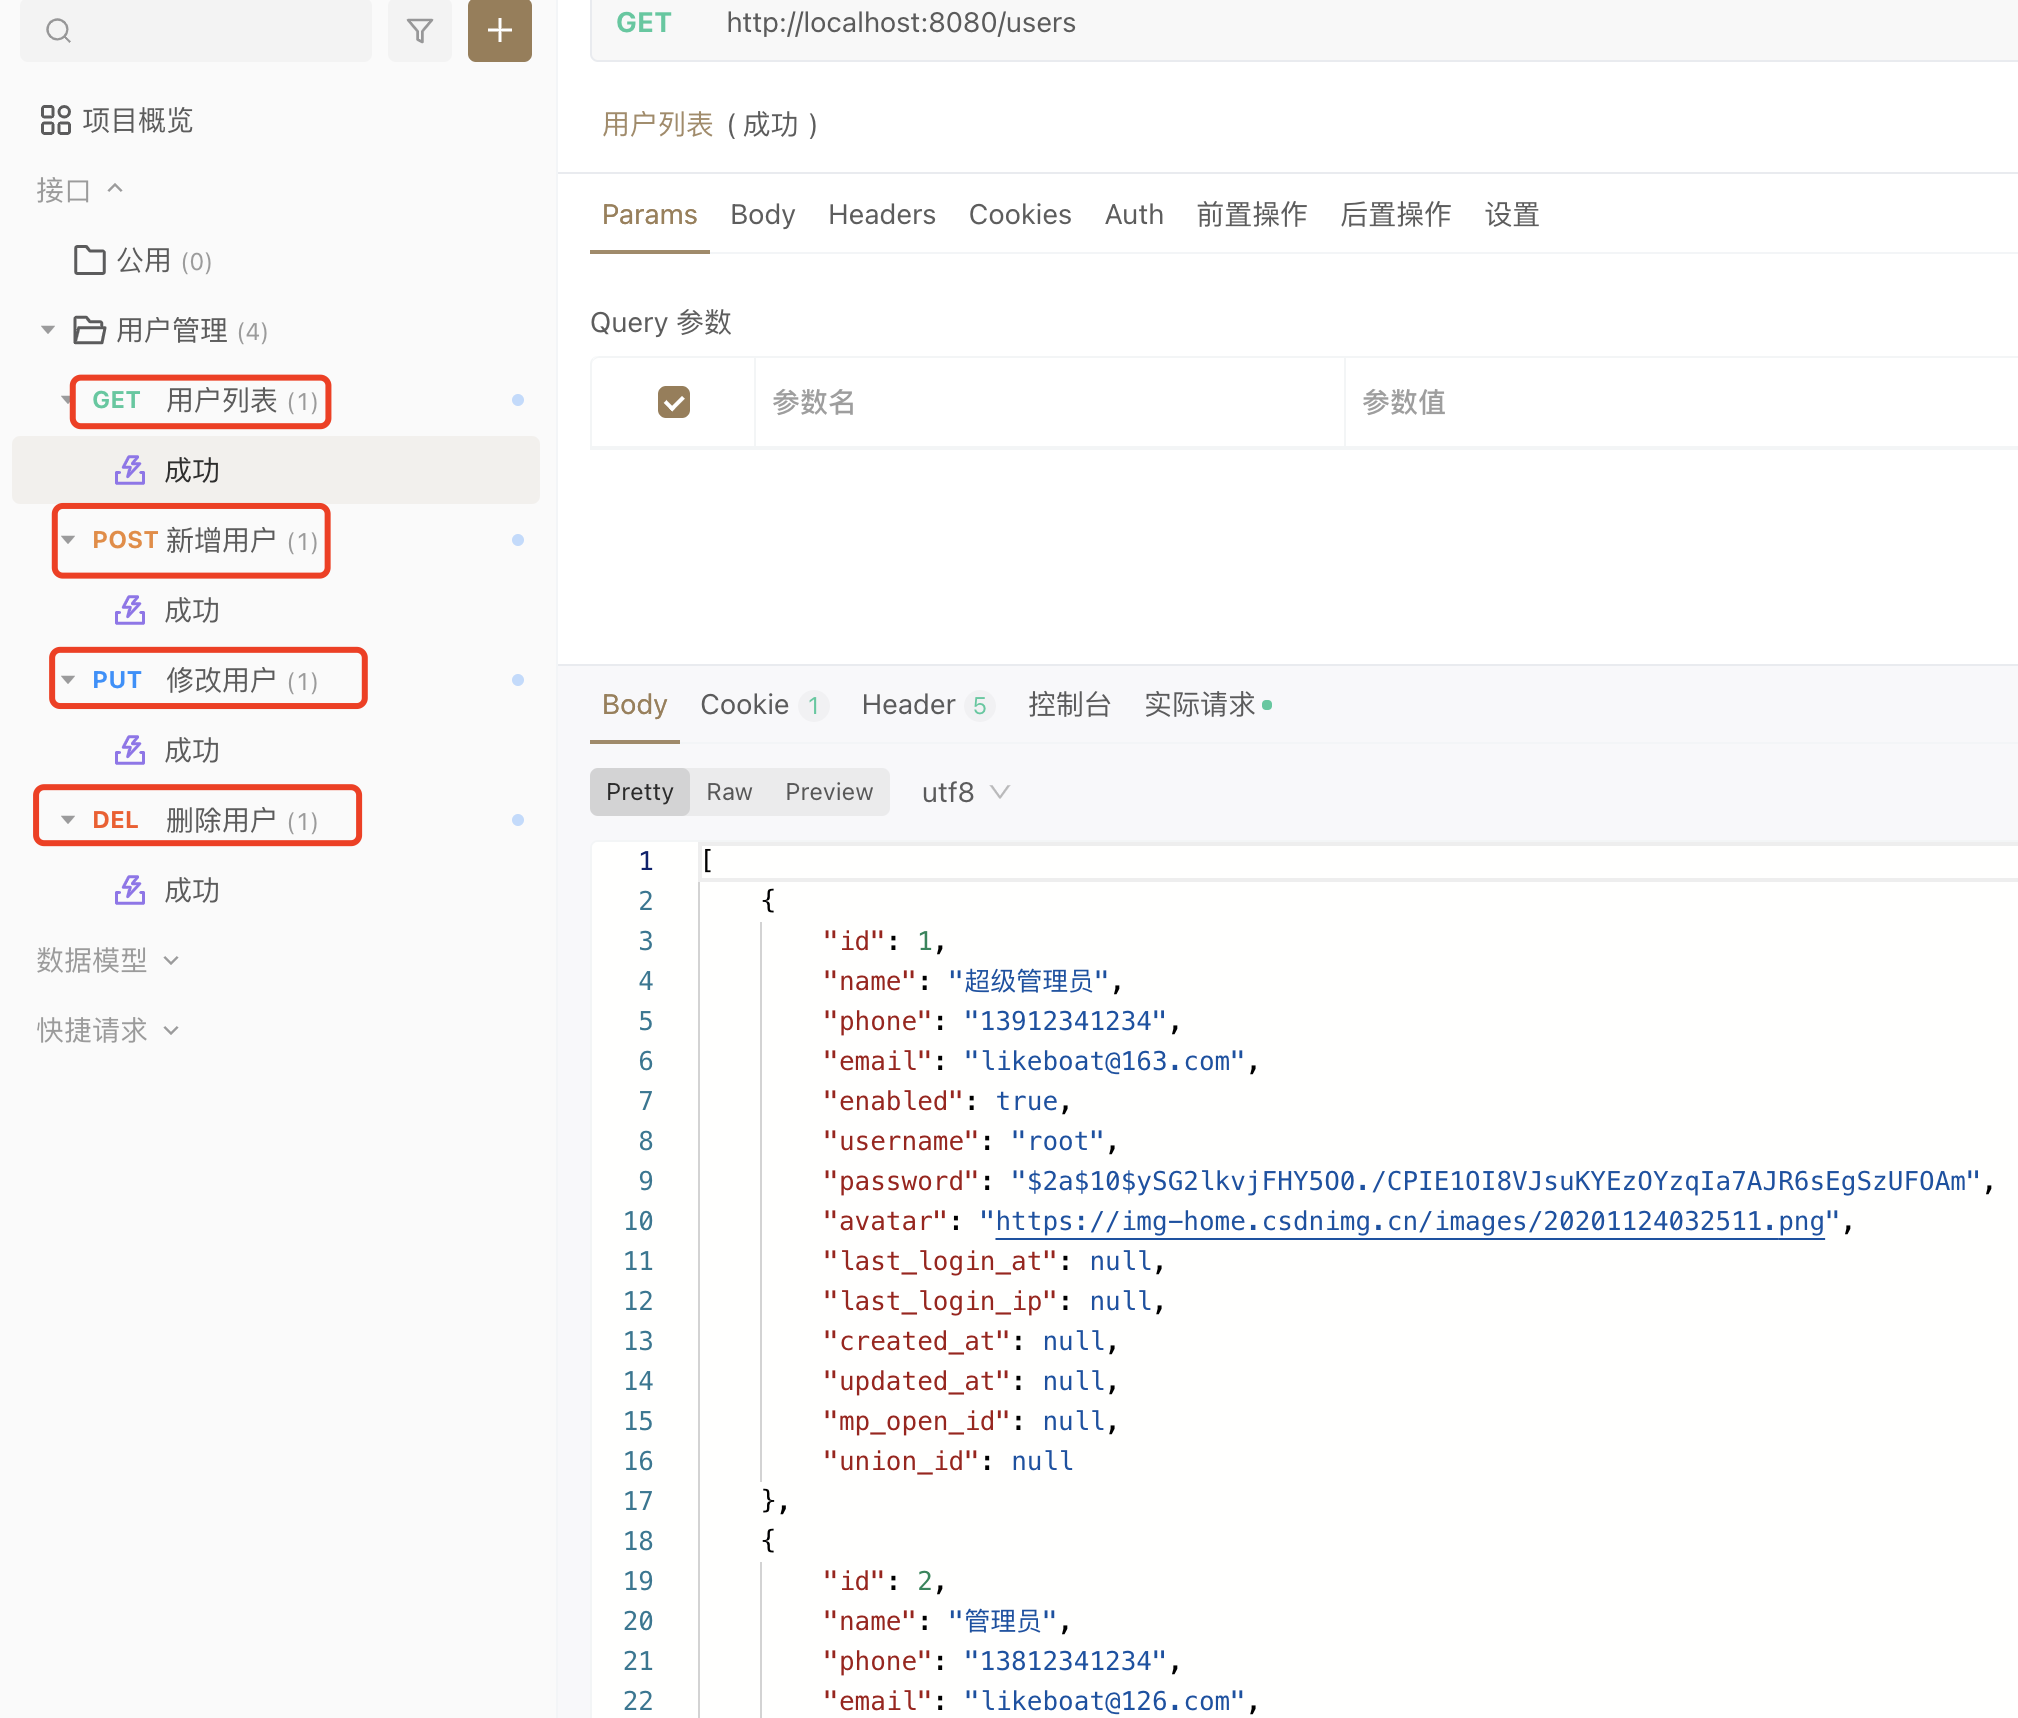
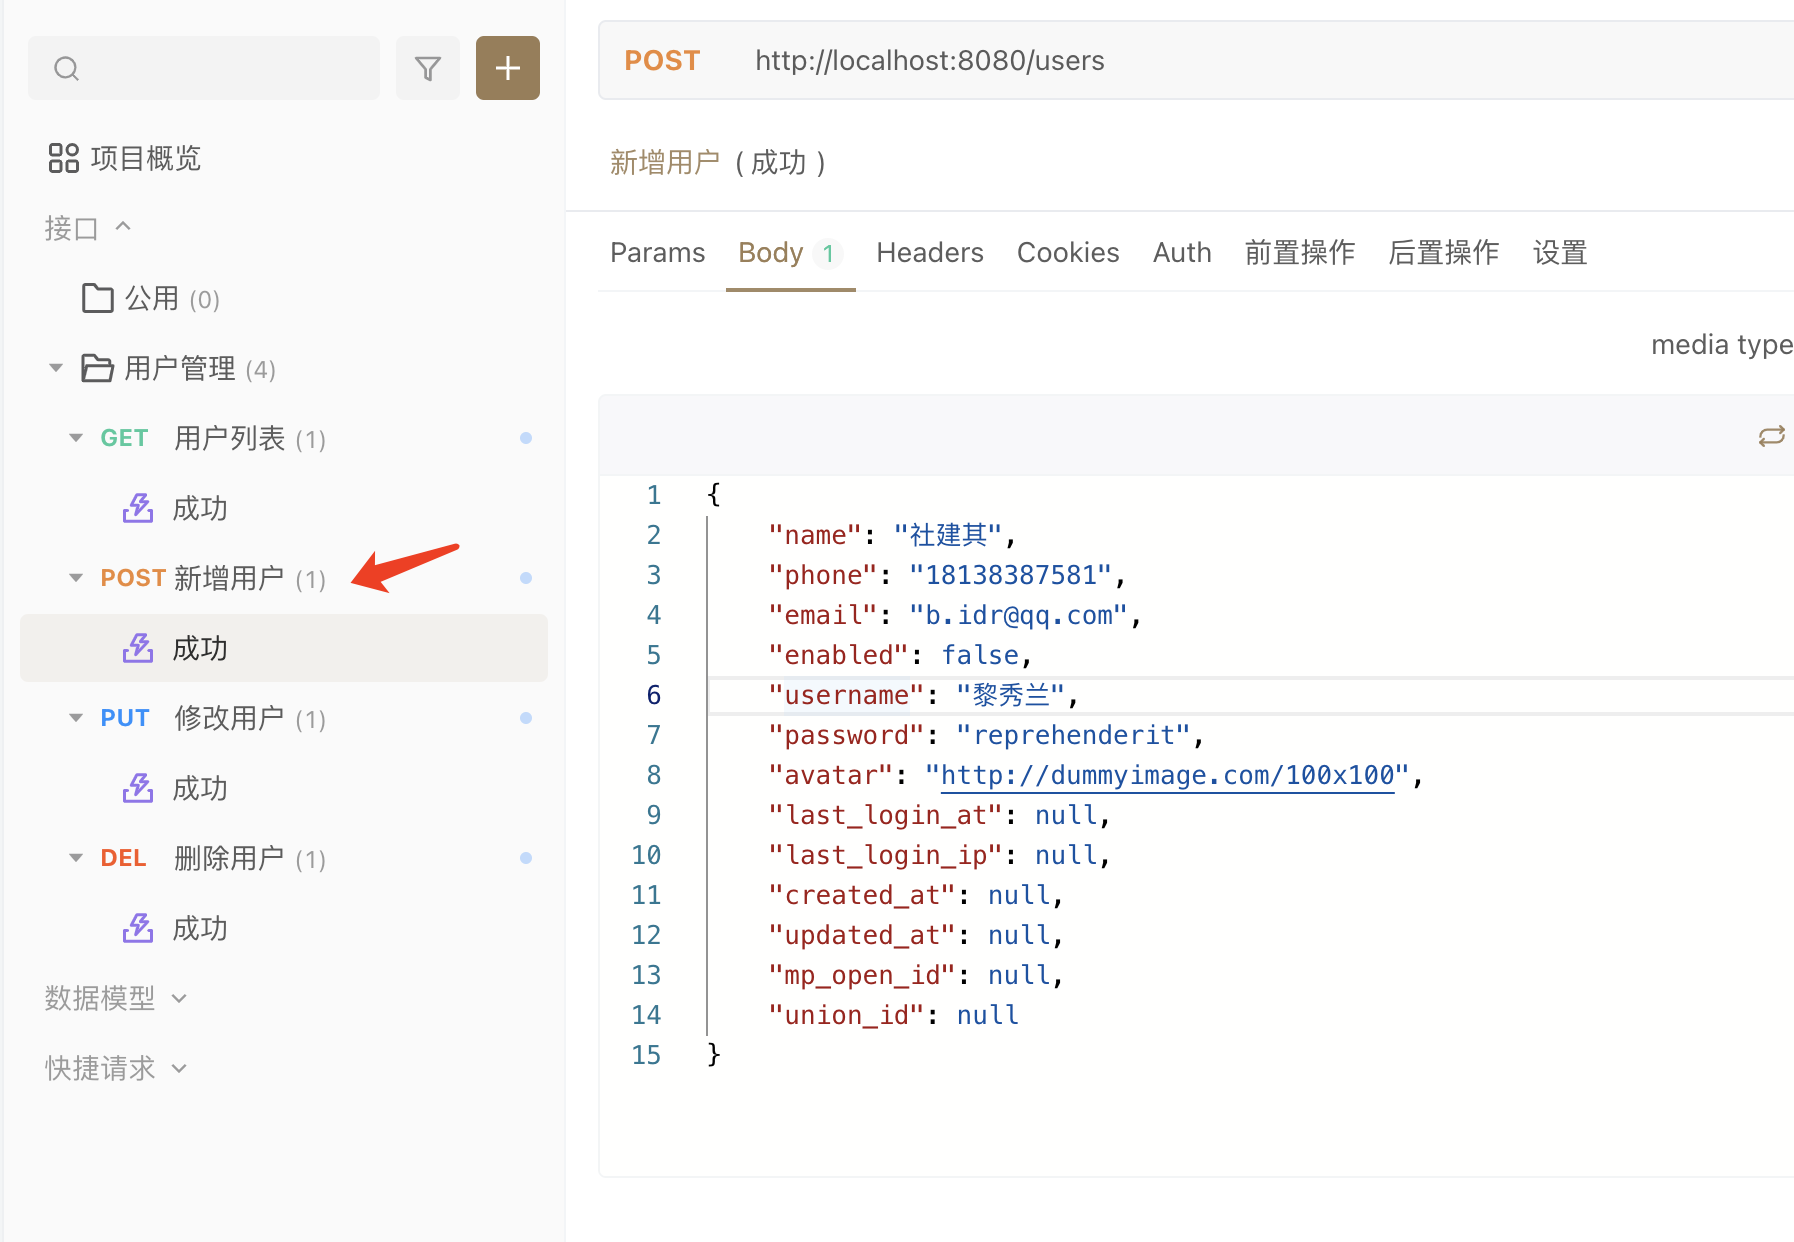
这里推荐一个接口调试工具,apifox
用户列表
新增用户
总结
- mybatis-plus 可以节省不少代码量
- 数据库的设计可以参考阿里的规范,参考文档中有连接
- 接口参考了标准的restful api的设计
问题
Could not autowire. No beans of ‘UserService’ type found.
这个问题很棘手,其实网上有很多解决方案,这里出现问题主要和命名空间有关,是一个容易被忽略的点。
代码地址
参考文档:
MyBatis-Plus
逻辑删除真的不是一个好的设计
阿里JAVA手册之MySQL数据库 (建表规约、索引规约、SQL语句、ORM映射)


 338
338


 被折叠的 条评论
为什么被折叠?
被折叠的 条评论
为什么被折叠?
 到【灌水乐园】发言


