


一 项目介绍
1.1项目描述
本项目是通过openharmony源码与hi3861开发板进行智慧婴儿陪睡伴侣开发。该项目基于openharmony操作系统实现了包括声音检测,音乐播放,udp远程控制,语音交互等功能。
1.2资源获取
1.openharmony开发者文档进行环境搭建及源码下载 官方文档 网址:https://www.bookstack.cn/read/openharmony-1.0-zh-cn/quick-start-%E6%90%AD%E5%BB%BA%E7%8E%AF%E5%A2%83.md
2.小熊派开源社区 (可以帮助大家学习):BearPi-HM_Nano: 小熊派BearPi-HM Nano开发板基于HarmonyOS的源码 (gitee.com)
3.操作系统Ubuntu华为云中国镜像网址: https://www.huaweicloud.com/theme/77291-1-U
4.hi3861的示例程序以及常见问题:http:// https://gitee.com/openharmony/docs/blob/OpenHarmony_1.0.1_release/zh-cn/device-dev/quick-start/Readme-CN.md
1.3 技术要求
1.熟悉Git代码版本管理工具
2.熟悉OpenHarmony设备端(L0)开发
3.熟悉WIFI、NB等通信方式;
4.熟悉UDP等物联网协议
二 解决方法
本项目的大概解决框架是在hi3861开发板上使用socket编程创建UDP客户端,接收客户端消息。从而控制音乐的播放以及播放时长的控制。对于声音的检测,我们则是通过使用MAX9814模块作为声音传感器,使用SNR8016VR模块进行语音交互,基于udp协议实现远程通信 通过max9814模块采集婴儿哭声,转换为电信号,MAX9814是一款低成本、高性能麦克风放大器,具有自动增益控制(AGC)和低噪声麦克风偏置。器件具有低噪声前端放大器、可变增益放大器(VGA)、输出放大器、麦克风偏置电压发生器和AGC控制电路。 低噪声前置放大器具有12dB固定增益;VGA增益根据输出电压和AGC门限在20dB至0dB间自动调节。输出放大器提供可选择的8dB、18dB和28dB增益。在未压缩的情况下,放大器的级联增益为40dB、50dB或60dB。输出放大器增益由一个三态数字输入编程。AGC门限由一个外部电阻分压器控制,动作/释放时间由单个电容编程。动作/释放时间比由一个三态数字输入设置。AGC保持时间固定为30ms。低噪声麦克风偏置电压发生器可为绝大部分驻极体麦克风提供偏置。 MAX9814提供节省空间的14引脚TDFN封装。该器件额定工作于-40°C至+85°C扩展级温度范围。
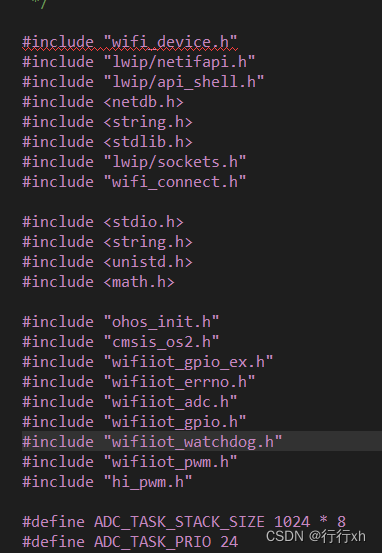
引入依赖的头文件
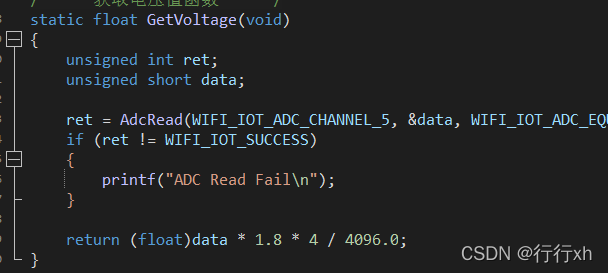
定义ADC数据采集函数
UDP远程通信

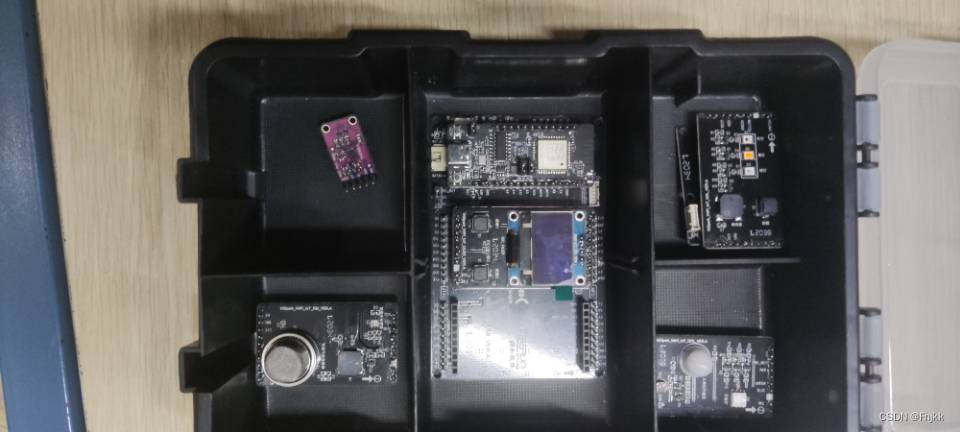
三.硬件准备
本项目所需设备比较比较日容易购买,我们首先需要获取openharmony智能硬件 Pegasus智能家居开发套件;如图:
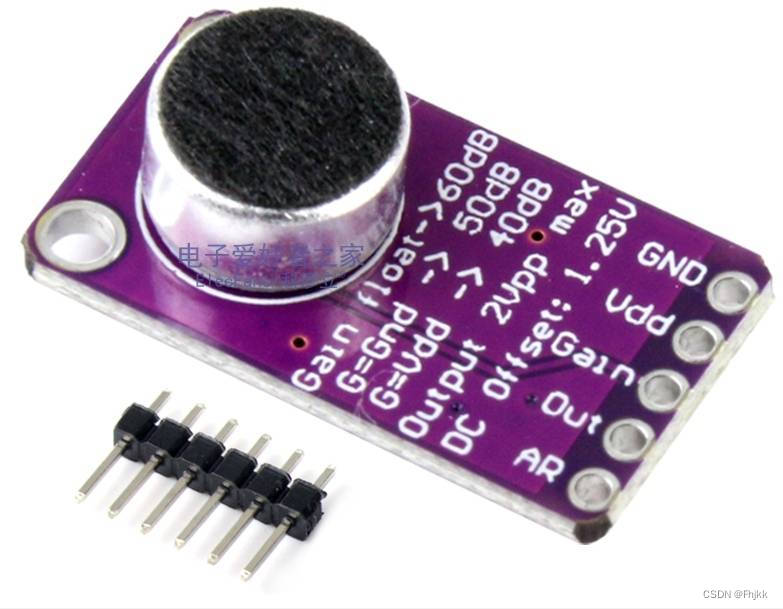
初次以外我们还需要MAX9814模块作为声音传感器,如图
四.快速上手
4.1Linux服务器基础环境准备
开发基础环境由windows 工作台和Linux 编译服务器组成。windows 工作台可以通过安装虚拟机VMare ,进而访问Linux编译服务器。其中我们的烧录是使用Hiburn软件,代码编辑工作是在Linux编译服务器里面完成的,并且Linux编译服务器用来编译OpenHarmony代码,为了简化步骤,Linux编译服务器推荐安装Ubuntu。
下面是下载网址
1. 操作系统Ubuntu华为云中国镜像网址: https://www.huaweicloud.com/theme/77291-1-U
2.虚拟机VMare的网址:https://www.vmware.com/
4.2虚拟机VMare的准备工作
配网
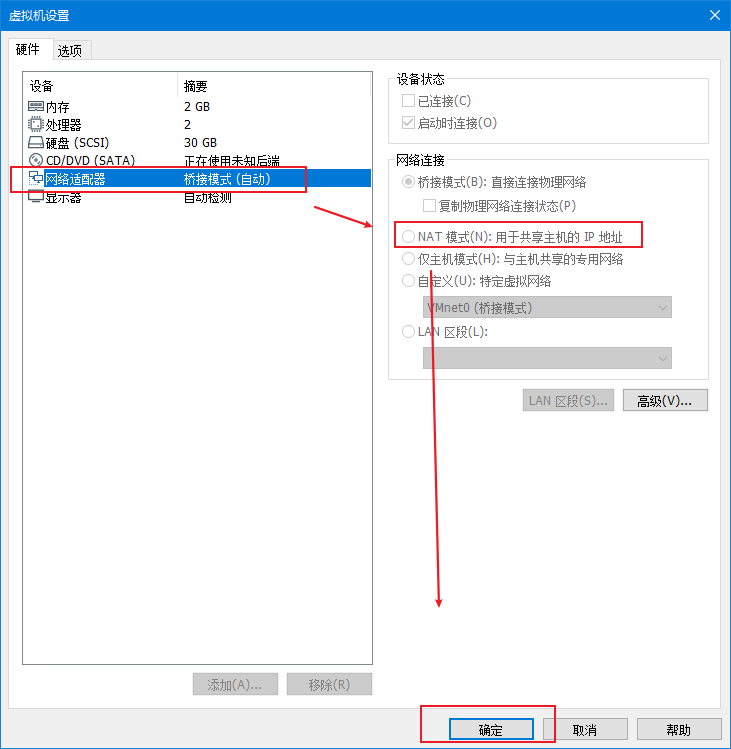
在 虚拟机VMware 中,点击虚拟机——设置
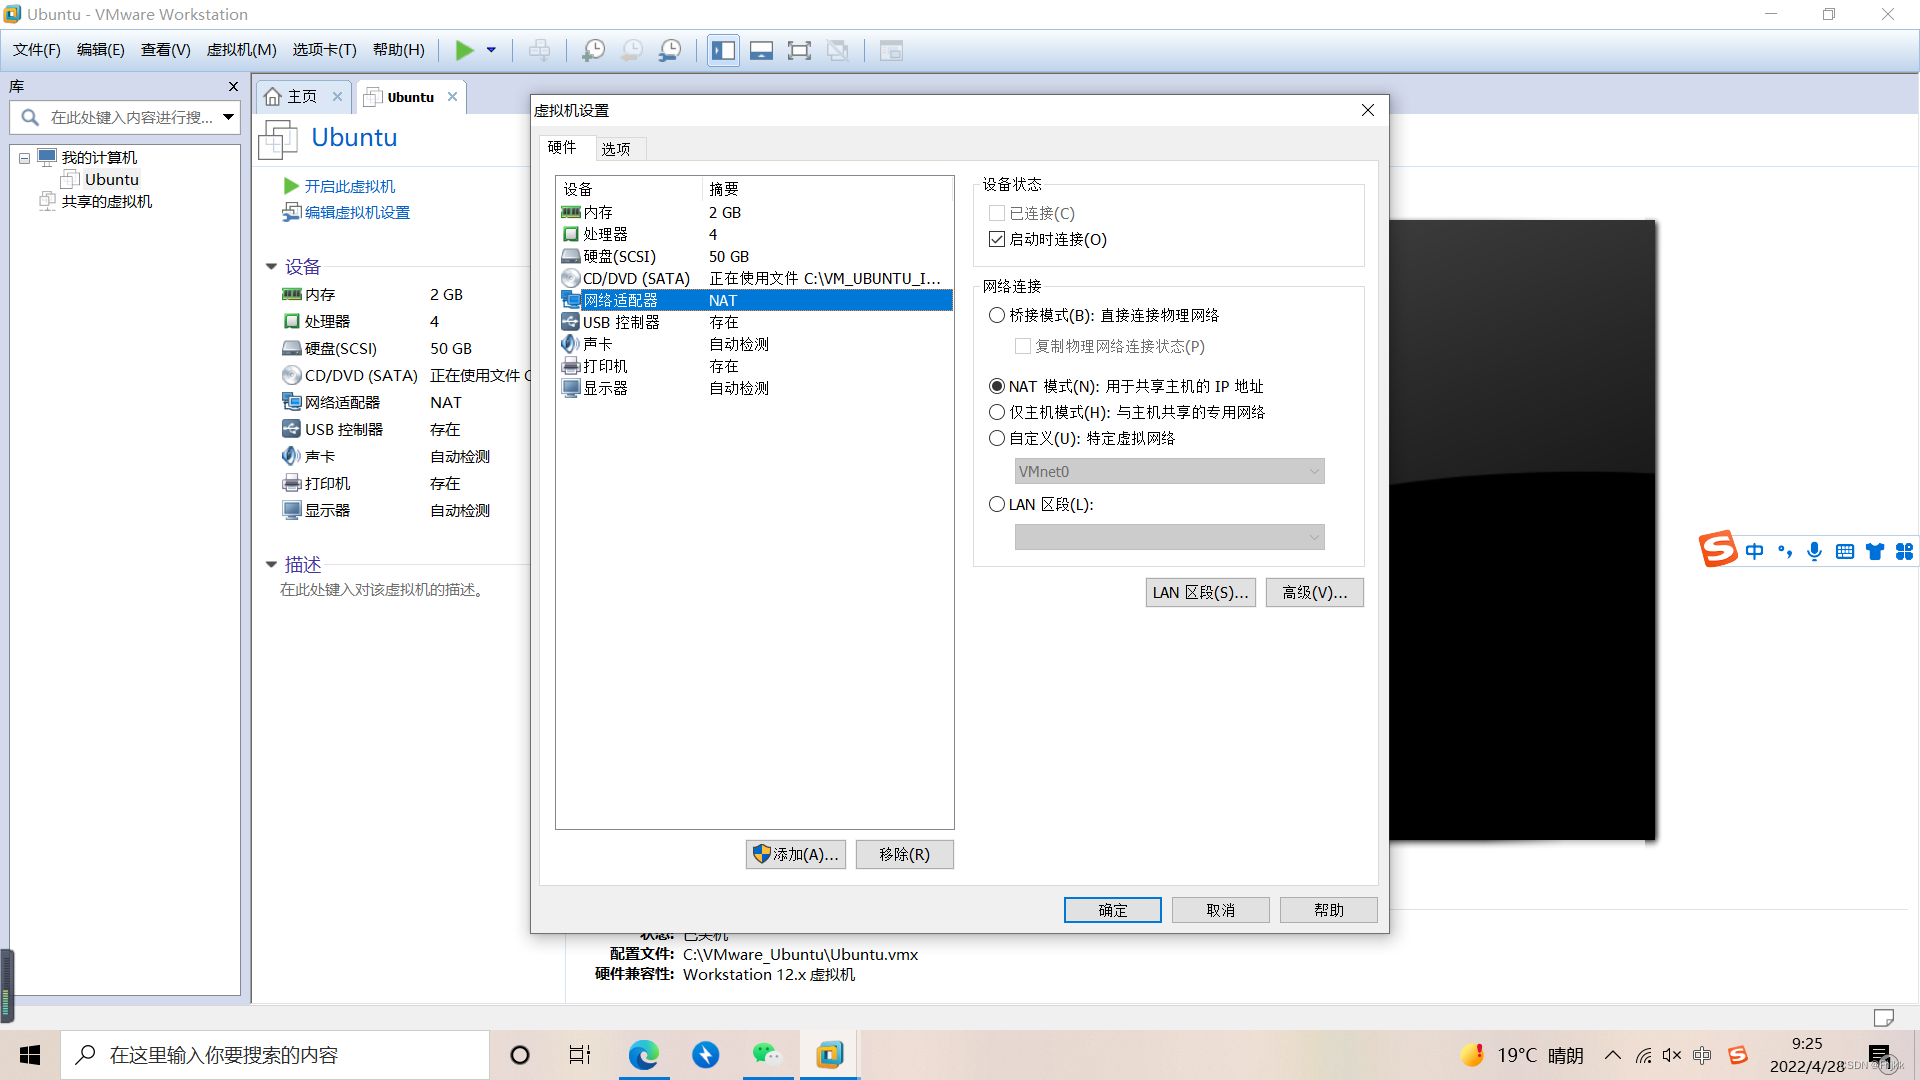
在网络适配器中选择NTA模式
最后在终端输入命令
ping www.baidu.com 4.3安装编译环境
1 连接Linux服务器
使用Windows远程登录Linux,将Linux shell改为bash,查看shell是否为bash,在终端运行如下命令
ls -l /bin/sh如果为显示为/bin/sh -> bash则为正常,否则请按以下方式修改:
方法一:在终端运行如下命令,然后选择 no。
ls -l /bin/sh
方法二:先删除sh,再创建软链接。
rm -rf /bin/sh
sudo ln -s /bin/bash /bin/sh
2.安装Python环境
1.打开Linux系统终端
2.在命令行中输入“python3 —version”,查看Python版本号。需使用python3.7以上版本,如果不满足要求,则可以通过一下方式安装。
1.准备工作
安装所需环境
sudo apt-get update
sudo apt-get install build-essential python-dev python-setuptools python-pip python-smbus
sudo apt-get install libncursesw5-dev libgdbm-dev libc6-dev
sudo apt-get install zlib1g-dev libsqlite3-dev tk-dev
sudo apt-get install libssl-dev openssl
sudo apt-get install libffi-dev
安装libffi-dev
sudo apt-get install libffi-dev2. 下载附件并解压
tar zxvf Python-3.8.5.tgz
3. 编译和安装
cd Python-3.8.5/
./configure --enable-optimizations
make -j56
sudo make install
sudo ln -vsf /usr/local/bin/python3.8 /usr/bin/python
4.安装成功测试:
出现python3.8相关字样,则说明安装成功。
5.更换pip源
cd Python-3.8.5/
./configure --enable-optimizations
make -j56
sudo make install
sudo ln -vsf /usr/local/bin/python3.8 /usr/bin/python
6.安装GUI menuconfig工具kconfiglib,建议安装Kconfiglib 13.2.0+版本
下载地址:https://pypi.org/project/kconfiglib#files
7.安装升级依赖的Python组件包pycryptodome、six、ecdsa
sudo pip3 install pycryptodome
sudo pip3 install six
sudo pip3 install ecdsa
4.4 安装Scons
- 打开Linux编译服务器终端。
-
安装SCons安装包(需root/sudo权限安装)。
运行命令:
sudo apt-get install scons -y -
如果软件源中无法找到安装包,请按以下步骤处理:下载源码包(下载路径:“ SCons Downloads ”,推荐SCons版本是3.0.4+)。解压源码包到任意目录。
安装源码包:进入解压目录,运行命令“sudo python3 setup.py install”(需root/sudo权限安装),等待安装完毕。 -
输入命令“scons -v”,查看是否安装成功。
4.5 安装gn
- 打开Linux编译服务器终端。
- 下载:gn.1523.tar
- 解压:tar axvf gn.1523.tar
- 安装:
sudo cp gn/gn /usr/local/bin/
4.6 安装ninja
- 打开Linux编译服务器终端
- 下载:ninja.1.9.0.tar
- 解压:tar axvf ninja.1.9.0.tar
- 安装:
sudo cp ninja/ninja /usr/local/bin/
4.7安装gcc_riscv32(WLAN模组类编译工具链)
- 打开Linux编译服务器终端。
- 下载gcc_riscv32工具。
- 解压gcc_riscv32安装包至/opt/gcc_riscv32路径下:”tar -xvf gcc_riscv32-linux-7.3.0.tar.gz -C ~/“。
- 设置环境变量:
vim ~/.bashrc 新增:export PATH=~/gcc_riscv32/bin:$PATH - 生效环境变量:
source ~/.bashrc - Shell命令行中输入
,如果能正确显示编译器版本号,表明编译器安装成功。
riscv32-unknown-elf-gcc -v
4.8安装编译SDK包
下载sdk包:
编译sdk包:
tar axvf Hi3861V100R001C00SPC025.tar.gz
cd Hi3861V100R001C00SPC025
make
出现successful,则表明安装成功。
五 源码编译
我们这里编译的方式是使用hb编译
进入源代码根目录,执行如下编译:
hb set2.选择当前路径
.3.执行编译
hb build -f4.编译结束后,屏幕上出现“build successful”就代表编译成功;
六 hi3861源代码的获取
获取方式一
如果我们是通过命令行获取,需要先安装Node.js和hpm命令行工具,安装步骤如下:
1.安装Node.js
1.官网下载并安装Node.js
2.通过Node.js自带的npm安装hpm命令行工具,执行以下命令:
-
npm install -g @ohos/hpm-cli2.安装完成后执行如下命令,显示hpm版本,即安装成功。
3 如果升级hpm的版本,请执行如下命令:hpm -V 或 hpm --version-
npm update -g @ohos/hpm-cli
-
接下来将组件添加到开发项目中,具体操作如下:
-
进入开发目录,执行如下命令,
hpm init -t default2.执行如下命令,安装组件
hpm install @组件名3.工具会自动从服务器下载所有依赖的组件,下载成功则显示Install successfully!
获取方式二
- 注册码云gitee账号。
- 注册码云SSH公钥。
-
安装git客户端并配置用户信息。
git config --global user.name "yourname"
git config --global user.email "your-email-address"
git config --global credential.helper store
4.安装码云repo工具
curl https://gitee.com/oschina/repo/raw/fork_flow/repo-py3 > /usr/local/bin/repo
chmod a+x /usr/local/bin/repo
pip install -i https://pypi.tuna.tsinghua.edu.cn/simple requests
5.通过repo下载
repo init -u https://gitee.com/openharmony/manifest.git -b master --no-repo-verify
repo sync -c
七 openharmony智能婴儿睡眠伴侣代码解析
1.编译可执行文件BUILD.gn
# Copyright (c) 2022 OpenHarmony Co., Ltd.
# Licensed under the Apache License, Version 2.0 (the "License");
# you may not use this file except in compliance with the License.
# You may obtain a copy of the License at
#
#     http://www.apache.org/licenses/LICENSE-2.0
#
# Unless required by applicable law or agreed to in writing, software
# distributed under the License is distributed on an "AS IS" BASIS,
# WITHOUT WARRANTIES OR CONDITIONS OF ANY KIND, either express or implied.
# See the License for the specific language governing permissions and
# limitations under the License.

static_library("Baby_sleep_partner") # 编译静态库
{
    sources = [
        "udp_client_demo.c",#编译主程序
        "src/wifi_connect.c",#编译scr文件下的wifi_connect.c程序
    ]

    cflags = [ "-Wno-unused-variable" ]

    include_dirs = [
        "//utils/native/lite/include",
        "//kernel/liteos_m/components/cmsis/2.0",

        "//base/iot_hardware/interfaces/kits/wifiiot_lite",
        "//foundation/communication/interfaces/kits/wifi_lite/wifiservice",
        "//vendor/hisi/hi3861/hi3861/third_party/lwip_sack/include/",
        "include"


    ]


}
2.wifi_connect.h
/*
 * Copyright (c) 2022 OpenHarmony Co., Ltd.
 * Licensed under the Apache License, Version 2.0 (the "License");
 * you may not use this file except in compliance with the License.
 * You may obtain a copy of the License at
 *
 *    http://www.apache.org/licenses/LICENSE-2.0
 *
 * Unless required by applicable law or agreed to in writing, software
 * distributed under the License is distributed on an "AS IS" BASIS,
 * WITHOUT WARRANTIES OR CONDITIONS OF ANY KIND, either express or implied.
 * See the License for the specific language governing permissions and
 * limitations under the License.
 */

#ifndef __WIFI_CONNECT_H__
#define __WIFI_CONNECT_H__

int WifiConnect(const char *ssid,const char *psk);#定义WiFiConnect函数

#endif /* __WIFI_CONNECT_H__ */
3wifi_connect.c
/*
 * Copyright (c) 2022 OpenHarmony Co., Ltd.
 * Licensed under the Apache License, Version 2.0 (the "License");
 * you may not use this file except in compliance with the License.
 * You may obtain a copy of the License at
 *
 *    http://www.apache.org/licenses/LICENSE-2.0
 *
 * Unless required by applicable law or agreed to in writing, software
 * distributed under the License is distributed on an "AS IS" BASIS,
 * WITHOUT WARRANTIES OR CONDITIONS OF ANY KIND, either express or implied.
 * See the License for the specific language governing permissions and
 * limitations under the License.
 */

#include <stdio.h>
#include <string.h>
#include <unistd.h>

#include "lwip/netif.h"
#include "lwip/netifapi.h"
#include "lwip/ip4_addr.h"
#include "lwip/api_shell.h"

#include "cmsis_os2.h"
#include "hos_types.h"
#include "wifi_device.h"
#include "wifiiot_errno.h"
#include "ohos_init.h"

#define DEF_TIMEOUT 15
#define ONE_SECOND 1

#define SELECT_WIFI_SECURITYTYPE WIFI_SEC_TYPE_PSK

static void WiFiInit(void);
static void WaitSacnResult(void);
static int WaitConnectResult(void);
static void OnWifiScanStateChangedHandler(int state, int size);
static void OnWifiConnectionChangedHandler(int state, WifiLinkedInfo *info);
static void OnHotspotStaJoinHandler(StationInfo *info);
static void OnHotspotStateChangedHandler(int state);
static void OnHotspotStaLeaveHandler(StationInfo *info);

static int g_staScanSuccess = 0;
static int g_ConnectSuccess = 0;
static int ssid_count = 0;
WifiEvent g_wifiEventHandler = {0};
WifiErrorCode error;

#define SELECT_WLAN_PORT "wlan0"

int WifiConnect(const char *ssid, const char *psk)
{
    WifiScanInfo *info = NULL;
    unsigned int size = WIFI_SCAN_HOTSPOT_LIMIT;
    static struct netif *g_lwip_netif = NULL;

    osDelay(200);
    printf("<--System Init-->\r\n");

    //初始化WIFI
    WiFiInit();

    //使能WIFI
    if (EnableWifi() != WIFI_SUCCESS)
    {
        printf("EnableWifi failed, error = %d\r\n", error);
        return -1;
    }

    //判断WIFI是否激活
    if (IsWifiActive() == 0)
    {
        printf("Wifi station is not actived.\r\n");
        return -1;
    }

    //分配空间,保存WiFi信息
    info = malloc(sizeof(WifiScanInfo) * WIFI_SCAN_HOTSPOT_LIMIT);
    if (info == NULL)
    {
        return -1;
    }
    //轮询查找WiFi列表
    do{
        //重置标志位
        ssid_count = 0;
        g_staScanSuccess = 0;

        //开始扫描
        Scan();

        //等待扫描结果
        WaitSacnResult();

        //获取扫描列表
        error = GetScanInfoList(info, &size);

    }while(g_staScanSuccess != 1);
    //打印WiFi列表
    printf("********************\r\n");
    for(uint8_t i = 0; i < ssid_count; i++)
    {
        printf("no:%03d, ssid:%-30s, rssi:%5d\r\n", i+1, info[i].ssid, info[i].rssi/100);
    }
    printf("********************\r\n");

    //连接指定的WiFi热点
    for(uint8_t i = 0; i < ssid_count; i++)
    {
        if (strcmp(ssid, info[i].ssid) == 0)
        {
            int result;

            printf("Select:%3d wireless, Waiting...\r\n", i+1);

            //拷贝要连接的热点信息
            WifiDeviceConfig select_ap_config = {0};
            strcpy(select_ap_config.ssid, info[i].ssid);
            strcpy(select_ap_config.preSharedKey, psk);
            select_ap_config.securityType = SELECT_WIFI_SECURITYTYPE;

            if (AddDeviceConfig(&select_ap_config, &result) == WIFI_SUCCESS)
            {
                if (ConnectTo(result) == WIFI_SUCCESS && WaitConnectResult() == 1)
                {
                    printf("WiFi connect succeed!\r\n");
                    g_lwip_netif = netifapi_netif_find(SELECT_WLAN_PORT);
                    break;
                }
            }
        }

        if(i == ssid_count-1)
        {
            printf("ERROR: No wifi as expected\r\n");
            while(1) osDelay(100);
        }
    }
     //启动DHCP
    if (g_lwip_netif)
    {
        dhcp_start(g_lwip_netif);
        printf("begain to dhcp\r\n");
    }


    //等待DHCP
    for(;;)
    {
        if(dhcp_is_bound(g_lwip_netif) == ERR_OK)
        {
            printf("<-- DHCP state:OK -->\r\n");

            //打印获取到的IP信息
            netifapi_netif_common(g_lwip_netif, dhcp_clients_info_show, NULL);
            break;
        }

        printf("<-- DHCP state:Inprogress -->\r\n");
        osDelay(100);
    }

    osDelay(100);

    return 0;
}

static void WiFiInit(void)
{
    printf("<--Wifi Init-->\r\n");
    g_wifiEventHandler.OnWifiScanStateChanged = OnWifiScanStateChangedHandler;
    g_wifiEventHandler.OnWifiConnectionChanged = OnWifiConnectionChangedHandler;
    g_wifiEventHandler.OnHotspotStaJoin = OnHotspotStaJoinHandler;
    g_wifiEventHandler.OnHotspotStaLeave = OnHotspotStaLeaveHandler;
    g_wifiEventHandler.OnHotspotStateChanged = OnHotspotStateChangedHandler;
    error = RegisterWifiEvent(&g_wifiEventHandler);
    if (error != WIFI_SUCCESS)
    {
        printf("register wifi event fail!\r\n");
    }
    else
    {
        printf("register wifi event succeed!\r\n");
    }
}

static void OnWifiScanStateChangedHandler(int state, int size)
{
    if (size > 0)
    {
        ssid_count = size;
        g_staScanSuccess = 1;
    }
    printf("callback function for wifi scan:%d, %d\r\n", state, size);
    return;
}

static void OnWifiConnectionChangedHandler(int state, WifiLinkedInfo *info)
{
    if (info == NULL)
    {
        printf("WifiConnectionChanged:info is null, stat is %d.\n", state);
    }
    else
    {
        if (state == WIFI_STATE_AVALIABLE)
        {
            g_ConnectSuccess = 1;
        }
        else
        {
            g_ConnectSuccess = 0;
        }
    }
}

static void OnHotspotStaJoinHandler(StationInfo *info)
{
    (void)info;
    printf("STA join AP\n");
    return;
}

static void OnHotspotStaLeaveHandler(StationInfo *info)
{
    (void)info;
    printf("HotspotStaLeave:info is null.\n");
    return;
}

static void OnHotspotStateChangedHandler(int state)
{
    printf("HotspotStateChanged:state is %d.\n", state);
    return;
}

static void WaitSacnResult(void)
{
    int scanTimeout = DEF_TIMEOUT;
    while (scanTimeout > 0)
    {
        sleep(ONE_SECOND);
        scanTimeout--;
        if (g_staScanSuccess == 1)
        {
            printf("WaitSacnResult:wait success[%d]s\n", (DEF_TIMEOUT - scanTimeout));
            break;
        }
    }
    if (scanTimeout <= 0)
    {
        printf("WaitSacnResult:timeout!\n");
    }
}

static int WaitConnectResult(void)
{
    int ConnectTimeout = DEF_TIMEOUT;
    while (ConnectTimeout > 0)
    {
        sleep(ONE_SECOND);
        ConnectTimeout--;
        if (g_ConnectSuccess == 1)
        {
            printf("WaitConnectResult:wait success[%d]s\n", (DEF_TIMEOUT - ConnectTimeout));
            break;
        }
    }
    if (ConnectTimeout <= 0)
    {
        printf("WaitConnectResult:timeout!\n");
        return 0;
    }

    return 1;
}
4.udp_client_demo.c
*
 * Copyright (c) 2022 OpenHarmony Co., Ltd.
 * Licensed under the Apache License, Version 2.0 (the "License");
 * you may not use this file except in compliance with the License.
 * You may obtain a copy of the License at
 *
 *    http://www.apache.org/licenses/LICENSE-2.0
 *
 * Unless required by applicable law or agreed to in writing, software
 * distributed under the License is distributed on an "AS IS" BASIS,
 * WITHOUT WARRANTIES OR CONDITIONS OF ANY KIND, either express or implied.
 * See the License for the specific language governing permissions and
 * limitations under the License.
 */

#include "wifi_device.h"
#include "lwip/netifapi.h"
#include "lwip/api_shell.h"
#include <netdb.h>
#include <string.h>
#include <stdlib.h>
#include "lwip/sockets.h"
#include "wifi_connect.h"

#include <stdio.h>
#include <string.h>
#include <unistd.h>
#include <math.h>

#include "ohos_init.h"
#include "cmsis_os2.h"
#include "wifiiot_gpio_ex.h"
#include "wifiiot_errno.h"
#include "wifiiot_adc.h"
#include "wifiiot_gpio.h"
#include "wifiiot_watchdog.h"
#include "wifiiot_pwm.h"
#include "hi_pwm.h"

#define ADC_TASK_STACK_SIZE 1024 * 8
#define ADC_TASK_PRIO 24
int num=0;
float voltage;
static int g_ledStates[3] = {0, 0, 0};
static int g_currentBright = 0;
static int g_beepState = 0;


static volatile int g_buttonPressed = 0;
static const uint16_t g_tuneFreqs[] = {
    0, // 40M Hz 对应的分频系数:
    38223, // 1046.5
    34052, // 1174.7
    30338, // 1318.5
    28635, // 1396.9
    25511, // 1568
    22728, // 1760
    20249, // 1975.5
    51021 // 5_ 783.99 // 第一个八度的 5
};

// 曲谱音符
static const uint8_t g_scoreNotes[] = {
    // 《两只老虎》简谱:http://www.jianpu.cn/pu/33/33945.htm
    1, 2, 3, 1,        1, 2, 3, 1,        3, 4, 5,  3, 4, 5,
    5, 6, 5, 4, 3, 1,  5, 6, 5, 4, 3, 1,  1, 8, 1,  1, 8, 1, // 最后两个 5 应该是低八度的,链接图片中的曲谱不对,声音到最后听起来不太对劲
};

// 曲谱时值
static const uint8_t g_scoreDurations[] = {
    4, 4, 4, 4,        4, 4, 4, 4,        4, 4, 8,  4, 4, 8,
    3, 1, 3, 1, 4, 4,  3, 1, 3, 1, 4, 4,  4, 4, 8,  4, 4, 8,
};


/***** 获取电压值函数 *****/
static float GetVoltage(void)
{
    unsigned int ret;
    unsigned short data;

    ret = AdcRead(WIFI_IOT_ADC_CHANNEL_5, &data, WIFI_IOT_ADC_EQU_MODEL_8, WIFI_IOT_ADC_CUR_BAIS_DEFAULT, 0xff);
    if (ret != WIFI_IOT_SUCCESS)
    {
        printf("ADC Read Fail\n");
    }

    return (float)data * 1.8 * 4 / 4096.0;
}
static float Voltage(void)
{

    //上拉,让按键未按下时GPIO_11保持高电平状态
    IoSetPull(WIFI_IOT_IO_NAME_GPIO_11, WIFI_IOT_IO_PULL_UP);

        printf("=======================================\r\n");
        printf("***************ADC*************\r\n");
        printf("=======================================\r\n");

        //获取电压值
        voltage = GetVoltage();
        printf("vlt:%.3fV\n", voltage);
        //延时1s
        usleep(1000000);
        return voltage;
}
#define _PROT_ 8888

//在sock_fd 进行监听,在 new_fd 接收新的链接
int sock_fd;

int addr_length;
static const char *send_data = " Coming  Coming  Coming  Coming  Coming  Coming  Coming  Coming \r\n";

static void UDPClientTask(void)
{
    //服务器的地址信息
    struct sockaddr_in send_addr;
    socklen_t addr_length = sizeof(send_addr);
    char recvBuf[512];

    printf("TrafficLightTask start!\r\n");
    WifiIotGpioIdx pins[] = {WIFI_IOT_GPIO_IDX_10, WIFI_IOT_GPIO_IDX_11, WIFI_IOT_GPIO_IDX_12};
    for (int i = 0; i < 4; i++) {
        for (unsigned int j = 0; j < 3; j++) {
            GpioSetOutputVal(pins[j], WIFI_IOT_GPIO_VALUE1);
            usleep(200*1000);

            GpioSetOutputVal(pins[j], WIFI_IOT_GPIO_VALUE0);
            usleep(100*1000);
        }
    }

        printf("BeeperMusicTask start!\r\n");

    Voltage();
    //连接Wifi
    WifiConnect("XH", "00000000");

    //创建socket
    if ((sock_fd = socket(AF_INET, SOCK_DGRAM, 0)) == -1)
    {
        perror("create socket failed!\r\n");
        exit(1);
    }

    //初始化预连接的服务端地址
    send_addr.sin_family = AF_INET;
    send_addr.sin_port = htons(_PROT_);
    send_addr.sin_addr.s_addr = inet_addr("192.168.93.145");
    addr_length = sizeof(send_addr);

    //总计发送 count 次数据
    while (1)
    {
        bzero(recvBuf, sizeof(recvBuf));
        //发送数据到服务远端
         sendto(sock_fd, send_data, strlen(send_data), 0, (struct sockaddr *)&send_addr, addr_length);
                //线程休眠一段时间
                sleep(10);
        //接收服务端返回的字符串
        recvfrom(sock_fd, recvBuf, sizeof(recvBuf), 0, (struct sockaddr *)&send_addr, &addr_length);
        printf("%s:%d=>%s\n", inet_ntoa(send_addr.sin_addr), ntohs(send_addr.sin_port), recvBuf);

        for (unsigned int j = 0; j < 3; j++) {
            GpioSetOutputVal(pins[j], g_ledStates[j]);
        }
        if (g_beepState) {
            PwmStart(WIFI_IOT_PWM_PORT_PWM0, 20*1000, 40*1000);
        } else {
            PwmStop(WIFI_IOT_PWM_PORT_PWM0);
        }

            hi_pwm_set_clock(PWM_CLK_XTAL); // 设置时钟源为晶体时钟(40MHz,默认时钟源160MHz)
             printf("=======================================\r\n");
        printf("***************VOICE*************\r\n");
        printf("=======================================\r\n");
       //获取电压值

        printf("vlt:%.3fV\n", voltage);

        if(1){
            printf(" Music ");
        for (size_t i = 0; i < sizeof(g_scoreNotes)/sizeof(g_scoreNotes[0]); i++) {
        uint32_t tune = g_scoreNotes[i]; // 音符
        uint16_t freqDivisor = g_tuneFreqs[tune];
        uint32_t tuneInterval = g_scoreDurations[i] * (125*1000); // 音符时间
        //printf("%d %d %d %d\r\n", tune, (40*1000*1000) / freqDivisor, freqDivisor, tuneInterval);
        PwmStart(WIFI_IOT_PWM_PORT_PWM0, freqDivisor/2, freqDivisor);
        usleep(tuneInterval);
        PwmStop(WIFI_IOT_PWM_PORT_PWM0);
    }
            }else if(0){
                PwmStop(WIFI_IOT_PWM_PORT_PWM0);
            }


    }

    //关闭这个 socket
    closesocket(sock_fd);
}

static void OnButtonPressed(char *arg)
{
    (void) arg;
    for (int i = 0; i < 3; i++) {
        if (i == g_currentBright) {
            g_ledStates[i] = 1;
        } else {
            g_ledStates[i] = 0;
        }
    }
    g_currentBright++;
    if (g_currentBright == 3) g_currentBright = 0;

    g_beepState = !g_beepState;
}

static void UDPClientDemo(void)
{
    osThreadAttr_t attr;


    GpioInit();
    IoSetFunc(WIFI_IOT_IO_NAME_GPIO_10, WIFI_IOT_IO_FUNC_GPIO_10_GPIO);
    GpioSetDir(WIFI_IOT_IO_NAME_GPIO_10, WIFI_IOT_GPIO_DIR_OUT);

    IoSetFunc(WIFI_IOT_IO_NAME_GPIO_11, WIFI_IOT_IO_FUNC_GPIO_11_GPIO);
    GpioSetDir(WIFI_IOT_IO_NAME_GPIO_11, WIFI_IOT_GPIO_DIR_OUT);

    IoSetFunc(WIFI_IOT_IO_NAME_GPIO_12, WIFI_IOT_IO_FUNC_GPIO_12_GPIO);
    GpioSetDir(WIFI_IOT_IO_NAME_GPIO_12, WIFI_IOT_GPIO_DIR_OUT);

    IoSetFunc(WIFI_IOT_IO_NAME_GPIO_8, WIFI_IOT_IO_FUNC_GPIO_8_GPIO);
    GpioSetDir(WIFI_IOT_IO_NAME_GPIO_8, WIFI_IOT_GPIO_DIR_IN);
    IoSetPull(WIFI_IOT_IO_NAME_GPIO_8, WIFI_IOT_IO_PULL_UP);
    GpioRegisterIsrFunc(WIFI_IOT_IO_NAME_GPIO_8,WIFI_IOT_INT_TYPE_EDGE, WIFI_IOT_GPIO_EDGE_FALL_LEVEL_LOW,
        OnButtonPressed, NULL);

    IoSetFunc(WIFI_IOT_IO_NAME_GPIO_9, WIFI_IOT_IO_FUNC_GPIO_9_PWM0_OUT);
    GpioSetDir(WIFI_IOT_IO_NAME_GPIO_9, WIFI_IOT_GPIO_DIR_OUT);
    PwmInit(WIFI_IOT_PWM_PORT_PWM0);

    WatchDogDisable();

    attr.name = "UDPClientTask";
    attr.attr_bits = 0U;
    attr.cb_mem = NULL;
    attr.cb_size = 0U;
    attr.stack_mem = NULL;
    attr.stack_size = 10240;
    attr.priority = osPriorityNormal;

    if (osThreadNew((osThreadFunc_t)UDPClientTask, NULL, &attr) == NULL)
    {
        printf("[UDPClientDemo] Falied to create UDPClientTask!\n");
    }
}

APP_FEATURE_INIT(UDPClientDemo);
八 源代码的使用
将本仓库提供源码加入到bearpi-hm_nano/applications/BearPi/BearPi-HM_Nano/sample路径下
在sample文件夹下Build.gn文件features中添加"Baby_sleep_partner:Baby_sleep_partner"
将udp_client_demo.c文件中,图片出所示代码修改为自己的wifi名称与密码


将udp_client_demo.c文件中,图片出所示代码修改为自己需要使用的端口(此处默认使用8888)

将udp_client_demo.c文件中,图片处所示代码修改为自己调试助手中设定的本地ip地址(调试助手可选用电脑版或手机版,可在本文附件处下载)

执行编译命令
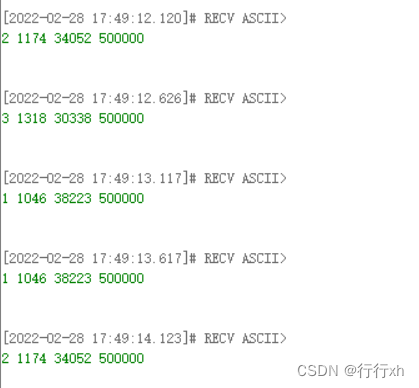
在编译烧录后可连接电脑,reset后在串口调试助手中可打印出此时开发板本身ip地址,使用udp调试助手连接对应ip与端口即可实现声音检测,音乐播放等功能。
九 结果演示
声音监测
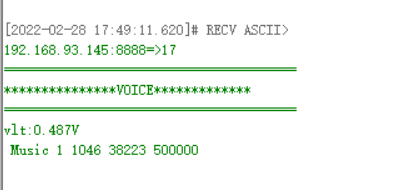
音乐播放
远程控制


 578
578

 被折叠的 条评论
为什么被折叠?
被折叠的 条评论
为什么被折叠?
 到【灌水乐园】发言


