


UI界面控制
使用XML布局文件控制UI界面
使用XML布局文件控制UI界面可以分为以下两个关键步骤。
(1)在Android应用的res/layout目录下编写XML布局文件,可以是任何符合Java命名规则的文件名。创建后,R.java会自动收录该布局资源。
(2)在Activity中使用以下Java代码显示XML文件中布局的内容。
setContentView(R.layout.main);在代码中控制UI界面
在代码中控制UI界面可以分为以下3个关键步骤。
(1)创建布局管理器,可以是帧布局管理器、表格布局管理器、线性布局管理器和相对布局布局管理器等,并且设置布局管理器的属性。例如,为布局管理器设置背景图片等。
(2)创建具体的组件,可以是TextView、ImageView、EditText和Button等任何Android提供的组件,并且设置组件的布局和各种属性。
(3)将创建的具体组件添加到布局管理器中。
使用XML和JAVA代码混合控制UI
使用XML和Java代码混合控制UI界面,习惯上把变化小、行为比较固定的组件放在XML布局文件中,把变化较多、行为控制比较复杂的组件交给Java代码来管理。
开发自定义的View
在Android中,所有的UI界面都是由View类和ViewGroup类及其子类组合而成的。其中,View类是所有UI组件的基类,而ViewGroup类是容纳这些UI组件的容器,其本身也是View类的子类。在ViewGroup类中,除了可以包含普通的View类外,还可以再次包含ViewGroup类。View类和ViewGroup类的层次结构如下图所示。

开发自定义的View组件大致分为以下3个步骤。
(1)创建一个继承android.view.View类的View类,并且重写构造方法。
(2)根据需要重写相应的方法。
(3)在项目的活动中,创建并实例化自定义View类,并将其添加到布局管理器中。
布局管理器
四大常用布局
线性布局
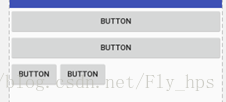
线性布局是将放入其中的组件按照垂直或水平方向来布局,也就是控制放入其中的组件横向排列或纵向排列。在线性布局中,每一行(针对垂直排列)或每一列(针对水平排列)中只能放一个组件。并且Android的线性布局不会换行,当组件一个挨着一个排列到窗体的边缘后,剩下的组件将不会被显示出来。
在Android中,可以在XML布局文件中定义线性布局管理器,也可以使用Java代码来创建。推荐使用在XML布局文件中定义线性布局管理器。在XML布局文件中定义线性布局管理器,需要使用<LinearLayout>标记,其基本的语法格式如下:
<LinearLayout xmlns:android="http://schemas.android.com/apk/res/android"
    属性列表
>
</LinearLayout>
实例:
<LinearLayout
    android:layout_width="match_parent"
    android:layout_height="wrap_content"
    android:orientation="horizontal"
    >
    <TextView
        android:id="@+id/t1"
        android:layout_width="wrap_content"
        android:layout_height="wrap_content"
        android:layout_marginBottom="10dp"
        android:text="添加备忘录内容:"
        />
    <EditText
        android:id="@+id/e"
        android:layout_width="match_parent"
        android:layout_height="wrap_content"
        />
</LinearLayout>
表格布局
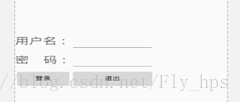
表格布局与常见的表格类似,它以行、列的形式来管理放入其中的UI组件。表格布局使用<TableLayout>标记定义,在表格布局中,可以添加多个<TableRow>标记,每个<TableRow>标记占用一行,由于<TableRow>标记也是容器,所以在该标记中还可添加其他组件,在<TableRow>标记中,每添加一个组件,表格就会增加一列。在表格布局中,列可以被隐藏,也可以被设置为伸展的,从而填充可利用的屏幕空间,也可以设置为强制收缩,直到表格匹配屏幕大小。
在XML布局文件中定义表格布局管理器的基本的语法格式如下:
<TableLayout  xmlns:android="http://schemas.android.com/apk/res/android"
         属性列表
>
         <TableRow 属性列表> 需要添加的UI组件 </TableRow>
         多个<TableRow>
</TableLayout>

实例:
<?xml version="1.0" encoding="utf-8"?>
<TableLayout xmlns:android="http://schemas.android.com/apk/res/android"
    android:orientation="vertical"
    android:layout_width="fill_parent"
    android:layout_height="fill_parent"
    android:gravity="center_vertical">
<!--
    TableLayout表格布局模型以行列的形式管理子控件,每一行为一个TableRow
    的对象,当然也可以是一个View的对象。
   1、 android:collapseColumns="1,2"
    隐藏从0开始的索引列,列直接必须用逗号隔开:1,2,5
   2、android:shrinkColumns="1,2"
   收缩从0开始的索引列。当可以收缩的列太宽(内容过多)不会被挤出屏幕,
   列之间必须用逗号隔开:1,2,5
   可以使用*号代表收缩所有列。
   注意:一列能同时表示收缩和拉伸。

   3、android:stretchColumns="1,2"
   拉伸从0开始的索引列。以填满剩下的多余空白空间,列直接必须用逗号隔开
   你可以通过*号代表收缩所有列。
   注意:一列能同时表示收缩和拉伸。
    示例:
    android:layout_column="1"  改控件显示第二列
    android:layout_span="2" 该控件占据2列
  -->
        <!--    应用表格实现用户登录界面布局-->
<!-- 第一行-->
    <TableRow
        android:id="@+id/tableRow1"
        android:layout_height="wrap_content"
        android:layout_width="wrap_content">

        <TextView />
        <TextView
            android:text="用户名:"
            android:id="@+id/textView1"
            android:layout_width="wrap_content"
            android:layout_height="wrap_content"
            android:textSize="50px"
            />
    <EditText
        android:id="@+id/editText1"
        android:textSize="50px"
        android:layout_width="wrap_content"
        android:layout_height="wrap_content"
        android:minWidth="300px"/>
        <TextView />
</TableRow>
    <!-- 第二行-->
    <TableRow
        android:id="@+id/tableRow2"
        android:layout_height="wrap_content"
        android:layout_width="wrap_content">
        <TextView />
        <TextView
            android:text="密    码:"
            android:id="@+id/textView2"
            android:layout_width="wrap_content"
            android:layout_height="wrap_content"
            android:textSize="50px"
            />
        <EditText
            android:id="@+id/editText2"
            android:textSize="50px"
            android:layout_width="wrap_content"
            android:layout_height="wrap_content"
            android:inputType="textPassword"/>
        <TextView />
    </TableRow>
    <!-- 第三行-->
    <TableRow
        android:id="@+id/tableRow3"
        android:layout_height="wrap_content"
        android:layout_width="wrap_content"
        >
        <TextView />
        <Button
            android:text="登录"
            android:id="@+id/button1"
            android:layout_width="wrap_content"
            android:layout_height="wrap_content"
            />
        <Button
            android:text="退出"
            android:layout_height="wrap_content"
            android:layout_width="wrap_content"
            android:id="@+id/button2"
            />
        <TextView />
    </TableRow>
</TableLayout>
帧布局
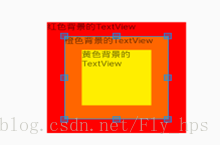
在帧布局管理器中,每加入一个组件,都将创建一个空白的区域,通常称为一帧,这些帧都会根据gravity属性执行自动对齐。默认情况下,帧布局是从屏幕的左上角(0,0)坐标点开始布局,多个组件层叠排序,后面的组件覆盖前面的组件。
在XML布局文件中,定义帧布局管理器可以使用<FrameLayout>标记,其基本的语法格式如下:
< FrameLayout xmlns:android="http://schemas.android.com/apk/res/android"
属性列表
>
</ FrameLayout>

实例:
<FrameLayout
    xmlns:android="http://schemas.android.com/apk/res/android"
    android:orientation="vertical"
    android:layout_width="match_parent"
    android:layout_height="match_parent">
<TextView
    android:id="@+id/textView1"
    android:text="红色背景的TextView"
    android:layout_width="400px"
    android:layout_height="400px"
    android:layout_gravity="center"
    android:background="#ffff0000"/>
    <TextView
        android:id="@+id/textView2"
        android:text="橙色背景的TextView"
        android:layout_width="300px"
        android:layout_height="300px"
        android:layout_gravity="center"
        android:background="#ffff6600"/>
    <TextView
        android:id="@+id/textView3"
        android:text="黄色背景的TextView"
        android:layout_width="200px"
        android:layout_height="200px"
        android:layout_gravity="center"
        android:background="#ffffee00"
        />
</FrameLayout>
相对布局
相对布局是指按照组件之间的相对位置来进行布局,如某个组件在另一个组件的左边、右边、上方或下方等。
在XML布局文件中,定义相对布局管理器可以使用<RelativeLayout>标记,其基本的语法格式如下:
<RelativeLayout xmlns:android="http://schemas.android.com/apk/res/android"
属性列表
>
</RelativeLayout>
实例:
<RelativeLayout
    xmlns:android="http://schemas.android.com/apk/res/android"
    android:orientation="vertical"
    android:layout_width="match_parent"
    android:layout_height="match_parent"
    >
<!--  添加一个居中显示的文本视图TextView-->
    <TextView
        android:id="@+id/textView1"
        android:text="发现新版本,是否更新!"
        android:layout_width="wrap_content"
        android:layout_height="wrap_content"
        android:layout_centerInParent="true"
        android:textSize="40px"/>
    <!-- 添加一个在button2左侧显示的按钮button1-->
    <Button
        android:id="@+id/button1"
        android:layout_width="wrap_content"
        android:layout_height="wrap_content"
        android:text="现在更新"
        android:layout_below="@+id/textView1"
        android:layout_toStartOf="@+id/button2" />
    <Button
        android:id="@+id/button2"
        android:layout_width="wrap_content"
        android:layout_height="wrap_content"
        android:text="以后再说"
        android:layout_alignRight="@+id/textView1"
        android:layout_below="@+id/textView1"/>
</RelativeLayout>

注:要熟记一下内容:
Android:layout_toRightOf=”@+id/名称”  位于“名称”的右侧
Android:layout_toLeftOf=”@+id/名称”  位于“名称”的左侧
Android:layout_above=”@+id/名称”     位于“名称”的上方
Android:layout_below=”@+id/名称”     位于“名称”的下方
Android:layout_alignRight=”@+id/名称”和“名称”右边界对齐
Android:layout_alignLeft=”@+id/名称” 和“名称”左边界对齐
绝对布局管理器
此处略!常用布局属性
android:orientation————horizontal(水平排列)、vertical(垂直排列)
android:gravity——————center_vertical、top、bottom、left、right    右下角对齐:right|bottom
android:layout_width  ————wrap_content、match_parent、fill_parent
android:layout_height————wrap_content、match_parent、fill_parent
android:id=”@+id/名称”
android:background=”#FFFFFFFF”
android:text=”显示内容”
android:textSize=”20px”


 162
162

 被折叠的 条评论
为什么被折叠?
被折叠的 条评论
为什么被折叠?
 到【灌水乐园】发言


