


Activity活动框图
Linear
Relative
生命周期图
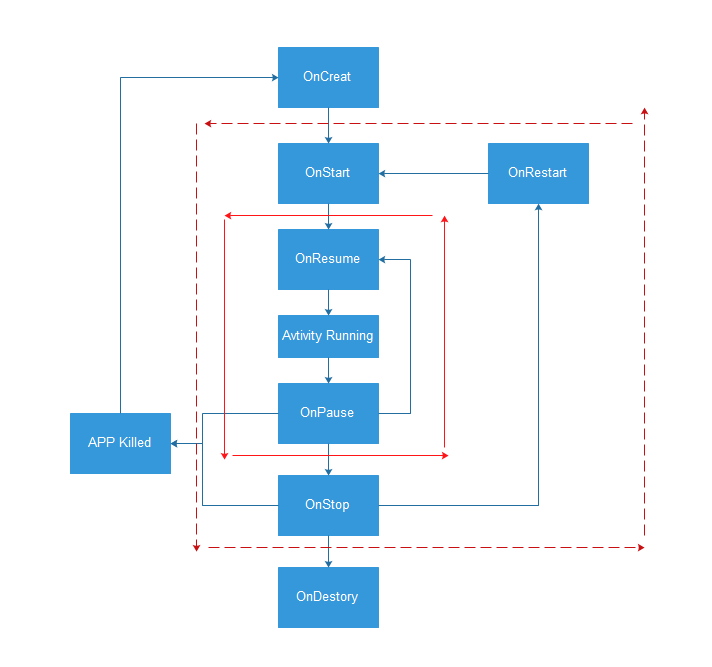
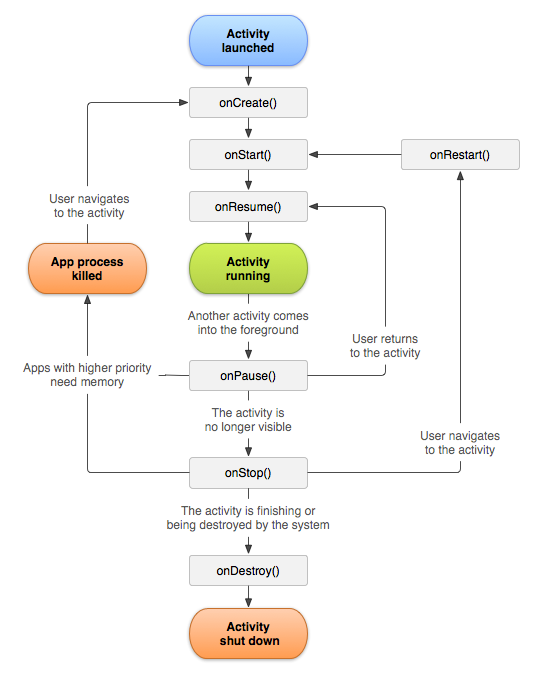
1.启动Activity:系统会先调用onCreate方法,然后调用onStart方法,最后调用onResume,Activity进入运行状态。
2.当前Activity被其他Activity覆盖其上或被锁屏:系统会调用onPause方法,暂停当前Activity的执行。
3.当前Activity由被覆盖状态回到前台或解锁屏:系统会调用onResume方法,再次进入运行状态。
4.当前Activity转到新的Activity界面或按Home键回到主屏,自身退居后台:系统会先调用onPause方法,然后调用onStop方法,进入停滞状态。
5.用户后退回到此Activity:系统会先调用onRestart方法,然后调用onStart方法,最后调用onResume方法,再次进入运行状态。
6.当前Activity处于被覆盖状态或者后台不可见状态,即第2步和第4步,系统内存不足,杀死当前Activity,而后用户退回当前Activity:再次调用onCreate方法、onStart方法、onResume方法,进入运行状态。
7.用户退出当前Activity:系统先调用onPause方法,然后调用onStop方法,最后调用onDestory方法,结束当前Activity。
生命周期测试
步骤方法:
1.新建 Class SecondActivity 继承Activity
2.复写onCreate方法setContentView
3.在res文件夹下的layout文件夹下建一个layout
4.在AndroidManifest.xml文件上注册
5.在MAinActivity的layout上添加按钮
6.买mainActivity代码的onCreate方法中通过findViewById方法找到button
7.给button设置点击事件setOnClickListener
8.新建Intent intent=newIntent(getApplicationContext(),SecondActivity.class)
调用startActivity();
package com.example.my.eightingaug;

import android.app.Activity;

import android.content.Intent;
import android.os.Bundle;
import android.util.Log;
import android.view.Menu;
import android.view.MenuItem;
import android.view.View;
import android.widget.Button;

public class MainActivity extends Activity {

    @Override
    protected void onCreate(Bundle savedInstanceState) {
        super.onCreate(savedInstanceState);
        setContentView(R.layout.activity_main);
        Button btn= (Button) findViewById(R.id.button);
        btn.setOnClickListener(new View.OnClickListener() {
            @Override
            public void onClick(View v) {
                Intent intent=new Intent(getApplicationContext(),SecondActivity.class);
                startActivity(intent);
            }
        });
        Log.d("eightingAug","运行到了onCreat");
    }

    @Override
    protected void onRestart() {
        super.onRestart();
        Log.d("eightingAug","运行到了onRestart");
    }

    @Override
    protected void onStart() {
        super.onStart();
        Log.d("eightingAug","运行到了onStart");
    }

    @Override
    protected void onResume() {
        super.onResume();
        Log.d("eightingAug","运行到了onResume");
    }

    @Override
    protected void onPause() {
        super.onPause();
        Log.d("eightingAug","运行到了onPause");
    }

    @Override
    protected void onStop() {
        super.onStop();
        Log.d("eightingAug","运行到了onStop");
    }

    @Override
    protected void onDestroy() {
        super.onDestroy();
        Log.d("eightingAug","运行到了onDestroy");
    }
}
package com.example.my.eightingaug;

import android.app.Activity;
import android.os.Bundle;
import android.util.Log;

/**
 * Created by Administrator on 2015/8/18.
 */
public class SecondActivity extends Activity{
    @Override
    protected void onCreate(Bundle savedInstanceState) {
        super.onCreate(savedInstanceState);
        setContentView(R.layout.layouttwo);
        Log.d("eightingAug", "SecondActivity运行到了onCreat");
    }
    @Override
    protected void onStart() {
        super.onStart();
        Log.d("eightingAug","SecondActivity运行到了onStart");
    }

    @Override
    protected void onResume() {
        super.onResume();
        Log.d("eightingAug","SecondActivity运行到了onResume");
    }

    @Override
    protected void onPause() {
        super.onPause();
        Log.d("eightingAug","SecondActivity运行到了onPause");
    }

    @Override
    protected void onStop() {
        super.onStop();
        Log.d("eightingAug","SecondActivity运行到了onStop");
    }

    @Override
    protected void onDestroy() {
        super.onDestroy();
        Log.d("eightingAug","SecondActivity运行到了onDestroy");
    }
}
在AndroidManifest.xml中注册
 <!-- 每一个活动都需要在manifest中声明-->
        <activity android:name=".SecondActivity"
            android:theme="@android:style/Theme.Dialog"></activity><!--theme主题是以弹窗的形式返回第二个窗口-->
常用的UI布局有以下5种
1.LinearLayout——线性布局
2.RelativeLayout——相对布局
3.FrameLayout——帧布局
4.TableLayout——表格布局
5.AbsoluteLayout——绝对布局
6.GridLayout——网格布局
Android:gravity和android:layout_gravity属性
1.他们都是用来设置对齐方式的
2.可选值包括left(左对齐)、right(右对齐)、top(上对齐)、bottom(下对齐)、
center(居中)、center_horizontal(水平居中)和center_vertical(垂直居中)等,这些值还可以组合使用,中间使用“|”分开即可
3.区别:
android:gravity:用于设置View内部内容的对齐方式,比如可以使用一个Button的该属性设置其上的文本在这个Button中的位置
android:layout_gravity:用于设置该View在其父View中的对齐方式。比如一个Button在一个LinearLayout中,可以使用Button的该属性设置这个Button在这个LinearLayout中的位置。
LINEAR布局方法
<?xml version="1.0" encoding="utf-8"?>
<LinearLayout xmlns:android="http://schemas.android.com/apk/res/android"
    android:orientation="vertical"
    android:layout_width="match_parent"
    android:layout_height="match_parent">
    <LinearLayout
        android:layout_width="match_parent"
        android:layout_weight="1"
        android:layout_height="0dip">
        <Button
            android:layout_weight="1"
            android:layout_width="0dip"
            android:layout_height="match_parent" />
        <LinearLayout
            android:orientation="vertical"
            android:layout_width="0dip"
            android:layout_weight="2"
            android:layout_height="match_parent">
            <Button
                android:layout_width="match_parent"
                android:layout_weight="1"
                android:layout_height="0dip"
                />
            <Button
                android:layout_width="match_parent"
                android:layout_weight="1"
                android:layout_height="0dip"
                />
        </LinearLayout>
    </LinearLayout>
    <Button
        android:layout_width="match_parent"
        android:layout_weight="1"
        android:layout_height="0dip" />
    <LinearLayout
        android:orientation="horizontal"
        android:layout_width="match_parent"
        android:layout_weight="1"
        android:layout_height="0dip">
        <LinearLayout
            android:orientation="vertical"
            android:layout_width="0dip"
            android:layout_weight="1"
            android:layout_height="match_parent">
            <Button
                android:layout_width="match_parent"
                android:layout_weight="1"
                android:layout_height="0dip" />
            <Button
                android:layout_width="match_parent"
                android:layout_weight="1"
                android:layout_height="0dip" />
            <Button
                android:layout_width="match_parent"
                android:layout_weight="1"
                android:layout_height="0dip" />
        </LinearLayout>
        <Button
            android:layout_width="0dip"
            android:layout_weight="2"
            android:layout_height="match_parent" />
    </LinearLayout>
</LinearLayout>
RelativeLayout的属性
1.alignParentLeft Right Bottom Top 相对父控件的 上下左右
2.centerInParent centerVertical centerHorizital 相对父控件的中心
3.toLeftOf toRightOf above below 相对后边跟的id的那个控件上下左右
4.alignLeft alignRight alignBottom alignTop 相对后边跟的id的那个控件上下左右边对齐
5.layout_alignBaseline基准线对齐
测试程序
<?xml version="1.0" encoding="utf-8"?>
<RelativeLayout xmlns:android="http://schemas.android.com/apk/res/android"
    android:orientation="vertical" android:layout_width="match_parent"
    android:layout_height="match_parent">
    <Button
        android:layout_width="100dp"
        android:layout_height="100dp"
        android:layout_centerVertical="true"
        android:layout_centerHorizontal="true"
        android:background="#ff0000ff"
        android:text="Button"
        android:id="@+id/button" />
    <Button
        android:layout_width="wrap_content"
        android:layout_height="wrap_content"
        android:layout_alignParentLeft="true"
        />
    <Button
        android:layout_width="wrap_content"
        android:layout_height="wrap_content"
        android:layout_alignParentRight="true"
        />
    <Button
        android:layout_width="wrap_content"
        android:layout_height="wrap_content"
        android:layout_centerVertical="true"
        />
    <Button
        android:layout_width="wrap_content"
        android:layout_height="wrap_content"
        android:layout_alignParentBottom="true"
        />
    <Button
        android:layout_width="wrap_content"
        android:layout_height="wrap_content"
        android:layout_alignParentBottom="true"
        android:layout_alignParentRight="true"
        />
    <Button
        android:layout_width="wrap_content"
        android:layout_height="wrap_content"
        android:layout_centerVertical="true"
        android:layout_alignParentRight="true"
        />
    <Button
        android:layout_width="wrap_content"
        android:layout_height="wrap_content"
        android:layout_centerHorizontal="true"
        />

</RelativeLayout>
<?xml version="1.0" encoding="utf-8"?>
<RelativeLayout xmlns:android="http://schemas.android.com/apk/res/android"
    android:orientation="vertical" android:layout_width="match_parent"
    android:layout_height="match_parent">

    <Button
        android:layout_width="200dp"
        android:layout_height="200dp"
        android:layout_centerInParent="true"
        android:background="#ff0000"
        android:text="Button"
        android:id="@+id/button"
        />
    <Button
        android:layout_width="wrap_content"
        android:layout_height="wrap_content"
        android:layout_toLeftOf="@id/button"
        />
    <Button
        android:layout_width="wrap_content"
        android:layout_height="wrap_content"
        android:layout_toRightOf="@id/button"
        />
    <Button
        android:layout_width="wrap_content"
        android:layout_height="wrap_content"
        android:layout_above="@id/button"
        />
    <Button
        android:layout_width="wrap_content"
        android:layout_height="wrap_content"
        android:layout_below="@id/button"
        />
    <Button
        android:layout_width="wrap_content"
        android:layout_height="wrap_content"
        android:layout_alignLeft="@id/button"
        android:layout_above="@id/button"
        />
    <Button
        android:layout_width="wrap_content"
        android:layout_height="wrap_content"
        android:layout_alignRight="@id/button"
        android:layout_above="@id/button"
        />
    <Button
        android:layout_width="wrap_content"
        android:layout_height="wrap_content"
        android:layout_below="@id/button"
        android:layout_alignLeft="@id/button"
        />
    <Button
        android:layout_width="wrap_content"
        android:layout_height="wrap_content"
        android:layout_below="@id/button"
        android:layout_alignRight="@id/button"
        />
    <Button
        android:layout_width="wrap_content"
        android:layout_height="wrap_content"

        android:layout_alignRight="@id/button"
        />
</RelativeLayout>


 537
537


 被折叠的 条评论
为什么被折叠?
被折叠的 条评论
为什么被折叠?
 到【灌水乐园】发言


