


本篇我们介绍如何调用Graph上传文件到OneDrive,我们将创建一个UWP的项目。

前期准备
首先打开Visual Studio,创建一个空的UWP项目。
添加如下NuGet包:
- Microsoft.Graph
- Microsoft.Identity.Client
在MainPage类中添加如下using声明:
using Microsoft.Graph;
using Microsoft.Identity.Client;
using System.Threading.Tasks;
using System.Net.Http.Headers;
using Windows.Storage;
using Windows.Storage.Pickers;
然后在构造函数下面添加如下代码:
private const string AADClientId = "YOUR APP ID";
        private const string GraphAPIEndpointPrefix = "https://graph.microsoft.com/v1.0/";
        private string[] AADScopes = new string[] { "files.readwrite.all" };
        private IPublicClientApplication AADAppContext = null;
        private GraphServiceClient graphClient = null;
        private AuthenticationResult userCredentials;
        public AuthenticationResult UserCredentials
        {
            get { return userCredentials; }
            set { userCredentials = value; }
        }

        public void InitializeGraph()
        {
            if (userCredentials != null)
            {
                graphClient = new GraphServiceClient(
                GraphAPIEndpointPrefix,
                 new DelegateAuthenticationProvider(
                 async (requestMessage) =>
                 {
                     requestMessage.Headers.Authorization = new AuthenticationHeaderValue("bearer", userCredentials.AccessToken);
                 }
                 )
                 );
            }
        }

        /// <summary>
        /// Log the user in to either Office 365 or OneDrive consumer
        /// </summary>
        /// <returns>A task to await on</returns>
        public async Task<string> SignInUser()
        {
            string status = "Unknown";

            // Instantiate the app with AAD
            AADAppContext = PublicClientApplicationBuilder.Create(AADClientId).Build();

            try
            {
                UserCredentials = await AADAppContext.AcquireTokenInteractive(AADScopes).ExecuteAsync();
                if (UserCredentials != null)
                {
                    status = "Signed in as " + UserCredentials.Account.Username;
                    InitializeGraph();
                }
            }

            catch (MsalServiceException serviceEx)
            {
                status = $"Could not sign in, error code: " + serviceEx.ErrorCode;
            }

            catch (Exception ex)
            {
                status = $"Error Acquiring Token: {ex}";
            }

            return (status);
        }
将YOUR APP ID替换为自己的。
这里我们使用了MSAL.NET v4的新写法,关于具体的更新就不再做细致的说明了,大家可以访问下面的链接自行查阅。
https://developer.microsoft.com/en-us/graph/blogs/30daysmsgraph-upgrading-to-msal-net-v4/
操作文件
在通过Microsoft Graph API调用OneDrive或SharePoint时,文件是很多我们想要做的任务的骨干。在操作文件时,第一步往往是从网盘开始的,这个网盘可以是用户的OneDrive或SharePoint网站中的某个文档库。
访问OneDrive中的文件很简单,直接调用/me/drive终结点。我们可以通过这个地方遍历子节点、下载文件、上传新文件甚至是文件的格式转换。
在SharePoint中我们则首先需要定位文件所在的网站。注意下面两个终结点,差个s。
通过网站Id获取网站中的所有网盘:
GET /sites/{id}/drives
通过网站Id获取网站中的默认网盘:
GET /sites/{id}/drive
如果我们不知道网站的Id,还可以通过路径去访问。
通过网站路径获取网站中的所有网盘:
GET /sites/TENANTHOSTURL:/SITEPATH:/drives
通过网站路径获取网站中的默认网盘:
GET /sites/TENANTHOSTURL:/SITEPATH:/drive
我们的示例会演示如何将文件上传到当前登录用户的个人网盘或根网站的默认文档库中,当然进行细微的修改也可以上传到其他我们想要的位置。
添加必要的权限
操作文件需要一些权限。如果只访问用户的OneDrive,需要Files.Read或Files.ReadWrite。如果要在用户有权限的任意地方访问或创建文件,需要Files.Read.All或Files.ReadWrite.All。
如果想让我们的程序有最大的权限那么可以直接授予Files.ReadWrite.All。
上传小文件
对于小于4M的文件我们可以使用PUT操作直接进行上传,实现代码如下,添加到MainPage类。
///<summary>
        /// Take a file and upload it to the service
        /// </summary>
        /// <param name="fileToUpload">The file that we want to upload</param>
        /// <param name="uploadToSharePoint">Should we upload to SharePoint or OneDrive?</param>
        public async Task<DriveItem> UploadSmallFile(StorageFile fileToUpload, bool uploadToSharePoint = false)
        {
            Stream fileStream = (await fileToUpload.OpenReadAsync()).AsStreamForRead();
            DriveItem uploadedFile = null;

            // Do we want OneDrive for Business/Consumer or do we want a SharePoint Site?
            if (uploadToSharePoint)
            {
                uploadedFile = await graphClient.Sites["root"].Drive.Root.ItemWithPath(fileToUpload.Name).Content.Request().PutAsync<DriveItem>(fileStream);
            }
            else
            {
                uploadedFile = await graphClient.Me.Drive.Root.ItemWithPath(fileToUpload.Name).Content.Request().PutAsync<DriveItem>(fileStream);
            }
            return (uploadedFile);
        }
上传大文件
在上传大于4M的文件时,我们需要使用CreateUploadSession模式。这种模式下我们通知服务开启一个会话,然后一次上传一个数据块。实现代码如下:
/// <summary>
        /// Take a file greater than 4MB and upload it to the service
        /// </summary>
        /// <param name="fileToUpload">The file that we want to upload</param>
        /// <param name="uploadToSharePoint">Should we upload to SharePoint or OneDrive?</param>
        public async Task<DriveItem> UploadLargeFile(StorageFile fileToUpload, bool uploadToSharePoint = false)
        {
            Stream fileStream = (await fileToUpload.OpenReadAsync()).AsStreamForRead();
            DriveItem uploadedFile = null;
            UploadSession uploadSession = null;

            // Do we want OneDrive for Business/Consumer or do we want a SharePoint Site?
            if (uploadToSharePoint)
            {
                uploadSession = await graphClient.Sites["root"].Drive.Root.ItemWithPath(fileToUpload.Name).CreateUploadSession().Request().PostAsync();
            }
            else
            {
                uploadSession = await graphClient.Me.Drive.Root.ItemWithPath(fileToUpload.Name).CreateUploadSession().Request().PostAsync();
            }

            if (uploadSession != null)
            {
                // Chunk size must be divisible by 320KiB, our chunk size will be slightly more than 1MB
                int maxSizeChunk = (320 * 1024) * 4;
                ChunkedUploadProvider uploadProvider = new ChunkedUploadProvider(uploadSession, graphClient, fileStream, maxSizeChunk);
                var chunkRequests = uploadProvider.GetUploadChunkRequests();
                var exceptions = new List<Exception>();
                var readBuffer = new byte[maxSizeChunk];

                foreach (var request in chunkRequests)
                {
                    var result = await uploadProvider.GetChunkRequestResponseAsync(request, readBuffer, exceptions);

                    if (result.UploadSucceeded)
                    {
                        uploadedFile = result.ItemResponse;
                    }
                }
            }
            return (uploadedFile);
        }
添加接口
接下来我们需要向我们的项目添加一些接口元素,即控件,以便可以选择文件并上传。
打开MainPage.xaml文件,将默认的Grid元素替换为如下内容:
<RelativePanel>
        <RelativePanel RelativePanel.AlignHorizontalCenterWithPanel="True" RelativePanel.AlignVerticalCenterWithPanel="True">
            <CheckBox x:Name="uploadToSharePointCheckBox" Margin="10,10,10,10">Upload to SharePoint?</CheckBox>
            <Button x:Name="uploadSmallFileButton" Margin="10,10,10,10" Click="uploadSmallFileButton_Click" RelativePanel.Below="uploadToSharePointCheckBox" RelativePanel.AlignHorizontalCenterWithPanel="True">Upload small file</Button>
            <Button x:Name="uploadLargeFileButton" Margin="10,10,10,10" Click="uploadLargeFileButton_Click" RelativePanel.Below="uploadSmallFileButton" RelativePanel.AlignHorizontalCenterWithPanel="True">Upload large file</Button>
            <TextBlock x:Name="statusTextBlock" Margin="10,10,10,10" RelativePanel.Below="uploadLargeFileButton" RelativePanel.AlignHorizontalCenterWithPanel="True" />
        </RelativePanel>
    </RelativePanel>
在后台代码中添加如下代码,定义按钮事件:
private async Task<StorageFile> PickFile()
        {
            var picker = new FileOpenPicker();
            picker.ViewMode = PickerViewMode.Thumbnail;
            picker.SuggestedStartLocation = PickerLocationId.PicturesLibrary;
            picker.FileTypeFilter.Add(".jpg");
            picker.FileTypeFilter.Add(".jpeg");
            picker.FileTypeFilter.Add(".png");

            StorageFile pickedFile = await picker.PickSingleFileAsync();
            return (pickedFile);
        }

        private async Task UploadFile(object whichButton)
        {
            if (this.UserCredentials == null)
            {
                await SignInUser();
            }

            StorageFile fileToUpload = await PickFile();
            DriveItem uploadedFile = null;

            if (whichButton == this.uploadSmallFileButton)
            {
                uploadedFile = await UploadSmallFile(fileToUpload);
            }
            else
            {
                uploadedFile = await UploadLargeFile(fileToUpload);
            }

            if (uploadedFile != null)
            {
                this.statusTextBlock.Text = "Uploaded file: " + uploadedFile.Name;
            }
            else
            {
                this.statusTextBlock.Text = "Upload failed";
            }
        }

        private async void uploadSmallFileButton_Click(object sender, RoutedEventArgs e)
        {
            await UploadFile(sender);
        }

        private async void uploadLargeFileButton_Click(object sender, RoutedEventArgs e)
        {
            await UploadFile(sender);
        }
结语
上传文件仅仅是一个开始。当上传文件到SharePoint时我们可以将文件操作和元数据相结合以实现满足我们需要的场景。如果我们面对的是大型场景,可以参考下面的最佳实践链接。
https://aka.ms/scanguidance
代码已上传。
https://github.com/foxdave/MSGraphCN/tree/master/OneDriveUploader
另外你可能会碰到如下图的问题。
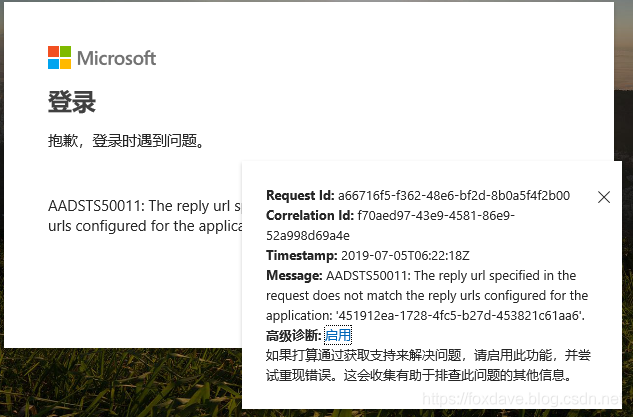
需要到注册应用程序的Rdirect URI那里添加一个Public client类型的,值为
urn:ietf:wg:oauth:2.0:oob


 200
200

 被折叠的 条评论
为什么被折叠?
被折叠的 条评论
为什么被折叠?
 到【灌水乐园】发言


