


相关文章
概述
本文将介绍以下内容:
- EdgeX 编译和EdgeX docker image 编译
- EdgeX 部署的基本环境准备
- EdgeX CLI
- EdgeX 连接 Modbus设备
- EdgeX 连接MQTT设备
- 分布式部署Device Service
- 如何设定定时任务
- 基于Release1.3.0(Hanoi)版本
实验设备
本文将同时基于x86-64架构设备和ARM64(AARCH64)设备进行实验,下面是硬件信息表
x86-64 设备
| CPU | Intel® Core™ i5-7267U CPU @ 3.10GHz 单CPU双核四线程 |
|---|---|
| Mem | 7.7Gi |
| Disk | 110GB |
| NIC | 1000Mb/s |
| OS | Ubuntu 20.04.2 LTS (Focal Fossa) |
| kernel | 5.8.0-43-generic |
ARM64 设备
| CPU | AArch64 Processor rev 12 (aarch64) Qualcomm Technologies, Inc SDA845双CPU八核八线程 |
|---|---|
| Mem | 3.5G |
| Disk | 64GB |
| NIC | 1000Mb/s |
| OS | Ubuntu 16.04.4 LTS (Xenial Xerus) |
| kernel | 4.9.103 |
基本安装
基础软件环境准备
- 安装docker
a. 参考:https://docs.docker.com/engine/install/ubuntu/
# 最简单的安装方式
sudo apt install -y docker.io
# 安装指定版本 或 最新版本
sudo apt remove docker docker-engine docker.io containerd runc
sudo apt update
sudo apt install -y\
    apt-transport-https \
    ca-certificates \
    curl \
    gnupg-agent \
    software-properties-common
curl -fsSL https://download.docker.com/linux/ubuntu/gpg | sudo apt-key add -
sudo apt-key fingerprint 0EBFCD88
sudo add-apt-repository \
   "deb [arch=amd64] https://download.docker.com/linux/ubuntu \
   $(lsb_release -cs) \
   stable"
# ARM64架构为
sudo add-apt-repository \
   "deb [arch=arm64] https://download.docker.com/linux/ubuntu \
   $(lsb_release -cs) \
   stable"
sudo apt update
apt-cache madison docker-ce
## 安装最新
sudo apt install docker-ce docker-ce-cli containerd.io
## 安装指定版本
sudo apt install docker-ce=5:20.10.0~3-0~ubuntu-focal \
    docker-ce-cli=5:20.10.0~3-0~ubuntu-focal \
    containerd.io
## ARM64设备由于是Ubuntu16.04系统,软件包名存在区别
sudo apt install docker-ce=5:20.10.0~3-0~ubuntu-xenial \
    docker-ce-cli=5:20.10.0~3-0~ubuntu-xenial \
    containerd.io
- 安装docker-compose
a. 参考:https://docs.docker.com/compose/install/
# x86_64设备
# 可以在https://github.com/docker/compose/releases/查看最新的release版本
# 并替换下面的版本号(1.28.4)
sudo curl -L "https://github.com/docker/compose/releases/download/1.28.4/docker-compose-$(uname -s)-$(uname -m)" -o /usr/local/bin/docker-compose
sudo chmod +x /usr/local/bin/docker-compose
sudo ln -s /usr/local/bin/docker-compose /usr/bin/docker-compose

# ARM64设备
# 官方并不提供arm64版本的docker-compose包,有以下途径获取
##@1 apt install docker-compose (可能版本过低无法使用)
##@2 源码编译
##@3 pip install
export LC_ALL=C
sudo apt install -y libssl-dev libffi-dev build-essential python3-dev \
    protobuf-compiler libprotoc-dev zlib1g-dev gcc g++ make \
    libxml2-dev libxslt1-dev
sudo apt install python3-pip
sudo pip3 install --upgrade pip
sudo pip3 install docker-compose
- 安装go语言环境(如果需要编译源码)
a. 参考:https://golang.org/dl/
b. 下载&安装合适版本golang安装包(当前需要 >=1.15.x)
wget https://golang.org/dl/go1.15.8.linux-amd64.tar.gz
sudo tar -C /usr/local -xzf ./go1.15.8.linux-amd64.tar.gz
# ARM64 为
wget https://golang.org/dl/go1.15.8.linux-arm64.tar.gz
sudo tar -C /usr/local -xzf ./go1.15.8.linux-arm64.tar.gz
c. 配置环境变量
# 需要替换{your gopath}为一用户指定的gopath的路径
# GOPATH  作为编译后二进制的存放目的地和import包时的搜索路径,包含bin、pkg、src三个目录
cat >> ~/.bashrc << EOF
export PATH=\$PATH:/usr/local/go/bin
export GOROOT=/usr/local/go
export GOPATH=/{your gopath}/gopath
EOF
source ~/.bashrc
go version
d. 配置国内依赖下载资源
go env -w GO111MODULE=on
go env -w GOPROXY=https://goproxy.io,direct
e. 其他依赖(如果需要编译源码)
sudo apt install -y libtool pkg-config build-essential \
    autoconf automake uuid-dev
sudo apt install -y libzmq3-dev libzmq5
EdgeX 编译源码
- 下载源码
sudo apt install -y git
git clone https://github.com/edgexfoundry/edgex-go.git
- 编译
cd edgex-go
go get github.com/rjeczalik/pkgconfig/cmd/pkg-config
go get github.com/edgexfoundry/edgex-go
make build
# 编译好的二进制在./cmd/下
# 编译docker镜像
sudo make docker
部署EdgeX
部署方式
- snap
- native binaries
- docker-compose
- kubernetes
native binaries
在上述编译源码完成的基础上,在edgex-go/目录下:(注意需要提前配置好数据库)
make run
docker-compose
docker-compose 部署需要edgex各微服务的容器镜像,在上述源码编译中最后一步(make docker)可以生成docker 镜像,也可以使用 Docker Hub上有已经编译好的docker 镜像。
可以使用github上提供的edgex部署脚本中的docker-compose的yaml文件进行部署,方法最为简便,方法如下:
- 下载配置文件
git clone https://github.com/edgexfoundry/developer-scripts.git
- 选择对应的release版本
# 本次选用的是1.3.1(Hanoi)当前最新版本
cd developer-scripts/releases/hanoi/compose-files/
# 当前版本提供了Makefile更简便的操作,之前的版本直接使用docker-compose 命令可以启动服务
# Makefile的脚本实际也是调用docker-compose
sudo make pull
sudo make run
# 查看状态
sudo docker-compose -pedgex -f docker-compose-hanoi.yml ps
# ARM64设备
sudo make pull arm64
sudo make run arm64
sudo docker-compose -pedgex -f docker-compose-hanoi-arm64.yml ps

3. UI
 # 如果需要开启UI
sudo make run-ui
 # ARM64设备额
sudo make run-ui arm64
- 当前版本的UI只是一个开发测试版本,并不是商业版本
- 此时可通过浏览器访问本机4000端口访问到UI页面(可以尝试用github上最新的ui代码编译镜像)

EdgeX CLI
edgex-cli 是用以和edgex微服务交互的命令行接口(工具)。取代以往使用curl命令的方式访问edgex内部的微服务接口。
- 安装
sudo snap install edgex-cli

设备连接 —— Device Service
Modbus 设备
部署Modbus设备服务
vim add-device-modbus.yml
# ARM64注意使用不同镜像
"""
version: '3.7'
networks:
  edgex-network:
    external: true
    name: edgex_edgex-network
services:
  device-modbus:
    container_name: edgex-device-modbus
    environment:
      SERVICE_HOST: edgex-device-modbus
      CLIENTS_COMMAND_HOST: edgex-core-command
      CLIENTS_COREDATA_HOST: edgex-core-data
      CLIENTS_DATA_HOST: edgex-core-data
      CLIENTS_METADATA_HOST: edgex-core-metadata
      CLIENTS_NOTIFICATIONS_HOST: edgex-support-notifications
      CLIENTS_RULESENGINE_HOST: edgex-kuiper
      CLIENTS_SCHEDULER_HOST: edgex-support-scheduler
      CLIENTS_VIRTUALDEVICE_HOST: edgex-device-random
      DATABASES_PRIMARY_HOST: edgex-redis
      EDGEX_SECURITY_SECRET_STORE: "false"
      REGISTRY_HOST: edgex-core-consul
    hostname: edgex-device-modbus
    image: edgexfoundry/docker-device-modbus-go:1.3.1
# For ARM64
#    image: edgexfoundry/docker-device-modbus-go-arm64:1.3.1
    networks:
      edgex-network: {}
    ports:
      - "127.0.0.1:49991:49991"
"""
sudo docker-compose -p edgex -f add-device-modbus.yml up -d
# 查看已启动的设备服务
edgex-cli deviceservice list
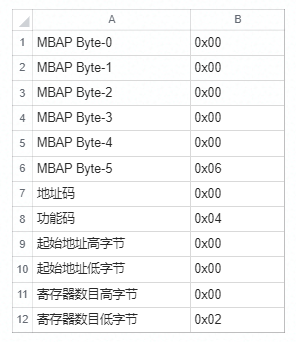
获取数据的例子(GET)—— RST5900
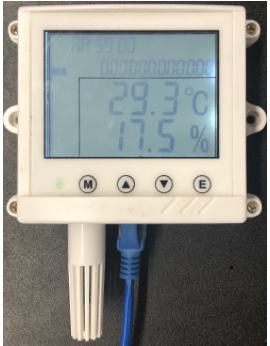
设备介绍
RST5900 是一个温湿度一体的传感器,有温度值和湿度值两个数据源。具体信息如下:
- 协议和连接信息

- Modbus通讯协议功能代码

- 获取温湿度请求报文

- 传感器应答数据
设备调试
#include <stdio.h>
#include <stdlib.h>
#include <string.h>
#include <sys/types.h>
#include <sys/socket.h>
#include <unistd.h>
#include <arpa/inet.h>
#include <netinet/in.h>
#include <unistd.h>

int main(int argc, char *argv[])
{
    int client_socket,ct;
    unsigned int SERVER_ADDR=0x0a0014c8;//设备IP 10.0.20.200 的十六进制
    struct sockaddr_in server_addr;
    int err;
    client_socket=socket(AF_INET,SOCK_STREAM,0);
    if(client_socket<0)
    {
        printf("socket error\n");
        return -1;
    }
    bzero(&server_addr,sizeof(server_addr));
    server_addr.sin_family=AF_INET;
    server_addr.sin_addr.s_addr=htonl(SERVER_ADDR);
    server_addr.sin_port=htons(502);  // 设备端口
    ct=connect(client_socket,(struct sockaddr *)&server_addr,sizeof(struct sockaddr)); // 连接
    if(ct<0)
    {
        printf("connect error\n");
        return -1;
    }
    modbusTCP_request(client_socket);  // 发送请求
    close(client_socket);
    return 0;
}

int modbusTCP_request(int client_socket)
{
    int recv,send;
    unsigned char buff[13];
    char request[12];
//	memset(request, 0x00, 12);
    request[5]=0x06;
    request[7]=0x04;
    request[11]=0x02;
    while(1)
    {
        send=write(client_socket,request,sizeof(request));
		if (send >= 0){
			printf("send:   ");
			for (int i=0; i<send; i++){
				printf("%02x\t",request[i]);
			}
			printf("\n");
		}
		else {
            printf("send error\n");
            return -1;
        }
        recv=read(client_socket,buff,13);
        if(recv>0)
        {
			printf("recive: ");
            for (int i=0; i<recv; i++)
            {
                printf("%02x\t",buff[i]);
            }
            printf("\n--------------------------------\n");
        }
        request[0]++;
		sleep(1);
    }
    return 0;
}
编译运行
gcc rst_5900_test.c -o rst_5900_test
./rst_5900_test

创建 profile
# Copyright 2019 TS Inc. All rights reserved.
name: "RST5900"
manufacturer: "TS Beijing"
model: "RST5900"
description: "Temperature and Humidity Senser."
labels:
  - "modbus"
  - "senser"
deviceResources:
    -
        name: "Temperature"
        description: "Sensor Temperature"
        attributes:
            { primaryTable: "INPUT_REGISTERS", startingAddress: "1", rawType: "INT16"}
        properties:
            value:
                { type: "FLOAT32", readWrite: "R",scale: "0.1", floatEncoding: "eNotation"}
            units:
                { type: "String", readWrite: "R", defaultValue: "°C"}
    -
        name: "Humidity"
        description: "Sensor Relative Humidity %"
        attributes:
            { primaryTable: "INPUT_REGISTERS", startingAddress: "2", rawType: "INT16" }
        properties:
            value:
                { type: "FLOAT32", readWrite: "R",scale: "0.1", floatEncoding: "eNotation"}
            units:
                { type: "String", readWrite: "R", defaultValue: "%RH"}
deviceCommands:
    -
        name: "Data"
        get:
            - { index: "1", operation: "get", object: "Temperature", parameter: "Temperature" }
            - { index: "2", operation: "get", object: "Humidity", parameter: "Humidity" }
coreCommands:
    -
        name: "Data"
        get:
            path: "/api/v1/device/{deviceId}/Data"
            responses:
                -
                    code: "200"
                    description: "Get the Data"
                    expectedValues: ["Temperature","Humidity"]
                -
                    code: "503"
                    description: "service unavailable"
                    expectedValues: []
关于profile的介绍:
关于profile的介绍:
1. name:profile标识。添加设备时,设备需要绑定一个profile名称以明确所支持的指令和数据源。
2. deviceResources:一个设备提供的数据源(如温湿度传感器的温度、湿度为两个resouce)
  1. name:数据源的名称标识
  2. attributes:数据源的特征值。在modbus device service中用来标识功能寄存器类型、起始地址等
    1. primaryTable:寄存器类型
      1. HOLDING_REGISTERS
      2. INPUT_REGISTERS
      3. COILS
      4. DISCRETES_INPUT
    2. startingAddress:寄存器起始地址(这里是从1开始,通常对应寄存器手册的0位)
    3. rawType:(可选)解析二进制数据的原始数据类型。如果没有设置,默认使用properties-value-type
       [ 避免精度丢失:如果一个精度为0.01的温度值存储在INT16类型数据中,如果实际温度 26.53,
       则读取值为2653。但是,在转换之后,值是26]
    4. properties:定义数据源的数据类型、精度值、单位等
3. deviceCommands:定义一个命令将数据源组合
  1. name:命令名称
  2. get:get方法,组合可以get的数据源
  3. set:set(post)方法,组合可以控制的数据源
4. coreCommands:定义外部调用的API接口
- (引)For example, a Modbus device stores the temperature and humidity in an INT16 data type with a float scale of 0.01. If the temperature is 26.53, the read value is 2653. However, following transformation, the value is 26.
设备接入
- 上传profile
edgex-cli profile add -f rst_5900_profile.yaml
# 或 curl -X POST http://localhost:48081/api/v1/deviceprofile/uploadfile -F "file=@rst_5900_profile.yaml"

2. 添加设备
# 使用CLI没有成功,报错“Error: fork/exec /usr/bin/vi: permission denied”
edgex-cli device add --description "Temperature & Humidity Senser " \
    --profileName RST5900 --operatingStatus ENABLED -i

 # 直接调接口
 curl -X POST -d \
'{
  "description": "Temperature & Humidity Senser ",
  "name": "RST5900",
  "adminState": "unlocked",
  "operatingState": "enabled",
  "protocols":{
    "modbus-tcp":{
      "name":"senser",
      "Address":"10.0.20.200",
      "Port":"502",
      "UnitID":"1"
    }
  },
  "labels": [
  ],
  "location": null,
  "service": {
    "name": "edgex-device-modbus"
  },
  "profile": {
    "name": "RST5900"
  }
}' \
http://localhost:48081/api/v1/device

## "Address":"10.0.20.200" ——> 设备的IP
## "Port":"502"           ——>modbus tcp 端口
## profile->name->RST5900 ——> 设备配置文件的名称
获取数据
- 查看设备
edgex-cli device list
edgex-cli device list --name RST5900
edgex-cli device list --name RST5900 -v

2. 获取数据
# Data是profile中定义的CMD
curl -X GET http://localhost:48082/api/v1/device/name/RST5900/command/Data

3. 获取历史数据
# 通过CLI
edgex-cli reading list -d RST5900
#  通过API
## 参考:https://app.swaggerhub.com/apis-docs/EdgeXFoundry1/core-data
curl -X GET "http://localhost:48080/api/v1/reading/device/RST5900/10" \
    -H  "accept: */*"|jq .

下发控制的例子(SET)—— Patlite LA6
设备介绍
Patlite LA6 是一组有5个LED灯和一个蜂鸣器的报警器。LED灯和蜂鸣器可以单独控制或群组控制,具体操作需要查看说明书的寄存器手册。本例只使用5个LED的单独控制作为例子,演示对Modbus设备的控制。
- 协议和连接信息

- Modbus通讯协议
根据说明书寄存器手册可知Holding 寄存器管理单个LED/蜂鸣器,功能码03为读,06为写。
  1. 读取单个LED/蜂鸣器的状态
    1. 请求数据
      1. 起始地址表示从哪一位开始查
      2. 起始地址 0~4 对应 LED1~5
    2. 响应数据


调试设备
#include <stdio.h>
#include <stdlib.h>
#include <string.h>
#include <sys/types.h>
#include <sys/socket.h>
#include <unistd.h>
#include <arpa/inet.h>
#include <netinet/in.h>
#define PORT 502

int main(int argc, char *argv[])
{
	int client_socket,ct;
	unsigned int SERVER_ADDR=0x0a0014c9;//10.0.20.201
	struct sockaddr_in server_addr;
	int err;
	client_socket=socket(AF_INET,SOCK_STREAM,0);
	if(client_socket<0)
	{
		printf("socket error\n");
		return -1;
	}
	bzero(&server_addr,sizeof(server_addr));
	server_addr.sin_family=AF_INET;
	server_addr.sin_addr.s_addr=htonl(SERVER_ADDR);
	server_addr.sin_port=htons(PORT);
	ct=connect(client_socket,(struct sockaddr *)&server_addr,sizeof(struct sockaddr));
	if(ct<0)
	{
		printf("connect error\n");
		return -1;
	}
	modbusTCP_request_read(client_socket);
	modbusTCP_request_write(client_socket);
	modbusTCP_request_read(client_socket);
	close(client_socket);
	return 0;
}


#if 1
// Read Holding Registers
int modbusTCP_request_read(int client_socket)
{
	int recv,send;
	char request[12];
	int BUFFERSIZE = 21;
	unsigned char buff[BUFFERSIZE];
	request[0]=0x00;
	request[1]=0x01;
	request[2]=0x00;
	request[3]=0x00;
	request[4]=0x00;
	request[5]=0x06;
	request[6]=0x01;
	request[7]=0x03;   // function:0x03 ——> 读取保持寄存器,读取信号塔和蜂鸣器对应寄存器 的当前状态
	/* request[8]~[9]: 寄存器起始地址
	   00~04 —— LED1~5;
	   05    —— 蜂鸣器
	*/
	request[8]=0x00;
//	request[9]=0x04;  //从第五位 LED5开始查
	request[9]=0x00;  //从第一位 LED1开始查
	// 向后查询几位
	request[10]=0x00;
//	request[11]=0x01; // 查询1个寄存器
	request[11]=0x06; // 查询6个寄存器

	send=write(client_socket,request,sizeof(request));
	if (send >= 0){
		printf("Send:%d\n",send);
		for (int i=0; i<send; i++){
			printf("%02x\t",request[i]);
		}
	}else{
		printf("send error\n");
		return -1;
	}
    recv=read(client_socket,buff,BUFFERSIZE);
    if(recv>0)
	{
		printf("\nRecv:%d\n",recv);
		for (int i=0; i<recv; i++)
		{
			printf("%02x\t",buff[i]);
		}
		printf("\n--------------------------------\n");
	}
	return 0;
}
#endif

#if 1
// Write Single Register (06H)
int modbusTCP_request_write(int client_socket)
{
	int recv,send;
	char request[12];
	int BUFFERSIZE = 12;
	unsigned char buff[BUFFERSIZE];
	request[0]=0x00;
	request[1]=0x03;
	request[2]=0x00;
	request[3]=0x00;
	request[4]=0x00;
	request[5]=0x06;
	request[6]=0xFF;
	request[7]=0x06;   // function:0x06 ——> 写保持寄存器,控制某一位寄存器
	request[8]=0x00;
	/*
	 第10位,request[9]:
	   0x00~0x04 LED1~LED5
       0x05      蜂鸣器
	   0x06      智能模式
	   0x07      clear
	 */
//	request[9]=0x00;  //LED1
//	request[9]=0x01;  //LED2
	request[9]=0x02;  //LED3
//	request[9]=0x03;  //LED4
//	request[9]=0x04;  //LED5
	/*
	LED1~LED5:
		request[10] —— 0x00:不控制; 0x01 控制
		request[11] —— 00:OFF; 01:ON; 02:闪烁
	蜂鸣器:
		request[10] —— 0x00:不控制; 0x01 控制
		request[11] —— 0x01~0x03 // 读取值为0x00~0x0B
    智能模式:
		request[10] —— 0x00:不控制; 0x01 控制
		request[11] —— 0x01~0x1F
    clear
		request[10] —— 0x00
		request[11] —— 0x01
	 */
	request[10]=0x01;
	request[11]=0x01;
	send=write(client_socket,request,sizeof(request));
	if (send >= 0){
		printf("Send:%d\n",send);
		for (int i=0; i<send; i++){
			printf("%02x\t",request[i]);
		}
	}else{
		printf("send error\n");
		return -1;
	}
    recv=read(client_socket,buff,BUFFERSIZE);
    if(recv>0)
	{
		printf("\nrecv:%d\n",recv);
		for (int i=0; i<BUFFERSIZE; i++)
		{
			printf("%02x\t",buff[i]);
		}
		printf("\n--------------------------------\n");
	}
	return 0;
}
#endif
编译运行
gcc patlite_la6_test.c -o patlite_la6_test
./patlite_la6_test
创建profile
name: "LA6-POE"
manufacturer: "PATLATE Japan(Profile by TS Beijing)"
model: "LA6-POE"
description: "Signal Tower LA6-POE."
labels:
  - "modbus"
  - "led"
deviceResources:
    -
        name: "LED1"
        description: "First LED Light RED, (0-ignore, 1-ctrl | 0-off, 1-on, 02-flashing, 09-no-chang)"
        attributes:
            { primaryTable: "HOLDING_REGISTERS", startingAddress: "1" }
        properties:
            value:
                { type: "INT16", readWrite: "RW", scale: "1", minimum: "0", maximum: "65535", defaultValue: "0"}
            units:
                { type: "String", readWrite: "R", defaultValue: "Operation Mode"}
    -
        name: "LED2"
        description: "Second LED Light YELLOW, (0-ignore, 1-ctrl | 0-off, 1-on, 02-flashing, 09-no-chang)"
        attributes:
            { primaryTable: "HOLDING_REGISTERS", startingAddress: "2" }
        properties:
            value:
                { type: "INT16", readWrite: "RW", scale: "1", minimum: "0", maximum: "65535", defaultValue: "0"}
            units:
                { type: "String", readWrite: "R", defaultValue: "Operation Mode"}
    -
        name: "LED3"
        description: "3rd LED Light RED, (0-ignore, 1-ctrl | 0-off, 1-on, 02-flashing, 09-no-chang)"
        attributes:
            { primaryTable: "HOLDING_REGISTERS", startingAddress: "3" }
        properties:
            value:
                { type: "INT16", readWrite: "RW", scale: "1", minimum: "0", maximum: "65535", defaultValue: "0"}
            units:
                { type: "String", readWrite: "R", defaultValue: "Operation Mode"}
    -
        name: "LED4"
        description: "4th LED Light RED, (0-ignore, 1-ctrl | 0-off, 1-on, 02-flashing, 09-no-chang)"
        attributes:
            { primaryTable: "HOLDING_REGISTERS", startingAddress: "4" }
        properties:
            value:
                { type: "INT16", readWrite: "RW", scale: "1", minimum: "0", maximum: "65535", defaultValue: "0"}
            units:
                { type: "String", readWrite: "R", defaultValue: "Operation Mode"}
    -
        name: "LED5"
        description: "5th LED Light RED, (0-ignore, 1-ctrl | 0-off, 1-on, 02-flashing, 09-no-chang)"
        attributes:
            { primaryTable: "HOLDING_REGISTERS", startingAddress: "5" }
        properties:
            value:
                { type: "INT16", readWrite: "RW", scale: "1", minimum: "0", maximum: "65535", defaultValue: "0"}
            units:
                { type: "String", readWrite: "R", defaultValue: "Operation Mode"}
deviceCommands:
    -
        name: "CUSTOM"
        set:
            - { index: "1", operation: "set", object: "LED1", parameter: "LED1" }
            - { index: "2", operation: "set", object: "LED2", parameter: "LED2" }
            - { index: "3", operation: "set", object: "LED3", parameter: "LED3" }
            - { index: "4", operation: "set", object: "LED4", parameter: "LED4" }
            - { index: "5", operation: "set", object: "LED5", parameter: "LED5" }
        get:
            - { index: "1", operation: "get", object: "LED1", parameter: "LED1" }
            - { index: "2", operation: "get", object: "LED2", parameter: "LED2" }
            - { index: "3", operation: "get", object: "LED3", parameter: "LED3" }
            - { index: "4", operation: "get", object: "LED4", parameter: "LED4" }
            - { index: "5", operation: "get", object: "LED5", parameter: "LED5" }
coreCommands:
    -
        name: "CUSTOM"
        get:
            path: "/api/v1/device/{deviceId}/CUSTOM"
            responses:
                -
                    code: "200"
                    description: "Get the Configuration"
                    expectedValues: ["LED1","LED2","LED3","LED4","LED5"]
                -
                    code: "503"
                    description: "service unavailable"
                    expectedValues: []
        put:
            path: "/api/v1/device/{deviceId}/CUSTOM"
            parameterNames: ["LED1","LED2","LED3","LED4","LED5" ]
            responses:
                -
                    code: "204"
                    description: "Set the Configuration"
                    expectedValues: []
                -
                    code: "503"
                    description: "service unavailable"
                    expectedValues: []
    -
        name: "LED1"
        get:
            path: "/api/v1/device/{deviceId}/LED1"
            responses:
                -
                    code: "200"
                    description: "Get the Configuration"
                    expectedValues: ["LED1"]
                -
                    code: "503"
                    description: "service unavailable"
                    expectedValues: []
        put:
            path: "/api/v1/device/{deviceId}/LED1"
            parameterNames: ["LED1" ]
            responses:
                -
                    code: "204"
                    description: "Set the Configuration"
                    expectedValues: []
                -
                    code: "503"
                    description: "service unavailable"
                    expectedValues: []
设备接入
- 上传profile
edgex-cli profile add -f patlite_la6_led_profile.yaml
# 或 curl -X POST http://localhost:48081/api/v1/deviceprofile/uploadfile -F "file=@patlite_la6_led_profile.yaml"

2. 添加设备
# 直接调用接口
curl -X POST -d \
'{
  "description": "Patlite LA6 POE",
  "name": "patlite",
  "adminState": "unlocked",
  "operatingState": "enabled",
  "protocols":{
    "modbus-tcp":{
      "name":"patlite_la6",
      "Address":"10.0.20.201",
      "Port":"502",
      "UnitID":"255"
    }
  },
  "labels": [
  ],
  "location": null,
  "service": {
    "name": "edgex-device-modbus"
  },
  "profile": {
    "name": "LA6-POE"
  }
}' \
http://localhost:48081/api/v1/device
通过edgex控制
- 查看设备
edgex-cli device list
edgex-cli device list --name patlite
edgex-cli device list --name patlite -v

2. 控制设备
通过coreCommands——deviceResource(LED1)
# 参数值
## 0x01 0x00 —— 关闭 —— 256
## 0x01 0x01 —— 常亮 —— 257
## 0x01 0x02 —— 闪烁 —— 258
curl -X PUT "http://localhost:48082/api/v1/device/name/patlite/command/LED1" -d '{"LED1":"257"}'

3. 通过coreCommands——deviceCommands——deviceResources组合(LED1~LED5)
##LED2 —— 常亮
## LED4 —— 闪烁
curl -X PUT "http://localhost:48082/api/v1/device/name/patlite/command/CUSTOM" -d '{"LED1":"256",  "LED2":"257",  "LED3":"256",  "LED4":"258",  "LED5":"256"}'

4. 获取设备状态
curl -X GET "http://localhost:48082/api/v1/device/name/patlite/command/CUSTOM"|jq .

MQTT设备
部署MQTT设备服务
- Broker
MQTT Device Service依赖MQTT Broker, 使用时可以单独部署一个MQTT Broker或使用外部的MQTT Broker。在我们本次的实验中,将MQTT Device Service和Broker放在一个yaml文件中部署使用。 - docker-compose.yaml
sudo vim add-device-mqtt.yml
"""
version: '3.7'
networks:
  edgex-network:
    external: true
    name: edgex_edgex-network

services:
  mqtt-broker:
    container_name: edgex-mqtt-broker
    hostname: edgex-mqtt-broker
    image: "eclipse-mosquitto"
    networks:
      edgex-network: {}
    ports:
      - "1883:1883"

  device-mqtt:
    container_name: edgex-device-mqtt
    environment:
      CLIENTS_COMMAND_HOST: edgex-core-command
      CLIENTS_COREDATA_HOST: edgex-core-data
      CLIENTS_DATA_HOST: edgex-core-data
      CLIENTS_METADATA_HOST: edgex-core-metadata
      CLIENTS_NOTIFICATIONS_HOST: edgex-support-notifications
      CLIENTS_RULESENGINE_HOST: edgex-kuiper
      CLIENTS_SCHEDULER_HOST: edgex-support-scheduler
      CLIENTS_VIRTUALDEVICE_HOST: edgex-device-random
      DATABASES_PRIMARY_HOST: edgex-redis
      EDGEX_SECURITY_SECRET_STORE: "false"
      REGISTRY_HOST: edgex-core-consul
      SERVICE_HOST: edgex-device-mqtt
      DRIVER_INCOMINGHOST: edgex-mqtt-broker
      DRIVER_INCOMINGTOPIC: MyDataTopic
      DRIVER_RESPONSEHOST: edgex-mqtt-broker
      DRIVER_RESPONSETOPIC: MyResponseTopic
    depends_on:
      - mqtt-broker
    hostname: edgex-device-mqtt
    image: edgexfoundry/docker-device-mqtt-go:1.3.1
#    image: edgexfoundry/docker-device-mqtt-go-arm64:1.3.1
    networks:
      edgex-network: {}
    ports:
      - "127.0.0.1:49982:49982"
"""
## eclipse-mosquitto 版本用的1.6.9
## 通过环境变量设置了broker,topic等
sudo docker-compose -p edgex -f add-device-mqtt.yml up -d
# 查看已启动的设备服务
edgex-cli deviceservice list --name edgex-device-mqtt
MQTT Device Service 的几种模式

设备主动上报数据

设备服务请求

虚拟一个EdgeX MQTT设备
模拟设备程序
该设备有一个resource : time; cmd为:localtime;支持get / set
#!/usr/bin/env python
# -*- coding: utf-8 -*-
# when       who           what, where, why
# --------   ---           ----------------------------------------------
# 19-9-27    zhanglu       init
#=========================================================================
import paho.mqtt.client as mqtt
import time
import json

def on_connect(client, userdata, flags, rc):
  print("Connected with result code " + str(rc))
  client.subscribe(topic="MyCommandTopic")
  '''
    MyCommandTopic 是该设备订阅的CommandTopic
  '''

def on_message(client, userdata, msg):
  print("topic:",msg.topic , "\nmessage:" + str(msg.payload))
  '''
  '''
  try:
    rcv_data = json.loads(msg.payload.decode('utf-8'))
  except:
    print("error")
  ret_data = rcv_data
  '''
    返回信息中需要:uuid、cmd、method等信息
  '''
  print("method:",rcv_data.get("method",None))
  ## 处理get
  if rcv_data.get("method",None) == "get":
    print ("cmd:",rcv_data.get("cmd",None))
    if rcv_data.get("cmd",None) == "time":
      ret_data["time"] = "{}".format(time.strftime("%Y-%m-%d %H:%M:%S", time.localtime()))
      print ("MyResponseTopic publish:",json.dumps(ret_data))
  ## 处理set
  elif rcv_data.get("method",None) == "set":
    print ("cmd:",rcv_data.get("cmd",None))
    print ("set resource value:",rcv_data.get(rcv_data.get("cmd",None)))
  client.publish(topic="MyResponseTopic", payload=json.dumps(ret_data), qos=0)


def mqtt_connect(client, username,password,broker_ip,broker_port=1883,keepalive=60):
  ret = 0
  try:
    client.on_connect = on_connect
    client.on_message = on_message
    client.username_pw_set(username, password)
    ret = client.connect(broker_ip, broker_port, keepalive)
    client.loop_start()
  except:
    ret = -1
  return ret

if __name__ == "__main__":
  client = mqtt.Client()
  ret = mqtt_connect(client,"admin","public","10.0.20.29",1883,60)
  print("mqtt_connect:",ret)
  while True:
    ## 定时上报
    ret_data = { "name": "mqtt_device", "cmd": "time", "time": "{}".format(time.strftime("%Y-%m-%d %H:%M:%S", time.localtime())) }
    print ("MyDataTopic publish:",json.dumps(ret_data))
    client.publish(topic="MyDataTopic", payload=json.dumps(ret_data), qos=0)
    time.sleep(6000)
profile
name: "Test.Device.MQTT.Profile"
manufacturer: "TS Beijing"
model: "MQTT-DEVICE"
description: "Test device profile"
labels:
  - "mqtt"
  - "test"
deviceResources:
  -
    name: time
    description: "local time"
    properties:
      value:
        { type: "String", size: "0", readWrite: "W" ,scale: "", offset: "", base: ""  }
      units:
        { type: "String", readWrite: "R", defaultValue: "" }

deviceCommands:
  -
    name: localtime
    get:
    - { index: "1", operation: "get", object: "time", parameter: "time" }
    set:
    - { index: "1", operation: "set", object: "time", parameter: "time" }

coreCommands:
  -
    name: localtime
    get:
      path: "/api/v1/device/{deviceId}/localtime"
      responses:
      -
        code: "200"
        description: "get the local time"
        expectedValues: ["time"]
      -
        code: "503"
        description: "service unavailable"
        expectedValues: []
    put:
      path: "/api/v1/device/{deviceId}/localtime"
      parameterNames: ["time"]
      responses:
      -
        code: "204"
        description: "set the local time."
        expectedValues: []
      -
        code: "503"
        description: "service unavailable"
        expectedValues: []
创建设备
- 上传profile
edgex-cli profile add -f mqtt_device_profile.yaml
# 或 curl -X POST http://localhost:48081/api/v1/deviceprofile/uploadfile -F "file=@mqtt_device_profile.yaml"
- 添加设备
# 直接调用接口
curl -X POST -d \
'{
  "Description": "mqtt device",
  "Name": "mqtt_device",
  "adminState": "unlocked",
  "operatingState": "enabled",
  "Protocols":{
    "mqtt":{
      "Schema": "tcp",
      "Host": "edgex-mqtt-broker",
      "Port": "1883",
      "ClientId": "mqtt_device_test",
      "User": "admin",
      "Password": "public",
      "Topic": "MyCommandTopic"
    }
  },
  "labels": [
  ],
  "location": null,
  "service": {
    "name": "edgex-device-mqtt"
  },
  "profile": {
    "name": "Test.Device.MQTT.Profile"
  }
}' \
http://localhost:48081/api/v1/device
启动模拟的设备程序
pip3 install paho.mqtt
python3 edgex_mqtt_device.py
查看主动上报的数据
edgex-cli reading list -d mqtt_device

get
curl -X GET http://localhost:48082/api/v1/device/name/mqtt_device/command/localtime|jq .

set
curl -X PUT http://localhost:48082/api/v1/device/name/mqtt_device/command/localtime -d '{"time":"12345"}'|jq .

分布式部署Device Service
DeviceService的分布式部署是该版本(1.3)的一个新feature,下面进行验证。
注销已有的设备服务
以Modbus device service为例
# 关闭
sudo docker-compose -p edgex -f add-device-modbus.yml stop device-modbus
sudo docker-compose -p edgex -f add-device-modbus.yml rm device-modbus
edgex-cli deviceservice rm --name edgex-device-modbus
edgex-cli deviceservice list

解除服务对localhost的限制
- 需要修改docker-compose-*.yaml 允许从localhost之外的端口访问
- 如果启用API Gateway 应该可以例外(参考:https://docs.edgexfoundry.org/1.3/microservices/security/Ch-APIGateway/)
vim docker-compose-hanoi.yml
# 将所有的127.0.0.1:xxxx:xxxx/tcp 改为:xxxx:xxxx/tcp
"""例如
    ports:
#    - 127.0.0.1:48100:48100/tcp
    - 48100:48100/tcp
"""
# docker-compose -p edgex -f docker-compose-hanoi.yml down
sudo make down
# docker-compose -p edgex -f docker-compose-hanoi.yml up -d
sudo make run

删除device service的旧记录
Consul 作为保存了所有微服务的注册信息,如果不删除,将会继续使用旧的配置
# API参考:
# https://docs.edgexfoundry.org/1.3/api/core/Ch-APICoreServiceConfiguration/
# 也可以在http://10.0.20.29:8500/ui/dc1/kv/edgex/devices/1.0/ 页面删除
curl --request DELETE http://127.0.0.1:8500/v1/kv/edgex/devices/1.0/edgex-device-modbus
在其他节点重新启动device service
需要修改device service的docker-compose file。有几点需要注意:
1. 环境变量
  1. 环境变量中SERVICE_HOST需要设置为运行device service的主机IP
  2. 其他HOST信息需要写运行edgex其他服务的主机IP
2. 设置command
  1. 原来镜像的dockerfile中指定了consul://edgex-core-consul 这里需要改为IP
3. 端口映射要允许除localhost外的访问
4. network_mode: "host"
  1. 原因
    1. SERVICE_HOST一方面被用为服务启动时指定的IP,另一方面要注册到consul和metadata
    2. 如果写为宿主机IP则容器内网络不同,web server will stop
    3. 如果写成localhost则其他微服务如consul,command 调用时调用不通
  2. 解决
    1. 修改程序引入其他环境变量区分
    2. 设备服务侧使用host部署/host network
    3. 使用kubernetes的部署方式,引入service概念解决集群的DNS问题
vim add-device-modbus.yml
"""
version: '3.7'
services:
  device-modbus:
    container_name: edgex-device-modbus
    environment:
      SERVICE_HOST: 10.0.20.58
      CLIENTS_COMMAND_HOST: 10.0.20.29
      CLIENTS_COREDATA_HOST: 10.0.20.29
      CLIENTS_DATA_HOST: 10.0.20.29
      CLIENTS_METADATA_HOST: 10.0.20.29
      CLIENTS_NOTIFICATIONS_HOST: 10.0.20.29
      CLIENTS_RULESENGINE_HOST: 10.0.20.29
      CLIENTS_SCHEDULER_HOST: 10.0.20.29
      CLIENTS_VIRTUALDEVICE_HOST: 10.0.20.29
      DATABASES_PRIMARY_HOST: 10.0.20.29
      EDGEX_SECURITY_SECRET_STORE: "false"
      REGISTRY_HOST: 10.0.20.29
    hostname: edgex-device-modbus
    image: edgexfoundry/docker-device-modbus-go:1.3.1
# For ARM64
#    image: edgexfoundry/docker-device-modbus-go-arm64:1.3.1
    ports:
      - "49991:49991"
    network_mode: "host"
    command: ["--cp=consul://10.0.20.29:8500", "--registry", "--confdir=/res"]
"""
sudo docker-compose -p edgex -f add-device-modbus.yml up -d
支持服务 —— Supporting Service
设置定时任务 —— Scheduler & event
Scheduler 微服务提供了内部时钟(计时器),和事件event(触发器)以定时发送请求。下面我们创建一个每10秒读一次温湿度数据的任务。
# 创建 定时器
curl -X POST -H "Content-Type: application/json" \
    -H "Cache-Control: no-cache" \
    -d '{"name": "every_10_seconds", "start": "","frequency": "PT10S"}' \
    http://localhost:48085/api/v1/interval
- name - 唯一名称
- start - 生效时间,以ISO 8601 YYYYMMDD’T’hhmmss格式表示。空意味着现在。
- end - 失效时间,同上。
- frequency - 频度,以ISO 8601 PxYxMxD’T’xHxMxS格式表示。空意味着没有频率
# 设置一个每10秒读一次温湿度数据的任务
curl -X POST -H "Content-Type: application/json" \
    -H "Cache-Control: no-cache" -d \
    '{
        "name":"get-temp-humy-events",
        "interval":"every_10_seconds",
        "target":"core-data",
        "protocol":"http",
        "httpMethod":"GET",
        "address":"edgex-core-command",
        "port":48082,
        "path":"/api/v1/device/name/RST5900/command/Data"
    }' \
    http://localhost:48085/api/v1/intervalaction
- name - 动作唯一名称
- interval - 间隔唯一名称,与Scheduler名称对应
- target - 间隔 操作接收者名称(ergo service or name).
- protocol - 通讯协议 (example HTTP).
- httpMethod - HTTP protocol verb.
- address - IP.
- port -端口.
- path - url 路径.
- parameters - (可选)参数例如 http post的 data
# 查询
curl -X GET http://localhost:48085/api/v1/interval|jq .
curl -X GET http://localhost:48085/api/v1/intervalaction  |jq .


RulesEngine
- 参考:
- https://github.com/emqx/kuiper/blob/master/docs/en_US/edgex/edgex_rule_engine_command.md
规则引擎在这一版本中使用的是EMQ的kuiper,下面的简单实例是创建一个当湿度大于50%时,LED1亮的规则。
- https://github.com/emqx/kuiper/blob/master/docs/en_US/edgex/edgex_rule_engine_command.md
# 规则流
## 创建(默认已有)
curl -X POST \
  http://127.0.0.1:48075/streams \
  -H 'Content-Type: application/json' \
  -d '{  "sql": "create stream demo() WITH (FORMAT=\"JSON\", TYPE=\"edgex\")"}'
## 查询现有
curl -X GET http://127.0.0.1:48075/streams
curl -X GET http://127.0.0.1:48075/streams/{规则流名称}
## 删除
curl -X DELETE http://127.0.0.1:48075/streams/{规则流名称}
# 规则
## 创建
curl -X POST \
  http://127.0.0.1:48075/rules \
  -H 'Content-Type: application/json' \
  -d '{
          "id": "rule-hum-led1",
          "sql": "SELECT uint8 FROM demo WHERE Humidity > 50.0",
          "actions": [
            {
              "rest": {
                "url": "http://edgex-core-command:48082/api/v1/device/name/patlite/command/LED1",
                "method": "put",
                "retryInterval": -1,
                "dataTemplate": "{\"LED1\":\"257\"}",
                "sendSingle": true
              }
            },
            {
              "log":{}
            }
          ]
        }'
## 查询
curl -X GET http://127.0.0.1:48075/rules
curl -X GET http://127.0.0.1:48075/rules/{规则名称}
## 删除
curl -X DELETE http://127.0.0.1:48075/rules/{规则名称}

配置完成后当湿度大于50%,LED1会亮灯


 2966
2966


 被折叠的 条评论
为什么被折叠?
被折叠的 条评论
为什么被折叠?
 到【灌水乐园】发言


