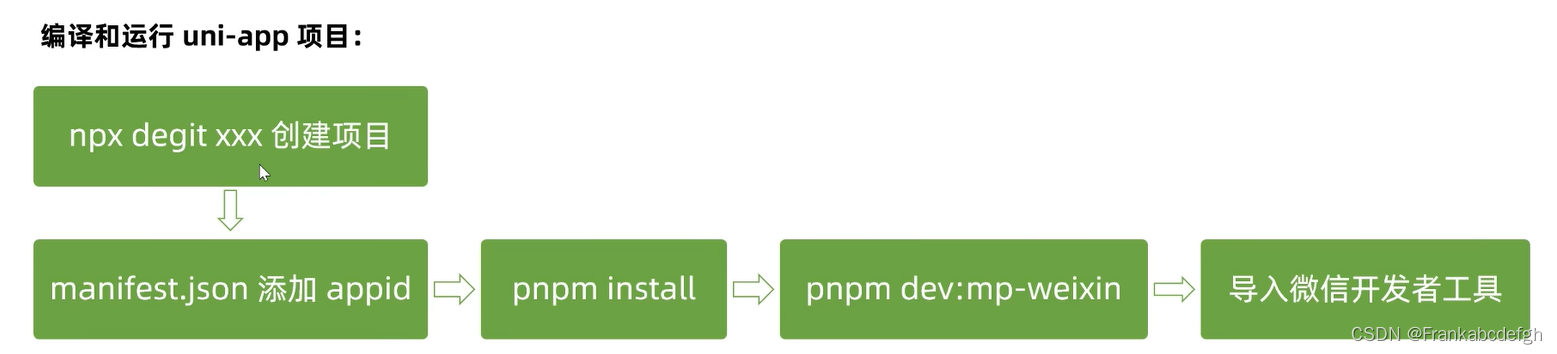
vue3+ts的uniapp项目创建

目录

创建

vscode编写uniapp

ui导入

拦截请求拦截器配置

创建

npx degit dcloudio/uni-preset-vue#vite-ts my-vue3-project

vscode编写uniapp

ts类型检测

pnpm i -D @types/wechat-miniprogram@uni-helper/uni-app-types

ui导入

npm i @dcloudio/uni-ui

 tsconfig.json

{
  "extends": "@vue/tsconfig/tsconfig.json",
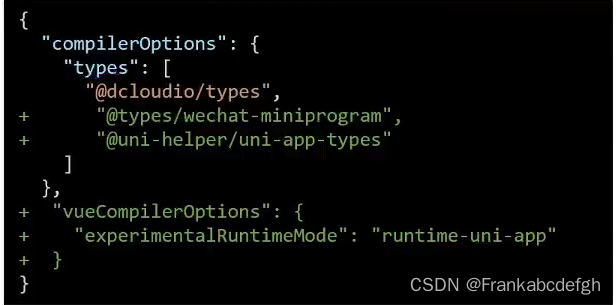
  "compilerOptions": {
    "vuecompileroptions": {
      "experimentalRuntimeMode": "runtime-uni-app"
    },
    "sourceMap": true,
    "baseUrl": ".",
    "paths": {
      "@/*": [
        "./src/*"
      ]
    },
    "lib": [
      "esnext",
      "dom"
    ],
    "types": [
      "@dcloudio/types",
      "@types/wechat-miniprogram",
      "@uni-helper/uni-app-types",
    ]
  },
  "include": [
    "src/**/*.ts",
    "src/**/*.d.ts",
    "src/**/*.tsx",
    "src/**/*.vue"
  ]
}

拦截请求拦截器配置

const baseUrl = ''
// 添加拦截器
const httpInterceptor = {
    invoke(options: UniApp.RequestOptions) {
        // 非http开头拼接路径
        if (!options.url.startsWith('http')) {
            options.url = baseUrl + options.url
        }
        // 请求超时
        options.timeout = 10000
        // 添加token
        const token = localStorage.getItem('token')
        if (token) {
            options.header.Authorization = token
        }
        options.header
    }
}
// 拦截requset请求
// 拦截uploadFile请求
uni.addInterceptor('request', httpInterceptor)
uni.addInterceptor('uploadFile', httpInterceptor)


interface Data<T> {
    code: string
    msg: string
    result: T
}
export const http = <T>(options: UniApp.RequestOptions) => {
    // 返回promise对象
    return new Promise<Data<T>>((resolve, reject) => {
        uni.request({
            ...options,
            // 请求成功
            success(res) {
                // code为2xx放行
                if (res.statusCode >= 200 && res.statusCode < 300) { resolve(res.data as Data<T>) }
                else if (res.statusCode == 401) {
                    localStorage.setItem('token', '')
                    uni.navigateTo({ url: '/pages/login/login' })
                    reject(res)
                } else {
                    uni.showToast({
                        icon: 'none',
                        title: (res.data as Data<T>).msg
                    })
                }
            },
            // 响应失败
            fail(err) {
                uni.showToast({
                    icon: 'none',
                    title: "网络错误"
                })
                reject(err)
            }
        })
    })
}

  • 2
    点赞
  • 0
    收藏
    觉得还不错? 一键收藏
  • 0
    评论
搭建一个使用vue3+ts+vite+uniapp的微信小程序的步骤如下: 1. 首先安装最新版的Node.js和npm。 2. 安装uni-app-cli脚手架工具,命令如下: ``` npm install -g @vue/cli npm install -g @vue/cli-init npm install -g @dcloudio/uni-cli ``` 3. 创建一个uni-app项目,命令如下: ``` vue create -p dcloudio/uni-preset-vue my-project ``` 4. 进入项目目录,安装依赖包,命令如下: ``` cd my-project npm install ``` 5. 安装并配置微信小程序开发者工具,下载地址:https://developers.weixin.qq.com/miniprogram/dev/devtools/download.html 6. 在微信小程序开发者工具中,选择导入uni-app项目,选择项目目录下的dist/dev/mp-weixin文件夹,导入后即可进行开发和调试。 7. 如果需要使用vue3和typescript,在项目中安装相关依赖包,命令如下: ``` npm install --save-dev vue@next @vue/compiler-sfc typescript ts-loader ``` 8. 在项目根目录下创建vue.config.js文件,配置如下: ``` module.exports = { chainWebpack: config => { config.module .rule('ts') .use('ts-loader') .loader('ts-loader') .tap(options => { options.appendTsSuffixTo = [/\.vue$/] return options }) } } ``` 9. 在src目录下创建shims-vue.d.ts文件,内容如下: ``` declare module "*.vue" { import { ComponentOptions } from "vue"; const component: ComponentOptions; export default component; } ``` 10. 现在你就可以使用vue3和typescript进行开发了。同时,如果需要使用vite进行开发,可以参考uni-app官方文档进行配置:https://uniapp.dcloud.io/collocation/vite 以上就是使用vue3+ts+vite+uniapp搭建微信小程序的步骤。

“相关推荐”对你有帮助么?

  • 非常没帮助
  • 没帮助
  • 一般
  • 有帮助
  • 非常有帮助
提交
评论
添加红包

请填写红包祝福语或标题

红包个数最小为10个

红包金额最低5元

当前余额3.43前往充值 >
需支付:10.00
成就一亿技术人!
领取后你会自动成为博主和红包主的粉丝 规则
hope_wisdom
发出的红包
实付
使用余额支付
点击重新获取
扫码支付
钱包余额 0

抵扣说明:

1.余额是钱包充值的虚拟货币,按照1:1的比例进行支付金额的抵扣。
2.余额无法直接购买下载,可以购买VIP、付费专栏及课程。

余额充值