


文章目录
一、要求
- 将上一周个人作业用 RESTful 接口实现;(上一周作业:软件工程综合实践课程第十一周作业( SpringBoot整合Mybatis完成CRUD操作并使用接口调试工具对接口进行测试))
- 配置统一响应体;
- 配置Swagger,生成API自动文档;
- 对 RESTful 接口用Postman进行测试,并将测试结果截图;
- 将项目和截图打包一起提交。
二、知识总结
1. Restful风格编程实现
RESTful 风格
后端分离前, 后端服务器既要转发页面、重定向 , 又要返回各种数据类型,因此URL 会被定义成动词、名词和动宾短语,非常混乱。
前后端分离后,前端页面由前端服务器统一维护,后端服务器只需要对外提供数据,
即提供给前端网页Ajax访问的接口,并返回JSON。此时,后端程序可以使用 RESTful 风
格来定义 URL,一般会以功能模块的名词作为 URL,以 HTTP 协议的请求方法 GET ,
POST,PUT , DELETE 等来表示行为。
REST(Representational State Transfer,(资源的)表象层状态转移):描述了
一组架构约束条件和原则,代表了分布式服务访问的架构风格。REST的含义可以从以下
三点来理解:
- 每一个 URL代表一种资源
- 在客户端和服务器之间,传递这种资源的某种表现层
- 客户端通过 HTTP 协议提供请求方法 ,并对服务器端的资源进行操作,以实现“表现层状态转换”
客户端用到的手段,只能是 HTTP 协议。具体来说,主要是HTTP协议的四个表示操
作方式的动词:GET、POST、PUT、DELETE。它们分别对应四种基本操作:GET用来获取资源,POST用来新建资源(也可以用于更新资源),PUT用来更新资源,DELETE用来删除资源。
满足这些约束条件和原则的应用程序或设计就是 RESTful。在行业中,一般用RESTful表示在项目中实现了REST。
统一的接口是RESTful风格的核心内容。RESTful定义了Web API接口的设计风格,非常适用于前后端分离的应用模式中。RESTful接口约束包含的内容有资源识别、请求动作和响应信息,即通过 URL 表明要操作的资源,通 过请求方法表 明要执行的操作,通过返回的状态码表明这次请求的结果。另外,RESTful规定服务端返回的数据格式是XML或JSON,或直接返回状态码。这样,服务端只需要关注实现接口就可以了,而且随着接口可读性增强,客户端调用也更加方便。
RESTful 设计主要规范
(1) 协议
API与用户的通信协议,使用HTTPs协议或者HTTP协议,统一确定用一种。
(2) 域名
应该尽量将API部署在专用域名之下,如https://xxx.xxx.com;
如果多个项目创建API,把项目名称带上 如 https://项目名.XXX.com
(3) 版本
应该将API的版本号放入URL,如下:
http://www.example.com/app/1.0/foo
http://www.example.com/app/1.1/foo
(4) 路径
路径又称"终点"(endpoint),表示API的具体网址,每个网址代表一种资源(resource),具体要求如下:
- 资源作为网址, 只能有名词,不能有动词,而且所用的名词往往与数据库的表名对应。
如 :
以下是不符合 RESTful 规范的 URL
/select Goods
/listOrders
/retreiveClientByOrder?orderId=1
以下是符合 RESTful 规范的 URL:
GET 请求: /goods ----- 表示将返回所有商品清单
POST 请求: /goods ----- 表示 将商品新增到表中
GET 请求: /goods/4 ----- 将获取 id=4的 商品信息
PATCH (或) PUT 请求: /goods/4 ---- 表示将更新 id=4 的商品
- API 中的名词应该使用复数
如获取产品的API可以这样定义:
获取单个产品: http://127.0.0.1:8080/AppName/goods/1
获取所有产品: http://127.0.0.1:8080/AppName/goods
(5) HTTP 动词
对于资源的具体操作类型,用HTTP动词表示。常用的HTTP动词有下面四个(括号里是对应的SQL命令)。
- GET ( SELECT ):从服务器取出资源(一项或多项)。
- POST ( INSERT):在服务器新增一个资源。
- PUT ( UPDATE ):在服务器更新资源(客户端提供改变后的完整资源)。
- DELETE ( DELETE ):从服务器删除资源。
具体应用如下:
GET: /goods:列出所有商品清单
POST: /goods:新建一个商品(上传文件)
GET: /goods/Id:获取某个指定商品的信息
PUT: /goods/Id:更新某个指定商品的信息(提供该商品的全部信息)
DELETE: /goods/Id:删除某个商品
GET: /goods/Id/attributes:列出某个指定商品的所有属性信息
DELETE: /goods/Id/attributes:删除某个指定商品的指定属性
(6) 过滤信息
如果记录数量很多,服务器不可能都将它们返回给用户,API会提供参数,过滤返回结果,用于补充规范一些通用字段,常见的参数有:
?limit=20:指定返回记录的数量为20
?offset=8:指定返回记录的开始位置为8
?page=1&per_page=50:指定第1页,以及每页的记录数为50
?sortby=name&order=asc:指定返回结果按照name属性进行升序排序
?attr_id=2:指定筛选条件
(7) 状态码
服务器会向用户返回状态码和提示信息,以下是常用的一些状态码,也可以根据实际业务添加对应的状态码:
200 OK - - [GET] :服务器成功返回用户请求的数据;
201 CREATED - - [POST/PUT/PATCH]:用户新建或修改数据成功;
202 Accepted - - [*] :表示一个请求已经进入后台排队(异步任务);
204 NO CONTENT - - [DELETE] :用户删除数据成功;
400 INVALID REQUEST - -[POST/PUT/PATCH] :用户发出的请求有错误,服务器没有进行新建或修改数据的操作;
401 Unauthorized - - [*]:表示用户没有权限(令牌、用户名、密码错误);
403 Forbidden - - [*]表示用户得到授权(与401错误相对),但是访问是被禁 止的;
404 NOT FOUND - - [*]:用户发出的请求针对的是不存在的记录,服务器没有进行操作;
406 Not Acceptabl e - - [GET] :用户请求的格式不可得;
410 Gone - - [GET] :用户请求的资源被永久删除,且不会再得到的;
422 Unprocesable entity - -[POST/PUT/PATCH] 当创建一个对象时,发生一个验证错误;
500 INTERNAL SERVER ERROR - - [*]:服务器发生错误,用户将无法判断发出的请求是否成功。
(8)返回结果
针对不同操作,服务器向用户返回的结果应该符合以下规范:
GET /collection:返回资源对象的列表
GET /collection/Id:返回单个资源对象
POST /collection:返回新生成的资源对象
PUT /collection/ID:返回完整的资源对象
DELETE /collection/Id:返回一个空文档
常见的返回值格式如下 :
code:200 ,
msg :查询成功
data : [{},{},{}]
基于 RESTful 的 SpringBoot 项目应用
(1)常用注解:
@RestController:相当于@Controller+@ResponseBody两个注解的功能,即表示该类是一个控制器类,同时返回值是JSON格式的;
@GetMapping(“/对外访问名” ):表示只接收 get请求;
@PostMapping(“/对外访问名” ):只接收post请求,插入新数据
@PutMapping(“/对外访问名” ):只接收put请求,更改数据
@DeleteMapping(“/对外访问名”/{id}"):只接收delete请求,删除数据
@PathVariable :表示从URL路径上获取指定的参数
(2)具体代码实现见完整参考代码
2. SpringBoot热部署
在开发过程中,通常会对业务代码不断地修改测试,在修改之后往往需要重启服务,有些服务需要加载很久才能启动成功,这种重复操作极大的降低了程序开发效率。Spring Boot框架专门提供了进行 热部署的依赖启动器 spring- boot- devtools,用于进行项目热部署,而无需手动重启项目。
具体实现步骤:
(1) 在pom.xml文件中添加spring-boot-devtools的依赖;
<!--        热部署的依赖启动器 spring-boot-devtools-->
<!--        spring-boot-devtools的依赖-->
        <dependency>
            <groupId>org.springframework.boot</groupId>
            <artifactId>spring-boot-devtools</artifactId>
            <optional>true</optional>
        </dependency>
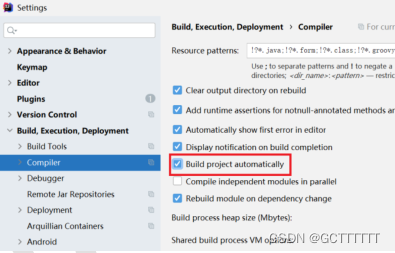
(2)IDEA 热部署设置:在IDEA中,进入“Settings”界面,打开 Build下的Compiler
面板设置页面,在右侧勾选 “Build project automatically” 选项将项目设置为自动编译;
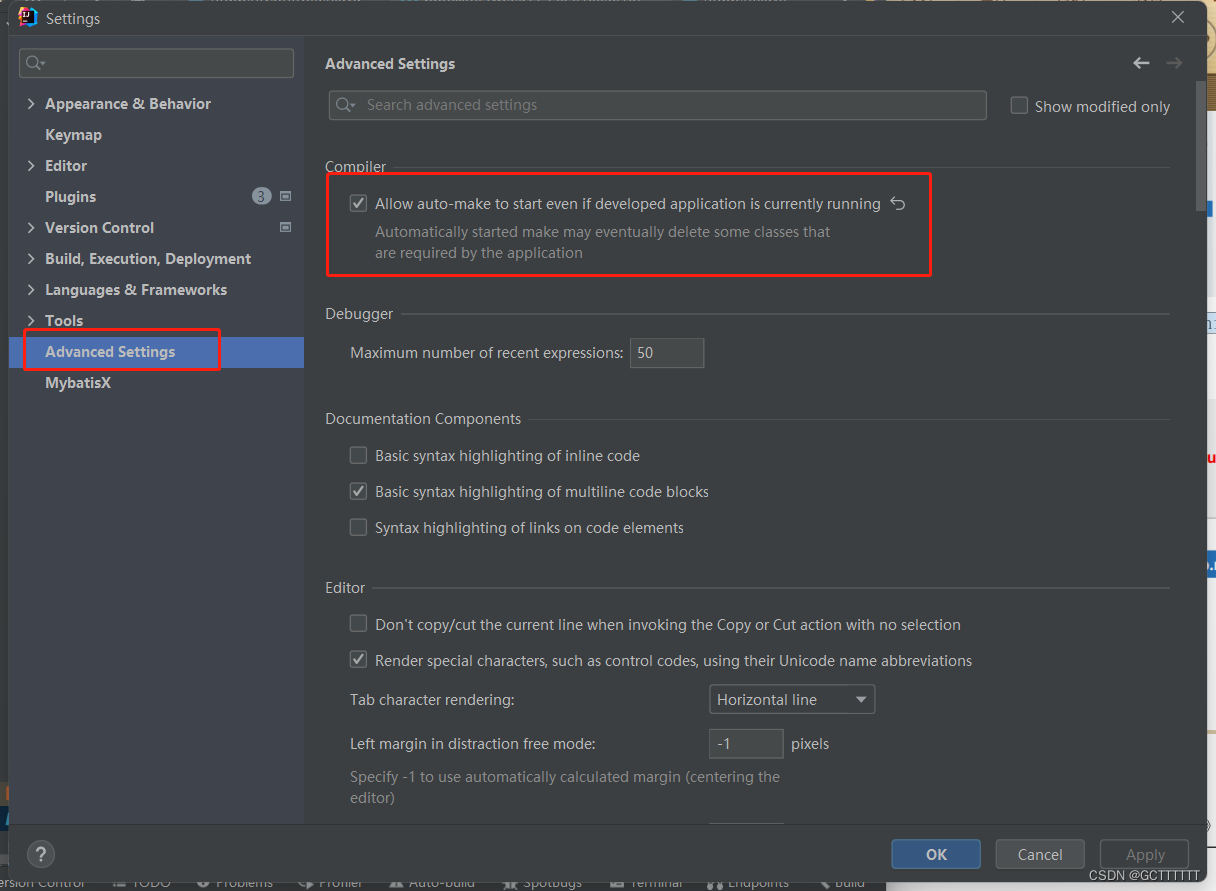
(3)在idea里面 按下“ ctrl + shift + alt + / ”然后选 Registry如下图所示,勾选该选项:

注意在2021版IDEA中会找不到这个,需要在这里进行设置: File—setting----advance
settings—勾选图中对应位置内容
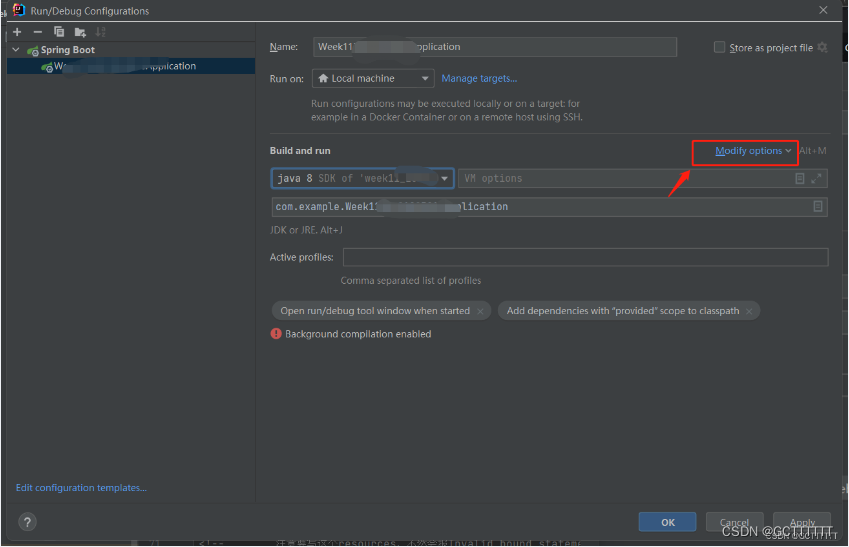
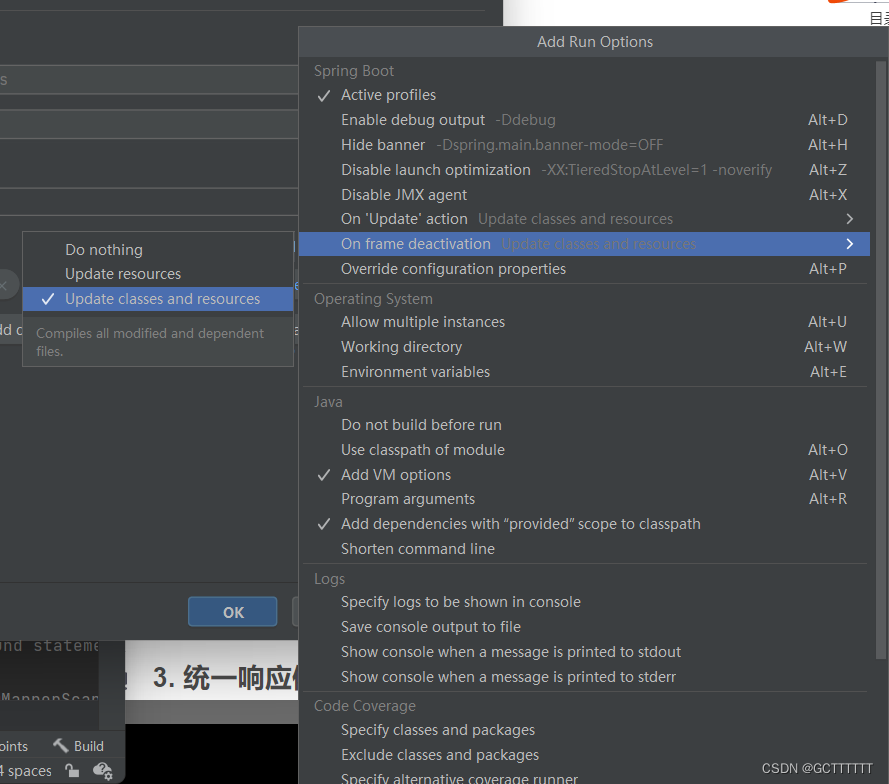
(4)配置项目更新策略
对项目进行配置,具体如下图所示。
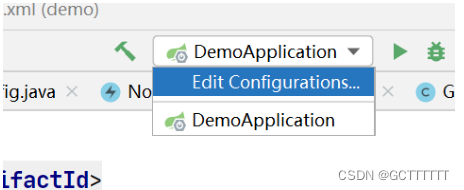
选择更新策略:
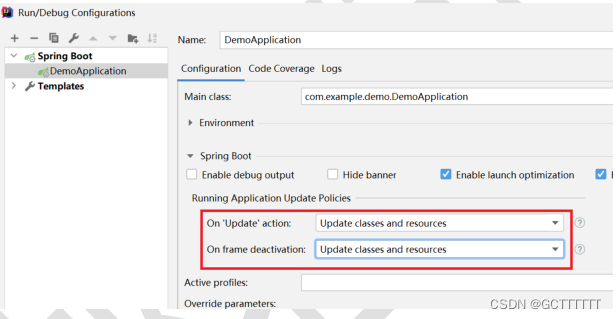
这个在2021版IDEA中在如图位置设置:

(5)重新启动IDEA即可。
3. 统一响应体
在前后端分离架构下,后端设计成 RESTful API的数据接口。接口中有时返回数据,有时又没有,还有的会出错,也就是返回结果不一致,客户端调用时非常不方便。实际开发中,一般设置 统一响应体返回值格式,通过修改响应返回的JSON数据,让其带上一些固有的字段,如下所示:
{
	"code": 200,
	"msg": "success",
	"data": {
		"id": 1,
		"uname": "cc"
		"password":111
	}
}
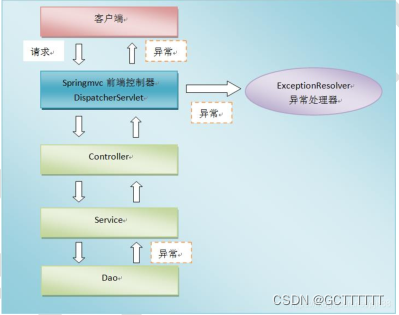
4. 全局异常处理
在web项目开发中,不管是mapper层、service层还是controller层,都有可能发生异常。如果每个异常都单独处理,系统的代码耦合性高,工作量大,维护困难。SpringMVC能将所有类型的异常处理,从各层的各种处理过程中解耦出来,进行统一处理,既保证了相关处理过程的功能较单一,也实现了异常信息的统一处理和维护。SpringMVC 框架中异常处理流程如下图所示。从图中可以看出, mapper/dao、service、controller各层出现的异常都通过throws Exception向上抛出,最后由SpringMVC前端控制器交由全局异常处理器(一个系统只有一个异常处理器)进行统一异常处理进行异常处理,所以,系统中的异常是由 SpringMVC 框架来统一处理异常的。
实现全局统一异常处理时,主要使用两个注解:
@RestControllerAdvice:定义一个类为异常类
@ExceptionHandler:指定处理特定异常的方法
具体实现思路:
- 自定义一个异常类,捕获针对项目或业务的某个异常
- 使用@ExceptionHandler注解处理自定义异常和通用异常
- 使用@RestControllerAdvice接收所有的控制层方法抛出的异常
5. Swagger API接口文档生成工具
Swagger是一个规范和完整的框架,用于生成、描述、调用和可视化 RESTful 风格的 Web 服务,它具有以下特点:
- 及时性:接口变更后,Api文档同步自动更新;
- 规范性:遵守RESTful风格,保证接口的规范性,如接口的地址,请求方式,参
数及响应格式和错误信息; - 一致性:接口信息一致,不会因开发人员拿到的文档版本不一致而导致分歧;
- 可测性:直接在接口文档上进行测试,可以在线测试Api接口,方便理解业务。
在SpringBoot 项目中应用Swagger
(1)在 pom.xml 中加入 Swagger 依赖
<!--        swagger依赖-->
        <dependency>
            <groupId>io.springfox</groupId>
            <artifactId>springfox-swagger2</artifactId>
            <version>2.9.2</version>
        </dependency>
        <dependency>
            <groupId>io.springfox</groupId>
            <artifactId>springfox-swagger-ui</artifactId>
            <version>2.9.2</version>
        </dependency>
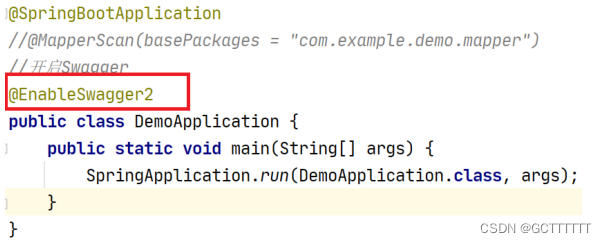
(2) 开启Swagger
在项目的启动类上加上 @EnableSwagger2注解,表示开启Swagger,同时它也支持自定义UI页面的一些信息。
(3) 修改application.yml
因为 Swagger使用的路径匹配是基于AntPathMatcher的,而Spring Boot 2.7.X使用的是PathPatternMatcher。
因此,需要在application.yml里做如下配置
  mvc:
    pathmatch:
      matching-strategy: ant_path_matcher
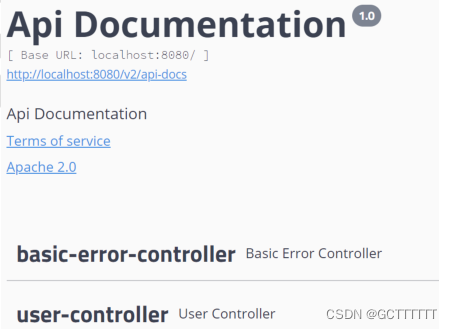
(4)启动项目,访问 API 在线文档
访问:http://localhost:8080/swagger-ui.html,即可看到接口文档信息
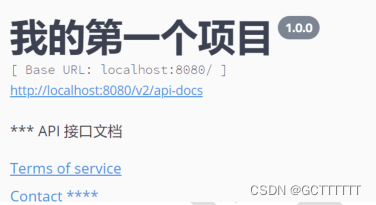
定义 Swagger 配置类,自定义 API
实现一个Swagger配置类,以实现对Swagger页面一些展示信息的定制化,例如添加作者,标题,描述等信息。
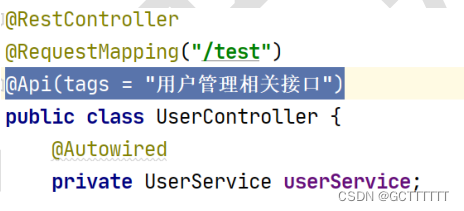
通过注解来完善API 文档
(1) ==@Api ==注解: 用来标记当前 Controller 的功能。
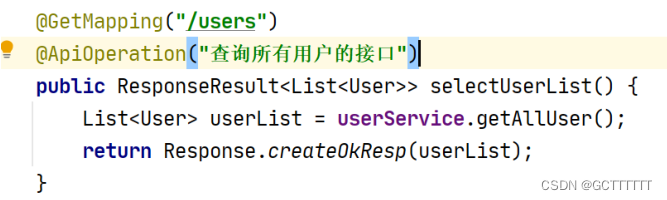
(2) @ApiOperation 注解:用来标记一个方法的作用
(3) @ApiImplicitParam 注解:用来描述一个参数,可以配置参数的中文含义,也可以给参数设置默认值,这样在接口测试的时候可以避免手动输入;
(4) @ApiModel :用在实体类上,主要属性有description(描述)、parent(父类)、
subTypes、value、discriminator等;
(5) @ApiModelProperty:用在实体类属性上,主要属性有access、accessMode、allowableValues、allowEmptyValue(是否允许为空)、dataType(数据类型)、example(示
例)、hidden(是否隐藏)、name(名称)、notes、required(是否必需)、value(说明)等。
三、项目结构
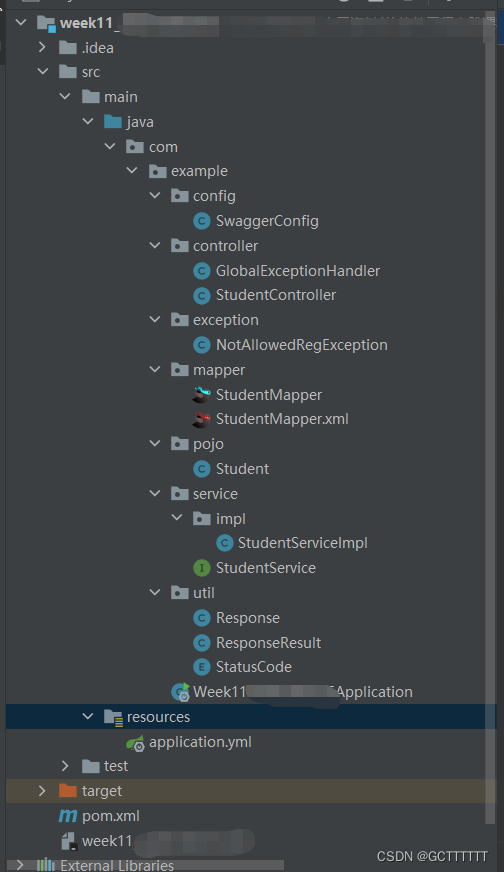
四、完整参考代码
com.example.config包
com.example.config.SwaggerConfig
package com.example.config;
import org.springframework.context.annotation.Bean;
import org.springframework.context.annotation.Configuration;
import springfox.documentation.builders.ApiInfoBuilder;
import springfox.documentation.builders.PathSelectors;
import springfox.documentation.builders.RequestHandlerSelectors;
import springfox.documentation.service.ApiInfo;
import springfox.documentation.service.Contact;
import springfox.documentation.spi.DocumentationType;
import springfox.documentation.spring.web.plugins.Docket;
/**
* Swagger配置类
*/
@Configuration
public class SwaggerConfig {
public static final String SWAGGER_SCAN_BASE_PACKAGE = "com.example";
public static final String VERSION = "1.0.0";
@Bean
public Docket createRestApi() {
return new Docket(DocumentationType.SWAGGER_2)
.apiInfo(apiInfo())
.select()
.apis(RequestHandlerSelectors.basePackage(SWAGGER_SCAN_BASE_PACKAGE))
.paths(PathSelectors.any()) // 可以根据url路径设置哪些请求加入文档,忽略哪些请求
.build();
}
private ApiInfo apiInfo() {
return new ApiInfoBuilder()
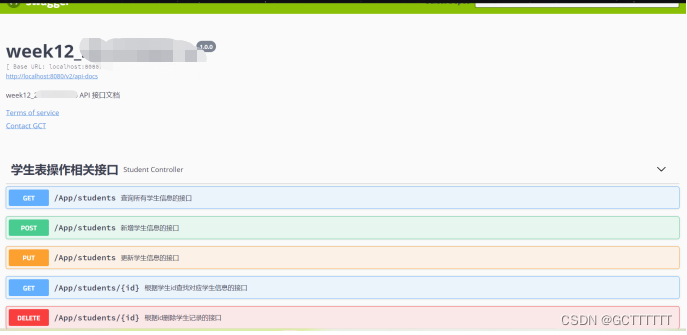
.title("week12_x") //设置文档的标题
.description("week12_x API 接口文档") // 设置文档的描述
.version(VERSION) // 设置文档的版本
.contact(new Contact("GCT", "", "***@qq.com"))
.termsOfServiceUrl("http://***.***.***") // 配置服务网站,
.build();
}
// @Bean
// public Docket docket() {
// return new Docket(DocumentationType.SWAGGER_2).apiInfo(
// new ApiInfoBuilder()
// .contact(new Contact("****", "", "****@qq.com"))
// .title("我的第一个项目")
// .build()
// );
// }
}
com.example.controller包
com.example.controller.GlobalExceptionHandler
package com.example.controller;
import com.example.exception.NotAllowedRegException;
import com.example.util.Response;
import com.example.util.ResponseResult;
import com.example.util.StatusCode;
import org.springframework.web.bind.annotation.ExceptionHandler;
import org.springframework.web.bind.annotation.RestControllerAdvice;
/**定义一个全局处理异常类,来统一处理各种异常
*
*/
//@RestController+@ControllerAdvice=@RestControllerAdvice
@RestControllerAdvice
public class GlobalExceptionHandler {
//处理异常的方法1. 并确定接收的是哪种类型的异常
@ExceptionHandler(Exception.class)
public ResponseResult exceptionHandler(Exception e)
{
// 捕获到某个指定的异常,比如是 NotAllowedRegException 类型
if(e instanceof NotAllowedRegException )
{
//处理结束后 还是要返回统一相应结果类
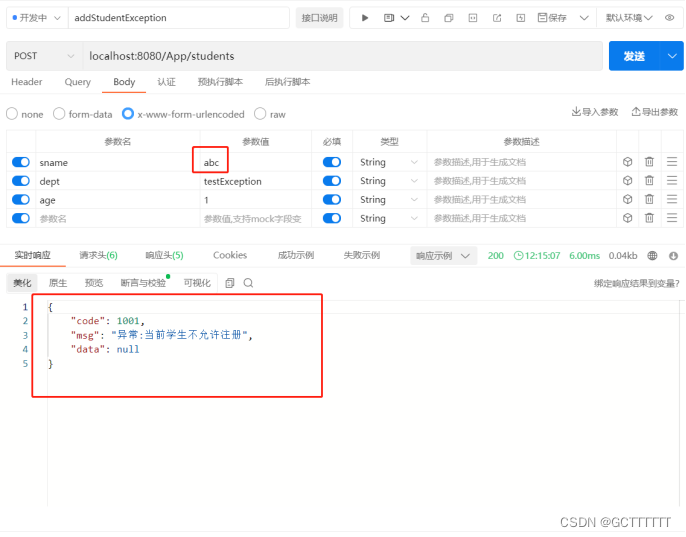
return Response.createFailResp(StatusCode.NOT_ALLOWRD_REG.code,"异常:当前学生不允许注册");
}
else
{
//处理其它类型的异常 可以进入到不同的分支
return Response.createFailResp();
}
}
/*
@ExceptionHandler(NullPointerException.class)
public ResponseResult exceptionHandler(NullPointerException e) {
}
*/
}
com.example.controller.StudentController
package com.example.controller;
import com.example.exception.NotAllowedRegException;
import com.example.pojo.Student;
import com.example.service.StudentService;
import com.example.util.Response;
import com.example.util.ResponseResult;
import io.swagger.annotations.Api;
import io.swagger.annotations.ApiOperation;
import org.springframework.beans.factory.annotation.Autowired;
import org.springframework.web.bind.annotation.*;
import java.util.List;
/**
* @projectName: week11_
* @package: com.example.controller
* @className: StudentController
* @author: GCT
* @description: TODO
* @date: 2022/11/8 21:02
* @version: 1.0
*/
@RestController //=@ResponseBody+@Controller
@RequestMapping(value = "/App")
@Api(tags = "学生表操作相关接口")
public class StudentController {
@Autowired
private StudentService studentService;
//GET请求:查找所有学生信息
@GetMapping(value = "/students")
@ApiOperation("查询所有学生信息的接口")
public ResponseResult<List<Student>> getAllStudent(){
List<Student> studentList = studentService.getAllStudentMap();
System.out.println(studentList);
return Response.createOkResp(studentList);
}
//GET请求:根据学生id查找对应学生信息
@GetMapping(value = "/students/{id}")
@ApiOperation("根据学生id查找对应学生信息的接口")
public ResponseResult<Student> getStudentById(@PathVariable("id") Long id){
Student studentById = studentService.getStudentById(id);
System.out.println(studentById);
return Response.createOkResp(studentById);
}
//使用统一的异常类处理
// 这里抛出NotAllowedRegException异常,被GlobalExceptionHandler全局异常处理类捕获并处理
//POST请求,处理页面表单中提交的数据,向数据库增加数据
@PostMapping(value = "/students")
@ApiOperation("新增学生信息的接口")
public ResponseResult<Student> addStudent(Student student) throws NotAllowedRegException {
//如果添加的学生名是"abc",则抛出异常
if(student.getSname().equals("abc"))
throw new NotAllowedRegException();
try {
studentService.addStudent(student);
return Response.createOkResp("添加成功",student);
} catch (Exception e) {
return Response.createFailResp("添加失败");
}
}
//PUT请求:更新对应学生的对应信息
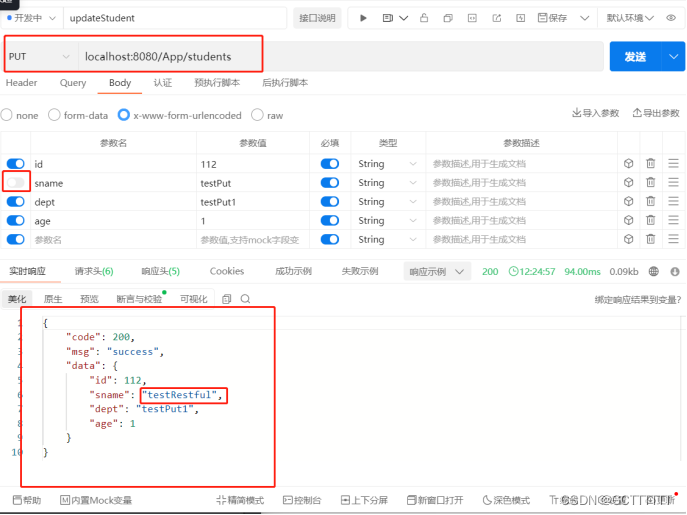
@PutMapping(value = "/students")
@ApiOperation("更新学生信息的接口")
public ResponseResult<Student> updateStudent(Student student){
System.out.println("student: ");
System.out.println(student);
int row = studentService.updateStudent(student);
System.out.println(row);
ResponseResult<Student> studentByUpdate = getStudentById(student.getId());
// return Response.createOkResp(student);
// 返回修改后的学生信息
return studentByUpdate;
}
//DELETE请求:根据id删除学生记录
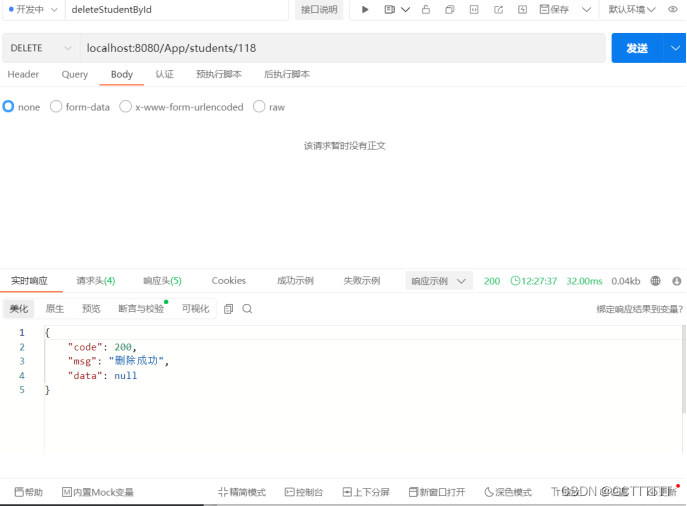
@DeleteMapping(value = "/students/{id}")
@ApiOperation("根据id删除学生记录的接口")
public ResponseResult<Student> deleteStudentById(@PathVariable("id") Long id){
try {
studentService.deleteStudentById(id);
return Response.createOkResp("删除成功");
} catch (Exception e) {
return Response.createFailResp("删除失败");
}
}
}
com.example.exception包
com.example.exception.NotAllowedRegException
package com.example.exception;

import lombok.Data;
import lombok.NoArgsConstructor;

/**
 *自定义一个异常类:不能注册
 */

@Data
@NoArgsConstructor
public class NotAllowedRegException extends Exception {

    private int code;

    private String message;

    public NotAllowedRegException(String message)
    {
        super(message);
    }
}
com.example.mapper包
com.example.mapper.StudentMapper
package com.example.mapper;

import com.example.pojo.Student;
import org.apache.ibatis.annotations.MapKey;
import org.apache.ibatis.annotations.Mapper;

import java.util.List;
import java.util.Map;

/**
 * @projectName: week11_
 * @package: com.example.mapper
 * @className: StudentMapper
 * @author: GCT
 * @description: TODO
 * @date: 2022/11/8 21:03
 * @version: 1.0
 */
@Mapper
public interface StudentMapper {

//   直接使用@Select()注解
//    @Select("SELECT * FROM users")
//    public List<User>  getAllUserMap();

    // 使用SQL配置文件
    public List<Student> getAllStudentMap();

    public Student getStudentById(Long id);

    // 该方法插入一条记录,带参数,更新操作一定要提交事务
    public int addStudent(Student student);


    public int updateStudent(Student student);

    //    根据id删除记录
    public int deleteStudentById(Long id);


}
com/example/mapper/StudentMapper.xml
<?xml version="1.0" encoding="UTF-8" ?>
<!DOCTYPE mapper
        PUBLIC "-//mybatis.org//DTD Mapper 3.0//EN"
        "http://mybatis.org/dtd/mybatis-3-mapper.dtd">
<mapper namespace="com.example.mapper.StudentMapper">

    <!--
        1.select语句返回List<Map<String,Object>,可以不使用实体类,直接用Map数据类型,更加简单,简化程序
     -->
    <select id="getAllStudentMap" resultType="Student">
        SELECT * FROM student
    </select>

    <!--
        3.SQL语句带一个参数
        parameterType:指定SQL语句接收的参数类型
     -->
    <select id="getStudentById" resultType="Student" parameterType="Long">
        SELECT * FROM student WHERE id=#{0}
    </select>


    <!-- 添加数据
        5. delete、insert、update操作没有resultType属性,默认返回int型
          parameterType=Map,表示参数类型为Map,用Map封装参数
          #表示在获取参数时可防止SQL注入攻击,应尽量使用#;模糊查询时,使用$
          INSERT INTO users SET username=,这种SQL语句是MmySql特有的扩展功能
     -->

    <insert id="addStudent" parameterType="Student">
<!--        <selectKey keyProperty="id" order="AFTER" resultType="int">-->
<!--            select LAST_INSERT_ID()-->
<!--        </selectKey>-->
        INSERT INTO student SET sname=#{sname},dept=#{dept},age=#{age}
    </insert>


    <update id="updateStudent" parameterType="Student">
        update student
        <set>
            <if test="sname!=null">
                sname=#{sname},
            </if>
            <if test="dept!=null">
                dept=#{dept},
            </if>
            <if test="age!=null">
                age=#{age},
            </if>
            id=#{id}
        </set>
        where id=#{id}
    </update>

    <!--    根据id删除记录-->
    <!--	注意传参类型改成long后这里parameterType也要改-->
    <delete id="deleteStudentById" parameterType="Long">
        DELETE FROM student WHERE id=#{id}
    </delete>

</mapper>
com.example.pojo包
com.example.pojo.Student
package com.example.pojo;

import io.swagger.annotations.ApiModel;
import io.swagger.annotations.ApiModelProperty;
import lombok.AllArgsConstructor;
import lombok.Data;
import lombok.NoArgsConstructor;

/**
 * @projectName: week11_
 * @package: com.example.pojo
 * @className: Student
 * @author: GCT
 * @description: TODO
 * @date: 2022/11/8 21:02
 * @version: 1.0
 */
@Data /*自动生成 set get toString方法*/
@NoArgsConstructor //自动生成无参构造函数
@AllArgsConstructor
@ApiModel(description = "学生实体类")
public class Student {
    @ApiModelProperty(value = "学生id",name = "id",example = "1")
    Long id;
    @ApiModelProperty(value = "学生用户名",name = "sname",example = "gct")
    String sname;
    @ApiModelProperty(value = "学生所在学院",name = "dept",example = "se")
    String dept;
    @ApiModelProperty(value = "年龄",name = "password",example = "0")
    int age;

}
com.example.service包
com.example.service.impl包
com.example.service.impl.StudentServiceImpl
package com.example.service.impl;

import com.example.mapper.StudentMapper;
import com.example.pojo.Student;
import com.example.service.StudentService;
import org.springframework.beans.factory.annotation.Autowired;
import org.springframework.stereotype.Service;

import java.util.List;
import java.util.Map;

/**
 * @projectName: week11_
 * @package: com.example.service.impl
 * @className: StudentServiceImpl
 * @author: GCT
 * @description: TODO
 * @date: 2022/11/8 21:03
 * @version: 1.0
 */
@Service //注意记得加@Service注解 :把这个类交给sping框架管理(bean),不然在controller中@Autowire会找不到该类!
public class StudentServiceImpl implements StudentService {
    @Autowired
    private StudentMapper studentMapper;

    @Override
    public List<Student> getAllStudentMap() {
        return studentMapper.getAllStudentMap();
    }

    @Override
    public Student getStudentById(Long id) {
        return studentMapper.getStudentById(id);
    }

    @Override
    public int addStudent(Student student) {
        return studentMapper.addStudent(student);
    }

    public int updateStudent(Student student) {
        return studentMapper.updateStudent(student);
    }

    @Override
    public int deleteStudentById(Long id) {
        return studentMapper.deleteStudentById(id);
    }

}
com.example.service.StudentService
package com.example.service;

import com.example.pojo.Student;
import org.apache.ibatis.annotations.MapKey;

import java.util.List;
import java.util.Map;

public interface StudentService {

    public List<Student> getAllStudentMap();

    public Student getStudentById(Long id);

    // 该方法插入一条记录,带参数,更新操作一定要提交事务
    public int addStudent(Student student);


    public int updateStudent(Student student);

    //    根据id删除记录
    public int deleteStudentById(Long id);

}
com.example.util包
com.example.util.Response
package com.example.util;

/**
 * 定义不同情景下,各种响应体返回的具体值
 *
 */
public class Response {

    private static String SUCCESS="success";

    private static String FAIL="fail";

    //创建不同场景下的返回结果对象

    //1.成功执行,没有要返回的数据
    public static <T> ResponseResult<T> createOkResp()
    {
           return new ResponseResult<T>(StatusCode.SUCCESS.code,SUCCESS,null);
    }

    //2.成功执行,需要返回数据
    public static <T> ResponseResult<T> createOkResp(T data)
    {
        return new ResponseResult<T>(StatusCode.SUCCESS.code,SUCCESS,data);
    }

    //3.成功执行,需要返回消息和数据
    public static <T> ResponseResult<T> createOkResp(String msg, T data)
    {
        return new ResponseResult<T>(StatusCode.SUCCESS.code,msg,data);
    }

    //4.成功执行,需要消息参数,无数据
    public static <T> ResponseResult<T> createOkResp(String msg)
    {
        return new ResponseResult<T>(StatusCode.SUCCESS.code,msg,null);
    }

    //1.失败执行
    public static <T> ResponseResult<T> createFailResp()
    {
        return new ResponseResult<T>(StatusCode.SERVER_ERROR.code,FAIL,null);
    }

    //2.失败执行
    public static <T> ResponseResult<T> createFailResp(String msg)
    {
        return new ResponseResult<T>(500,msg,null);
    }

    //3.其它失败执行
    public static <T> ResponseResult<T> createFailResp(int code, String msg)
    {
        return new ResponseResult<T>(code,msg,null);
    }

    //4.其他执行
    public static <T> ResponseResult<T> createResp(int code, String msg, T data)
    {
        return new ResponseResult<T>(code,msg,data);
    }

}
com.example.util.ResponseResult
package com.example.util;

import lombok.AllArgsConstructor;
import lombok.Data;
import lombok.NoArgsConstructor;

/**
 * 定义响应结果的统一格式,这里定义响应结果由三个要素构成
 *
 */
@Data
@NoArgsConstructor
@AllArgsConstructor
public class ResponseResult<T> {
    //1.状态码
    private int code;
    //2.消息
    private String msg;
    //3.返回数据
    private  T  data;

}
com.example.util.StatusCode
package com.example.util;

/**
 *封装各种状态码
 */
public enum StatusCode {

    //定义枚举项,并调用构造函数
    //http定义好的状态码
     SUCCESS(200),
     SERVER_ERROR(500),
     URL_NOT_FOUND(404),

    //自定义的状态码
    NOT_ALLOWRD_REG(1001);

    //定义成员变量
    public int code;
    //构造方法
    private StatusCode(int code)
    {
        this.code=code;
    }

}
com.example.Week11xxxxxxxxxxxApplication
package com.example;

import org.mybatis.spring.annotation.MapperScan;
import org.springframework.boot.SpringApplication;
import org.springframework.boot.autoconfigure.SpringBootApplication;
import springfox.documentation.swagger2.annotations.EnableSwagger2;

@SpringBootApplication
//别忘了加这个注解扫描mapper层中的所有类,不然会找不到对应的mapper文件
@MapperScan(basePackages = "com.example.mapper")
@EnableSwagger2 //http://localhost:8080/swagger-ui.html
public class Week11xxxxxxxxxxxApplication {

    public static void main(String[] args) {
        SpringApplication.run(Week11xxxxxxxxxxxApplication.class, args);
    }

}
src/main/resources文件夹
src/main/resources/application.yml
spring:
  datasource:
    driver-class-name: com.mysql.cj.jdbc.Driver
    url: jdbc:mysql://localhost:3306/myschool?serverTimezone=Hongkong?characterEncoding=utf8&serverTimezone=GMT%2B8
    username: root
    password: pwd
  mvc:
    pathmatch:
      matching-strategy: ant_path_matcher

mybatis:
  mapper-locations: classpath:com/exmaple/mapper/*.xml    #指定sql配置文件的位置
  type-aliases-package: com.example.pojo      #指定实体类所在的包名
  configuration:
    log-impl: org.apache.ibatis.logging.stdout.StdOutImpl   #输出SQL命令
pom.xml
<?xml version="1.0" encoding="UTF-8"?>
<project xmlns="http://maven.apache.org/POM/4.0.0" xmlns:xsi="http://www.w3.org/2001/XMLSchema-instance"
         xsi:schemaLocation="http://maven.apache.org/POM/4.0.0 https://maven.apache.org/xsd/maven-4.0.0.xsd">
    <modelVersion>4.0.0</modelVersion>
    <parent>
        <groupId>org.springframework.boot</groupId>
        <artifactId>spring-boot-starter-parent</artifactId>
        <version>2.7.5</version>
        <relativePath/> <!-- lookup parent from repository -->
    </parent>
    <groupId>com.example</groupId>
    <artifactId>week11_x</artifactId>
    <version>0.0.1-SNAPSHOT</version>
    <name>week11_x</name>
    <description>week11_x</description>
    <properties>
        <java.version>1.8</java.version>
    </properties>
    <dependencies>
        <dependency>
            <groupId>org.springframework.boot</groupId>
            <artifactId>spring-boot-starter-web</artifactId>
        </dependency>
        <dependency>
            <groupId>org.mybatis.spring.boot</groupId>
            <artifactId>mybatis-spring-boot-starter</artifactId>
            <version>2.2.2</version>
        </dependency>

        <dependency>
            <groupId>com.mysql</groupId>
            <artifactId>mysql-connector-j</artifactId>
            <scope>runtime</scope>
        </dependency>
        <dependency>
            <groupId>org.projectlombok</groupId>
            <artifactId>lombok</artifactId>
            <optional>true</optional>
        </dependency>
        <dependency>
            <groupId>org.springframework.boot</groupId>
            <artifactId>spring-boot-starter-test</artifactId>
            <scope>test</scope>
        </dependency>

        <!--        swagger依赖-->
        <dependency>
            <groupId>io.springfox</groupId>
            <artifactId>springfox-swagger2</artifactId>
            <version>2.9.2</version>
        </dependency>
        <dependency>
            <groupId>io.springfox</groupId>
            <artifactId>springfox-swagger-ui</artifactId>
            <version>2.9.2</version>
        </dependency>

<!--        热部署的依赖启动器 spring-boot-devtools-->
<!--        spring-boot-devtools的依赖-->
        <dependency>
            <groupId>org.springframework.boot</groupId>
            <artifactId>spring-boot-devtools</artifactId>
            <optional>true</optional>
        </dependency>


    </dependencies>

    <build>

<!--        注意要写这个resources,不然会报Invalid bound statement (not found): com.example.mapper.....-->
<!--        遇到这个报错:-->
<!--        1、检查springboot的application中是否有加@MapperScan(basePackages = "com.example.mapper")注解-->
<!--        2、检查...Mapper.java文件是否有@Mapper注解-->
<!--        3、检查配置文件(application.yml)中是否有-->
<!--        mybatis:-->
<!--            mapper-locations: classpath:com/exmaple/mapper/*.xml    #指定sql配置文件的位置-->
<!--        4、检查pom.xml文件中<build>标签中是否有配这个resources-->
        <!-- 将java目录下的xml文件打包-->
        <resources>
            <resource>
                <directory>src/main/java</directory>
                <includes>
                    <include>**/*.xml</include>
                </includes>
            </resource>
            <resource>
                <directory>src/main/resources</directory>
                <includes>
                    <include>**.*</include>
                </includes>
            </resource>
        </resources>

        <plugins>
            <plugin>
                <groupId>org.springframework.boot</groupId>
                <artifactId>spring-boot-maven-plugin</artifactId>
                <configuration>
                    <fork>true</fork>
                    <excludes>
                        <exclude>
                            <groupId>org.projectlombok</groupId>
                            <artifactId>lombok</artifactId>
                        </exclude>
                    </excludes>
                </configuration>
            </plugin>
        </plugins>
    </build>

</project>
五、运行结果
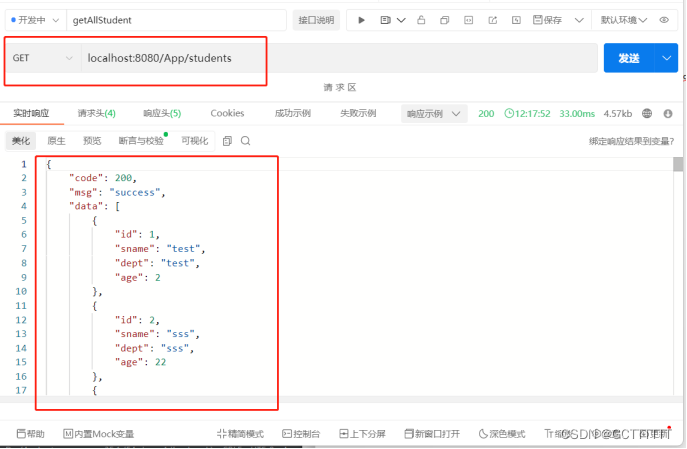
StudentController中接口测试截图
查询所有学生信息的测试接口localhost:8080/App/students,GET请求:
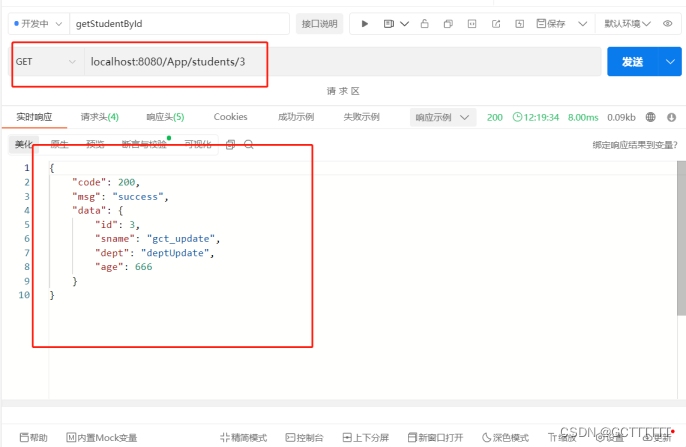
根据学生id查找对应学生信息的测试接口localhost:8080/App/students/3,GET请求:
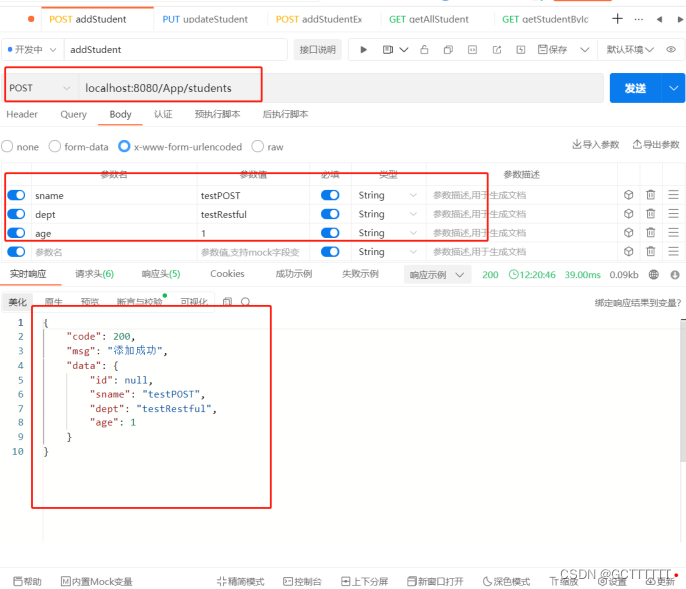
新增学生信息的测试接口localhost:8080/App/students,POST请求:
新增学生信息的异常处理测试接口localhost:8080/App/students,POST请求:
更新学生信息的测试接口localhost:8080/App/students,PUT请求:
(返回信息data中的为更新后该id对应学生的信息)
根据id删除学生记录的测试接口localhost:8080/App/students/118,DELETE请求:
配置Swagger后生成的API自动文档截图:


 3108
3108


 被折叠的 条评论
为什么被折叠?
被折叠的 条评论
为什么被折叠?
 到【灌水乐园】发言


