


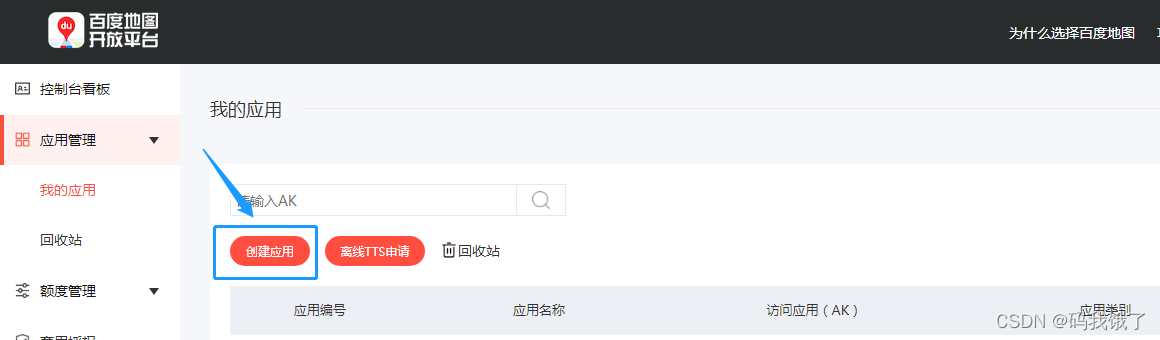
1.首先在百度地图开放平台创建应用,获取AKhttps://lbsyun.baidu.com/
2.在vue项目最外层的index.html文件中引入
<script type="text/javascript"src="https://api.map.baidu.com/api?v=3.0&ak=你的AK"></script>
3.在需要使用地图的页面(看着代码多,直接复制上去,修改请求接口名称,styleId,再根据后台接口返回的数据进行赋值,替换自定义图标,----记得设置地图容器宽高)
<div class="mapBox" id="allmap"></div>//设置宽高
//在接口返回数据中进行操作(根据自己接口返回数据进行填充)
getJdList().then((res) => {
    if (res.data.success) {
        this.tableData = res.data.result.records;
        // 百度地图API功能
        let map = new BMap.Map("allmap"); // 创建Map实例
        //我在这里使用第一个点的经纬度作为地图的中心点坐标,如果没有值,使用一个默认的点;
        if(this.tableData.length > 0){
            let p0 = this.tableData[0].location.split(",")[0];
            let p1 = this.tableData[0].location.split(",")[1];
            map.centerAndZoom(new BMap.Point(p0, p1), 12); // 初始化地图,设置中心点坐标和地图级别
        }else{
            map.centerAndZoom(new BMap.Point(108.93425, 34.23053), 6); // 初始化地图,设置中心点坐标和地图级别
        }
        map.enableScrollWheelZoom(true); //开启鼠标滚轮缩放
        // 设置个性化地图----这块需要注意,地图的版本必须是v=3.0,否则加载不出来
        map.setMapStyleV2({
            styleId: '你的styleId'
        });
        for (let i = 0; i < this.tableData.length; i++) {
            let p0 = this.tableData[i].location.split(",")[0]; //
            let p1 = this.tableData[i].location.split(",")[1]; //将location的经纬度分别提出来
            let points = new window.BMap.Point(p0, p1); //循环生成新的地图点
            let opts = {
                width: 350, // 信息窗口宽度
                height: 140, // 信息窗口高度
            }
            let html =
                "<div style='height:140px;display:flex;justify-content: space-between;font-size:0.8vw;background:rgba(0,255,255,0.1)'>"+
                    "<img style='width: 40%;height:100%' src="+this.tableData[i].photo+" alt=''>"+
                    "<div style='width:55%;height:100%;display:flex;justify-content: space-between;flex-flow:column;'>"+
                        "<div style='display:flex;line-height:2.5vh;padding-right:10px;justify-content: space-between;border-bottom:1px solid rgba(255,255,255,.5)'>"+
                            "<span>名称:</span>"+
                            "<span>"+this.tableData[i].name+"</span>"+
                        "</div>"+
                        "<div style='line-height:2.5vh;padding-right:10px;display:flex;justify-content: space-between;border-bottom:1px solid rgba(255,255,255,.5)'>"+
                            "<span>面积(亩):</span>"+
                            "<span>"+this.tableData[i].space+"</span>"+
                        "</div>"+
                        "<div style='line-height:2.5vh;padding-right:10px;display:flex;justify-content: space-between;border-bottom:1px solid rgba(255,255,255,.5)'>"+
                            "<span>联系人:</span>"+
                            "<span>"+this.tableData[i].user+"</span>"+
                        "</div>"+
                        "<div style='line-height:2.5vh;padding-right:10px;display:flex;justify-content: space-between;border-bottom:1px solid rgba(255,255,255,.5)'>"+
                            "<span>联系电话:</span>"+
                            "<span>"+this.tableData[i].userPhone+"</span>"+
                        "</div>"+
                        "<div style='line-height:2.5vh;padding-right:10px;display:flex;justify-content: space-between;border-bottom:1px solid rgba(255,255,255,.5)'>"+
                            "<span>主栽品种:</span>"+
                            "<span>"+this.tableData[i].variety+"</span>"+
                        "</div>"+
                    "</div>"+
                "</div>";
            let infoWindows = new BMap.InfoWindow(html, opts);
            //设置自定义图标时,需要使用require
            let myIcon = new BMap.Icon(require("@/assets/images/other/marker.png"), new BMap.Size(43, 55), {
                offset: new BMap.Size(0, 0), // 指定定位位置
                // imageOffset: new BMap.Size(0, 0 - 10 * 25) // 设置图片偏移
            });
            let markers = new BMap.Marker(points,{ icon: myIcon });
            map.addOverlay(markers);
            //鼠标点击标注点
            markers.addEventListener('click', function () {
                this.openInfoWindow(infoWindows, points);//参数:窗口、点  根据点击的点出现对应的窗口
            })
            // 鼠标移开标注点
            markers.addEventListener("mouseout", function () {
              	this.closeInfoWindow(infoWindows);
            });
        };
    }
}).catch((err) => {});
备注:
如需修改infoWindow弹出框的样式,在index.html进行设置;
.BMap_pop div:nth-child(1){
    border-radius:7px;
    border: none;
    padding: 0;
}
.BMap_pop .BMap_top{
  	border:0 !important;
}
.BMap_pop .BMap_center{
  	border:0 !important;
}
.BMap_pop .BMap_bottom{
  	border:0 !important;
}
这篇文章…en 总的来说…en… 不错


 2万+
2万+

 被折叠的 条评论
为什么被折叠?
被折叠的 条评论
为什么被折叠?
 到【灌水乐园】发言


