


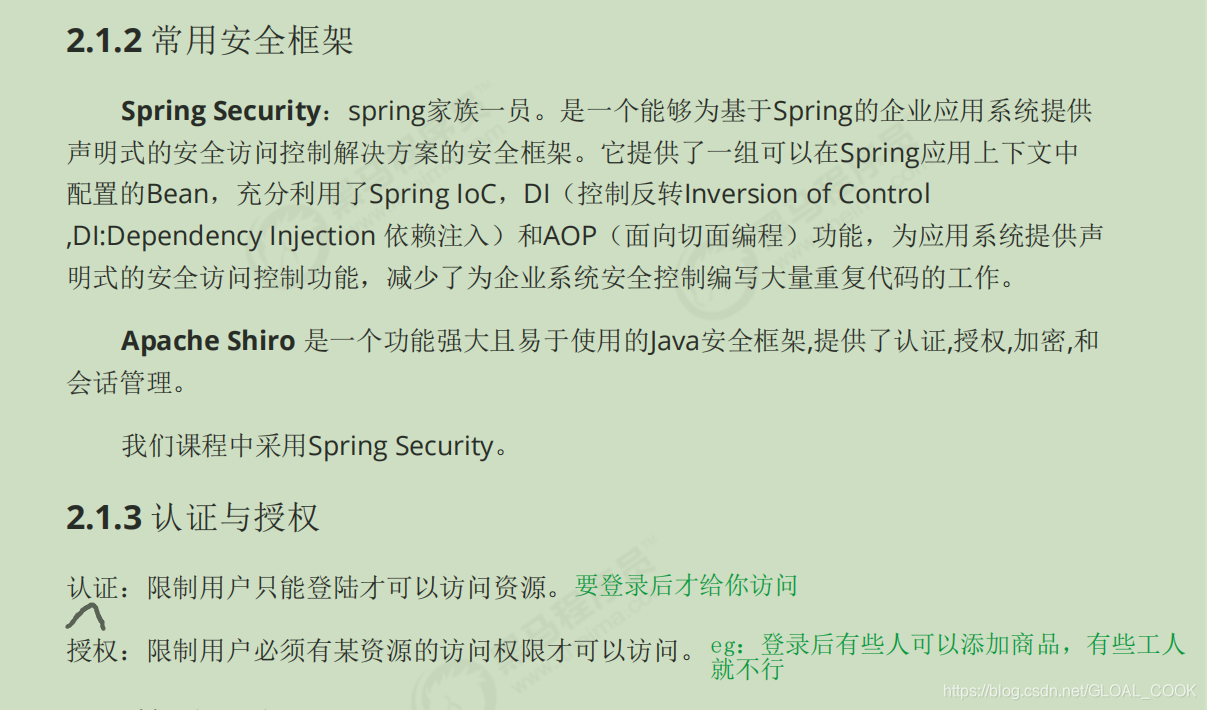
一、概念
什么是安全框架? 解决系统安全问题的框架。如果没有安全框架,我们需要手动处 理每个资源的访问控制,非常麻烦。使用安全框架,我们可以通过配置的方式实现对资 源的访问限制。(之前用session来认证很麻烦的)
二、快速入门
需求:实现简单的登陆,当用户没有登陆访问主页执行拦截跳转到登陆,登陆后跳转到 主页。实现退出登陆的功能,退出后再次访问主页仍然拦截。用户名和密码不连接数据 库,直接在配置文件中配置。
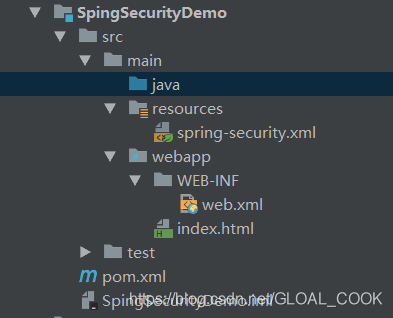
(1)新建war工程(无骨架maven工程),pom文件引入依赖:
<?xml version="1.0" encoding="UTF-8"?>
<project xmlns="http://maven.apache.org/POM/4.0.0"
         xmlns:xsi="http://www.w3.org/2001/XMLSchema-instance"
         xsi:schemaLocation="http://maven.apache.org/POM/4.0.0 http://maven.apache.org/xsd/maven-4.0.0.xsd">
    <modelVersion>4.0.0</modelVersion>

    <groupId>com.itheima</groupId>
    <artifactId>SpingSecurityDemo</artifactId>
    <version>1.0-SNAPSHOT</version>
    <packaging>war</packaging>

    <dependencies>

        <!-- spring-security依赖 -->
        <dependency>
            <groupId>org.springframework.security</groupId>
            <artifactId>spring-security-config</artifactId>
            <version>5.0.5.RELEASE</version>
        </dependency>
        <dependency>
            <groupId>org.springframework.security</groupId>
            <artifactId>spring-security-web</artifactId>
            <version>5.0.5.RELEASE</version>
        </dependency>
		<dependency>
            <groupId>javax.servlet</groupId>
            <artifactId>javax.servlet-api</artifactId>
            <version>3.1.0</version>
            <scope>provided</scope>
        </dependency>
    </dependencies>

    <build>
        <plugins>
            <plugin>
                <groupId>org.apache.tomcat.maven</groupId>
                <artifactId>tomcat7-maven-plugin</artifactId>
                <configuration>
                    <port>9090</port>
                    <path>/</path>
                </configuration>
            </plugin>
        </plugins>
    </build>


</project>
(2)创建webapp/WEB-INF/web.xml:
<?xml version="1.0" encoding="UTF-8"?>
<web-app xmlns:xsi="http://www.w3.org/2001/XMLSchema-instance"
         xmlns="http://java.sun.com/xml/ns/javaee"
         xsi:schemaLocation="http://java.sun.com/xml/ns/javaee http://java.sun.com/xml/ns/javaee/web-app_2_5.xsd"
         version="2.5">
    <context-param>
        <param-name>contextConfigLocation</param-name>
        <param-value>classpath:spring-security.xml</param-value>
    </context-param>
    <listener>
        <listener-class>
            org.springframework.web.context.ContextLoaderListener
        </listener-class>
    </listener>
    <filter>
        <filter-name>springSecurityFilterChain</filter-name>
        <filter-class>org.springframework.web.filter.DelegatingFilterProxy</filter-class>
    </filter>
    <filter-mapping>
        <filter-name>springSecurityFilterChain</filter-name>
        <url-pattern>/*</url-pattern>
    </filter-mapping>
</web-app>
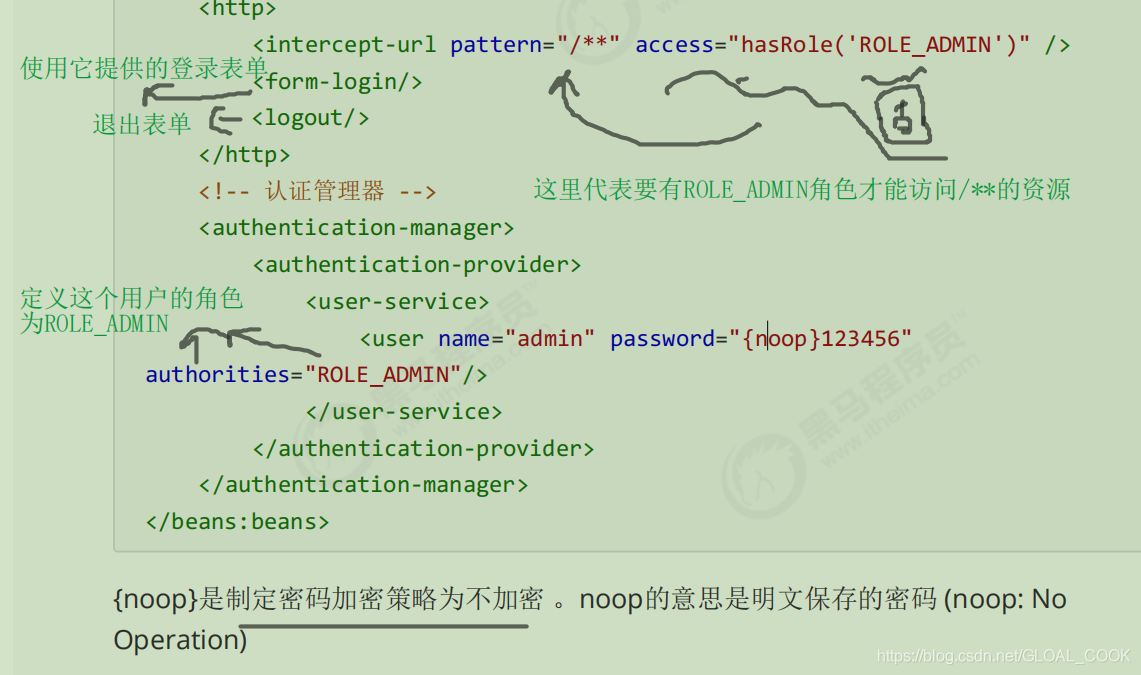
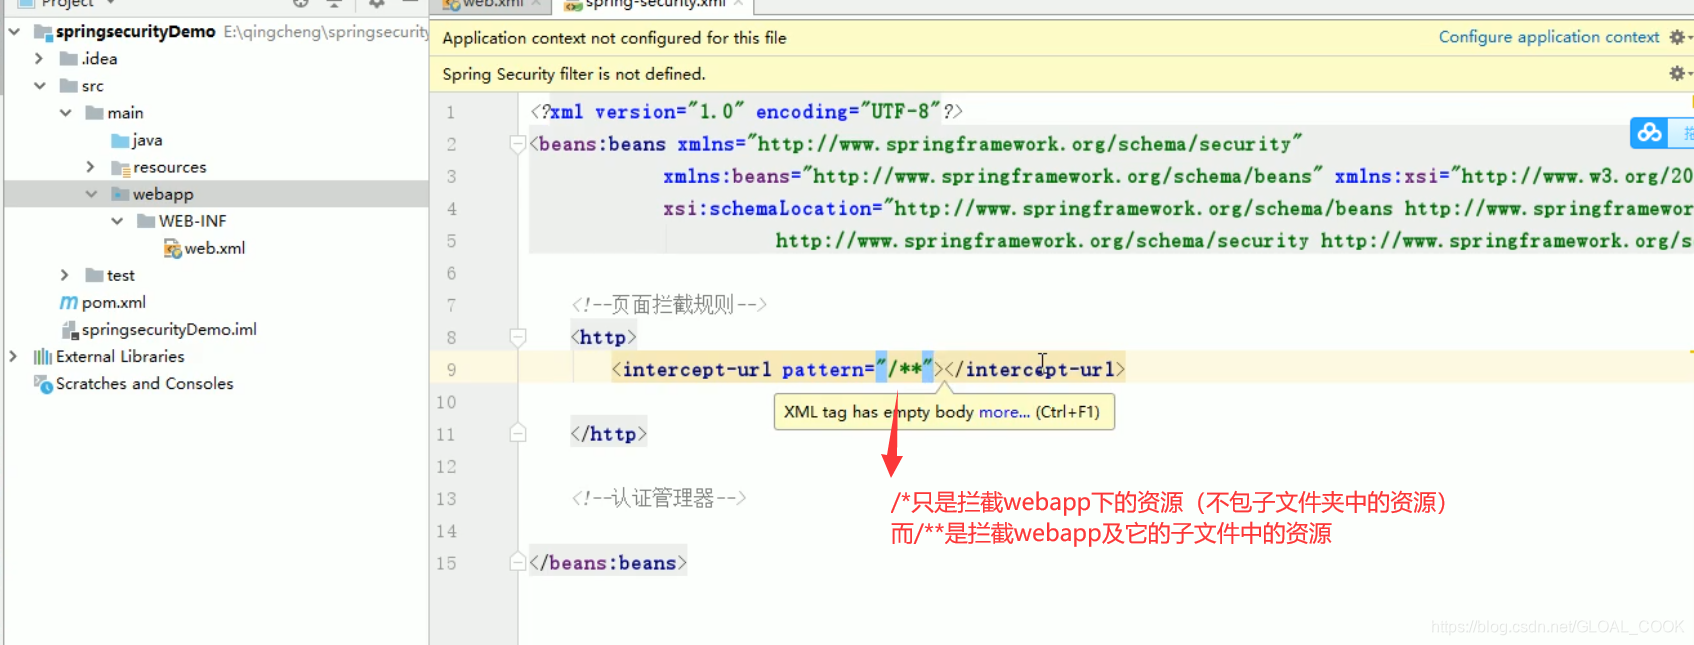
(3)resources下创建spring-security.xml:
<?xml version="1.0" encoding="UTF-8"?>
<beans:beans xmlns="http://www.springframework.org/schema/security"
             xmlns:beans="http://www.springframework.org/schema/beans" xmlns:xsi="http://www.w3.org/2001/XMLSchema-instance"
             xsi:schemaLocation="http://www.springframework.org/schema/beans http://www.springframework.org/schema/beans/spring-beans.xsd
						http://www.springframework.org/schema/security http://www.springframework.org/schema/security/spring-security.xsd">
    <!--页面拦截规则-->
    <http>
        <intercept-url pattern="/**" access="hasRole('ROLE_ADMIN')"></intercept-url>
        <form-login/>
        <logout/>
    </http>

    <!--认证管理器-->
    <authentication-manager>
        <authentication-provider>
            <user-service>
                <user name="admin" password="{noop}123456" authorities="ROLE_ADMIN"/>
            </user-service>
        </authentication-provider>
    </authentication-manager>
</beans:beans>
(4)新建一个html:
<!DOCTYPE html>
<html lang="en">
<head>
    <meta charset="UTF-8">
    <title>index</title>
</head>
<body>
<h1>欢迎来到神奇的Spring Security世界</h1>
</body>
</html>
右边运行tomca,打开浏览器输入地址 http://localhost:9090/index.html ,浏览器显示 这个登陆页面时SpringSecurity帮我们自动生成的。输入正确的密码,进入首页: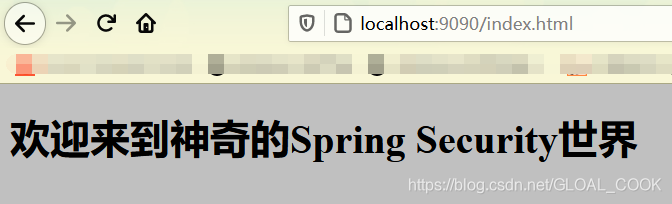
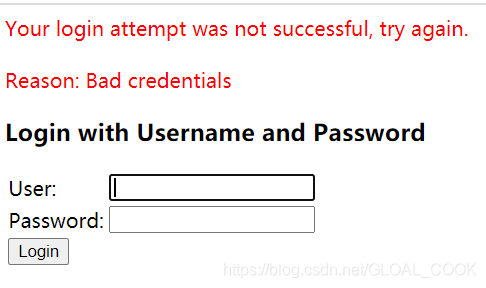
输入错误的密码显示如下信息:
入门成功!
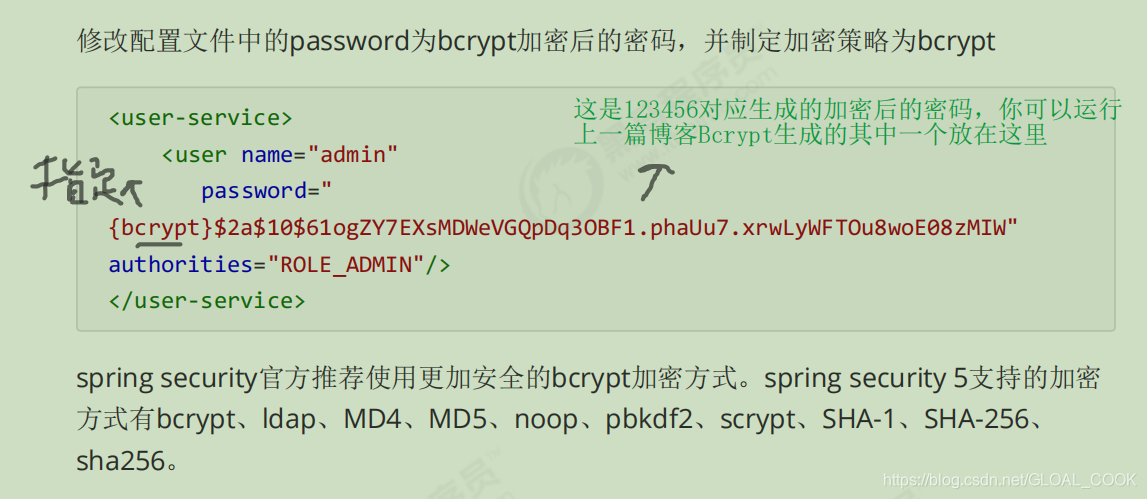
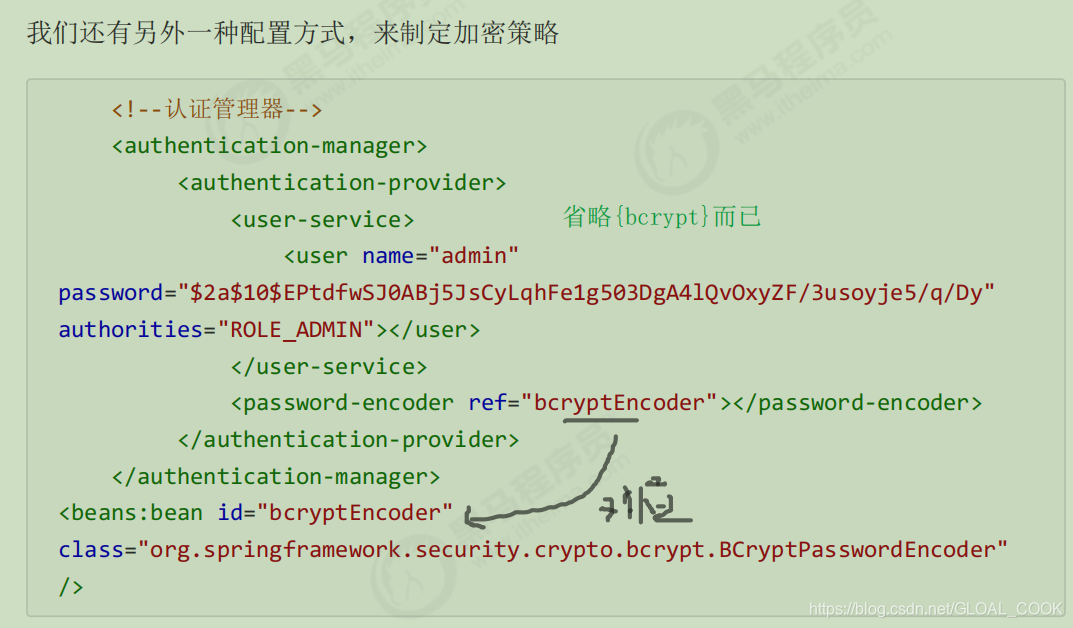
spring-security.xml可以改为这个:
三、自定义登录页面
刚刚我们都是使用spring security提供的登录表单,现在我们自定义登录表单:
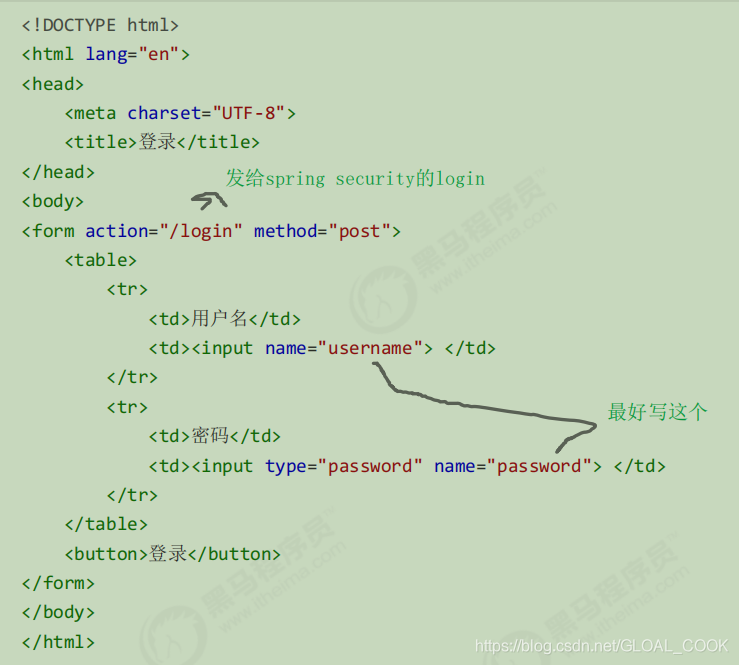
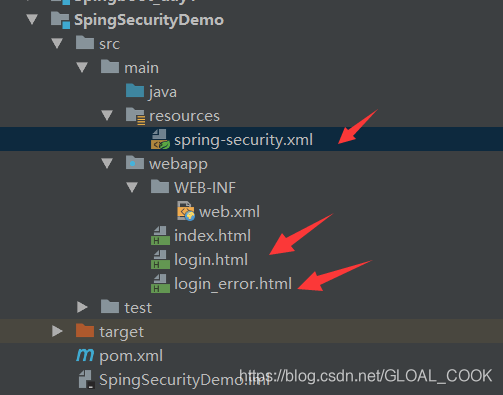
(1)创建页面login.html
(2)创建login_error.html
<!DOCTYPE html>
<html lang="en">
<head>
    <meta charset="UTF-8">
    <title>登录错误</title>
</head>
<body>

<h1>用户名或者密码错误</h1>
</body>
</html>
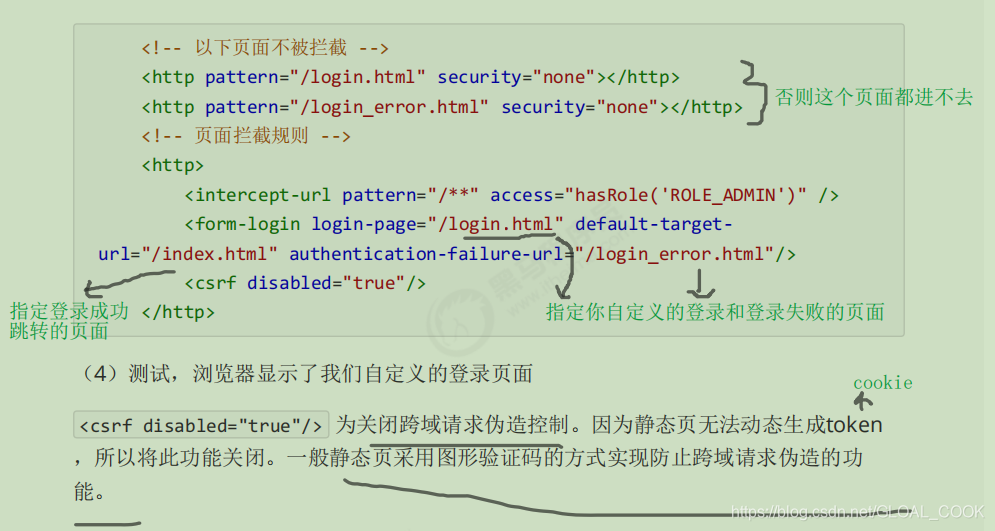
(3)修改spring-security.xml拦截规则部分:
<?xml version="1.0" encoding="UTF-8"?>
<beans:beans xmlns="http://www.springframework.org/schema/security"
             xmlns:beans="http://www.springframework.org/schema/beans" xmlns:xsi="http://www.w3.org/2001/XMLSchema-instance"
             xsi:schemaLocation="http://www.springframework.org/schema/beans http://www.springframework.org/schema/beans/spring-beans.xsd
						http://www.springframework.org/schema/security http://www.springframework.org/schema/security/spring-security.xsd">

    <!--以下页面不被拦截-->
    <http pattern="/login.html" security="none"></http>
    <http pattern="/login_error.html" security="none"></http>
    <!--页面拦截规则-->
    <http>
        <intercept-url pattern="/**" access="hasRole('ROLE_ADMIN')"></intercept-url>
        <form-login login-page="/login.html" default-target-url="/index.html"
                    authentication-failure-url="/login_error.html"/>
        <!--关闭跨域请求伪造控制-->
        <csrf disabled="true"></csrf>
        <logout/>
    </http>

    <!--认证管理器-->
    <authentication-manager>
        <authentication-provider>
            <user-service>
                <user name="admin" password="{bcrypt}$2a$10$.y06VRPWJYKPH/DRafZgMunFX.y/0iKzBLkD/YyPXupVvMexPKQ5G" authorities="ROLE_ADMIN"/>
            </user-service>
        </authentication-provider>
    </authentication-manager>
</beans:beans>
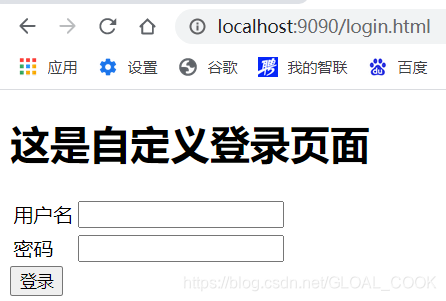
运行tomcat登录:
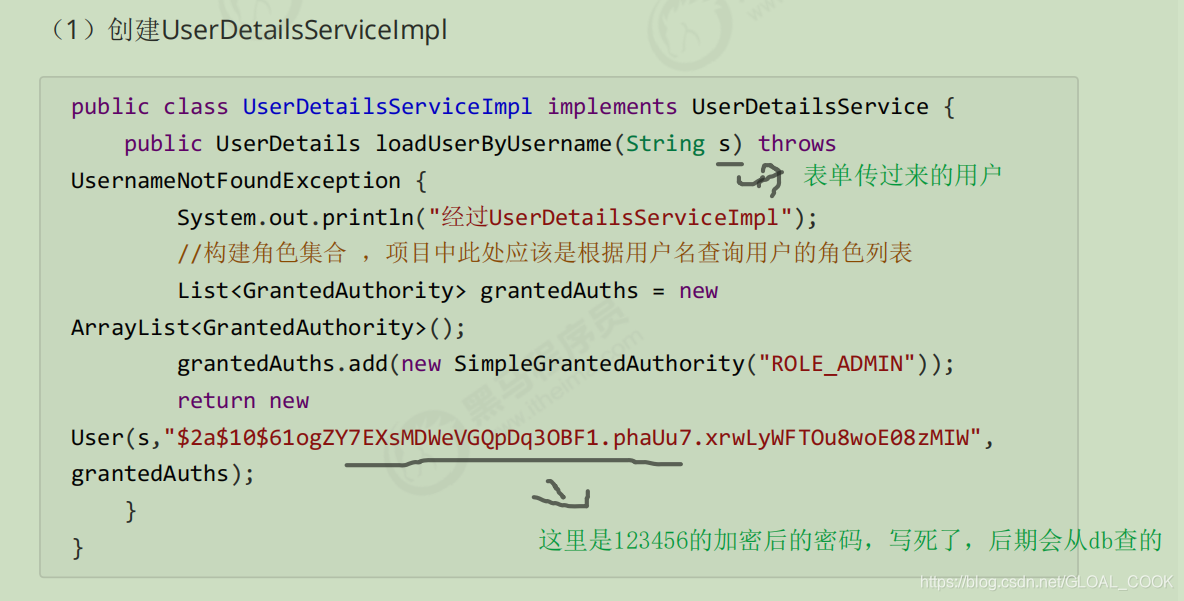
四、UserDetailsService
我们刚才的例子是将用户名和密码配置在配置文件中,实际的企业级开发更多的是从数 据库中提取用户名和密码信息,如何做到呢?我们这里学习UserDetailsService的使用。
(2)修改配置文件 spring-security.xml认证管理器部分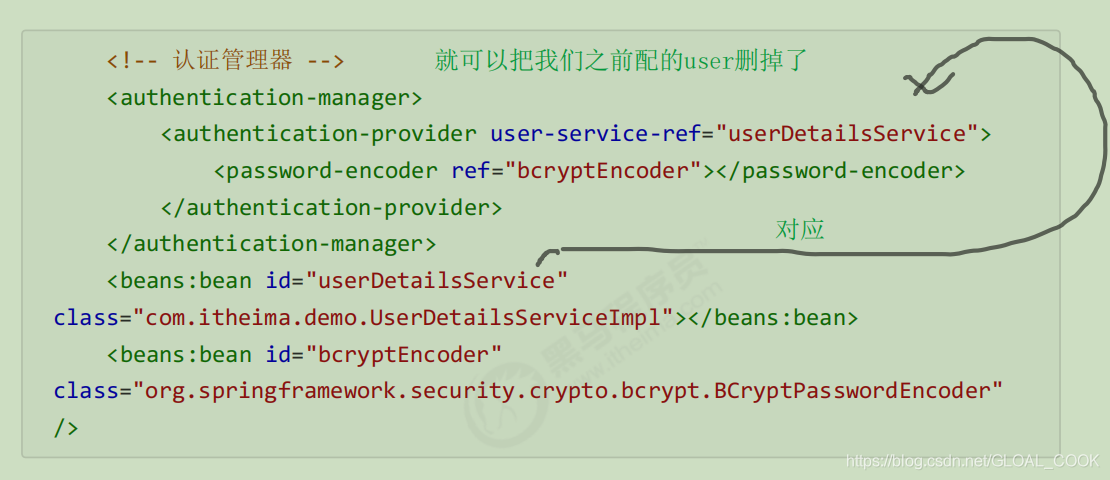
运行:test success


 333
333


 被折叠的 条评论
为什么被折叠?
被折叠的 条评论
为什么被折叠?
 到【灌水乐园】发言


