


原作者:renzo mischianti - 2019年10月21日出版 - 2021年6月21日更新
我创建了一个库来管理基于Semtech系列的LoRa设备的EBYTE E32,该设备非常强大,简单且便宜。

他们可以在3000米到8000米的距离上工作,他们有很多的功能和参数。
所以我创建了这个库来简化使用。
0.1.库
你可以在这里找到我的库。
要下载。
点击右上角的DOWNLOADS按钮,重命名未压缩的文件夹LoRa_E32。
检查LoRa_E32文件夹是否包含LoRa_E32.cpp和LoRa_E32.h。
将LoRa_E32库文件夹放在/libraries/文件夹中。
如果是你的第一个库,你可能需要创建libraries子文件夹。
重新启动IDE。
0.1.1.引脚分布


如你所见,你可以通过M0和M1引脚设置各种模式。

有一些引脚可以以静态的方式使用,但如果你把它连接到微控制器并在库中配置它们,你的性能就会提高,你可以通过软件控制所有的模式,但我们接下来会更好地解释。
0.2.全连接模式
正如我已经说过的,把所有的引脚连接到单片机的输出端并不重要,你可以把M0和M1引脚放到高电平或低电平以获得所需的配置,如果你不连接AUX,库中设置一个合理的延迟以确保操作完成(如果你有像冻结设备那样的麻烦,你必须放一个4.7k的上拉电阻或更好的连接到设备上。 )。
0.2.1.AUX引脚
当传输数据时,可用于唤醒外部MCU,并在数据传输完成后返回高电平。

当接收AUX时为低电平,当缓冲区为空时返回高电平。

它还用于自我检查,以恢复正常操作(在开机和睡眠/编程模式下)。

esp8266的连接模式更简单,因为它在逻辑通信的相同电压下工作(3.3v)。

重要的是添加上拉电阻(4.7Kohm)以获得良好的稳定性。

Arduino的工作电压是5V,所以我们需要在LoRa模块的RX引脚M0和M1上加一个分压器以防止损坏,你可以在这里得到更多的信息 电压分压器:计算器和应用。(Voltage divider: calculator and application – Renzo Mischianti)
你可以使用一个2K欧姆的电阻到GND和1K欧姆的信号比一起放在RX上。


0.3.构造器
我做了一套相当多的构造器,因为我们可以有更多的选择和情况来管理。
LoRa_E32(byte txE32pin, byte rxE32pin, UART_BPS_RATE bpsRate = UART_BPS_RATE_9600);
LoRa_E32(byte txE32pin, byte rxE32pin, byte auxPin, UART_BPS_RATE bpsRate = UART_BPS_RATE_9600);
LoRa_E32(byte txE32pin, byte rxE32pin, byte auxPin, byte m0Pin, byte m1Pin, UART_BPS_RATE bpsRate = UART_BPS_RATE_9600);
第一组构造函数的创建是为了将串行和其他引脚的管理委托给库。
·txE32pin 和rxE32pin 是连接到UART的引脚,它们是强制性的。
·auxPin 是一个检查操作、传输和接收状态的引脚(我们接下来会更好地解释),该引脚不是强制性的,如果你不设置它,我就应用一个延迟来允许操作自己完成(有延迟,如果你有麻烦,像冻结设备,你必须放一个4.7k的上拉电阻或更好地连接到设备)。
·m0pin 和 m1Pin 是改变操作模式的引脚(见上表),我认为这些引脚在 "生产 "中会直接连接到高电平或低电平,但对于测试来说,它们由库来管理是很有用的。
·bpsRate 是SoftwareSerial的波特率,通常是9600(在programmin/sleep模式下的唯一波特率)。
一个简单的例子是
#include "LoRa_E32.h"

LoRa_E32 e32ttl100(2, 3);  // e32 TX e32 RX
// LoRa_E32 e32ttl100(2, 3, 5, 6, 7);  // e32 TX e32 RX
我们可以直接使用一个SoftwareSerial的另一个构造函数
LoRa_E32(HardwareSerial* serial, UART_BPS_RATE bpsRate = UART_BPS_RATE_9600);
LoRa_E32(HardwareSerial* serial, byte auxPin, UART_BPS_RATE bpsRate = UART_BPS_RATE_9600);
LoRa_E32(HardwareSerial* serial, byte auxPin, byte m0Pin, byte m1Pin, UART_BPS_RATE bpsRate = UART_BPS_RATE_9600);
使用这个构造函数的例子可以这样做。
#include <SoftwareSerial.h>
#include "LoRa_E32.h"

SoftwareSerial mySerial(2, 3); // e32 TX e32 RX
LoRa_E32 e32ttl100(&mySerial);
// LoRa_E32 e32ttl100(&mySerial, 5, 7, 6);
最后一组构造函数是为了允许使用HardwareSerial而不是SoftwareSerial。
LoRa_E32(SoftwareSerial* serial, UART_BPS_RATE bpsRate = UART_BPS_RATE_9600);
LoRa_E32(SoftwareSerial* serial, byte auxPin, UART_BPS_RATE bpsRate = UART_BPS_RATE_9600);
LoRa_E32(SoftwareSerial* serial, byte auxPin, byte m0Pin, byte m1Pin, UART_BPS_RATE bpsRate = UART_BPS_RATE_9600);
对于esp32,你有3个额外的构造函数,允许管理HardWare串口的引脚。
LoRa_E32(byte txE32pin, byte rxE32pin, HardwareSerial* serial, UART_BPS_RATE bpsRate = UART_BPS_RATE_9600, uint32_t serialConfig = SERIAL_8N1);
LoRa_E32(byte txE32pin, byte rxE32pin, HardwareSerial* serial, byte auxPin, UART_BPS_RATE bpsRate = UART_BPS_RATE_9600, uint32_t serialConfig = SERIAL_8N1);
LoRa_E32(byte txE32pin, byte rxE32pin, HardwareSerial* serial, byte auxPin, byte m0Pin, byte m1Pin, UART_BPS_RATE bpsRate = UART_BPS_RATE_9600, uint32_t serialConfig = SERIAL_8N1);
对管理HardwareSerial引脚的esp32构造函数进行了突破性修改,现在HardwareSerial的引用在引脚之后,以消除构造函数的歧义。
0.4.开始
begin命令用于在输入和输出模式下启动串行和引脚。
void begin();在执行中是
// Startup all pins and UART
e32ttl100.begin();0.4.1.配置与信息的获取方法
有一组方法用于管理配置和获取设备的信息。
ResponseStructContainer getConfiguration();
ResponseStatus setConfiguration(Configuration configuration, PROGRAM_COMMAND saveType = WRITE_CFG_PWR_DWN_LOSE);

ResponseStructContainer getModuleInformation();
void printParameters(struct Configuration configuration);
ResponseStatus resetModule();
0.4.1.1. 响应容器
为了简化响应的管理,我创建了一组容器,对我来说,管理错误和返回通用数据是非常有用的。
0.4.1.1.1.响应状态
这是一个状态容器,有两个简单的入口点,通过它你可以获得状态代码和状态代码的描述。
Serial.println(c.getResponseDescription()); // Description of code
Serial.println(c.code); // 1 if Success
这些代码是
SUCCESS = 1,
ERR_UNKNOWN,
ERR_NOT_SUPPORT,
ERR_NOT_IMPLEMENT,
ERR_NOT_INITIAL,
ERR_INVALID_PARAM,
ERR_DATA_SIZE_NOT_MATCH,
ERR_BUF_TOO_SMALL,
ERR_TIMEOUT,
ERR_HARDWARE,
ERR_HEAD_NOT_RECOGNIZED
0.4.1.1.2.响应容器
创建这个容器是为了管理字符串响应,有两个入口点。
data 是由消息返回的字符串 status 是 RepsonseStatus的实例。
ResponseContainer rs = e32ttl.receiveMessage();
String message = rs.data;

Serial.println(rs.status.getResponseDescription());
Serial.println(message);
0.4.1.1.3.响应结构容器
这是一个更 "复杂 "的容器,我用它来管理结构,它有与ResponseContainer相同的入口点,但数据是一个无效指针,用来管理复杂的结构。
ResponseStructContainer c;
c = e32ttl100.getConfiguration();
// It's important get configuration pointer before all other operation
Configuration configuration = *(Configuration*) c.data;
Serial.println(c.status.getResponseDescription());
Serial.println(c.status.code);
c.close();每次你使用ResponseStructContainer时,你必须用close()关闭它。
0.4.1.2.获取配置和设置配置
第一个方法是getConfiguration,你可以用它来检索存储在设备上的所有数据。
ResponseStructContainer getConfiguration();这里有一个使用例子。
ResponseStructContainer c;
c = e32ttl100.getConfiguration();
// It's important get configuration pointer before all other operation
Configuration configuration = *(Configuration*) c.data;
Serial.println(c.status.getResponseDescription());
Serial.println(c.status.code);
    Serial.println(configuration.SPED.getUARTBaudRate());
配置的结构有所有的设置数据,我添加了一系列的函数来获得所有单一数据的描述。
configuration.ADDL = 0x0; // First part of address
configuration.ADDH = 0x1; // Second part of address
configuration.CHAN = 0x19;// Channel

configuration.OPTION.fec = FEC_0_OFF; // Forward error correction switch
configuration.OPTION.fixedTransmission = FT_TRANSPARENT_TRANSMISSION; // Transmission mode
configuration.OPTION.ioDriveMode = IO_D_MODE_PUSH_PULLS_PULL_UPS; // Pull-up management
configuration.OPTION.transmissionPower = POWER_17; // dBm transmission power
configuration.OPTION.wirelessWakeupTime = WAKE_UP_1250; // Wait time for wake up

configuration.SPED.airDataRate = AIR_DATA_RATE_011_48; // Air data rate
configuration.SPED.uartBaudRate = UART_BPS_115200; // Communication baud rate
configuration.SPED.uartParity = MODE_00_8N1; // Parity bit你有等量的全属性函数来获得所有描述:
Serial.print(F("Chan : "));  Serial.print(configuration.CHAN, DEC); Serial.print(" -> "); Serial.println(configuration.getChannelDescription());
Serial.println(F(" "));
Serial.print(F("SpeedParityBit     : "));  Serial.print(configuration.SPED.uartParity, BIN);Serial.print(" -> "); Serial.println(configuration.SPED.getUARTParityDescription());
Serial.print(F("SpeedUARTDatte  : "));  Serial.print(configuration.SPED.uartBaudRate, BIN);Serial.print(" -> "); Serial.println(configuration.SPED.getUARTBaudRate());
Serial.print(F("SpeedAirDataRate   : "));  Serial.print(configuration.SPED.airDataRate, BIN);Serial.print(" -> "); Serial.println(configuration.SPED.getAirDataRate());

Serial.print(F("OptionTrans        : "));  Serial.print(configuration.OPTION.fixedTransmission, BIN);Serial.print(" -> "); Serial.println(configuration.OPTION.getFixedTransmissionDescription());
Serial.print(F("OptionPullup       : "));  Serial.print(configuration.OPTION.ioDriveMode, BIN);Serial.print(" -> "); Serial.println(configuration.OPTION.getIODroveModeDescription());
Serial.print(F("OptionWakeup       : "));  Serial.print(configuration.OPTION.wirelessWakeupTime, BIN);Serial.print(" -> "); Serial.println(configuration.OPTION.getWirelessWakeUPTimeDescription());
Serial.print(F("OptionFEC          : "));  Serial.print(configuration.OPTION.fec, BIN);Serial.print(" -> "); Serial.println(configuration.OPTION.getFECDescription());
Serial.print(F("OptionPower        : "));  Serial.print(configuration.OPTION.transmissionPower, BIN);Serial.print(" -> "); Serial.println(configuration.OPTION.getTransmissionPowerDescription());
同样,setConfiguration想要一个配置结构,所以我认为管理配置的更好方法是检索当前的配置,应用你需要的唯一变化并再次设置它。
ResponseStatus setConfiguration(Configuration configuration, PROGRAM_COMMAND saveType = WRITE_CFG_PWR_DWN_LOSE);
configuration 是预先显示的结构, saveType 允许你选择是否改变为永久性的,或者只为当前会话。
ResponseStructContainer c;
c = e32ttl100.getConfiguration();
// It's important get configuration pointer before all other operation
Configuration configuration = *(Configuration*) c.data;
Serial.println(c.status.getResponseDescription());
Serial.println(c.status.code);

printParameters(configuration);
configuration.ADDL = 0x0;
configuration.ADDH = 0x1;
configuration.CHAN = 0x19;

configuration.OPTION.fec = FEC_0_OFF;
configuration.OPTION.fixedTransmission = FT_TRANSPARENT_TRANSMISSION;
configuration.OPTION.ioDriveMode = IO_D_MODE_PUSH_PULLS_PULL_UPS;
configuration.OPTION.transmissionPower = POWER_17;
configuration.OPTION.wirelessWakeupTime = WAKE_UP_1250;

configuration.SPED.airDataRate = AIR_DATA_RATE_011_48;
configuration.SPED.uartBaudRate = UART_BPS_115200;
configuration.SPED.uartParity = MODE_00_8N1;

// Set configuration changed and set to not hold the configuration
ResponseStatus rs = e32ttl100.setConfiguration(configuration, WRITE_CFG_PWR_DWN_LOSE);
Serial.println(rs.getResponseDescription());
Serial.println(rs.code);
printParameters(configuration);参数都是作为常量管理的:
0.4.1.3.基本配置选项

0.4.1.4.SPED细节
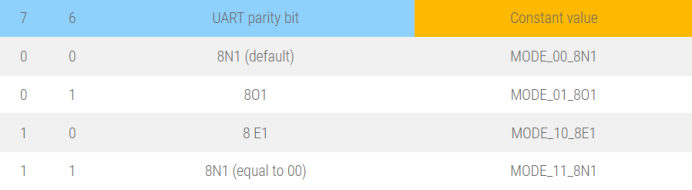
UART奇偶校验位: UART模式在通信双方之间可以不同
UART波特率。UART波特率在通信双方之间可以不同,UART波特率与无线传输参数无关,不会影响无线发送/接收功能。

空中数据率。空中数据率越低,传输距离越长,抗干扰性能越好,传输时间越长,通信双方的空中数据率必须保持一致。

0.4.1.5.OPTION详情
传输模式:在固定传输模式下,每个用户的数据帧的前三个字节可以作为高/低地址和信道。发送时,模块改变其地址和频道。完成这一过程后,它将恢复到原始设置。

IO驱动模式:该位用于模块的内部上拉电阻。它也增加了电平在漏极开路情况下的适应性。但在某些情况下,它可能需要外部拉高电阻器。

无线唤醒时间:发射和接收模块工作在模式0,其延迟时间是无效的,可以是任意值,发射器工作在模式1,可以连续发射相应时间的前导码,当接收器工作在模式2,该时间是指监测间隔时间(无线唤醒)。只有工作在模式1的发射器的数据可以被接收。

FEC:关闭FEC后,实际数据传输率增加,而抗干扰能力下降。另外,由于传输距离较短,通信双方必须在开启或关闭FEC方面保持一致。

0.4.1.6.传输功率
你可以通过应用这样的定义来改变这组常数:
#define E32_TTL_100 // default value without set 适用于E32-TTL-100, E32-TTL-100S1, E32-T100S2。
外接电源必须保证电流输出能力超过250mA,并保证电源纹波在100mV以内。
不推荐使用低功率传输,因为它的电源效率很低。
#define E32_TTL_100 // default value without set 
适用于E32-TTL-500。
外接电源必须保证电流输出能力超过700mA,并保证电源纹波在100mV以内。
不建议使用低功率传输,因为它的供电效率很低。
#define E32_TTL_500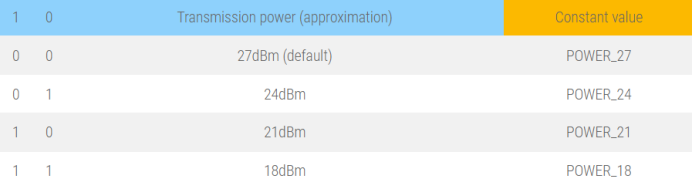
适用于E32-TTL-1W、E32(433T30S)、E32(868T30S)、E32(915T30S)。
外接电源必须保证电流输出能力在1A以上,并保证电源纹波在100mV以内。
不建议使用低功率传输,因为它的电源效率很低。
#define E32_TTL_1W
你也可以用这个定义来配置通道频率:
// One of
#define FREQUENCY_433
#define FREQUENCY_170
#define FREQUENCY_470
#define FREQUENCY_868
#define FREQUENCY_915
0.4.2.发送接收信息
首先,我们必须引入一个简单但有用的方法来检查接收缓冲区中是否有东西。
int available();它只是简单地返回你在当前流中有多少个字节。
0.4.2.1.正常传输模式
正常/透明传输模式用于向所有具有相同地址和通道的设备发送信息。

有很多方法来发送/接收信息,我们将详细解释:
ResponseStatus sendMessage(const String message);
ResponseContainer receiveMessage();第一个方法是sendMessage,用于向正常模式下的设备发送一个字符串。
ResponseStatus rs = e32ttl.sendMessage("Prova");
Serial.println(rs.getResponseDescription());
其他设备简单地做循环
   if (e32ttl.available()  > 1){
    ResponseContainer rs = e32ttl.receiveMessage();
    String message = rs.data; // First ever get the data
    Serial.println(rs.status.getResponseDescription());
    Serial.println(message);
}
请注意,如果你在缓冲区中收到多条信息,而你又不想一次读完,你必须使用 ResponseContainer rs = e32ttl.receiveMessageUntil();
0.4.2.2.管理结构
如果你想发送一个复杂的结构,你可以使用这个方法
ResponseStatus sendMessage(const void *message, const uint8_t size);
ResponseStructContainer receiveMessage(const uint8_t size);例如,它被用来发送结构:
struct Messaggione {
    char type[5];
    char message[8];
    bool mitico;
};
    struct Messaggione messaggione = {"TEMP", "Peple", true};
    ResponseStatus rs = e32ttl.sendMessage(&messaggione, sizeof(Messaggione));
Serial.println(rs.getResponseDescription());
而另一边你可以收到这样的信息
ResponseStructContainer rsc = e32ttl.receiveMessage(sizeof(Messaggione));
struct Messaggione messaggione = *(Messaggione*) rsc.data;
Serial.println(messaggione.message);
Serial.println(messaggione.mitico);
0.4.2.2.1.读取部分结构
如果你想读取信息的第一部分来管理更多的结构类型,你可以使用这种方法。
ResponseContainer receiveInitialMessage(const uint8_t size);我创建它是为了接收一个带有类型或其他的字符串来识别要加载的结构。
struct Messaggione { // Partial strucutre without type
    char message[8];
    bool mitico;
};

char type[5]; // first part of structure
ResponseContainer rs = e32ttl.receiveInitialMessage(sizeof(type));
        // Put string in a char array (not needed)
memcpy ( type, rs.data.c_str(), sizeof(type) );

Serial.println("READ TYPE: ");
Serial.println(rs.status.getResponseDescription());
Serial.println(type);

        // Read the rest of structure
ResponseStructContainer rsc = e32ttl.receiveMessage(sizeof(Messaggione));
struct Messaggione messaggione = *(Messaggione*) rsc.data;
0.4.2.3.固定模式而不是正常模式
以同样的方式,我创建了一套用于固定传输的方法。
0.4.2.4.固定传输
你只需要改变发送方式,因为在固定模式下,目标设备不会收到带有地址和频道的前奏。
因此,对于字符串信息,你可以有
ResponseStatus sendFixedMessage(byte ADDH, byte ADDL, byte CHAN, const String message);
ResponseStatus sendBroadcastFixedMessage(byte CHAN, const String message);
而在结构方面,你有
ResponseStatus sendFixedMessage(byte ADDH, byte ADDL, byte CHAN, const void *message, const uint8_t size);
ResponseStatus sendBroadcastFixedMessage(byte CHAN, const void *message, const uint8_t size );
这里有一个简单的例子
    ResponseStatus rs = e32ttl.sendFixedMessage(0, 0, 0x17, &messaggione, sizeof(Messaggione));
//  ResponseStatus rs = e32ttl.sendFixedMessage(0, 0, 0x17, "Ciao");
固定传输有更多的场景

如果你向一个特定的设备发送(第二种情况下的固定传输),你必须添加 ADDL, ADDH 和 CHAN 来直接识别它。
ResponseStatus rs = e32ttl.sendFixedMessage(2, 2, 0x17, "Message to a device");如果你想向一个指定的通道中的所有设备发送信息,你可以使用这个方法。
ResponseStatus rs = e32ttl.sendBroadcastFixedMessage(0x17, "Message to a devices of a channel");
如果你想接收网络中的所有广播信息,你必须用 BROADCAST_ADDRESS设置你的 ADDH 和 ADDL 。
    ResponseStructContainer c;
c = e32ttl100.getConfiguration();
// It's important get configuration pointer before all other operation
Configuration configuration = *(Configuration*) c.data;
Serial.println(c.status.getResponseDescription());
Serial.println(c.status.code);

printParameters(configuration);
configuration.ADDL = BROADCAST_ADDRESS;
configuration.ADDH = BROADCAST_ADDRESS;

// Set configuration changed and set to not hold the configuration
ResponseStatus rs = e32ttl100.setConfiguration(configuration, WRITE_CFG_PWR_DWN_LOSE);
Serial.println(rs.getResponseDescription());
Serial.println(rs.code);
printParameters(configuration);
0.5.Thanks
现在你有所有的信息来做你的工作,但我认为展示一些现实的例子来更好地理解所有的可能性是很重要的。


 708
708


 被折叠的 条评论
为什么被折叠?
被折叠的 条评论
为什么被折叠?
 到【灌水乐园】发言


