JAVA项目发送邮箱 SpringBoot

 想用JAVA发送邮箱仅需要简单的几个步骤就可以实现啦!!!!!

1、在开始之前需要去获取到自己邮箱的授权码

我拿网易@163.com做例子网易邮箱网址

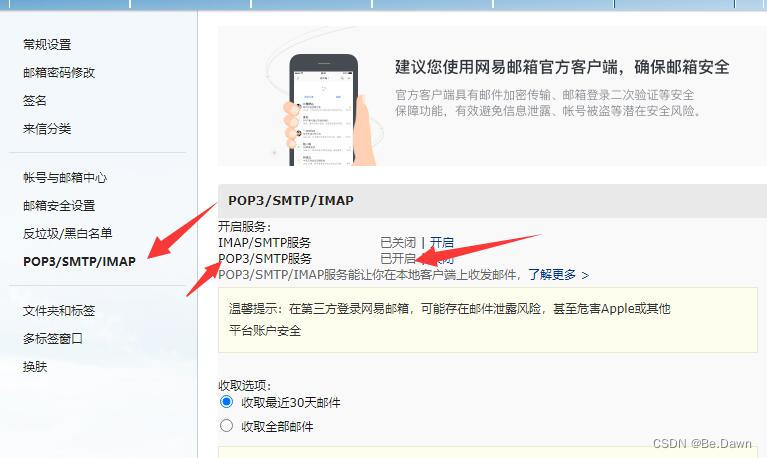
 开启POP3/SMTP后会弹出我们自己的邮箱授权码

只会显示一次,如果想再次看只能重新生成,所以弹出授权码要复制保存好(重点!!)

2、然后在JAVA项目中配置我们的application.properties

spring.mail.host=smtp.163.com
spring.mail.port=465
spring.mail.username=!!!!你自己的邮箱!!!!
spring.mail.password=!!!!你自己的邮箱授权码!!!!
spring.mail.default-encoding=UTF-8
spring.mail.properties.mail.smtp.socketFactory.class=javax.net.ssl.SSLSocketFactory
spring.mail.properties.mail.debug=true

 3、接下来就是代码部分

@Service
public class SendService {

    // JavaMailSender 在Mail 自动配置类 MailSenderAutoConfiguration 中已经导入,这里直接注入使用即可
    @Resource
    JavaMailSender javaMailSender;

    //方法5个参数分别表示:邮件发送者、收件人、抄送人、邮件主题以及邮件内容
    public void sendSimpleMail(String from, String to, String subject, String text) {
        // 简单邮件直接构建一个 SimpleMailMessage 对象进行配置并发送即可
        SimpleMailMessage simpMsg = new SimpleMailMessage();
        simpMsg.setFrom(from);
        simpMsg.setTo(to);
        simpMsg.setCc(cc);
        simpMsg.setSubject(subject);
        simpMsg.setText(text);
        javaMailSender.send(simpMsg);
    }

}
@Service
public class EmailServiceImpl implements EmailService {

    @Autowired
    SendService sendService;

    @Override
    public CommonResult sendEmail(EmailEntity emailEntity) {
        EmailEntity emailEntity = new EmailEntity();
        //生成六位随机数(验证码)
        String s = RandomStringUtils.randomNumeric(6);
        //这里的问号是你的邮箱 需要和你的application.properties中写的邮箱相同否则会报错
        String from = "??????";
        //这里的感叹号是你要发送给谁
        String to = !!!!!!!;
        //subject是你的标题头
        String subject = "测试验证";
        String text = "尊贵的用户您好,您的验证码是: "+s+" 验证码仅在15分钟内有效,请及时校验.";
        sendService.sendSimpleMail(from,to,subject,text);
        return CommonResult.ok();
    }

Controller

    @GetMapping("send")
    public CommonResult send(EmailEntity emailEntity){
        CommonResult yzm = emailService.sendEmail(emailEntity);
        return yzm;
    }

POM

        <!--邮箱-->
        <dependency>
            <groupId>org.springframework.boot</groupId>
            <artifactId>spring-boot-starter-mail</artifactId>
        </dependency>
        <!--邮箱依赖-->
        <dependency>
            <groupId>javax.mail</groupId>
            <artifactId>mail</artifactId>
            <version>1.5.0-b01</version>
        </dependency>
        <!--随机数-->
        <dependency>
            <groupId>org.apache.commons</groupId>
            <artifactId>commons-lang3</artifactId>
            <version>3.7</version>
        </dependency>

调用controller方法给予实体对象或参数即可实现发送邮箱

如果用qq邮箱可以把application.properties中的

spring.mail.host=smtp.163.com

改成

spring.mail.host=smtp.qq.com

其他平台也是同样哦

还有不明白或者有报错可以通过网络查询或者评论区讨论

  • 4
    点赞
  • 3
    收藏
    觉得还不错? 一键收藏
  • 打赏
    打赏
  • 4
    评论
Spring Boot发送邮件需要使用JavaMailSender接口来实现。以下是一个简单的示例代码: 首先,确保在你的项目中添加了相关依赖。在pom.xml文件中添加以下代码: ```xml <dependencies> <!-- Spring Boot Starter Mail --> <dependency> <groupId>org.springframework.boot</groupId> <artifactId>spring-boot-starter-mail</artifactId> </dependency> </dependencies> ``` 然后,在你的应用程序中创建一个类来发送邮件。例如,你可以创建一个名为EmailSender的类: ```java import org.springframework.beans.factory.annotation.Autowired; import org.springframework.mail.SimpleMailMessage; import org.springframework.mail.javamail.JavaMailSender; import org.springframework.stereotype.Component; @Component public class EmailSender { @Autowired private JavaMailSender javaMailSender; public void sendEmail(String to, String subject, String text) { SimpleMailMessage message = new SimpleMailMessage(); message.setTo(to); message.setSubject(subject); message.setText(text); javaMailSender.send(message); } } ``` 在上述示例中,我们使用了@Autowired注解来自动注入JavaMailSender对象,该对象是由Spring Boot自动配置提供的。 现在,你可以在你的应用程序的任何地方使用EmailSender类来发送邮件。例如,你可以在控制器中使用它: ```java import org.springframework.beans.factory.annotation.Autowired; import org.springframework.web.bind.annotation.PostMapping; import org.springframework.web.bind.annotation.RequestBody; import org.springframework.web.bind.annotation.RestController; @RestController public class EmailController { @Autowired private EmailSender emailSender; @PostMapping("/sendEmail") public String sendEmail(@RequestBody EmailRequest emailRequest) { emailSender.sendEmail(emailRequest.getTo(), emailRequest.getSubject(), emailRequest.getText()); return "Email sent successfully!"; } } ``` 上述示例中,我们创建了一个名为EmailController的REST控制器,它接收一个包含收件人、主题和内容的EmailRequest对象,并使用EmailSender发送邮件。 请注意,你需要适当配置你的邮件服务器信息。在Spring Boot的application.properties(或application.yml)文件中添加以下配置: ```yaml spring.mail.host=your-mail-server spring.mail.port=your-mail-server-port spring.mail.username=your-username spring.mail.password=your-password spring.mail.properties.mail.smtp.auth=true spring.mail.properties.mail.smtp.starttls.enable=true ``` 以上是一个简单的示例,你可以根据你的实际需求进行修改和扩展。希望对你有帮助!

“相关推荐”对你有帮助么?

  • 非常没帮助
  • 没帮助
  • 一般
  • 有帮助
  • 非常有帮助
提交
评论 4
添加红包

请填写红包祝福语或标题

红包个数最小为10个

红包金额最低5元

当前余额3.43前往充值 >
需支付:10.00
成就一亿技术人!
领取后你会自动成为博主和红包主的粉丝 规则
hope_wisdom
发出的红包

打赏作者

GG-0408

你的鼓励将是我创作的最大动力

¥1 ¥2 ¥4 ¥6 ¥10 ¥20
扫码支付:¥1
获取中
扫码支付

您的余额不足,请更换扫码支付或充值

打赏作者

实付
使用余额支付
点击重新获取
扫码支付
钱包余额 0

抵扣说明:

1.余额是钱包充值的虚拟货币,按照1:1的比例进行支付金额的抵扣。
2.余额无法直接购买下载,可以购买VIP、付费专栏及课程。

余额充值