


背景
一、使用方法:
1. 创建项目— 此处使用springboot项目
2. 引入starter
<dependency>
    <groupId>com.alicp.jetcache</groupId>
        <artifactId>jetcache-starter-redis</artifactId>
    <version>2.5.14</version>
</dependency>
3. 配置application.yaml文件
为测试方便,本机先安装redis
brew install redis

启动redis
1、修改conf  --- /opt/homebrew/etc/redis.conf
	daemonize no改成yes 以守护进程的方式启动
2、启动redis
brew services restart redis

3、客户定链接测试


jetcache:
  statIntervalMinutes: 15
  areaInCacheName: false
  local:
    default:
      type: linkedhashmap
      keyConvertor: fastjson
  remote:
    default:
      type: redis
      keyConvertor: fastjson
      valueEncoder: java
      valueDecoder: java
      poolConfig:
        minIdle: 5
        maxIdle: 20
        maxTotal: 50
      host: 127.0.0.1
      port: 6379
4. 配置启动扫描
EnableMethodCache,EnableCreateCacheAnnotation这两个注解分别激活Cached和CreateCache注解,其他和标准的Spring Boot程序是一样的。这个类可以直接main方法运行、
package com.ghq.jetcachelearn;

import com.alicp.jetcache.anno.config.EnableCreateCacheAnnotation;
import com.alicp.jetcache.anno.config.EnableMethodCache;
import org.springframework.boot.SpringApplication;
import org.springframework.boot.autoconfigure.SpringBootApplication;

@SpringBootApplication
@EnableMethodCache(basePackages = "com.ghq.jetcachelearn")
@EnableCreateCacheAnnotation
public class JetcacheLearnApplication {

	public static void main(String[] args) {
		SpringApplication.run(JetcacheLearnApplication.class, args);
	}

}
5. 使用案例:
User类:
package com.ghq.learn.jetcachelearn.entity;

import lombok.AllArgsConstructor;
import lombok.Data;
import lombok.NoArgsConstructor;

import java.io.Serializable;

/**
 * @author tobedawn
 * @date 2022/5/13 10:44 上午
 */
@Data
@NoArgsConstructor
@AllArgsConstructor
public class User implements Serializable {

    private Long id;
    private String name;

}
UserService:
package com.ghq.learn.jetcachelearn.service;

import com.alicp.jetcache.anno.CacheType;
import com.alicp.jetcache.anno.Cached;
import com.ghq.learn.jetcachelearn.entity.User;

/**
 * @author
 * @date 2022/5/13 10:43 上午
 */
public interface UserService {

    @Cached(expire = 10,cacheType = CacheType.LOCAL)
    User getUser(Long id);
}
UserSercviceImpl
package com.ghq.learn.jetcachelearn.service.impl;

import com.ghq.learn.jetcachelearn.entity.User;
import com.ghq.learn.jetcachelearn.service.UserService;
import lombok.extern.slf4j.Slf4j;
import org.springframework.stereotype.Service;

/**
 * @author
 * @date 2022/5/13 10:43 上午
 */
@Slf4j
@Service
public class UserServiceImpl implements UserService {
    @Override
    public User getUser(Long id) {
        log.info("userId {}", id);
        return new User(id, "" + id);
    }
}
测试:
package com.ghq.learn.jetcachelearn;

import com.ghq.learn.jetcachelearn.service.UserService;
import org.junit.jupiter.api.Test;
import org.springframework.boot.test.context.SpringBootTest;

import javax.annotation.Resource;

@SpringBootTest
class JetcacheLearnApplicationTests {

	@Resource
	UserService userService;

	@Test
	void contextLoads() {
	}

	@Test
	void testUser(){
		userService.getUser(1L);
		userService.getUser(1L);
	}

}
6. 注意事项:
- 缓存实体必须序列化
- 使用过程中可能会出现包冲突:
-
解决方法: jetcache-starter-redis 依赖redis 是2.9.0 ,Maven 打包时可能打出来的包时3.7.x 此时启动报错,修改pom文件强制指定redis 版本
-
        <dependency>
 			<groupId>redis.clients</groupId>
 			<artifactId>jedis</artifactId>
 			<version>2.9.0</version>
 		</dependency>

 		<dependency>
 			<groupId>com.alicp.jetcache</groupId>
 			<artifactId>jetcache-starter-redis</artifactId>
 			<version>2.5.14</version>
 			<exclusions>
 				<exclusion>
 					<groupId>redis.clients</groupId>
 					<artifactId>jedis</artifactId>
 				</exclusion>
 			</exclusions>
 		</dependency>
源码解析:
相关链接:
jetCache源码地址:github.com/alibaba/jet…
一、初始化过程
1、自动装配入口:
jetcache-autoconfigure
spring.factorys
org.springframework.boot.autoconfigure.EnableAutoConfiguration=\
com.alicp.jetcache.autoconfigure.JetCacheAutoConfiguration
2、JetCacheAutoConfiguration :
功能:
- 初始化_globalCacheConfig ,最终生成Bean -
GlobalCacheConfig; - Import 不同不同类型的AutoConfiguration 对应不同的缓存方式 —AutoConfigurationg对应继承图;
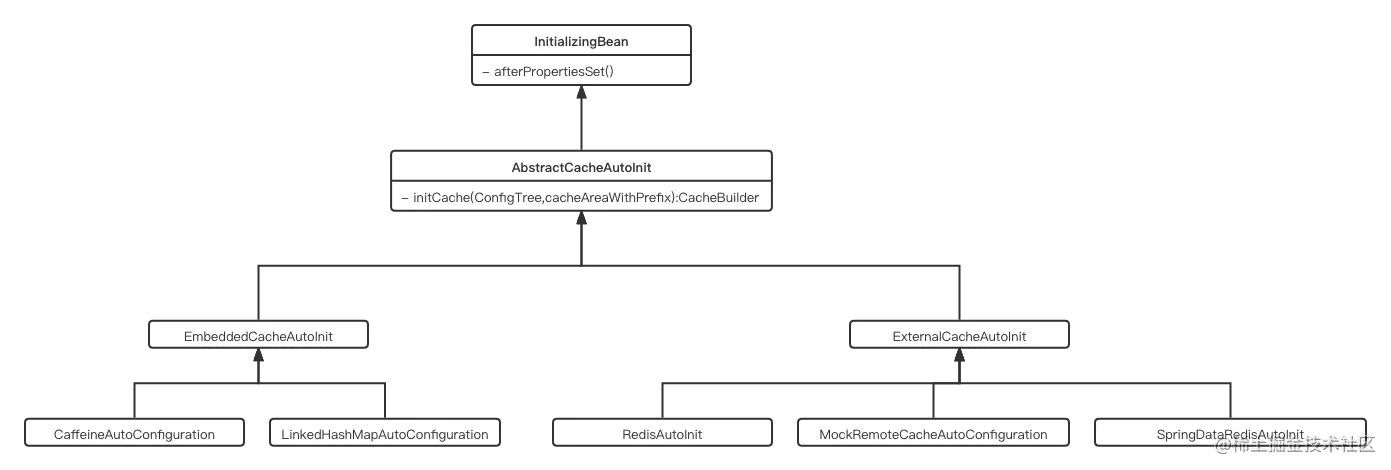
-
不同AutoConfiguration对应生成不同的CacheBuilder ,存储在
AutoConfigureBeans;package com.alicp.jetcache.autoconfigure; import com.alicp.jetcache.AbstractCacheBuilder; import com.alicp.jetcache.CacheBuilder; import com.alicp.jetcache.anno.support.ConfigProvider; import org.slf4j.Logger; import org.slf4j.LoggerFactory; import org.springframework.beans.factory.InitializingBean; import org.springframework.beans.factory.annotation.Autowired; import org.springframework.core.env.ConfigurableEnvironment; import org.springframework.util.Assert; import java.util.*; /** * Created on 2016/11/29. * * @author <a href="mailto:areyouok@gmail.com">huangli</a> */ public abstract class AbstractCacheAutoInit implements InitializingBean { private static Logger logger = LoggerFactory.getLogger(AbstractCacheAutoInit.class); @Autowired protected ConfigurableEnvironment environment; @Autowired protected AutoConfigureBeans autoConfigureBeans; @Autowired protected ConfigProvider configProvider; protected String[] typeNames; private boolean inited = false; public AbstractCacheAutoInit(String... cacheTypes) { Objects.requireNonNull(cacheTypes,"cacheTypes can't be null"); Assert.isTrue(cacheTypes.length > 0, "cacheTypes length is 0"); this.typeNames = cacheTypes; } @Override public void afterPropertiesSet() { if (!inited) { synchronized (this) { if (!inited) { process("jetcache.local.", autoConfigureBeans.getLocalCacheBuilders(), true); process("jetcache.remote.", autoConfigureBeans.getRemoteCacheBuilders(), false); inited = true; } } } } private void process(String prefix, Map cacheBuilders, boolean local) { ConfigTree resolver = new ConfigTree(environment, prefix); Map<String, Object> m = resolver.getProperties(); Set<String> cacheAreaNames = resolver.directChildrenKeys(); for (String cacheArea : cacheAreaNames) { final Object configType = m.get(cacheArea + ".type"); boolean match = Arrays.stream(typeNames).anyMatch((tn) -> tn.equals(configType)); if (!match) { continue; } ConfigTree ct = resolver.subTree(cacheArea + "."); logger.info("init cache area {} , type= {}", cacheArea, typeNames[0]); CacheBuilder c = initCache(ct, local ? "local." + cacheArea : "remote." + cacheArea); //将子类生成的CacheBuilder 放进autoConfigureBeans 中 cacheBuilders.put(cacheArea, c); } } protected void parseGeneralConfig(CacheBuilder builder, ConfigTree ct) { AbstractCacheBuilder acb = (AbstractCacheBuilder) builder; acb.keyConvertor(new FunctionWrapper<>(() -> configProvider.parseKeyConvertor(ct.getProperty("keyConvertor")))); String expireAfterWriteInMillis = ct.getProperty("expireAfterWriteInMillis"); if (expireAfterWriteInMillis == null) { // compatible with 2.1 expireAfterWriteInMillis = ct.getProperty("defaultExpireInMillis"); } if (expireAfterWriteInMillis != null) { acb.setExpireAfterWriteInMillis(Long.parseLong(expireAfterWriteInMillis)); } String expireAfterAccessInMillis = ct.getProperty("expireAfterAccessInMillis"); if (expireAfterAccessInMillis != null) { acb.setExpireAfterAccessInMillis(Long.parseLong(expireAfterAccessInMillis)); } } protected abstract CacheBuilder initCache(ConfigTree ct, String cacheAreaWithPrefix); }
代码:
package com.alicp.jetcache.autoconfigure;

import com.alicp.jetcache.anno.support.GlobalCacheConfig;
import com.alicp.jetcache.anno.support.SpringConfigProvider;
import org.springframework.boot.autoconfigure.condition.ConditionalOnClass;
import org.springframework.boot.autoconfigure.condition.ConditionalOnMissingBean;
import org.springframework.boot.context.properties.EnableConfigurationProperties;
import org.springframework.context.annotation.Bean;
import org.springframework.context.annotation.Configuration;
import org.springframework.context.annotation.Import;

/**
 * Created on 2016/11/17.
 *
 * @author <a href="mailto:areyouok@gmail.com">huangli</a>
 */
@Configuration
@ConditionalOnClass(GlobalCacheConfig.class)
@ConditionalOnMissingBean(GlobalCacheConfig.class)
@EnableConfigurationProperties(JetCacheProperties.class)
//此处IMport对应不同类型缓存配置初始化
@Import({RedisAutoConfiguration.class,
        CaffeineAutoConfiguration.class,
        MockRemoteCacheAutoConfiguration.class,
        LinkedHashMapAutoConfiguration.class,
        RedisLettuceAutoConfiguration.class,
        RedisSpringDataAutoConfiguration.class})
public class JetCacheAutoConfiguration {

    public static final String GLOBAL_CACHE_CONFIG_NAME = "globalCacheConfig";

    private SpringConfigProvider _springConfigProvider = new SpringConfigProvider();

    private AutoConfigureBeans _autoConfigureBeans = new AutoConfigureBeans();

    private GlobalCacheConfig _globalCacheConfig;

    @Bean
    @ConditionalOnMissingBean
    public SpringConfigProvider springConfigProvider() {
        return _springConfigProvider;
    }

    @Bean
    public AutoConfigureBeans autoConfigureBeans() {
        return _autoConfigureBeans;
    }

    @Bean
    public static BeanDependencyManager beanDependencyManager(){
        return new BeanDependencyManager();
    }

    @Bean(name = GLOBAL_CACHE_CONFIG_NAME)
    public GlobalCacheConfig globalCacheConfig(AutoConfigureBeans autoConfigureBeans, JetCacheProperties props) {
        if (_globalCacheConfig != null) {
            return _globalCacheConfig;
        }
        _globalCacheConfig = new GlobalCacheConfig();
        _globalCacheConfig.setHiddenPackages(props.getHiddenPackages());
        _globalCacheConfig.setStatIntervalMinutes(props.getStatIntervalMinutes());
        _globalCacheConfig.setAreaInCacheName(props.isAreaInCacheName());
        _globalCacheConfig.setPenetrationProtect(props.isPenetrationProtect());
        _globalCacheConfig.setEnableMethodCache(props.isEnableMethodCache());
        _globalCacheConfig.setLocalCacheBuilders(autoConfigureBeans.getLocalCacheBuilders());
        _globalCacheConfig.setRemoteCacheBuilders(autoConfigureBeans.getRemoteCacheBuilders());
        return _globalCacheConfig;
    }

}
二、Cache解析
Cache作为jetCache缓存最上层的抽象接口,不同类型的的Cache对应一个子类实现。

不同的子类Cache ,对应不同的CacheBuilder生成器,这里需要关注一下MultiLevelCacheBuilder (用于支持多级缓存)

基于上面使用案例可知道JetCache 在接口或者实现接口上增加相应的注解(@Cached,@CachedUpdate 等),缓存就会自动生效,可以想到JetCache使用的是SpringAOP对方法进行了增强,AOP的代码不在此处展示,直接看缓存相关的关键逻辑
AOP相关代码类列在此处,感兴趣可以自行查阅
CacheAdvisor — advisor
CachePointcut —pointCut
JetCacheInterceptor— 真正切面增强逻辑在这里
JetCacheProxyConfiguration — spring config 类
缓存逻辑 (只贴了关键代码):
#JetCacheInterceptor
@Override
    public Object invoke(final MethodInvocation invocation) throws Throwable {
        if (configProvider == null) {
            configProvider = applicationContext.getBean(ConfigProvider.class);
        }
        if (configProvider != null && globalCacheConfig == null) {
            globalCacheConfig = configProvider.getGlobalCacheConfig();
        }
        if (globalCacheConfig == null || !globalCacheConfig.isEnableMethodCache()) {
            return invocation.proceed();
        }

        Method method = invocation.getMethod();
        Object obj = invocation.getThis();
        CacheInvokeConfig cac = null;
        if (obj != null) {
            String key = CachePointcut.getKey(method, obj.getClass());
            cac  = cacheConfigMap.getByMethodInfo(key);
        }

        if (cac == null || cac == CacheInvokeConfig.getNoCacheInvokeConfigInstance()) {
            return invocation.proceed();
        }


				//从这里,idea跟进代码到最终实现逻辑
        CacheInvokeContext context = configProvider.getCacheContext().createCacheInvokeContext(cacheConfigMap);
        context.setTargetObject(invocation.getThis());
        context.setInvoker(invocation::proceed);
        context.setMethod(method);
        context.setArgs(invocation.getArguments());
        context.setCacheInvokeConfig(cac);
        context.setHiddenPackages(globalCacheConfig.getHiddenPackages());
        return CacheHandler.invoke(context);
    }
# CacheContext
public CacheInvokeContext createCacheInvokeContext(ConfigMap configMap) {
        CacheInvokeContext c = newCacheInvokeContext();
        c.setCacheFunction((invokeContext, cacheAnnoConfig) -> {
            Cache cache = cacheAnnoConfig.getCache();
            if (cache == null) {
                if (cacheAnnoConfig instanceof CachedAnnoConfig) {
                    cache = createCacheByCachedConfig((CachedAnnoConfig) cacheAnnoConfig, invokeContext);
                } else if ((cacheAnnoConfig instanceof CacheInvalidateAnnoConfig) || (cacheAnnoConfig instanceof CacheUpdateAnnoConfig)) {
                    CacheInvokeConfig cacheDefineConfig = configMap.getByCacheName(cacheAnnoConfig.getArea(), cacheAnnoConfig.getName());
                    if (cacheDefineConfig == null) {
                        String message = "can't find @Cached definition with area=" + cacheAnnoConfig.getArea()
                                + " name=" + cacheAnnoConfig.getName() +
                                ", specified in " + cacheAnnoConfig.getDefineMethod();
                        CacheConfigException e = new CacheConfigException(message);
                        logger.error("Cache operation aborted because can't find @Cached definition", e);
                        return null;
                    }
                    cache = createCacheByCachedConfig(cacheDefineConfig.getCachedAnnoConfig(), invokeContext);
                }
                cacheAnnoConfig.setCache(cache);
            }
            return cache;
        });
        return c;
    }
#CacheHandler
private static Object invokeWithCached(CacheInvokeContext context)
            throws Throwable {
        CacheInvokeConfig cic = context.getCacheInvokeConfig();
        CachedAnnoConfig cac = cic.getCachedAnnoConfig();
	//此处apply BiFunction 的实现逻辑  见 CacheContext.createCacheInvokeContext
        Cache cache = context.getCacheFunction().apply(context, cac);

        if (cache == null) {
            logger.error("no cache with name: " + context.getMethod());
            return invokeOrigin(context);
        }

        Object key = ExpressionUtil.evalKey(context, cic.getCachedAnnoConfig());
        if (key == null) {
            return loadAndCount(context, cache, key);
        }

        if (!ExpressionUtil.evalCondition(context, cic.getCachedAnnoConfig())) {
            return loadAndCount(context, cache, key);
        }

        try {
            CacheLoader loader = new CacheLoader() {
                @Override
                public Object load(Object k) throws Throwable {
                    Object result = invokeOrigin(context);
                    context.setResult(result);
                    return result;
                }

                @Override
                public boolean vetoCacheUpdate() {
                    return !ExpressionUtil.evalPostCondition(context, cic.getCachedAnnoConfig());
                }
            };
            Object result = cache.computeIfAbsent(key, loader);
            return result;
        } catch (CacheInvokeException e) {
            throw e.getCause();
        }
    }
# AbstractCache
static <K, V> V computeIfAbsentImpl(K key, Function<K, V> loader, boolean cacheNullWhenLoaderReturnNull,
                                               long expireAfterWrite, TimeUnit timeUnit, Cache<K, V> cache) {
        AbstractCache<K, V> abstractCache = CacheUtil.getAbstractCache(cache);
        CacheLoader<K, V> newLoader = CacheUtil.createProxyLoader(cache, loader, abstractCache::notify);
        CacheGetResult<V> r;
	// @CacheRefresh  走这一块
        if (cache instanceof RefreshCache) {
            RefreshCache<K, V> refreshCache = ((RefreshCache<K, V>) cache);
            r = refreshCache.GET(key);
            refreshCache.addOrUpdateRefreshTask(key, newLoader);
        } else {
            r = cache.GET(key);
        }
        if (r.isSuccess()) {
            return r.getValue();
        } else {
            Consumer<V> cacheUpdater = (loadedValue) -> {
                if(needUpdate(loadedValue, cacheNullWhenLoaderReturnNull, newLoader)) {
                    if (timeUnit != null) {
                        cache.PUT(key, loadedValue, expireAfterWrite, timeUnit).waitForResult();
                    } else {
                        cache.PUT(key, loadedValue).waitForResult();
                    }
                }
            };

            V loadedValue;
            if (cache.config().isCachePenetrationProtect()) {
                loadedValue = synchronizedLoad(cache.config(), abstractCache, key, newLoader, cacheUpdater);
            } else {
                loadedValue = newLoader.apply(key);
		//生产者消费者模式,调用上面的cache.PUT 方法
                cacheUpdater.accept(loadedValue);
            }

            return loadedValue;
        }
    }
# 具体Cache  put逻辑,此处使用RedisCache来做案例
@Override
    protected CacheResult do_PUT(K key, V value, long expireAfterWrite, TimeUnit timeUnit) {
        try (Jedis jedis = config.getJedisPool().getResource()) {
            CacheValueHolder<V> holder = new CacheValueHolder(value, timeUnit.toMillis(expireAfterWrite));
            byte[] newKey = buildKey(key);
            String rt = jedis.psetex(newKey, timeUnit.toMillis(expireAfterWrite), valueEncoder.apply(holder));
            if ("OK".equals(rt)) {
                return CacheResult.SUCCESS_WITHOUT_MSG;
            } else {
                return new CacheResult(CacheResultCode.FAIL, rt);
            }
        } catch (Exception ex) {
            logError("PUT", key, ex);
            return new CacheResult(ex);
        }
    }
其他
- jetcache-anno-api:定义jetcache的注解和常量,不传递依赖。如果你想把Cached注解加到接口上,又不希望你的接口jar传递太多依赖,可以让接口jar依赖jetcache-anno-api。
- jetcache-core:核心api,完全通过编程来配置操作
Cache,不依赖Spring。两个内存中的缓存实现LinkedHashMapCache和CaffeineCache也由它提供。 - jetcache-anno:基于Spring提供@Cached和@CreateCache注解支持。
- jetcache-redis:使用jedis提供Redis支持。
- jetcache-redis-lettuce(需要JetCache2.3以上版本):使用lettuce提供Redis支持,实现了JetCache异步访问缓存的的接口。
- jetcache-starter-redis:Spring Boot方式的Starter,基于Jedis。
- jetcache-starter-redis-lettuce(需要JetCache2.3以上版本):Spring Boot方式的Starter,基于Lettuce。


 7790
7790

 被折叠的 条评论
为什么被折叠?
被折叠的 条评论
为什么被折叠?
 到【灌水乐园】发言


