


 本文介绍了如何在SpringBoot3.0项目中使用Druid数据库连接池,包括Maven依赖管理、启动类配置、Controller实现以及测试过程中遇到的问题和解决方案。
本章概要
- 创建程序
- 引入依赖
- 启动类
- 配置文件编写
- 编写 Controller
- 启动测试
- 问题解决
4.1 创建程序
4.2 引入依赖
<?xml version="1.0" encoding="UTF-8"?>
<project xmlns="http://maven.apache.org/POM/4.0.0"
         xmlns:xsi="http://www.w3.org/2001/XMLSchema-instance"
         xsi:schemaLocation="http://maven.apache.org/POM/4.0.0 http://maven.apache.org/xsd/maven-4.0.0.xsd">
    <modelVersion>4.0.0</modelVersion>

    <parent>
        <groupId>org.springframework.boot</groupId>
        <artifactId>spring-boot-starter-parent</artifactId>
        <version>3.0.5</version>
    </parent>
    <groupId>com.atguigu</groupId>
    <artifactId>springboot-starter-druid-04</artifactId>
    <version>1.0-SNAPSHOT</version>

    <properties>
        <maven.compiler.source>17</maven.compiler.source>
        <maven.compiler.target>17</maven.compiler.target>
        <project.build.sourceEncoding>UTF-8</project.build.sourceEncoding>
    </properties>


    <dependencies>
        <!--  web开发的场景启动器 -->
        <dependency>
            <groupId>org.springframework.boot</groupId>
            <artifactId>spring-boot-starter-web</artifactId>
        </dependency>

        <!-- 数据库相关配置启动器 jdbctemplate 事务相关-->
        <dependency>
            <groupId>org.springframework.boot</groupId>
            <artifactId>spring-boot-starter-jdbc</artifactId>
        </dependency>

        <!-- druid启动器的依赖  -->
        <dependency>
            <groupId>com.alibaba</groupId>
            <artifactId>druid-spring-boot-3-starter</artifactId>
            <version>1.2.18</version>
        </dependency>

        <!-- 驱动类-->
        <dependency>
            <groupId>mysql</groupId>
            <artifactId>mysql-connector-java</artifactId>
            <version>8.0.28</version>
        </dependency>

        <dependency>
            <groupId>org.projectlombok</groupId>
            <artifactId>lombok</artifactId>
            <version>1.18.28</version>
        </dependency>

    </dependencies>

    <!--    SpringBoot应用打包插件-->
    <build>
        <plugins>
            <plugin>
                <groupId>org.springframework.boot</groupId>
                <artifactId>spring-boot-maven-plugin</artifactId>
            </plugin>
        </plugins>
    </build>

</project>
4.3 启动类
@SpringBootApplication
public class MainApplication {

    public static void main(String[] args) {
        SpringApplication.run(MainApplication.class,args);
    }
}
4.4 配置文件编写
添加
druid连接池的基本配置
spring:
  datasource:
    # 连接池类型
    type: com.alibaba.druid.pool.DruidDataSource

    # Druid的其他属性配置 springboot3整合情况下,数据库连接信息必须在Druid属性下!
    druid:
      url: jdbc:mysql://localhost:3306/day01
      username: root
      password: root
      driver-class-name: com.mysql.cj.jdbc.Driver
      # 初始化时建立物理连接的个数
      initial-size: 5
      # 连接池的最小空闲数量
      min-idle: 5
      # 连接池最大连接数量
      max-active: 20
      # 获取连接时最大等待时间,单位毫秒
      max-wait: 60000
      # 申请连接的时候检测,如果空闲时间大于timeBetweenEvictionRunsMillis,执行validationQuery检测连接是否有效。
      test-while-idle: true
      # 既作为检测的间隔时间又作为testWhileIdel执行的依据
      time-between-eviction-runs-millis: 60000
      # 销毁线程时检测当前连接的最后活动时间和当前时间差大于该值时,关闭当前连接(配置连接在池中的最小生存时间)
      min-evictable-idle-time-millis: 30000
      # 用来检测数据库连接是否有效的sql 必须是一个查询语句(oracle中为 select 1 from dual)
      validation-query: select 1
      # 申请连接时会执行validationQuery检测连接是否有效,开启会降低性能,默认为true
      test-on-borrow: false
      # 归还连接时会执行validationQuery检测连接是否有效,开启会降低性能,默认为true
      test-on-return: false
      # 是否缓存preparedStatement, 也就是PSCache,PSCache对支持游标的数据库性能提升巨大,比如说oracle,在mysql下建议关闭。
      pool-prepared-statements: false
      # 要启用PSCache,必须配置大于0,当大于0时,poolPreparedStatements自动触发修改为true。在Druid中,不会存在Oracle下PSCache占用内存过多的问题,可以把这个数值配置大一些,比如说100
      max-pool-prepared-statement-per-connection-size: -1
      # 合并多个DruidDataSource的监控数据
      use-global-data-source-stat: true

logging:
  level:
    root: debug
4.5 编写 Controller
@Slf4j
@Controller
@RequestMapping("/user")
public class UserController {

    @Autowired
    private JdbcTemplate jdbcTemplate;

    @GetMapping("/getUser")
    @ResponseBody
    public User getUser(){
        String sql = "select * from users where id = ? ; ";
        User user = jdbcTemplate.queryForObject(sql, new BeanPropertyRowMapper<>(User.class), 1);
        log.info("查询的user数据为:{}",user.toString());
        return user;
    }

}
4.6 启动测试
4.7 问题解决
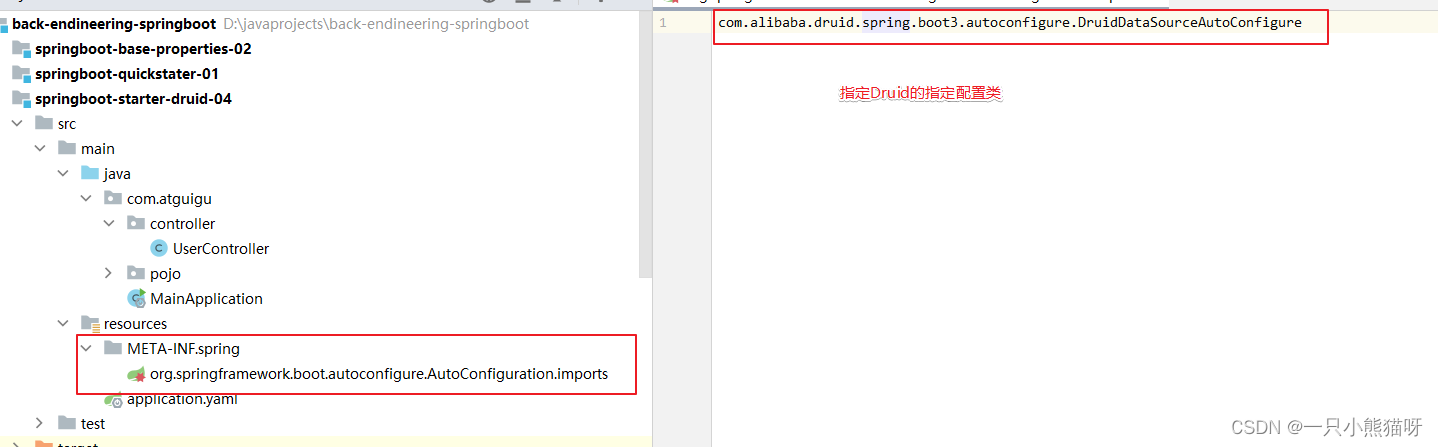
通过源码分析,
druid-spring-boot-3-starter版本是1.2.18,虽然适配了SpringBoot3,但缺少自动装配的配置文件,需要手动在resources目录下创建META-INF/spring/org.springframework.boot.autoconfigure.AutoConfiguration.imports,文件内容如下:
com.alibaba.druid.spring.boot3.autoconfigure.DruidDataSourceAutoConfigure


 648
648

 被折叠的 条评论
为什么被折叠?
被折叠的 条评论
为什么被折叠?
 到【灌水乐园】发言


