


BurpSuitePro 插件开发
测试网站的时候发现可能存在sql注入地方的时候,虽然可以手工测试,但是遇到基于时间的盲注或者参数太多的情况下,需要借用sqlmap进行扫描,但是每次启动sqlmap其实是一个很麻烦的事情,渗透讲究什么,讲究的就是快准狠,所以写了这个插件,可以在Proxy直接调用sqlmap进行扫描,类似下图
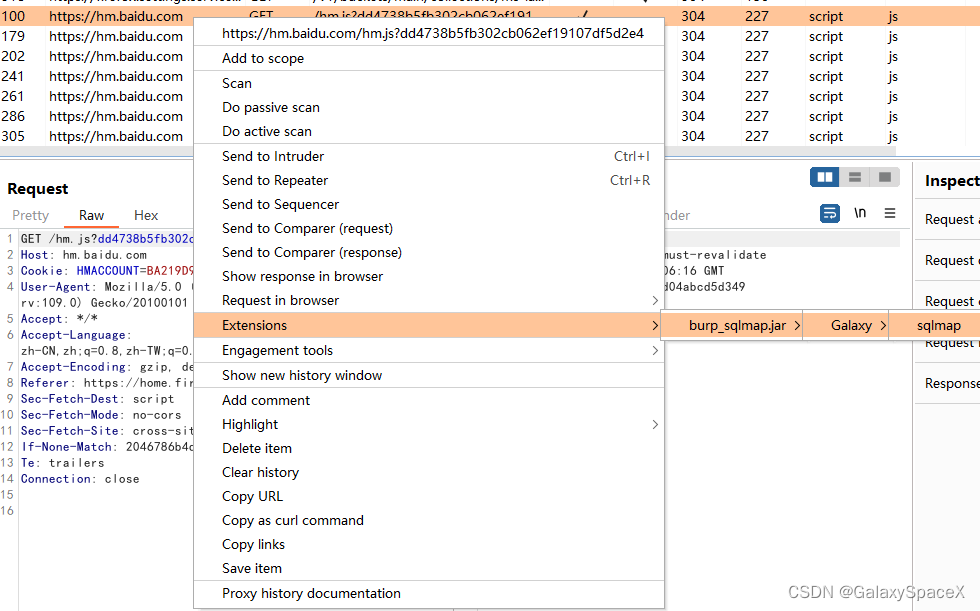

执行后会直接弹出sqlmap的cmd窗口并执行,这样可以省去很多麻烦。
编写过程:
创建项目
编写这个小工具首先要创建项目,具体的创建项目请参考下面的帖子
https://blog.csdn.net/GalaxySpaceX/article/details/129682466创建类
创建main.java,代码如下
package main;
import burp.api.montoya.BurpExtension;
import burp.api.montoya.MontoyaApi;
import burp.api.montoya.http.message.HttpRequestResponse;
import burp.api.montoya.logging.Logging;
import burp.api.montoya.ui.contextmenu.ContextMenuEvent;
import burp.api.montoya.ui.contextmenu.ContextMenuItemsProvider;
import javax.swing.*;
import java.awt.*;
import java.awt.event.ActionEvent;
import java.awt.event.ActionListener;
import java.io.IOException;
import java.util.ArrayList;
import java.util.List;
public class main implements BurpExtension, ContextMenuItemsProvider {
public Logging logging;
public MontoyaApi API;
@Override
public void initialize(MontoyaApi api) {
this.API = api;
this.logging = api.logging();
api.userInterface().registerContextMenuItemsProvider(this);
}
@Override
public List<Component> provideMenuItems(ContextMenuEvent event) {
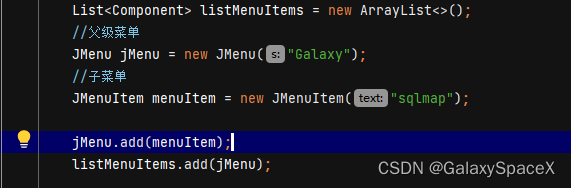
List<Component> listMenuItems = new ArrayList<>();
//父级菜单
JMenu jMenu = new JMenu("Galaxy");
//子菜单
JMenuItem menuItem = new JMenuItem("sqlmap");
jMenu.add(menuItem);
listMenuItems.add(jMenu);
menuItem.addActionListener(new ActionListener() {
@Override
public void actionPerformed(ActionEvent e) {
HttpRequestResponse ReqResp = event.selectedRequestResponses().get(0);
sqlmap_engine sqlengine = new sqlmap_engine();
try {
sqlengine.run_main(ReqResp, API);
} catch (IOException ex) {
throw new RuntimeException(ex);
}
}
});
return listMenuItems;
}
}创建sqlmap_engine.java,附加代码如下
package main;

import burp.api.montoya.MontoyaApi;
import burp.api.montoya.http.message.HttpRequestResponse;
import burp.api.montoya.logging.Logging;

import java.io.*;

public class sqlmap_engine {
    private Logging logging;
    public String str_cmd = "C:/Windows/System32/cmd.exe /k start python D:\\permeate\\sqlmap\\sqlmap.py -r ";
    public String str_sockpage = "sqlmap_sockpack";

    public void run_main( HttpRequestResponse ReqResp ,MontoyaApi API) throws IOException {
        logging = API.logging();
        String sockpage = ReqResp.request().toString();

        BufferedWriter writer = null;
        File file = new File(str_sockpage);
        String file_path = file.getAbsolutePath();

        if(!file.exists()){
            try {
                file.createNewFile();
            } catch (IOException e) {
                e.printStackTrace();
            }
        }
        //写入
        try {
            writer = new BufferedWriter(new OutputStreamWriter(new FileOutputStream(file,false), "UTF-8"));
            writer.write(sockpage);
            writer.close();
        } catch (IOException e) {
            logging.logToOutput(e.getMessage());
        }

        execute_command(file_path);
    }

    public void execute_command(String file_path) throws IOException {
        Runtime.getRuntime().exec( str_cmd + file_path);
    }
}
代码讲解:
上面贴出了具体的代码实现,打包后放入burp中就可以直接调用sqlmap,并将对应的数据包保存到文件中,采用sqlmap -r的方式扫描,这样不用手动添加cookie,很方便。
代码处首先需要添加右键菜单,这里我们需要继承ContextMenuItemsProvider类,继承后会自动添加provideMenuItems函数,这里面我们要添加我们右键的菜单
这里就实现了我们的右键菜单功能,下面我们要去读取我们右键点击对应的数据包和对点击时间进行回调

这里主要使用addActionListener来添加一个监听,其中使用ContextMenuEvent上下文的selectedRequestResponses函数,来得到我们点击的条目,并读取其中的数据。然后将读取的内容发送到sqlmap_engine中
这里为了执行sqlmap方便一些,选择把数据包保存成本地文件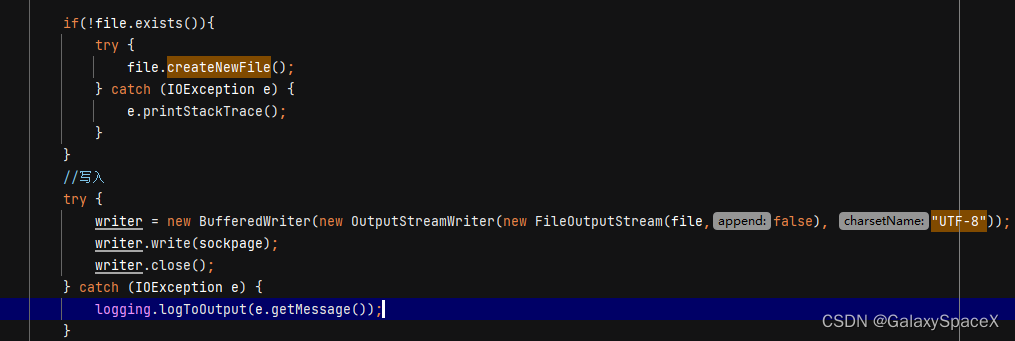 本地保存成功后,就可以使用Runtime调用cmd执行sqlmap

这里就可以调用cmd,执行sqlmap。
结尾
整个代码很简单,后期还会添加更多,比如反序列化检测等简单的小工具,最好能all in one,这样能节约大量的时间,代码很简单,但是这里也是为了抛砖引玉,帮助更多的想写自己插件的人入门,进而写出更实用的插件。


 859
859


 被折叠的 条评论
为什么被折叠?
被折叠的 条评论
为什么被折叠?
 到【灌水乐园】发言


