


前言:
今天碰到个程序是用python编写,然后编译成exe程序,有点兴趣就拿来研究了一下,下面记录下分析的过程。
python代码的运行是靠python解析器将源代码转换为字节码(.pyc),然后把编译好的字节码转发到Python虚拟机(PVM)中进行执行,那么python程序是如何打包成为exe程序来执行的那,这里面有二种方法可以将python转换为exe程序执行。
第一种就是将python程序转换为c/c++代码后,然后编译成为exe程序,但是这种方法会有很多限制且容易出bug,并不好用;
第二种就是首先将python所需要的所有库代码编码为pyd文件并拷贝到对应的目录中,然后按照PE格式制造一个可执行文件,包含了windows自带的运行dll库和PythonXX.dll(解析器库),入口点为python解析器,就是将整个python所需要的全部压缩进了一个exe程序中来进行执行,需要的库通过pyd调用。
python编译:
为了兼容性或者代码的保护,我们会采用将python程序编码为exe程序来进行运行,使用工具一般采用PyInstaller工具进行转换。这里先介绍PyInstaller是如何将python程序转换为exe程序的:
安装:
下载地址:
https://github.com/pyinstaller/pyinstaller
或者直接执行命令:
pip install PyInstaller
支持版本为 Python version 3.7-3.11 ,并且支持PyQt5, PySide2, PyQt6, PySide6, wxPython, matplotlib and others out-of-the-box的捆绑:
注意:Python 3.10.0 包含一个错误,使得 PyInstaller 不支持它。PyInstaller也无法与Python 3.12的beta版本一起使用
支持操作系统为win7以及以上版本。
打包:
首先看下PyInstaller的常用命令:
picture.ico为图标:
PyInstaller -F -i picture.ico -n noPac.exe noPac.py
打包成独立exe:
PyInstaller -F --version-file ver.txt noPac.py
# 多文件
pyinstaller -D noPac.py
# 单个可执行文件
pyinstaller -F noPac.py
加密打包exe(加密只针对依赖库):
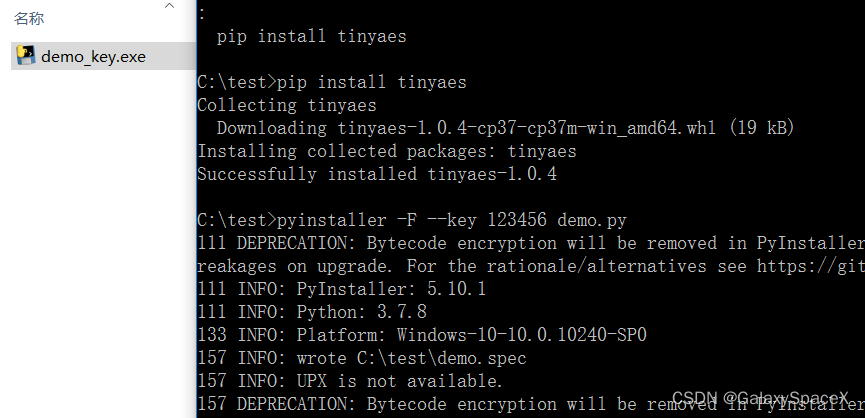
但是要安装tinyaes:pip install tinyaes
pyinstaller -F --key 123456 xxx.py我这里使用一个连接mysql的python代码进行测试:
包含两个py文件:demo.py和mysql_client_tools.py
执行:PyInstaller -F -i icon.ico -n demo.exe demo.py
 执行成功后会在dist目录下生成exe文件,并在build目录生成build文件
当提示缺少库的时候可以在PyCharm中查看:
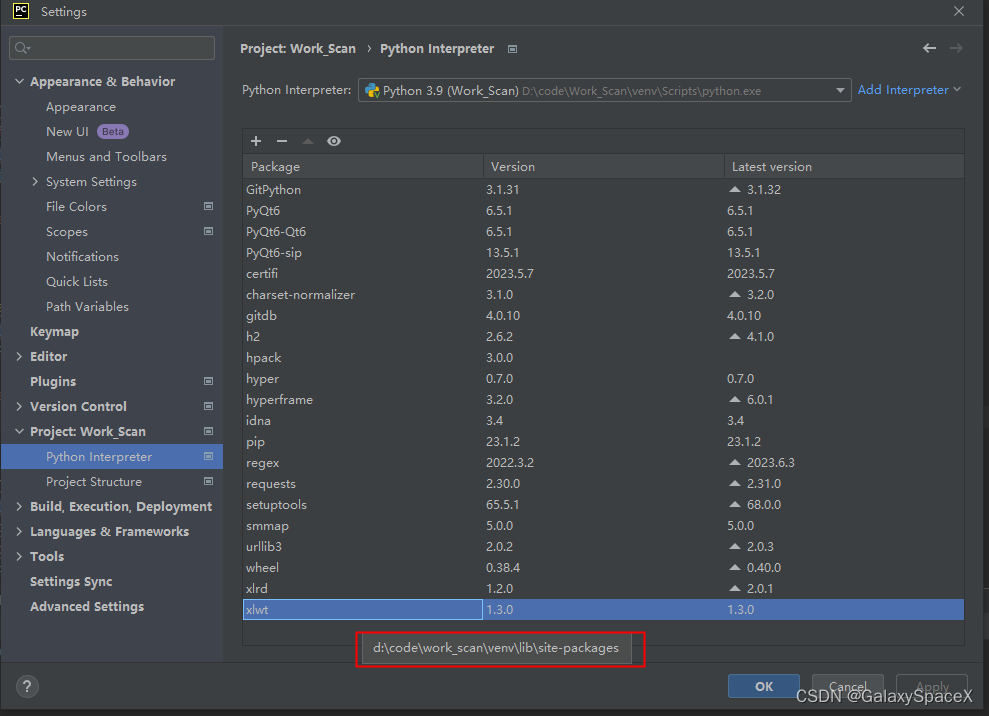
然后使用命令:
pyinstaller -F -p D:\code\Work_Scan\venv\Lib\site-packages main.py
加密exe可以使用:pyinstaller -F --key 123456 demo.py
python逆向:
前期分析:
拿到一个程序我们首先要去分析这个程序到底是用什么语言写的,然后才能对症下药,既然是exe程序,我们使用die进行分析:
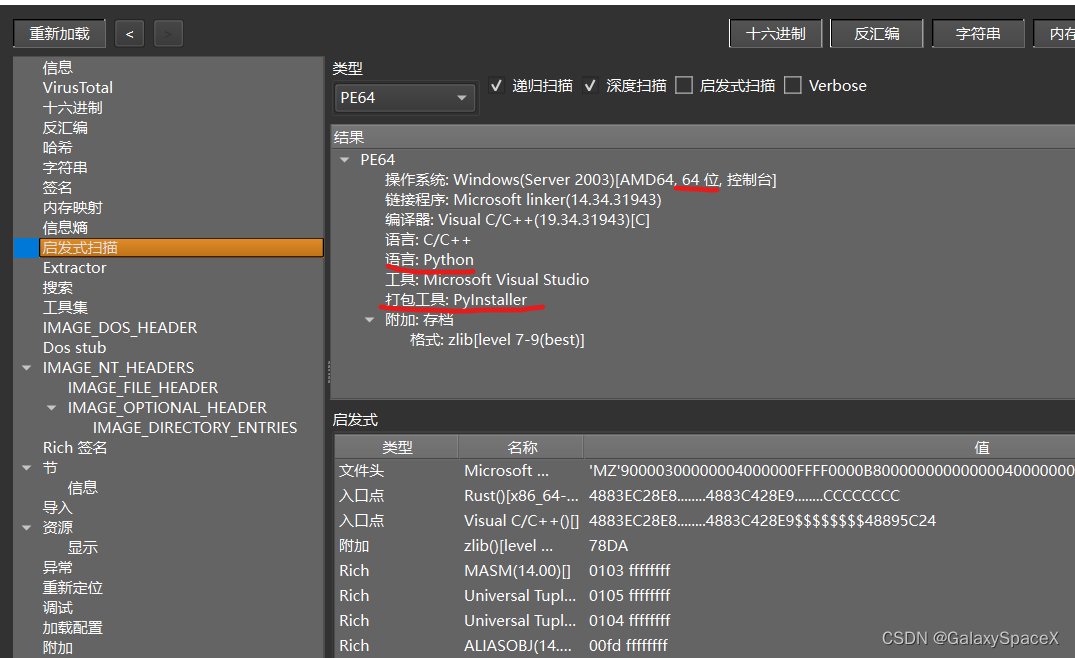
我这里测试的就是上面生成的加密后的exe,可以看到分析结果,使用的是PyInstaller进行的打包,且语言为python。
解包:
之后我们要对exe进行解包处理,这里我们要使用工具pyinstxtractor:
pyinstxtractor下载地址:
https://github.com/extremecoders-re/pyinstxtractor
执行:
python pyinstxtractor.py demo_key.exe 
这里需要注意使用的什么版本的python编译的exe,就要用什么版本的python进行解包,不然会报错

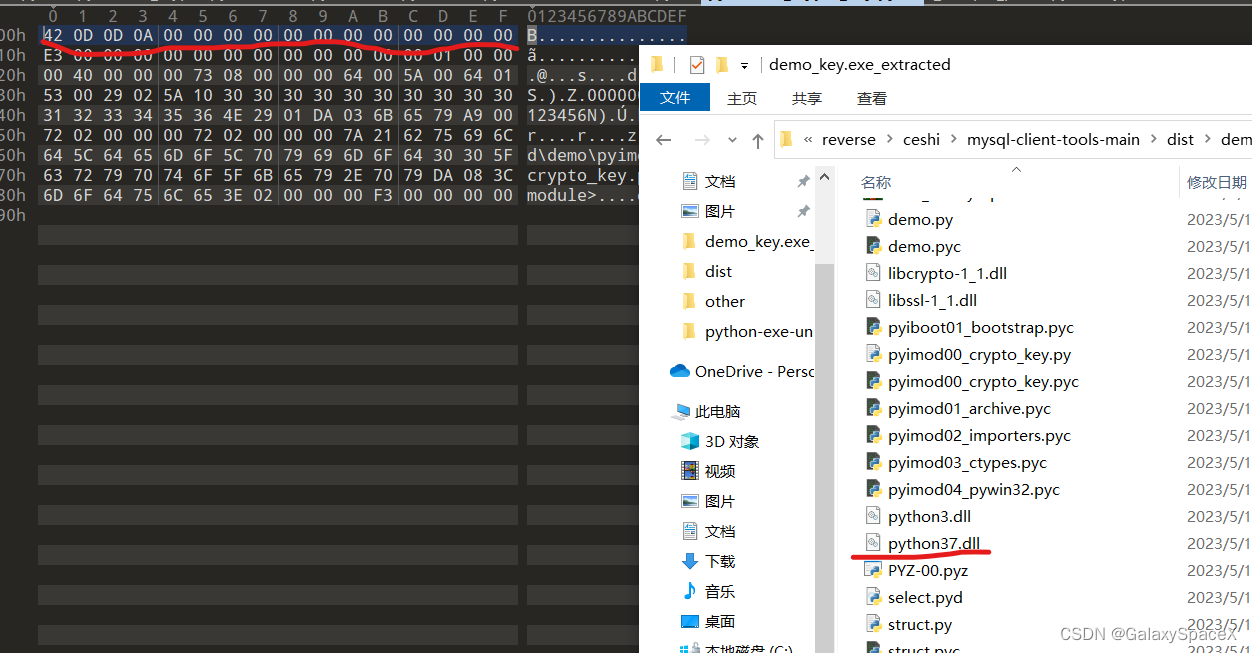
解包完成后可以看到生成了demo_key.exe_extracted文件夹,里面就是解包后的文件,需要特别注意的几个文件:
main.pyc 主函数
pyimod00_crypto_key.pyc 这里面保存有加密key
PYZ-00.pyz_extracted 文件夹里面为依赖库

如果PYZ-00.pyz_extracted里面的文件是pyc.encrypted,则证明为加密文件,如果不是则为加密。
解密:
当发现存在pyc.encrypted,则进行解密,如果不是则跳过这一步:
使用010editor打开pyimod00_crypto_key.pyc,注意看我们解包的python的dll版本,这里就要注意header头的版本一定要一致,不然会报错
这里列出各个版本的python头:
Python 2.7: \x03\xf3\x0d\x0a\0\0\0\0

Python 3.0: \x3b\x0c\x0d\x0a\0\0\0\0

Python 3.1: \x4f\x0c\x0d\x0a\0\0\0\0

Python 3.2: \x6c\x0c\x0d\x0a\0\0\0\0

Python 3.3: \x9e\x0c\x0d\x0a\0\0\0\0\0\0\0\0

Python 3.4: \xee\x0c\x0d\x0a\0\0\0\0\0\0\0\0

Python 3.5: \x17\x0d\x0d\x0a\0\0\0\0\0\0\0\0

Python 3.6: \x33\x0d\x0d\x0a\0\0\0\0\0\0\0\0

Python 3.7: \x42\x0d\x0d\x0a\0\0\0\0\0\0\0\0\0\0\0\0

Python 3.8: \x55\x0d\x0d\x0a\0\0\0\0\0\0\0\0\0\0\0\0

Python 3.9: \x61\x0d\x0d\x0a\0\0\0\0\0\0\0\0\0\0\0\0

Python 3.10: \x6f\x0d\x0d\x0a\0\0\0\0\0\0\0\0\0\0\0\0
使用uncompyle6反编译:
pip install uncompyle6
注意uncompyle6有版本限制为1.4, 2.1-2.7, and 3.0-3.8
执行如下命令:
uncompyle6 -o pyimod00_crypto_key.py pyimod00_crypto_key.pyc
uncompyle6 -o demo.py demo.pyc
cat pyimod00_crypto_key.py
可以看到解密出来的key为0000000000123456

因为使用的是AES加密,使用如下代码进行解密,这里要注意看PyInstaller用的是什么版本,如果是>=4.0使用的是tinyaes,而且使用的算法也不一样
Pyinstaller < 4.0 => PyCrypto and CFB
Pyinstaller >= 4.0 => tinyaes and CTR
当pyinstaller < 4.0 使用如下:
# For pyinstaller < 4.0
import glob
import zlib
from Crypto.Cipher import AES
from pathlib import Path

CRYPT_BLOCK_SIZE = 16

# key obtained from pyimod00_crypto_key
key = bytes('MySup3rS3cr3tK3y', 'utf-8')

for p in Path("PYZ-00.pyz_extracted").glob("**/*.pyc.encrypted"):
	inf = open(p, 'rb') # encrypted file input
	outf = open(p.with_name(p.stem), 'wb') # output file

	# Initialization vector
	iv = inf.read(CRYPT_BLOCK_SIZE)

	cipher = AES.new(key, AES.MODE_CFB, iv)

	# Decrypt and decompress
	plaintext = zlib.decompress(cipher.decrypt(inf.read()))

	# Write pyc header
	# The header below is for Python 3.8
	outf.write(b'\x55\x0d\x0d\x0a\0\0\0\0\0\0\0\0\0\0\0\0')

	# Write decrypted data
	outf.write(plaintext)

	inf.close()
	outf.close()

	# Delete .pyc.encrypted file
	p.unlink()
当使用版本>= 4.0使用如下代码:
# For pyinstaller >=4.0
import glob
import zlib
import tinyaes
from pathlib import Path

CRYPT_BLOCK_SIZE = 16

# key obtained from pyimod00_crypto_key
key = bytes('MySup3rS3cr3tK3y', 'utf-8')

for p in Path("PYZ-00.pyz_extracted").glob("**/*.pyc.encrypted"):
	inf = open(p, 'rb') # encrypted file input
	outf = open(p.with_name(p.stem), 'wb') # output file

	# Initialization vector
	iv = inf.read(CRYPT_BLOCK_SIZE)

	cipher = tinyaes.AES(key, iv)

	# Decrypt and decompress
	plaintext = zlib.decompress(cipher.CTR_xcrypt_buffer(inf.read()))

	# Write pyc header
	# The header below is for Python 3.8
	outf.write(b'\x55\x0d\x0d\x0a\0\0\0\0\0\0\0\0\0\0\0\0')

	# Write decrypted data
	outf.write(plaintext)

	inf.close()
	outf.close()

	# Delete .pyc.encrypted file
	p.unlink()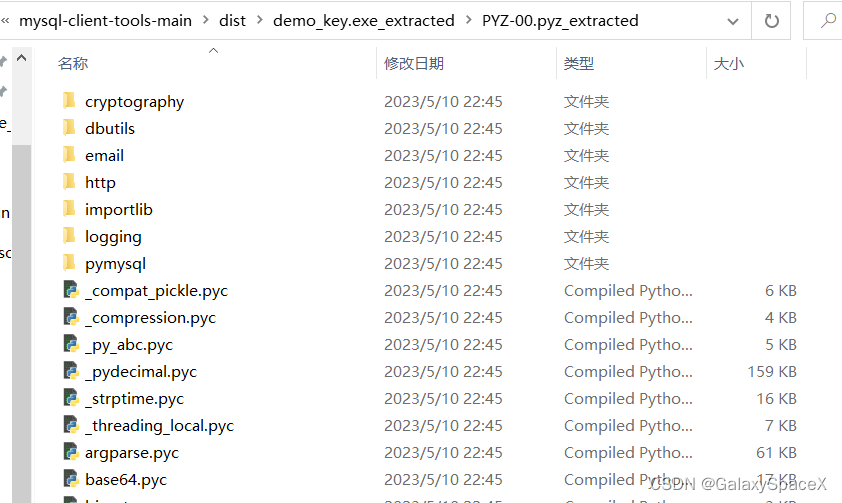
但是要如何判单使用的是什么版本,我们可以反编译 pyimod01_archive.pyc,看里面是否引用了tinyaes,这里可以看到,引用了tinyaes
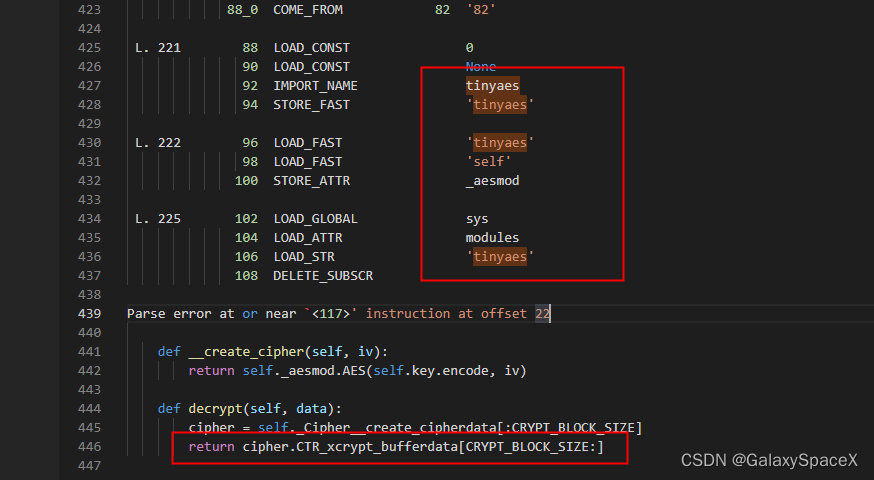
则使用下面的版本。
反编译:
其实上面也讲过了,使用uncompyle6进行反编译,这里可以使用我上面的脚本进行批量的反编译,但是当反汇编的为公共库的时候会失败,所以也可以选择uncompyle6进行指定反汇编:
我这里直接全部反编译,可以看到可以将源代码反编译出来

但是可以看看其他反编译的文件可以看到有些没成功会报错比如如下的
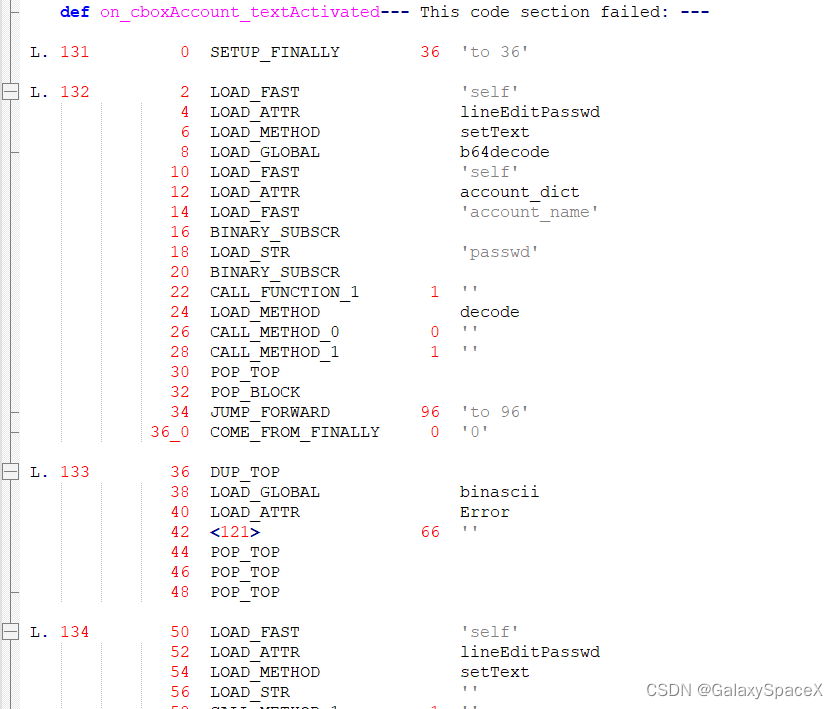
这就是加了混淆,具体的怎么解混淆就要看情况了,后面有时间在写
总结:
过程其实很简单,主要使用pyinstxtractor.py和uncompyle6两个工具,一个是解包,一个是反编译,中间有当文件加密,可以使用解密工具进行解密,之后使用uncompyle6反编译,过程不难,用这样的方法可以很简单的反编译出源代码,所以为了对抗破解,会进行混淆等操作,这个后续进行介绍。


 630
630


 被折叠的 条评论
为什么被折叠?
被折叠的 条评论
为什么被折叠?
 到【灌水乐园】发言


