


requests 模块是写python脚本使用频率最高的模块之一。很多人写python第一个使用的模块就是requests,因为它可以做网络爬虫。不仅写爬虫方便,在日常的开发中更是少不了requests的使用。如调用后端接口,上传文件,查询数据库等。本篇详细介绍requests的使用。
requests 是⽤Python编写的第三方库,它基于python自带网络库urllib3封装完成。采⽤Apache2 Licensed开源协议的 HTTP 库。它⽐ urllib3 更加⽅便,可以节约使用者⼤量的时间。
下面从如下6个方面,全面讲解requests模块
- 简单使用
- 请求方法
- 请求参数
- 请求返回
- 异常捕获
- 提升性能
1|1功能快速传送门
不需要看完全篇内容,直接跳转到需要查找的功能
上传文件: 请求参数->files使用
认证接口调用:请求参数->header使用
json接口调用:请求参数->json使用
form表单接口调用:请求参数->data使用
2|0requests初识
requests 是一个第三方库,使用之前需要安装。安装命令如下:
pip3 install requests -i https://pypi.tuna.tsinghua.edu.cn/simple
最简单请求,发送一个get请求,获得返回值。
import requests res = requests.get("http://www.baidu.com") print(res) >>> <Response [200]>
从如上代码可以看出,使用requets发送请求只需要一行代码就可以搞定,是非常简单的事情。而requests的设计理念就是 **Requests** is an elegant and simple HTTP library for Python, built for human beings.意思就是:requests是一个优雅而简单的 Python HTTP 库,它是为人类构建的。
由于不同版本之间参数和功能略有差异,所以说明本文使用的requests版本是 2.31.0
3|0请求方法
requests支持大部分的HTTP请求方法。具体如下:

关于每一个请求方法的使用下面一一列举出来。以下示例基于本地启动的后端服务,尝试跑示例请更换url。
3|1get请求获取记录
import requests url = "http://127.0.0.1:8090/demos" res = requests.get(url) print(res.json()) # 返回json反序列化之后的字典对象 >>> {'result': [{'age': 0, 'create_at': 'Mon, 29 May 2023 22:05:40 GMT', 'id': 2, 'name': 'string', 'status': 0, 'update_at': 'Mon, 29 May 2023 22:05:40 GMT', 'user_id': 0}, {'age': 100, 'create_at': 'Sun, 11 Jun 2023 10:38:28 GMT', 'id': 3, 'name': 'ljk', 'status': 0, 'update_at': 'Sun, 11 Jun 2023 10:38:28 GMT', 'user_id': 223}], 'total': 2}
3|2post请求创建记录
import requests url = "http://127.0.0.1:8090/demo" payload = { "age": 18, "desc": "post_demo", "name": "post_method", "user_id": 102 } # body体会自动json序列化 res = requests.post(url, json=payload) print(res.json()) >>> {'age': 18, 'create_at': 'Sun, 11 Jun 2023 16:14:40 GMT', 'id': 4, 'name': 'post_method', 'status': 0, 'update_at': 'Sun, 11 Jun 2023 16:14:40 GMT', 'user_id': 102}
3|3put请求更新记录
import requests url = "http://127.0.0.1:8090/demo/4" payload = { "age": 20, "user_id": 1001 } res = requests.put(url, json=payload) print(res.json()) >>> {'msg': 'success'}
3|4delete请求删除记录
import requests url = "http://127.0.0.1:8090/demo/4" res = requests.delete(url) print(res.json()) >>> {'msg': 'success'}
3|5head请求获取header
import requests url = "http://127.0.0.1:8090/demos" res = requests.head(url) print(res.ok) print(res.headers) >>> ok {'Server': 'Werkzeug/2.3.6 Python/3.9.6', 'Date': 'Sat, 17 Jun 2023 06:34:44 GMT', 'Content-Type': 'application/json', 'Content-Length': '702', 'Connection': 'close'}
从返回结果的headers中可以找到返回的数据类型 'Content-Type': 'application/json',这说明返回的数据是json编码格式的,所以需要json反序列化之后才能使用。
3|6patch请求更新部分数据
import requests url = "http://127.0.0.1:8090/demo/4" payload = { "age": 200 } res = requests.patch(url, json=payload) print(res.json()) ''' {'msg': 'success'} '''
3|7options请求查看接口要求
import requests url = "http://127.0.0.1:8090/demo/4" headers={ "Access-Control-Request-Method": "GET", "Origin": "*", "Access-Control-Request-Headers": "Authorization", } res = requests.options(url, headers=headers) print(res.ok) print(res.headers) >>> True {'Server': 'Werkzeug/2.3.6 Python/3.9.6', 'Date': 'Sat, 17 Jun 2023 06:38:21 GMT', 'Content-Type': 'text/html; charset=utf-8', 'Allow': 'OPTIONS, DELETE, PUT, PATCH, HEAD, GET', 'Content-Length': '0', 'Connection': 'close'}
从返回的headers中可以看到,该接口允许的请求包括:'Allow': 'OPTIONS, DELETE, PUT, PATCH, HEAD, GET',所以该接口可以使用允许的方法去访问。相反没有允许的方法是无法访问的该接口的。
4|0请求参数
request 请求的函数签名如下,可以看出requests支持非常多的参数。截止当前版本2.31.0一共16个参数。
def request( self, method, url, params=None, data=None, headers=None, cookies=None, files=None, auth=None, timeout=None, allow_redirects=True, proxies=None, hooks=None, stream=None, verify=None, cert=None, json=None, ):
参数说明:
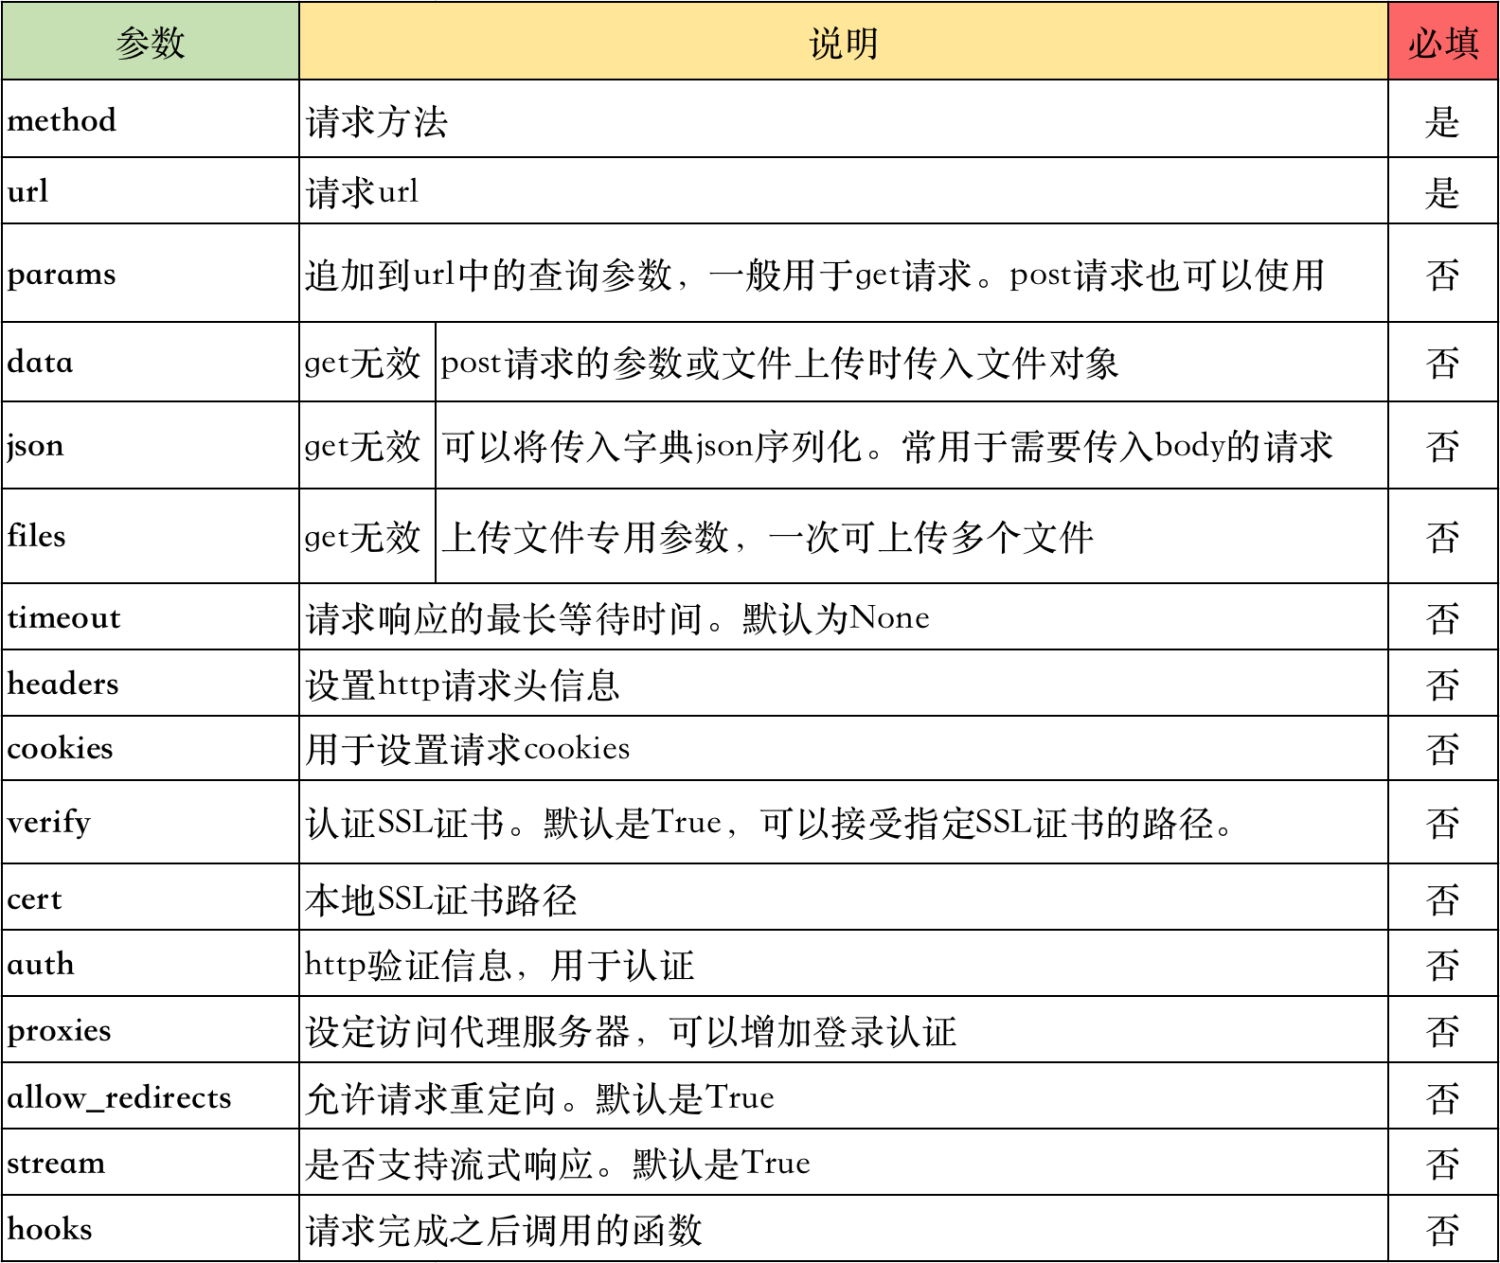
4|1params 使用示例
功能:拼接请求url
在get请求中如果携带查询参数如分页查询
http://127.0.0.1:8090/demos?offset=10&limint=10
查询部分的参数有两种写法,第一是直接拼接成如上的url,另一种写法是使用params参数。
将查询的参数定义为字典,传入到params中。
url = "http://127.0.0.1:8090/demos" res = requests.get(url, params={"offset": 1, "limit": 10}) print(res.json()) print(res.url) # 返回请求的url >>> {'result': [{'age': 200, 'create_at': 'Sun, 11 Jun 2023 10:38:28 GMT', 'id': 3, 'name': 'ljk', 'status': 0, 'update_at': 'Sun, 11 Jun 2023 10:38:28 GMT', 'user_id': 1002}], 'total': 2} http://127.0.0.1:8090/demos?offset=1&limit=10
请求返回对象有一个url属性,可以展示请求的方法。可以看到params将传入的字典追加到url当中。
4|2data 使用示例
功能:保存请求body体、上传文件
使用data发送一个body是json格式的请求,首先设置header中数据格式为json,然后使用json序列化body。
import json import requests url = "http://127.0.0.1:8090/demo" payload = { "age": 18, "desc": "post_demo", "name": "post_method", "user_id": 102 } headers = {"Content-Type": "application/json"} res = requests.post(url, data=json.dumps(payload), headers=headers) print(res.json())
知识加油站:
Content-Type字段:
header 头部信息中有一个 Content-Type 字段,该字段用于客户端告诉服务器实际发送的数据类型,比如发送的数据可以是文件、纯文本、json字符串、表单等。在requests中常用的数据类型有5种:
- application/x-www-form-urlencoded:form表单数据被编码为key/value格式发送到服务器。请求默认格式
- multipart/form-data:不仅可以传输参数,还可以传输文件
- text/xml : XML格式。发送的数据必须是xml格式
- application/json:json 格式。发送的数据必须是json格式
- text/plain :纯文本格式
form-data 提交数据的接口
某些接口需要发送multipart/form-data类型的数据,有两种方法:
- 手动组建form-data并修改headers
- 通过files参数传递form-data,推荐此种方式
手动组建form-data
import requests url = "http://www.demo.com/" payload = """------WebKitFormBoundary7MA4YWxkTrZu0gW\r\nContent-Disposition: form-data; name=\"phone\"\n\n{}\r\n------WebKitFormBoundary7MA4YWxkTrZu0gW\r\nContent-Disposition: form-data; name=\"idnum\"\n\n{}\r\n------WebKitFormBoundary7MA4YWxkTrZu0gW\r\nContent-Disposition: form-data; name=\"name\"\r\n\r\n{}\r\n------WebKitFormBoundary7MA4YWxkTrZu0gW\r\nContent-Disposition: form-data; name=\"products\"\r\n\r\n {}\r\n------WebKitFormBoundary7MA4YWxkTrZu0gW--""".format(12374658756, 23, "demo", [201,]) headers = { "content-type": "multipart/form-data; boundary=----WebKitFormBoundary7MA4YWxkTrZu0gW" } resp = requests.post(url, data=payload, verify=False, headers=headers)
通过files传递
import requests files = { 'schoolId': (None, -1), 'schoolName': (None, ""), "reward": (None, 5), "publishText": (None, "测试测试"), "tags": (None, 1), 'image': ('image.jpg', open('%s/resource/upload_images/image.jpg' % PATH_DIR, 'rb'), 'application/octet-stream') } response = requests.post(url, files=files)
4|3json 使用示例
功能:保存body体并json序列化
后端接口接受json格式的数据,除了使用json.dumps序列化body之后,使用json参数是更方便的选择。json参数会自动将传入的字典序列化并添加json格式的头信息。
import requests url = "http://127.0.0.1:8090/demo" payload = { "age": 18, "desc": "post_demo", "name": "post_method", "user_id": 102 } res = requests.post(url, json=payload) print(res.json())
4|4header 使用示例
功能:保存header信息,可用于伪装浏览器,携带认证信息等
公共接口为了反爬虫都会校验请求头里的信息,非浏览器的请求会被拒绝。使用特定的headers信息即可将脚本伪装成浏览器。
接口中通常需要校验认证信息,需要携带token发起请求,token就需要再headers中指定。
import requests url = "http://127.0.0.1:8090/demo" headers = { 'User-Agent':'Mozilla/5.0 (Macintosh; Intel Mac OS X 10_15_7) AppleWebKit/537.36 (KHTML, like Gecko) Chrome/114.0.0.0 Safari/537.36' 'mtk': "xxxxx" } res = requests.get(url, headers=headers) print(res.json())
4|5files 使用示例
功能:上传文件
上传文件首先打开一个文件获得文件句柄,然后传入files中。可以上传一个或多个文件。
建议使用二进制的方式读取文件,requests 可能会为你提供 header 中的 Content-Length。
import requests url = "http://127.0.0.1:8090/demo" filea = open("a.txt", "rb") fileb = open("b.txt", "rb") res = requests.post(url, files={"file_a": filea, "file_b": fileb}) print(res.json())
4|6timeout 使用示例
功能:指定请求的超时时间
超时可分为连接超时和读取超时
分别设置连接超时和读取超时,timeout=(连接超时时间, 读取超时时间)
统一设置连接超时和读取超时, timeout=超时时间
url = "http://127.0.0.1:8090/demo/10" res = requests.get(url, timeout=(3, 10)) print(res.json())
4|7hooks 使用示例
功能:添加钩子函数
Hooks即钩子方法,用于在某个流程执行时捎带执行另一个自定义的方法。
requests库只支持一个response的钩子,在响应返回时可以捎带执行我们自定义的某些方法。可以用于打印一些信息,做一些响应检查或在响应对象中添加额外的信息。
import requests def verify_res(res, *args, **kwargs): res.status = 'PASS' if res.status_code == 200 else 'FAIL' print(res.status) url = "http://www.baiu.com" response = requests.get(url, hooks={'response': verify_res}) print("result_url " + response.url)
除了为某一个请求自定义钩子之外,还可以给所有请求都自定钩子函数。
# 创建自定义请求对象时,修改全局模块抛出错误异常 seesion = requests.Session() def hook_func(): pass http.hooks["response"] = [hook_func] session.get("xxx")
5|0返回对象
每一次请求都需要获取详细准确的返回结果,requests请求返回的是一个response对象,该对象有丰富的属性和方法。
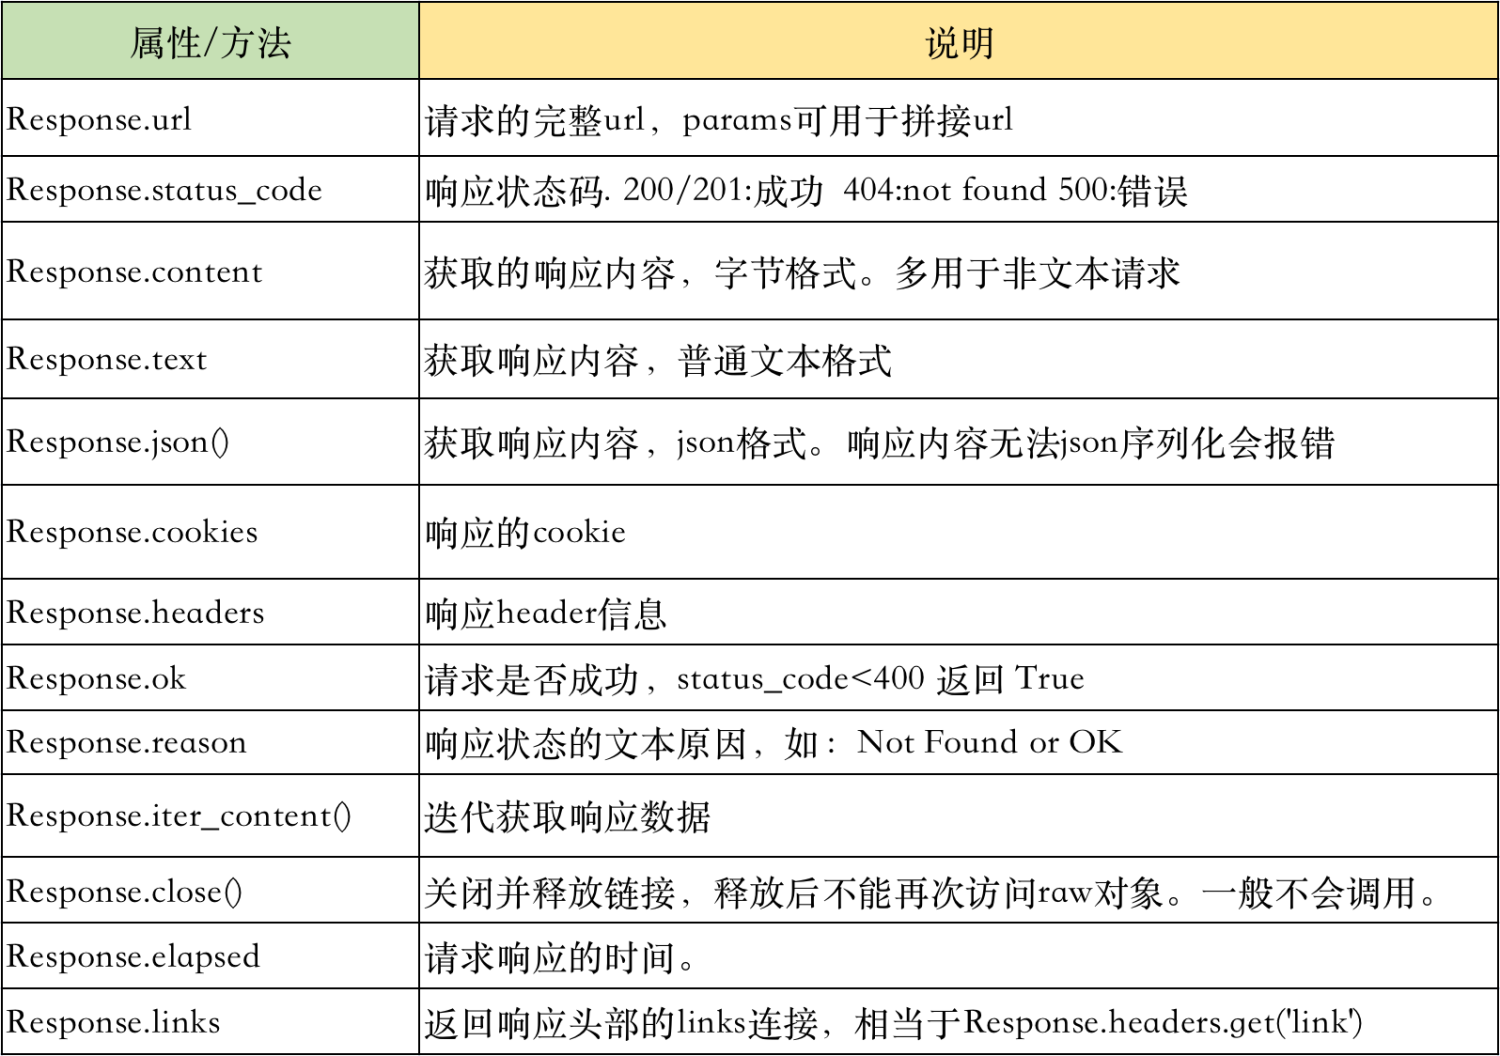
5|1content、text、json() 的区别
content 返回是的二进制的内容,text返回是字符串格式的内容,json()返回的是序列化的内容。
import requests url = "http://127.0.0.1:8090/demo/5" res = requests.get(url) print(f"content类型 -> type: {type(res.content)}\n 内容: {res.content}") print(f"text类型 -> type: {type(res.text)}\n 内容: {res.text}") print(f"json()类型 -> type: {type(res.json())}\n 内容: {res.json()}") >>> content类型 -> type: <class 'bytes'> 内容: b'{\n "age": 18,\n "id": 5,\n "name": "post_method",\n "status": 0,\n "user_id": 102\n}\n' text类型 -> type: <class 'str'> 内容: { "age": 18, "id": 5, "name": "post_method", "status": 0, "user_id": 102 } json()类型 -> type: <class 'dict'> 内容: {'age': 18, 'id': 5, 'name': 'post_method', 'status': 0, 'user_id': 102}
从以上返回结果的类型可以清晰看出三者之间的不同。通常接口返回json格式的数据比较好处理。
推荐使用:
- 确切知道接口返回的json格式的字符串,使用response.json()获取结果
- 不知道接口返回的数据格式,使用response.text获取结果
5|2status_code 和 ok
status_code 是接口的标准响应码,ok 是表示一个请求是否正常。关于正常的定义可以参见ok函数的函数说明。
@property def ok(self): """Returns True if :attr:`status_code` is less than 400, False if not.
import requests url = "http://127.0.0.1:8090/demo/5" res = requests.get(url) print(f"状态码:{res.status_code}, 是否ok: {res.ok}") url = "http://127.0.0.1:8090/demo/10" res = requests.get(url) print(f"状态码:{res.status_code}, 是否ok: {res.ok}") >>> 状态码:200, 是否ok: True 状态码:404, 是否ok: False
接口标准响应码:
- 信息响应 (100–199)
- 成功响应 (200–299)
- 重定向消息 (300–399)
- 客户端错误响应 (400–499)
- 服务端错误响应 (500–599)
5|3reason 简要结果说明
reason 可以获取请求的简单结果描述。200的结果是200,非200的结果都会有一个简洁的说明。
import requests url = "http://127.0.0.1:8090/demo/5" res = requests.get(url) print(f"状态码:{res.status_code}, reason: {res.reason}") >>> 状态码:404, reason: NOT FOUND url = "http://127.0.0.1:8090/demo/5" res = requests.get(url) print(f"状态码:{res.status_code}, reason: {res.reason}") >>> 状态码:500, reason: INTERNAL SERVER ERROR
5|4header 和 cookies 的展示
在调用需要登陆的接口可能需要认证之后的cookies和header中某些特殊字段,所以在请求返回中通过header和cookies拿到相应的参数。
import requests url = "http://127.0.0.1:8090/demo/5" res = requests.get(url) print(f"header: {res.headers}") print(f"cookies: {res.cookies}") >>> header: {'Server': 'Werkzeug/2.3.6 Python/3.9.6', 'Date': 'Tue, 13 Jun 2023 13:27:13 GMT', 'Content-Type': 'application/json', 'Content-Length': '85', 'Connection': 'close'} cookies: <RequestsCookieJar[]>
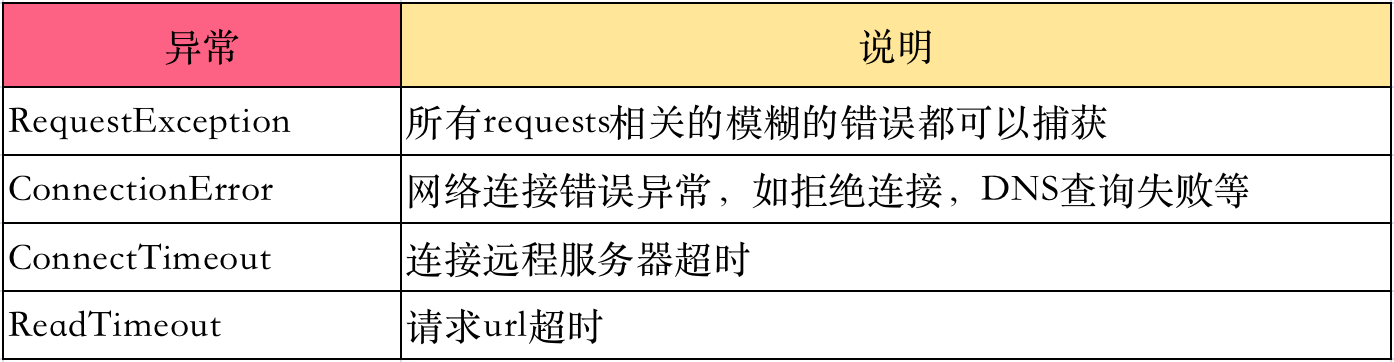
6|0异常捕获
网络请求通常会存在很多可能的错误,特别是http请求还有复杂的后端接口。所以对于错误信息的捕获就特别重要,合理的捕获异常信息可以极大的增强代码的及健壮性。requests 提供了多种异常库,包括如下:
class RequestException(IOError): pass class InvalidJSONError(RequestException): pass class JSONDecodeError(InvalidJSONError, CompatJSONDecodeError): pass class HTTPError(RequestException): pass class ConnectionError(RequestException): pass class ProxyError(ConnectionError): pass class SSLError(ConnectionError): pass class Timeout(RequestException): pass class ConnectTimeout(ConnectionError, Timeout): pass class ReadTimeout(Timeout): pass class URLRequired(RequestException): pass class TooManyRedirects(RequestException): pass class MissingSchema(RequestException, ValueError): pass class InvalidSchema(RequestException, ValueError): pass class class InvalidURL(RequestException, ValueError): pass class InvalidHeader(RequestException, ValueError): pass class InvalidProxyURL(InvalidURL): pass class ChunkedEncodingError(RequestException): pass class ContentDecodingError(RequestException, BaseHTTPError): pass class StreamConsumedError(RequestException, TypeError): pass class RetryError(RequestException): pass class UnrewindableBodyError(RequestException): pass
挑选最常用的几个异常加以说明
6|1未捕获异常
没有捕获异常,当异常发生时最后会导致程序异常退出。
url = "http://127.0.0.1:8090/demo/10" res = requests.get(url) >>> Traceback (most recent call last): File "/Users/ljk/Documents/python_env/dev/lib/python3.9/site-packages/urllib3/connection.py", line 174, in _new_conn conn = connection.create_connection( File "/Users/ljk/Documents/python_env/dev/lib/python3.9/site-packages/urllib3/util/connection.py", line 95, in create_connection raise err File "/Users/ljk/Documents/python_env/dev/lib/python3.9/site-packages/urllib3/util/connection.py", line 85, in create_connection sock.connect(sa) ConnectionRefusedError: [Errno 61] Connection refused
6|2RequestException
RequestException 可以捕获requests请求所有的异常,是最大颗粒度的异常。
import requests url = "http://127.0.0.1:8090/demo/10" try: res = requests.get(url) except requests.exceptions.RequestException as e: print("something error:") print(e) else: print(f"状态码:{res.status_code}, 是否ok: {res.ok}") finally: print("request end") >>> something error: HTTPConnectionPool(host='127.0.0.1', port=8090): Max retries exceeded with url: /demo/10 (Caused by NewConnectionError('<urllib3.connection.HTTPConnection object at 0x1035db790>: Failed to establish a new connection: [Errno 61] Connection refused')) request end
6|3ConnectionError
ConnectionError 可以捕获请求中网络相关的错误,如网络不可达,拒绝连接等。使用ConnectionError捕获到拒绝连接的错误。
import requests url = "http://127.0.0.1:8090/demo/10" try: res = requests.get(url, timeout=1) except requests.exceptions.ConnectionError as e: print("something error:") print(e) else: print(f"状态码:{res.status_code}, 是否ok: {res.ok}") finally: print("request end") >>> something error: HTTPConnectionPool(host='127.0.0.1', port=8090): Max retries exceeded with url: /demo/10 (Caused by NewConnectionError('<urllib3.connection.HTTPConnection object at 0x103833880>: Failed to establish a new connection: [Errno 61] Connection refused')) request end
6|4ConnectTimeout
请求拒绝是对端服务器收到了请求但是拒绝连接,而ConnectTimeout是没有和对端服务器建立连接而超时。
import requests url = "http://www.facebook.com" try: res = requests.get(url, timeout=10) except requests.exceptions.ConnectTimeout as e: print("something error:") import pdb pdb.set_trace() print(e) else: print(f"状态码:{res.status_code}, 是否ok: {res.ok}") finally: print("request end") >>> something error: HTTPConnectionPool(host='www.facebook.com', port=80): Max retries exceeded with url: / (Caused by ConnectTimeoutError(<urllib3.connection.HTTPConnection object at 0x1056d28b0>, 'Connection to www.facebook.com timed out. (connect timeout=10)')) request end
6|5ReadTimeout
ReadTimeout 是和对端服务器建立了连接,接口返回时超时。在请求接口中睡眠10s,人为制造一个读取超时。
class Demo(MethodView): @swag_from("./apidocs/get.yml") def get(self, demo_id): """获取单个demo数据""" # 直接查询数据库也可,封装成函数可以做一些缓存 import time time.sleep(5) demo = DemoTable.get_by_demo_id(demo_id) return json_response(data=demo.to_dict())
import requests url = "http://127.0.0.1:8090/demo/10" try: res = requests.get(url, timeout=1) except requests.exceptions.ReadTimeout as e: print("something error:") print(e) else: print(f"状态码:{res.status_code}, 是否ok: {res.ok}") finally: print("request end") >>> something error: HTTPConnectionPool(host='127.0.0.1', port=8090): Read timed out. (read timeout=1) request end
6|6接口错误的异常处理
requests请求中所有的接口本身出错都不会抛出异常,比如接口404,500,502等都不会主动抛出异常,而是通过异常状态码展示出来。
import requests url = "http://127.0.0.1:8090/demo/10" try: res = requests.get(url, timeout=10) except requests.exceptions.RequestException as e: print("something error:") print(e) else: print(f"状态码:{res.status_code}, 是否ok: {res.ok}") finally: print("request end") >>> 状态码:404, 是否ok: False request end 状态码:502, 是否ok: False request end
可以看到使用最大返回的异常捕获也没有捕获到接口相关的异常,所以接口异常需要通过status_code状态码去判断。
状态码有很多,如果不想写很多if else判断语句,可以使用 response.raise_for_status() 来抛出异常。raise_for_status() 是一个类似断言assert的方法,如果请求不是200就抛出一个异常。
import requests url = "http://127.0.0.1:8090/demo/10" res = requests.get(url, timeout=5) res.raise_for_status() print(res.json()) >>> Traceback (most recent call last): File "/Users/ljk/Documents/code/daily_dev/requests_demo/method_demo.py", line 166, in <module> res.raise_for_status() File "/Users/ljk/Documents/python_env/dev/lib/python3.9/site-packages/requests/models.py", line 1021, in raise_for_status raise HTTPError(http_error_msg, response=self) requests.exceptions.HTTPError: 404 Client Error: NOT FOUND for url: http://127.0.0.1:8090/demo/10
7|0提高请求效率的方法
7|1多线程
低效的请求:
当有大量的请求任务时使用for循环逐个遍历请求是非常低效的实现。网络IO最耗时的地方便是等待请求的返回,而for循环是顺序执行,只有在前一个请求返回之后才能继续下一个,大量的时间都浪费在网络等待中。
多线程优化:
使用多线程能够显著提高代码效率,减少请求耗时。原理是:python的多线程在遇到网络请求时会主动让CPU,所以当大量请求线程执行时,一个线程遇到网络请求就让出CPU给其他线程使用,不会阻塞等待请求返回。这样大量请求都能同一时间发送出去。
for循环请求和多线程请求对比:
import time import threading import requests # for循环 start = time.time() for i in range(10): res = requests.get("https://www.csdn.net/", timeout=3) end = time.time() print(f"总计耗时:{end-start}") # 多线程 def get_request(): res = requests.get("https://www.csdn.net/", timeout=3) start = time.time() t_list = [] for i in range(10): t = threading.Thread(target=get_request) t_list.append(t) t.start() for t in t_list: t.join() end = time.time() print(f"总计耗时:{end-start}") >>> 总计耗时:6.254332065582275 总计耗时:0.740969181060791
可以看出多线程的耗时几乎是for循环的10分之一,将整体的请求耗时降低了一个层级。
在多线程请求时如果线程超过10个,比较推荐使用线程池的技术,能够有效减少线程的创建耗时。
from concurrent.futures import ThreadPoolExecutor def get_request(): res = requests.get("https://www.csdn.net/", timeout=3) with ThreadPoolExecutor(max_workers=2) as pool: for i in range(10): pool.submit(get_request)
7|2复用TCP链路
每调用一次requests方法请求一次目标服务器,本地机器和目标服务器之间都会建立一次TCP连接,然后传输http请求的数据。在发起大量请求的情况下建立过多的tcp连接不仅会导致代码耗时增加,而且会让目标服务器承受网络读写压力。
使用session可以做到多个请求共用一个TCP连接,在大量请求的场景下能够有效减少代码耗时和降低目标服务器压力。
使用session非常简单,只需要多做一步实例化一个session对象即可,示例如下:
# 初始化一个session对象,相当于建立一个tcp连接 s = requests.Session() for i in range(100): res = s.get(f'https://www.target.com/i') print(res.text) # 另一种使用方法 with requests.Session() as s: s.get('https://httpbin.org/get')
普通请求和复用tcp连接请求耗时对比:
import threading # 普通连接 def get_request(): res = requests.get("https://www.csdn.net/", timeout=3) start = time.time() t_list = [] for i in range(10): t = threading.Thread(target=get_request) t_list.append(t) t.start() for t in t_list: t.join() end = time.time() print(f"总计耗时:{end-start}") # 复用tcp连接 def get_request_session(s): res = s.get("https://www.csdn.net/", timeout=3) start = time.time() t_list = [] with requests.Session() as s: for i in range(10): t = threading.Thread(target=get_request_session, args=(s,)) t_list.append(t) t.start() for t in t_list: t.join() end = time.time() print(f"总计耗时:{end-start}") >>> 总计耗时:0.9967081546783447 总计耗时:0.7688210010528564
可以看出,复用TCP之后速度有更进一步的提升。
7|3重试机制
通常在一次请求中如果超时了还会重试几次,实现重试逻辑通常会使用一个记次的逻辑。可能会写出如下的代码:
i = 0 while i < 3: try: res = requests.get(url, timeout=5) break except requests.exceptions.Timeout: i += 1
其实重试的功能requests已经提供了。requests提供了一个传输适配器的方法完成一些如重试机制、心跳检测等功能能。
重试机制:
每当 Session 被初始化,就会有默认的适配器附着在 Session 上,其中一个供 HTTP 使用,另一个供 HTTPS 使用。requests允许用户创建和使用他们自己的传输适配器,实现他们需要的特殊功能。示例如下:
import time from requests.adapters import HTTPAdapter s = requests.Session() # 为session添加适配器。根据url是否为https选择一个即可 s.mount('http://', HTTPAdapter(max_retries=3)) s.mount('https://', HTTPAdapter(max_retries=3)) start = time.time() try: res = s.get('http://www.facebook.com', timeout=5) print(res.text) except requests.exceptions.Timeout as e: print(e) end = time.time() print(end-start) >>> HTTPConnectionPool(host='www.facebook.com', port=80): Max retries exceeded with url: / (Caused by ConnectTimeoutError(<urllib3.connection.HTTPConnection object at 0x10538f0d0>, 'Connection to www.facebook.com timed out. (connect timeout=5)')) 20.0400869846344
说明:
以上代码一共耗时20s,然后抛出异常。一次正常的请求加上三次重试,每次5s超时,所以是20s。三次之后请求还是超时,抛出timeout的异常并被捕获到。
8|0附录 resquests 最核心代码
def send( self, request, stream=False, timeout=None, verify=True, cert=None, proxies=None ): """Sends PreparedRequest object. Returns Response object. :param request: The :class:`PreparedRequest <PreparedRequest>` being sent. :param stream: (optional) Whether to stream the request content. :param timeout: (optional) How long to wait for the server to send data before giving up, as a float, or a :ref:`(connect timeout, read timeout) <timeouts>` tuple. :type timeout: float or tuple or urllib3 Timeout object :param verify: (optional) Either a boolean, in which case it controls whether we verify the server's TLS certificate, or a string, in which case it must be a path to a CA bundle to use :param cert: (optional) Any user-provided SSL certificate to be trusted. :param proxies: (optional) The proxies dictionary to apply to the request. :rtype: requests.Response """ try: conn = self.get_connection(request.url, proxies) except LocationValueError as e: raise InvalidURL(e, request=request) self.cert_verify(conn, request.url, verify, cert) url = self.request_url(request, proxies) self.add_headers( request, stream=stream, timeout=timeout, verify=verify, cert=cert, proxies=proxies, ) chunked = not (request.body is None or "Content-Length" in request.headers) if isinstance(timeout, tuple): try: connect, read = timeout timeout = TimeoutSauce(connect=connect, read=read) except ValueError: raise ValueError( f"Invalid timeout {timeout}. Pass a (connect, read) timeout tuple, " f"or a single float to set both timeouts to the same value." ) elif isinstance(timeout, TimeoutSauce): pass else: timeout = TimeoutSauce(connect=timeout, read=timeout) try: resp = conn.urlopen( method=request.method, url=url, body=request.body, headers=request.headers, redirect=False, assert_same_host=False, preload_content=False, decode_content=False, retries=self.max_retries, timeout=timeout, chunked=chunked, ) except (ProtocolError, OSError) as err: raise ConnectionError(err, request=request) except MaxRetryError as e: if isinstance(e.reason, ConnectTimeoutError): # TODO: Remove this in 3.0.0: see #2811 if not isinstance(e.reason, NewConnectionError): raise ConnectTimeout(e, request=request) if isinstance(e.reason, ResponseError): raise RetryError(e, request=request) if isinstance(e.reason, _ProxyError): raise ProxyError(e, request=request) if isinstance(e.reason, _SSLError): # This branch is for urllib3 v1.22 and later. raise SSLError(e, request=request) raise ConnectionError(e, request=request) except ClosedPoolError as e: raise ConnectionError(e, request=request) except _ProxyError as e: raise ProxyError(e) except (_SSLError, _HTTPError) as e: if isinstance(e, _SSLError): # This branch is for urllib3 versions earlier than v1.22 raise SSLError(e, request=request) elif isinstance(e, ReadTimeoutError): raise ReadTimeout(e, request=request) elif isinstance(e, _InvalidHeader): raise InvalidHeader(e, request=request) else: raise return self.build_response(request, resp)


 192
192


 被折叠的 条评论
为什么被折叠?
被折叠的 条评论
为什么被折叠?
 到【灌水乐园】发言


