


1 nimbus启动场景分析
storm cluster中有以下各种进程
1. nimbus
2. zookeeper
3. supervisor
4. worker
进程之间的逻辑关系如下图所示,其中executor是运行于进程worker中的线 程用于执行spout或是bolt.
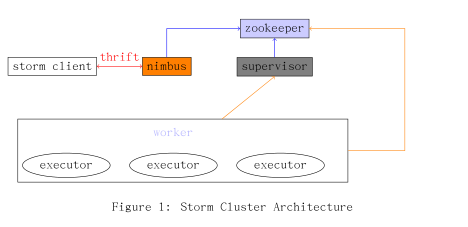
由Figure 1可以看出, Nimbus主要的工作就是用来处理thrift接口和 zookeeper 接口上的消息与事件。本文试图阐述在nimbus启动之际在这两个接口上都需要做 哪些初始化的工作。
1.1 程序入口
入口函数main定义入下
(defn -main []
    (-launch (standalone-nimbus)))
注意在clojure中的函数命名规范,-functionname表示该函数是public的, 如上 面的-main,调用该函数的时候,不需要加-,使用main即可。 而与此相对的是defn-,这个表示该函数是私有函数,不可在外部调用。 -main表示 standalone-nimbus用以实现INimbus接口。
(defn standalone-nimbus []
    (reify INimbus
        (prepare [this conf local-dir]
    )
    (allSlotsAvailableForScheduling [this supervisors topologies topologies-missing-assignments]
    (->> supervisors
        (mapcat (fn [^SupervisorDetails s] (for [p (.getMeta s)] (WorkerSlot. (.getId s) p))))
        set ))
    (assignSlots [this topology slots]
    )
    (getForcedScheduler [this]
    nil )
    (getHostName [this supervisors node-id]
        (if-let [^SupervisorDetails supervisor (get supervisors node-id)]
            (.getHost supervisor)))
))
(defn -launch [nimbus]
    (launch-server! (read-storm-config) nimbus))
1.2 配置文件读取
阅读源码其实都会遵循一个范式,那就是程序的入口在哪,配置文件是在什么时候读入的。那么好,现在就来讲配置参数的读入,在上面的-launch函数中,已经可以见到用以读取配置文件的函数了,那就是read-storm-config。
非常狗血的是,在nimbus.clj中有一个名称非常类似的函数称为read-storm-conf,这个可不是来读取storm cluster的配置信息,它其实是用来读取Topology的配置内容的。
read-storm-config定义于config.clj中,此时你会说等等,没见到有地方import或是use backtype.storm.config啊。这一切都被包装了,它们统统被放到bootstrap.clj中了。
注意到这行没
(bootstrap)
好了,上述有关文件引用的疑问解决之后,还是回到正题,看看read-storm-config的定义吧。storm默认的配置文件使用的是yaml格式,一定要找到使用yaml parser的地方。
```
(defn read-storm-config []
    (let [
        conf (clojurify-structure (Utils/readStormConfig))]
    (validate-configs-with-schemas conf)
    conf))
真正实现对配置文件storm.yaml进行读取的是由java代码来实现的,read-StormConfig定义于Utils.java中。
public static Map readStormConfig() {
    Map ret = readDefaultConfig();
    String confFile = System.getProperty("storm.conf.file");
    Map storm;
    if (confFile==null || confFile.equals("")) {
        storm = findAndReadConfigFile("storm.yaml", false);
    } else {
        storm = findAndReadConfigFile(confFile, true);
    }
    ret.putAll(storm);
    ret.putAll(readCommandLineOpts());
    return ret;
}
public static Map findAndReadConfigFile(String name, boolean mustExist) {
    try {
        HashSet<URL> resources = new HashSet<URL>(findResources(name));
        if(resources.isEmpty()) {
            if(mustExist) throw
            new RuntimeException("Could not find config file on classpath " + name);
            else return new HashMap();
        }
        if(resources.size() > 1) {
            throw
            new RuntimeException("Found multiple "
            + name
            + " resources. You're probably bundling the Storm jars with your topology jar. "
            + resources);
        }
        URL resource = resources.iterator().next();
        Yaml yaml = new Yaml();
        Map ret = (Map) yaml.load(new InputStreamReader(resource.openStream()));
        if(ret==null) ret = new HashMap();
        return new HashMap(ret);
    } catch (IOException e) {
        throw new RuntimeException(e);
    }
}
public static Map findAndReadConfigFile(String name) {
    return findAndReadConfigFile(name, true);
}
终于看到神秘的Yaml了,那么Yaml这个类又是由谁提供的呢,看看Utils.java的 开头部分有这么一句话。
import org.yaml.snakeyaml.Yaml;再看看在storm-core/project.clj中定义的dependencies,
[org.yaml/snakeyaml “1.11”]
至此,yaml文件的解析及其依赖关系的解决探索完毕。
1.2.1 配置文件的内容
配置文件到底长的是个啥样子呢,让我们来一探究竟。下面就是一份随storm源
码发布的storm.yaml
########### These MUST be filled in for a storm configuration
storm.zookeeper.servers:
    - "localhost"
    # - "server2"
#
nimbus.host: "localhost"
#
#
# ##### These may optionally be filled in:
#
## List of custom serializations
# topology.kryo.register:
# - org.mycompany.MyType
# - org.mycompany.MyType2: org.mycompany.MyType2Serializer
#
## List of custom kryo decorators
# topology.kryo.decorators:
# - org.mycompany.MyDecorator
#
## Locations of the drpc servers
# drpc.servers:
# - "server1"
# - "server2"
## Metrics Consumers
# topology.metrics.consumer.register:
# - class: "backtype.storm.metrics.LoggingMetricsConsumer"
# parallelism.hint: 1
# - class: "org.mycompany.MyMetricsConsumer"
# parallelism.hint: 1
# argument:
# - endpoint: "metrics-collector.mycompany.org"
java.library.path: "/usr/local/lib:/usr/local/share/java"
supervisor.slots.ports:
    - 6700
    - 6701
在配置文件中需要至少回答以下三个问题
1. zookeeper server在哪台机器上运行,具体就来说就是ip地址啦
2. nimbus在哪运行,可以填写ip地址或域名
3. 在每台supervisor运行的机器上可以启几个slot,指定这些slot监听的端口号
1.3 thrift
网络结点之间的消息交互一般会牵涉到两个基本的问题,
• 消息通道的建立
• 消息的编解码
如果每变化一个需求就手工来重写一次,一是繁琐,二是易错。为了一劳永逸的 解决此类问题,神一样的工具就出现了,如google protolbuffer,如thrift.
thrift的使用步骤如下
1. 编写后缀名为thrift的文件,使用工具生成对应语言的源码,thrift支
持 的语言很多的,什么c,c++,java,python等,统统不是问题。
2. 实现thrift client
3. 实现thrift server
thrift server需要实现thrift文件中定义的service接口。更为具体的信息
可以 通过阅读thrift.apache.org中的文档来获得。
有了thrift这个背景,我们再重新拾起上述的代码执行路径。上头讲到程序执行至。
(defn -launch [nimbus]
    (launch-server! (read-storm-config) nimbus))
我们来仔细看看launch-sever!这个看起来名字怪怪的函数都要弄些啥东东。
(defn launch-server! [conf nimbus]
    (validate-distributed-mode! conf)
    (let [service-handler (service-handler conf nimbus)
        options (-> (TNonblockingServerSocket. (int (conf NIMBUS-THRIFT-PORT)))
            (THsHaServer$Args.)
            (.workerThreads 64)
            (.protocolFactory (TBinaryProtocol$Factory.))
            (.processor (Nimbus$Processor. service-handler))
            )
        server (THsHaServer. options)]
        (.addShutdownHook (Runtime/getRuntime) (Thread. (fn [] (.shutdown service-handler) (.stop server))))
        (log-message "Starting Nimbus server...")
        (.serve server)))
launch-server!说白了,就是让nimbus作为一个thrift server运行起来,那么 storm.thrift中service指定的各个接口函数实现在service-handler中完成。
这里是存在包的依赖问题的,ThsHaServer是libthrift提供的,所以打开storm-core/project.clj文件可以看到这么一行来说明库的依赖。
[storm/libthrift7 “0.7.0-2” :exclusions [org.slf4j/slf4j-api]
service-handler可是一个大家伙,具体代码就不罗列了。对比一下service-handler可以发现,在storm.thrift中的定义的Nimbus服务,其接口在 service-handler中一一得以实现。 以下是storm.thrift中关于service Nimbus的声明。
service Nimbus {
    void submitTopology(1: string name, 2: string
        uploadedJarLocation , 3: string jsonConf , 4:
        StormTopology topology) throws (1:
        AlreadyAliveException e, 2: InvalidTopologyException
        ite);
    void submitTopologyWithOpts(1: string name, 2: string
        uploadedJarLocation , 3: string jsonConf , 4:
        StormTopology topology , 5: SubmitOptions options)
        throws (1: AlreadyAliveException e, 2:
        InvalidTopologyException ite);
    void killTopology(1: string name) throws (1:
        NotAliveException e);
    void killTopologyWithOpts(1: string name, 2:
        KillOptions options) throws (1: NotAliveException e);
    void activate(1: string name) throws (1:
        NotAliveException e);
    void deactivate(1: string name) throws (1:
        NotAliveException e);
    void rebalance(1: string name, 2: RebalanceOptions
        options) throws (1: NotAliveException e, 2:
        InvalidTopologyException ite);
    // need to add functions for asking about status of
    storms, what nodes they're running on, looking at
    task logs
    string beginFileUpload();
    void uploadChunk(1: string location , 2: binarychunk);
    void finishFileUpload(1: string location);
    string beginFileDownload(1: string file);
    //can stop downloading chunks when receive 0−length
    byte array back
    binary downloadChunk(1: string id);
    // returns json
    string getNimbusConf();
    // stats functions
    ClusterSummary getClusterInfo();
    TopologyInfo getTopologyInfo(1: string id) throws (1:
    NotAliveException e);
    //returns json
    string getTopologyConf(1: string id) throws (1:NotAliveException e);
    StormTopology getTopology(1: string id) throws (1:NotAliveException e);
    StormTopology getUserTopology(1: string id) throws (1:NotAliveException e);
}
到这里nimbus就启动起来,问题是没见到nimbus是如何与zookeeper cluster建 立连接啊,这个放在下回分析。
1.4 zookeeper
在上节中讲到了service-handler,此函数在开头处就是要建立与ookeeper
server之间的通讯,不过代码写的很隐蔽。
zookeeper提供的原生java api用于实际场景中对于开发者要求很高,为了减少 开发周期,storm中使用了curator来与zookeeper server进行交互。
zookeeper.clj中的mk-client函数就是初始化Curator即建立与ookeeper
server的连接。
(defnk mk-client [conf servers port :root "" :watcher default-watcher :auth-conf nil]
(let [fk (Utils/newCurator conf servers port root (when auth-conf (ZookeeperAuthInfo. auth-conf)))]
(.. fk
(getCuratorListenable)
(addListener
(reify CuratorListener (^void eventReceived [this ^CuratorFramework _fk ^CuratorEvent e] (when (= (.getType e) CuratorEventType/WATCHED) (let [^WatchedEvent event (.getWatchedEvent e)] (watcher (zk-keeper-states (.getState event)) (zk-event-types (.getType event)) (.getPath event))))))))
(.start fk)
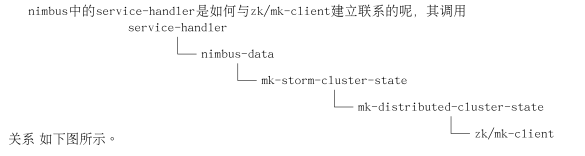
fk))nimbus中的service-handler是如何与zk/mk-client建立联系的呢,其调用关系 如下图所示。


 449
449

 被折叠的 条评论
为什么被折叠?
被折叠的 条评论
为什么被折叠?
 到【灌水乐园】发言


