


背景:前些天看过的butterKnife解析,感觉自己对注解这一块的了解缺口很大,所以稍微学习了一下,感觉还是很好玩的,所以记录下来。本文长期更新维护。
注解是什么?
这个东西其实一直活在我们的代码中,比如继承的@Override,到butterKnife中的@BindView,但是我们(我)可能习惯性的忽略它。相对于长长的重复性代码(findViewById(xxx)),它更加简介,可读性强,后期维护也比较方便。至于缺点,我想到的是自定义注解在没有说明完好的情况下可能对后来者不是很友好,存在一定的学习成本;另外一点是背后的实现逻辑交给注解器来处理,一旦注解类型多了,处理的逻辑也就多了,因此学习、维护与改错都比较难,相对于直接嵌入工程使用的小段代码而言。
注解类型?
注解中存在元注解(概念上类似与基本数据结构int,short,long等),共有四种@Retention, @Target, @Inherited, @Documented。
一个注解大概长这样子:
@Retention(RetentionPolicy.CLASS)
@Target(ElementType.FIELD)
public @interface BindView {
    int value();
}
比较重要的是@Retention, @Target
@Retention 是指注解保留的范围,默认有三种:
- SOURCE 源码级别注解,该类型的注解信息只会保留在.java源码中,>.class中不会存在
- CLASS 编译时注解,会保留在.java和.class中,执行时会被java虚拟机丢弃
- RUNTIME 运行时注解,不仅是.java .class,还会加载到虚拟机中,可以通过反射机制读取注解信息(方便)@Target 取值是一个ElementType的类型数组(后面会讲到),用来指定我们注解的使用范围,有这么几种:
其中最后两种是java 8新增的,在之前的版本中只允许在声明式前使用注解,但是现在可以用在type之前:
TYPE_PARAMETER 用来表示类型参数,比如class test<@GzoomAnnotation T>{ //... }TYPE_USE 适用范围更广,适用于标注的各式形态,比如:
Module m =(@GzoomAnnotation Module)new Object();

注解的过程?
注解大体上又分为运行时注解和编译时注解,简单的说就是以什么时候处理注解为分界线。
- 运行时注解相对比较简单,可以看成“标签”,给属性(或者方法等等)特殊化,在需要的时候找到这些标签的标记,这其中使用了反射的方法。这种方法的优点是方便,简单易学,本质上就是在运行时进行代码调用,和我们平常的反射区别不是很大;缺点还是反射,使得性能比较低。推荐文章:Android中的自定义注解(反射实现-运行时注解)(++还有一点,在Android平台上,查询注解的效率比较低,特别是在Android 4.0之前的系统上,可以看看这个Bug,其中也推荐我们用编译时注解,所以个人观点是慎用++)
- 编译时注解不需要适用反射,在编译阶段它不能操作已经有的java文件,因此为了实现我们的“目的”,我们可以创造目标java文件来实现代码逻辑功能。
编译时注解流程
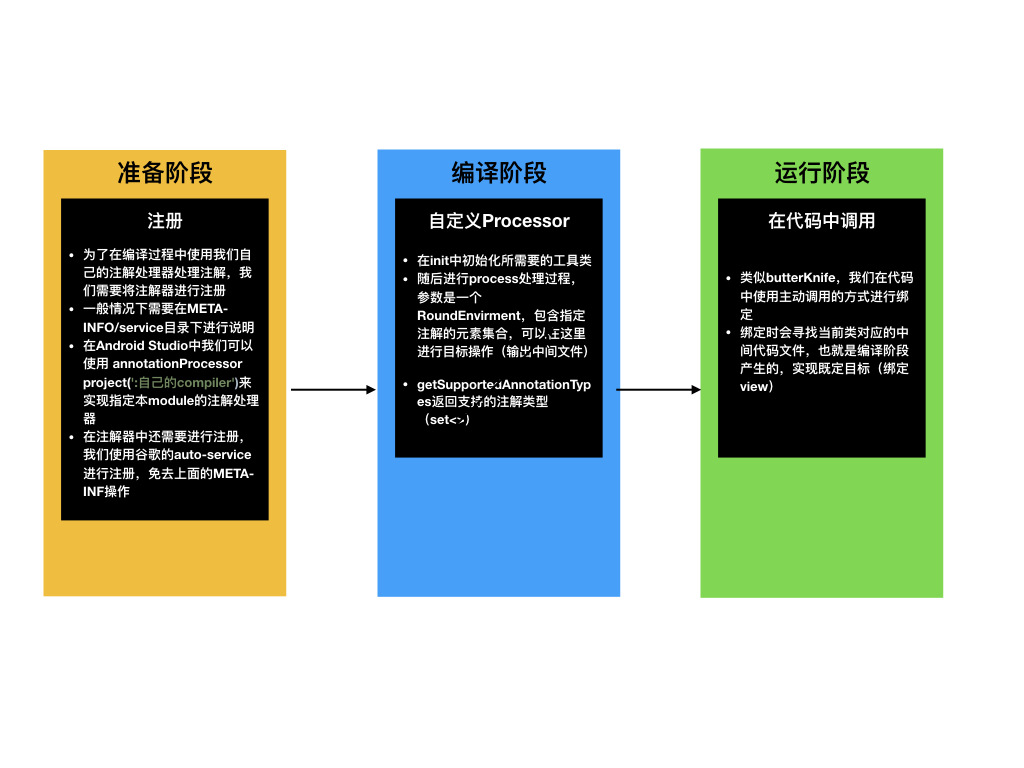
参考工程:Android注解使用之通过annotationProcessor注解生成代码实现自己的ButterKnife框架
工程大体流程:
原文作者对工程的说明已经很好了,所以我在这里就不班门弄斧了,从我自己diy的点击事件说起。
注解
最基础的当然是我们的注解,给源代码加“标签”,这里我是这样设计的:
@Retention(RetentionPolicy.CLASS)

@Target(ElementType.FIELD)
public @interface GZBindView {
    int value();
}
首先是Retention,我们基于编译注解,所以需要保存直到class文件中;在Target上,我们选择方法注解FIELD;此注解还需要id值来指定绑定的控件,因此我们使用默认的value()方法,这样的好处是不用特别指定字段。
处理器
- 支持注解类型
 @Override
    public Set<String> getSupportedAnnotationTypes() {
        Set<String> types = new LinkedHashSet<>();
        types.add(GZBindView.class.getCanonicalName());
        types.add(GZClickView.class.getCanonicalName());
        return types;
}- 初始化工具
 @Override
    public synchronized void init(ProcessingEnvironment processingEnv) {
        super.init(processingEnv);
        //filter用来创建新的源文件、class文件以及辅助文件
        mFiler = processingEnv.getFiler();
        //elements中包含着操作element的工具方法
        mElementUtils = processingEnv.getElementUtils();
        //用来报告错误、警告以及其他提示信息
        mMessager = processingEnv.getMessager();
        mAnnotatedClassMap = new TreeMap<>();
        //processingZEnvirment中还有操作TYPE mirror的
        //processingEnv.getTypeUtils();
}- 在process过程中处理目标注解
@Override
public boolean process(Set<? extends TypeElement> annotations, RoundEnvironment roundEnv) {
//RoundEnvironment
//可以返回包含指定注解类型的元素的集合
mAnnotatedClassMap.clear();
try {
//增加方法,处理点击注解
processBindView(roundEnv);
processClickBindMethod(roundEnv);
} catch (IllegalArgumentException e) {
e.printStackTrace();
error(e.getMessage());
}
、、、
return true;
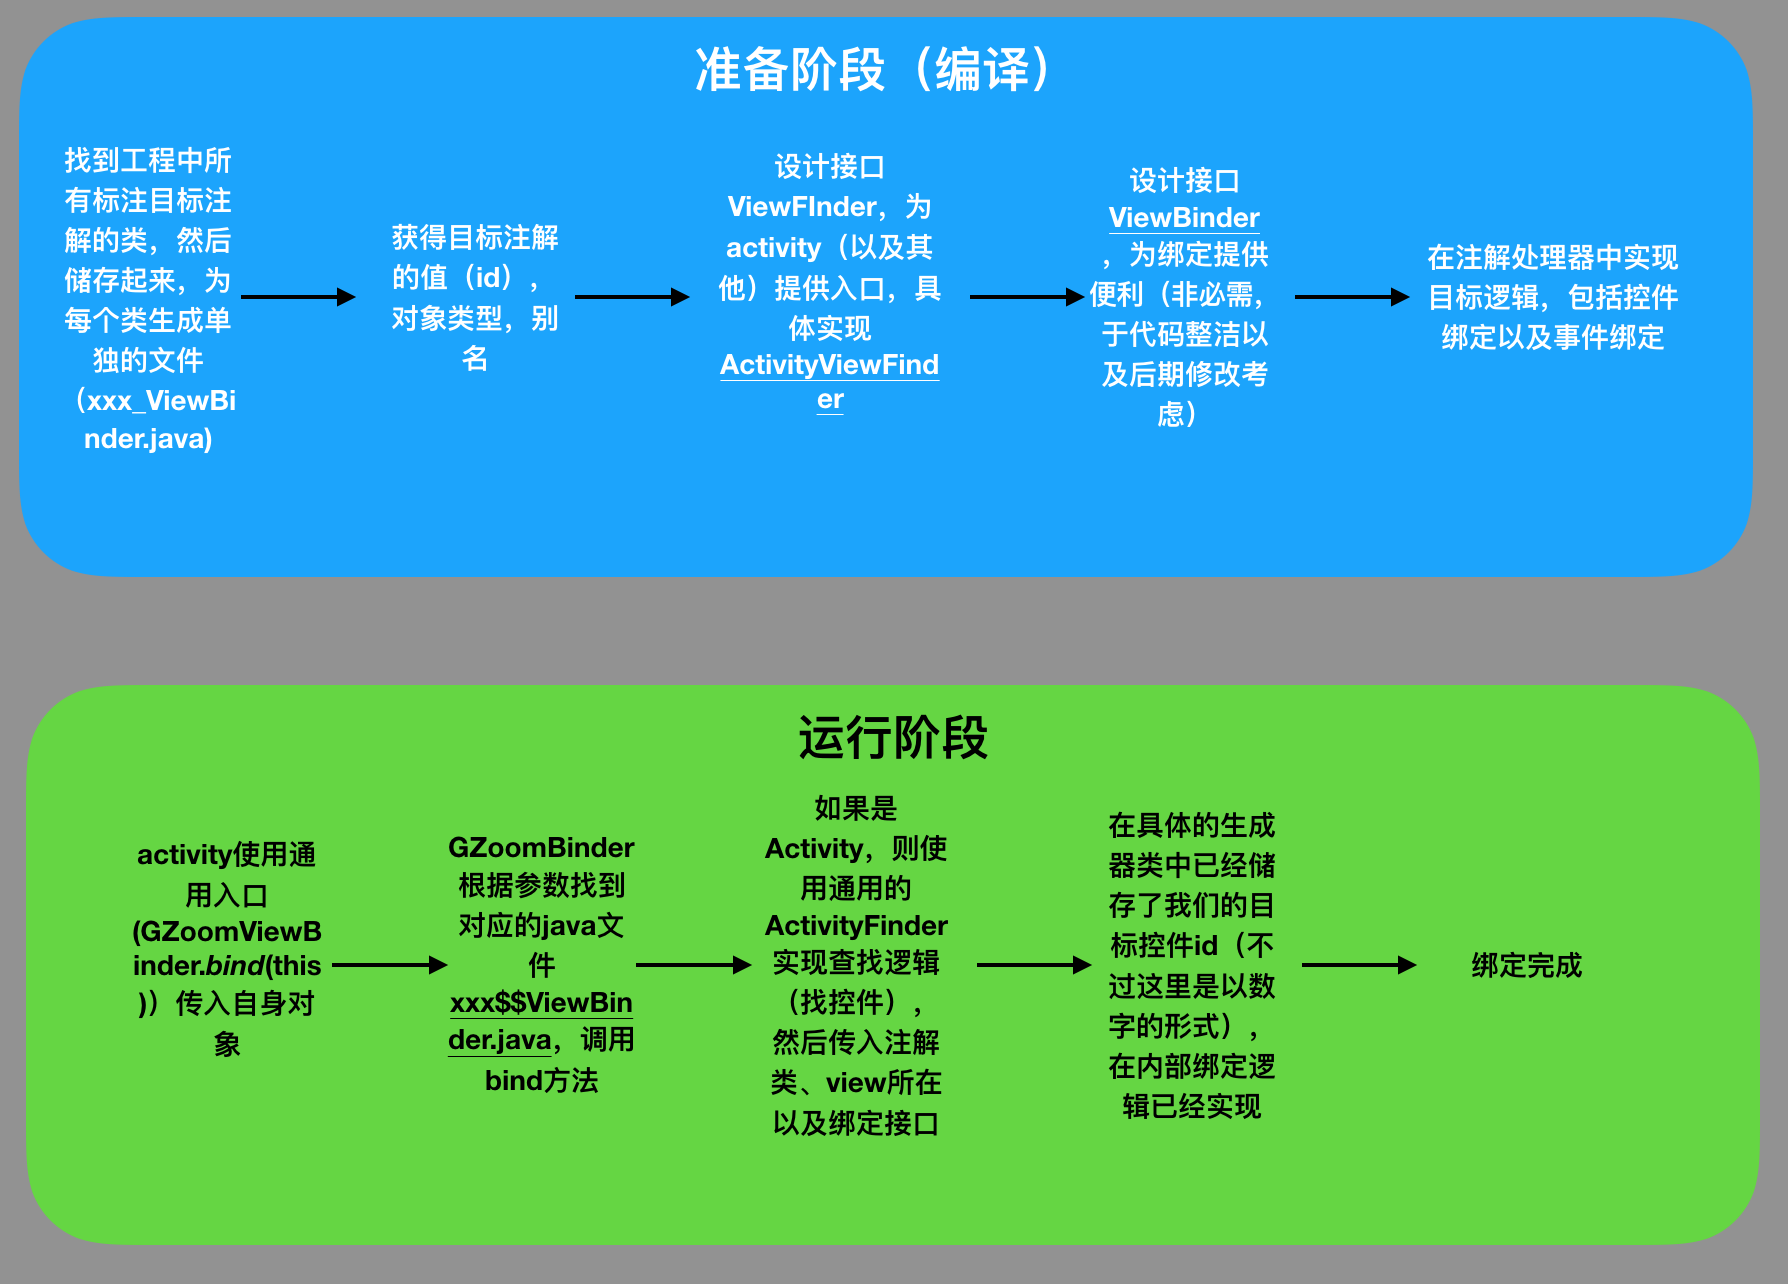
}处理的流程就是,找到被我们目标注解标记的部分,然后进行储存
/**处理点击事件绑定*/
    private void processClickBindMethod(RoundEnvironment roundEnv) {
        for(Element element : roundEnv.getElementsAnnotatedWith(GZClickView.class))
        {
            //获取对应的生成类
            AnnotatedClass annotatedClass = getAnnotatedClass(element);
          //生成我们的目标注解模型,方便后期文件输出
            ClickViewFIled clickFile = new ClickViewFIled(element);
           annotatedClass.addClickField(clickFile);
        }

    }
获取生成类:
  /**获取注解所在文件对应的生成类*/
    private AnnotatedClass getAnnotatedClass(Element element) {
        //typeElement表示类或者接口元素
        TypeElement typeElement = (TypeElement) element.getEnclosingElement();
        String fullName = typeElement.getQualifiedName().toString();
        //这里其实就是变相获得了注解的类名(完全限定名称,这里是这么说的)
        AnnotatedClass annotatedClass = mAnnotatedClassMap.get(fullName);
        // Map<String, AnnotatedClass>
        if (annotatedClass == null) {
            annotatedClass = new AnnotatedClass(typeElement, mElementUtils);
            mAnnotatedClassMap.put(fullName, annotatedClass);
        }
        return annotatedClass;
    }
生成类中保存了什么东西呢?
    /**类或者接口元素*/
    private TypeElement mTypeElement;

    /**绑定的view对象*/
    private ArrayList<BindViewField> mFields;

    /**辅助类,用于后文的文件输出*/
    private Elements mElements;

    /**绑定方法域*/
   private ArrayList<ClickViewFIled> mClickFiled;


    /**增加绑定方法域*/
    void addClickField(ClickViewFIled fIled)
    {
        mClickFiled.add(fIled);
    }

    /**
     * @param typeElement 注解所在的类或者接口
     *
     * @param elements 辅助类
     * */
    AnnotatedClass(TypeElement typeElement, Elements elements) {
        mTypeElement = typeElement;
        mElements = elements;
        mFields = new ArrayList<>();
        mClickFiled = new ArrayList<>();
    }
可能也或多或少能猜到,这些是为后面的文件输出做准备。
那ClickViewFIled是什么呢?
先跳到另外一个问题,我们如何将注解的方法注册到目标view的点击事件中呢?
首先注册语句可以自己写,但是怎么在一个新的类中引用老类(Activity)中的方法?我开始想复杂了,竟然想用反射= =转念一想,这样我们编译时注解还有意义吗。。。性能又下来了。。
方法二:在Activity中进行绑定的时候我们传入了自身对象,对吧?( GZoomViewBinder.bind(this);)那利用起来不就好了吗?
所以我们只需要保存注解时的id以及方法名就可以了,就此设计了ClickViewFIled
public class ClickViewFIled {
    /**方法元素*/
   private ExecutableElement executableElement;
    /**控件id*/
    private int resId ;
    /**绑定方法名*/
    private  String methodName ;
   public ClickViewFIled(Element element)
    {
        //只支持方法注解
        if(element.getKind()!= ElementKind.METHOD)
        {
            throw new IllegalArgumentException(String.format("Only method can be annotated with @%s",
                    GZClickView.class.getSimpleName()));
        }
       //转化成方法元素
        executableElement = (ExecutableElement) element;
        //获取注解对象整体
        GZClickView gzClickView = executableElement.getAnnotation(GZClickView.class);
        //获取id
        resId = gzClickView.value();
        if (resId<0){
            throw new IllegalArgumentException(
                    String.format("value() in %s for field %s is not valid !", GZBindView.class.getSimpleName(),
                            executableElement.getSimpleName()));
        }
         methodName = executableElement.getSimpleName().toString();


    }

    public ExecutableElement getExecutableElement() {
        return executableElement;
    }

    public int getResId() {
        return resId;
    }

    public String getMethodName() {
        return methodName;
    }
}
生成目标文件xxx$$ViewBinder.java
这一块我们使用的是squareup的javapoet进行文件输出,提供了很多方法。
使用:
dependencies {
   、、、
    //提供各种API生成Java代码文件
    compile 'com.squareup:javapoet:1.7.0'
}
生成可以直接看注释,基本是api的使用:
  JavaFile generateFile() {
        //定义方法 bindbindView(final T host, Object object, ViewFinder finder);
        MethodSpec.Builder bindViewMethod = MethodSpec.methodBuilder("bindView")
                .addModifiers(Modifier.PUBLIC)
                .addAnnotation(Override.class)
                .addParameter(TypeName.get(mTypeElement.asType()), "host")
                //后面我们需要使用源文件注册方法到控件中,因此这里需要final
                .addParameter(TypeName.OBJECT, "source",Modifier.FINAL)
                .addParameter(TypeUtil.PROVIDER, "finder");


        for (BindViewField field : mFields) {
            // find views
            bindViewMethod.addStatement("host.$N = ($T)(finder.findView(source, $L))", field.getFieldName(), ClassName.get(field.getFieldType()), field.getResId());
        }

        ClassName androidView = ClassName.get("android.view","View");

        //add clickFiled
        if(mClickFiled!=null) {
            for (ClickViewFIled fIled : mClickFiled) {
                bindViewMethod.addStatement("finder.findView(source, $L).setOnClickListener(new $T.OnClickListener()" +
                        " {" +
                        "@Override " +
                        "public void onClick($T view) " +
                        "{ " +
                        " (($T)source).$N " +
                        "}" +
                        "}" +
                        ");", fIled.getResId(),androidView,androidView,TypeName.get(mTypeElement.asType()),fIled.getMethodName() + "();");
            }//使用source直接调用方法
        }
        //类似的,这里生成unbind方法
        MethodSpec.Builder unBindViewMethod = MethodSpec.methodBuilder("unBindView")
                .addModifiers(Modifier.PUBLIC)
                .addParameter(TypeName.get(mTypeElement.asType()), "host")
                .addAnnotation(Override.class);
        for (BindViewField field : mFields) {
            unBindViewMethod.addStatement("host.$N = null", field.getFieldName());
        }


        //generaClass 生成类
        TypeSpec injectClass = TypeSpec.classBuilder(mTypeElement.getSimpleName() + "$$ViewBinder")//类名字
                .addModifiers(Modifier.PUBLIC)
                .addSuperinterface(ParameterizedTypeName.get(TypeUtil.BINDER, TypeName.get(mTypeElement.asType())))//接口,首先是接口然后是范型
               //再加入我们的目标方法
                .addMethod(bindViewMethod.build())
                .addMethod(unBindViewMethod.build())
                .build();

        String packageName = mElements.getPackageOf(mTypeElement).getQualifiedName().toString();
        return JavaFile.builder(packageName, injectClass)
                .build();
    }
这里有个比较好玩的地方就是,javapoet中的类型转换是自带import的。。。这个比较好玩,因为工程是java library,一开始我还傻傻的找import的api,发现只有import static的
4、使用
 @GZBindView(R.id.textView)
    TextView textView;

    @GZBindView(R.id.button)
    Button button;


    @Override
    protected void onCreate(Bundle savedInstanceState) {
        super.onCreate(savedInstanceState);
        setContentView(R.layout.activity_main);
        GZoomViewBinder.bind(this);
        textView.setText("Gzoom's annotation compiler");
    }
    /**自定义-给button设定监听器*/
    @GZClickView(R.id.button)
    public void buttonClick()
    {
        Log.d("gzoom","this is button,help me!");
    }
在GZoomViewBinder.bind中所做的工作就是找到目前调用类的¥$ViewBinder.java,然后实现方法。
到这里,我们的工程就结束了。想详细了解的朋友可以查看—–源码
非常欢迎大家评论与指正,star那更是极好的。感谢观看。


 1502
1502

 被折叠的 条评论
为什么被折叠?
被折叠的 条评论
为什么被折叠?
 到【灌水乐园】发言


