搜索引擎

我本来选择的是elasticsearch 5.4 ,但是版本太新了,搭建过程全是坑,所以无奈选择了一个版本很低的1.7
安装Elasticsearch
[root@node1 ~]# java -version
openjdk version "1.8.0_131"
OpenJDK Runtime Environment (build 1.8.0_131-b11)
OpenJDK 64-Bit Server VM (build 25.131-b11, mixed mode)

[root@node1 ~]# ls -l /usr/bin/java
lrwxrwxrwx. 1 root root 22 May 21 16:46 /usr/bin/java -> /etc/alternatives/java
[root@node1 ~]# ls -l /etc/alternatives/java
lrwxrwxrwx. 1 root root 73 May 21 16:46 /etc/alternatives/java -> /usr/lib/jvm/java-1.8.0-openjdk-1.8.0.131-2.b11.el7_3.x86_64/jre/bin/java
配置java家目录。
[root@node1 ~]# vim /etc/profile.d/java.sh
export JAVA_HOME=/usr

[root@node1 ~]# . /etc/profile.d/java.sh
安装elasticsearch
/etc/elasticsearch
[root@node1 elasticsearch]# vim elasticsearch.yml
[root@node2 ~]# systemctl start elasticsearch
[root@node1 ~]# tcpdump  -i eno16777736 -vvnn tcp port 9300
tcpdump: listening on eno16777736, link-type EN10MB (Ethernet), capture size 65535 bytes
17:24:19.630572 IP (tos 0x0, ttl 64, id 60804, offset 0, flags [DF], proto TCP (6), length 170)
    192.168.30.133.52499 > 192.168.30.131.9300: Flags [P.], cksum 0xda72 (correct), seq 3018421775:3018421893, ack 457870399, win 229, options [nop,nop,TS val 3124034 ecr 3134684], length 118
17:24:19.630998 IP (tos 0x0, ttl 64, id 33875, offset 0, flags [DF], proto TCP (6), length 72)
    192.168.30.131.9300 > 192.168.30.133.52499: Flags [P.], cksum 0xbe93 (incorrect -> 0xad67), seq 1:21, ack 118, win 227, options [nop,nop,TS val 3135689 ecr 3124034], length 20
9300端口已经开启,并且开始互相通信。
[root@node1 ~]# curl -X GET 'http://node2.example.com:9200/?pretty'
{
  "status" : 200,
  "name" : "node2.example.com",
  "cluster_name" : "elasticsearch",
  "version" : {
    "number" : "1.7.6",
    "build_hash" : "c730b59357f8ebc555286794dcd90b3411f517c9",
    "build_timestamp" : "2016-11-18T15:21:16Z",
    "build_snapshot" : false,
    "lucene_version" : "4.10.4"
  },
  "tagline" : "You Know, for Search"
}
[root@node1 ~]# curl -X GET 'http://node2.example.com:9200/_cat'
=^.^=
/_cat/allocation
/_cat/shards
/_cat/shards/{index}
/_cat/master
/_cat/nodes
/_cat/indices
/_cat/indices/{index}
/_cat/segments
/_cat/segments/{index}
/_cat/count
/_cat/count/{index}
/_cat/recovery
/_cat/recovery/{index}
/_cat/health
/_cat/pending_tasks
/_cat/aliases
/_cat/aliases/{alias}
/_cat/thread_pool
/_cat/plugins
/_cat/fielddata
/_cat/fielddata/{fields}
[root@node1 ~]# curl -X GET 'http://node2.example.com:9200/_cat/nodes?v'
host              ip             heap.percent ram.percent load node.role master name
node1.example.com 192.168.30.131            4          40 0.02 d         *      node1.example.com
node2.example.com 192.168.30.132            4          40 0.01 d         m      node2.example.com
node3.example.com 192.168.30.133            4          42 0.01 d         m      node3.example.com
健康查询
[root@node1 ~]# curl -X GET 'http://node2:9200/_cat/health?v'
epoch      timestamp cluster       status node.total node.data shards pri relo init unassign pending_tasks
1495360000 17:46:40  elasticsearch green           3         3      0   0    0    0        0             0
集群健康查询
[root@node2 ~]# curl  -X GET 'http://node2:9200/_cluster/health?pretty'
{
  "cluster_name" : "elasticsearch",
  "status" : "green",
  "timed_out" : false,
  "number_of_nodes" : 3,
  "number_of_data_nodes" : 3,
  "active_primary_shards" : 0,
  "active_shards" : 0,
  "relocating_shards" : 0,
  "initializing_shards" : 0,
  "unassigned_shards" : 0,
  "delayed_unassigned_shards" : 0,
  "number_of_pending_tasks" : 0,
  "number_of_in_flight_fetch" : 0
}
详细的内容可以去官网去查看。
https://www.elastic.co/guide/en/elasticsearch/reference/current/index.html
ES的使用
引索组件:Lucene
搜索组件:ES
数据获取组件:solr,Nutch,Grub,Apeture
ES:索引是文档的容器
索引(index),类型(type),文件(document),映射(mapping)
Plugins可以扩展ES的功能。
比如添加自定义映射类型,本地脚本,自定义发现方式。
安装:
直接将插件放置于plugins目录就好。或者plugin命令去安装。
[root@node2 ~]# /usr/share/elasticsearch/bin/plugin -l
Installed plugins:
- No plugin detected in /usr/share/elasticsearch/plugins
安装插件
首先介绍一些常见插件:
[head插件]
介绍:
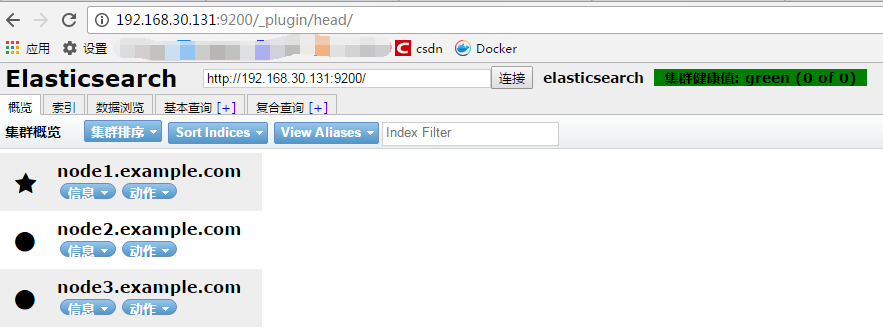
head插件是ES的一个可视化插件,head插件用来浏览,与ES数据进行交互的Web前端展示插件,是一个用来监视ES状态的客户端插件。
安装:
[root@node1 bin]# ./plugin install mobz/elasticsearch-head
测试:
[marvel插件]
介绍:
主要功能是监控,也可以用来当console来使用,它包含一个叫做Sense的交互式控制平台。使用户方便的通过浏览器去交互。
安装:
[root@node1 elasticsearch]# ./bin/plugin -i elasticsearch/marvel/latest
[bigdesk插件]
[root@node1 elasticsearch]# ./bin/plugin -l
Installed plugins:
    - head
    - license
    - bigdesk
    - kopf
    - marvel
全部安装完成之后,重启elasticsearch

[root@node1 elasticsearch]# curl -XPUT 'localhost:9200/students/class/1?pretty' -d '
> {
>   "first_name":"Rong",
>   "last_name":"Huang",
>   "age":25,
>   "gender":"Male"
> }'
{
  "_index" : "students",
  "_type" : "class",
  "_id" : "1",
  "_version" : 1,
  "created" : true
}
[root@node1 elasticsearch]# curl -XPUT 'localhost:9200/students/class/2?pretty' -d '
{
  "first_name":"Jing",
  "last_name":"Guo",
  "age":26,
  "gender":"Female"
}'
{
  "_index" : "students",
  "_type" : "class",
  "_id" : "2",
  "_version" : 1,
  "created" : true
}
{
"took" : 10,
"timed_out" : false,
"_shards" : {
"total" : 5,
"successful" : 5,
"failed" : 0
},
"hits" : {
[root@node1 elasticsearch]# curl -XGET 'localhost:9200/_search?q='Guo'&pretty'
{
  "took" : 10,
  "timed_out" : false,
  "_shards" : {
    "total" : 7,
    "successful" : 7,
    "failed" : 0
  },
  "hits" : {
    "total" : 1,
    "max_score" : 0.15342641,
    "hits" : [ {
      "_index" : "students",
      "_type" : "class",
      "_id" : "2",
      "_score" : 0.15342641,
      "_source":
{
  "first_name":"Jing",
  "last_name":"Guo",
  "age":26,
  "gender":"Female"
}
    } ]
  }
}


 本文介绍了选择Elasticsearch 1.7.6作为学习版本的原因,并详细讲解了安装过程,包括健康和集群健康查询。接着探讨了ES的使用,如其内部组件Lucene、搜索组件ES,以及数据获取组件如Solr。还提到了索引、类型、文档和映射的概念,强调了Plugins在扩展ES功能上的重要性,提供了安装和管理插件的示例。


 789
789

 被折叠的 条评论
为什么被折叠?


