


原文地址: http://www.learnopencv.com/average-face-opencv-c-python-tutorial/
先看实验效果:最右边的人脸是由左边6幅人脸平均得到的。

Figure 2 : Average face of US Presidents : Carter to Obama.
实现过程:
1、人脸关键点检测:
采用dlib的关键点检测器,获得人脸的68个关键点。
2、坐标变换:
由于输入图像的尺寸是大小不一的,人脸区域大小也不相同,所以要通过坐标变换,对人脸图像进行归一化操作。
在这里,我们把人脸区域warp成600*600大小,使得左眼(外眼角)位置在(180,200),右眼(外眼角)位置在(420,200)。
选择这两个位置的原因是:我们希望人脸中心在图像高度的1/3位置,并且两个眼睛保持水平,所以我们选择左眼角位置为( 0.3*width, height / 3 ),右眼角位置为(0.7*width , height / 3) 。
dlib关键点检测器,检测到的左外眼角是第36个点,右外眼角为第45个点,如下图:
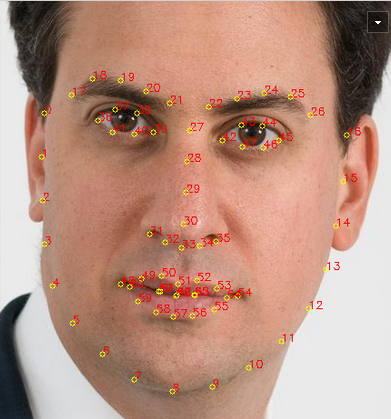
利用这两个点计算图像的变换矩阵(similarity transform),该矩阵是一个2*3的矩阵,如下:
如果我们想对一个矩形进行变换,其中x、y方向的缩放因为分别为sx,sy,同时旋转一个角度 ,然后再在x方向平移tx, 在y方向平移ty, 则这样的一个变换矩阵可以写成:

第一列和第二列是缩放和旋转,第三列是平移。
Given, a point , the above similarity transform, moves it to point using the equation given below:

利用opencv的estimateRigidTransform方法,可以获得这样的变换矩阵,但遗憾的是,estimateRigidTransform至少需要三个点,所以我们需要构选第三个点,构造方法是用第三个点与已有的两个点构成等边三角形,这样第三个点的坐标为:

相似变换矩阵计算出来之的一,就可以用它来对图像和landmark进行变换。The image is transformed using warpAffine and the points are transformed using transform.
3、人脸对齐
经过步骤2之后,所有的图像都变成一样大小,并且两个眼睛的位置是保持一致。如果就这样进行平均脸计算的话,会得到下面这种效果,因为除了眼睛对齐了之外,其他点并没有对齐,所以会出现这种效果。

Figure 5 : Result of naive face averaging
其他点怎么对齐呢?我们已经知道输入图像68个点的位置,如果还能知道输出图像68个点的位置,那自然是很容易对齐的。遗憾的是,除了眼睛的位置我们可以事先定义之外,其他点的位置一般很难给出合理的定义。
解决办法是Delaunay Triangulation,具体如下:
(1)Calculate Mean Face Points
计算N张similarity transform之后的输出图像的所有关键点位置的平均值,即平均脸的第i个关键点位置,等于所有经过similarity transform之后的图像的第i个关键点位置的平均值。
(2)Calculate Delaunay Triangulation
利用平均脸的68个关键点,以及图像边界的8个点,计算Delaunay Triangulation,如下图所示。The result of Delaunay triangulation is a list of triangles represented by the indices of points in the 76 points ( 68 face points + 8 boundary points ) array。

Figure 6 : Delaunay Triangulation of average landmark points.
(3)Warp Triangles
对输入图像(similarity transform之后的图像)和平均脸分别计算Delaunay Triangulation,如图7的left image 和middle image,left image里面的triangle 1对应middle image里面的triangle 1,通过这两个三角形,可以计算一个从输入图像triangle 1到平均脸triangle 1的放射变换,从而把输入图像triangle 1里面的所有像素,变换成平均脸triangle 1的所有像素。其他triangle 也进行同样的操作,得到的结果就如right image所示。

Figure 7 : Image Warping based on Delaunay Triangulation.
The left image shows Delaunay triangles on the transformed input image.
The middle image shows the triangulation on the average landmarks.
The right image is simply the left image warped to the average face
4、人脸平均
经过warp之后,将所有人脸的对应像素的灰度值加起来求平均,即是平均脸图像。
原作者的实验效果:

Figure 8 : Facial Average of Mark Zuckerberg, Larry Page, Elon Musk and Jeff Bezos

Figure 9 : Facial Average of last four best actress winners : Brie Larson, Julianne Moore, Cate Blanchett and Jennifer Lawrence
还有一个有趣的实验是,将Obama左右镜像的两张图像进行平均之后,得到一张对称脸,如下图:

Figure 10 : President Obama made symmetric (center) by averaging his image (left) with its mirror reflection (right).
完整代码:
#!/usr/bin/env python

# Copyright (c) 2016 Satya Mallick <spmallick@learnopencv.com>
# All rights reserved. No warranty, explicit or implicit, provided.


import os
import cv2
import numpy as np
import math
import sys

# Read points from text files in directory
def readPoints(path) :
    # Create an array of array of points.
    pointsArray = [];

    #List all files in the directory and read points from text files one by one
    for filePath in os.listdir(path):

        if filePath.endswith(".txt"):

            #Create an array of points.
            points = [];

            # Read points from filePath
            with open(os.path.join(path, filePath)) as file :
                for line in file :
                    x, y = line.split()
                    points.append((int(x), int(y)))

            # Store array of points
            pointsArray.append(points)

    return pointsArray;

# Read all jpg images in folder.
def readImages(path) :

    #Create array of array of images.
    imagesArray = [];

    #List all files in the directory and read points from text files one by one
    for filePath in os.listdir(path):
        if filePath.endswith(".jpg"):
            # Read image found.
            img = cv2.imread(os.path.join(path,filePath));

            # Convert to floating point
            img = np.float32(img)/255.0;

            # Add to array of images
            imagesArray.append(img);

    return imagesArray;

# Compute similarity transform given two sets of two points.
# OpenCV requires 3 pairs of corresponding points.
# We are faking the third one.

def similarityTransform(inPoints, outPoints) :
    s60 = math.sin(60*math.pi/180);
    c60 = math.cos(60*math.pi/180);

    inPts = np.copy(inPoints).tolist();
    outPts = np.copy(outPoints).tolist();

    xin = c60*(inPts[0][0] - inPts[1][0]) - s60*(inPts[0][1] - inPts[1][1]) + inPts[1][0];
    yin = s60*(inPts[0][0] - inPts[1][0]) + c60*(inPts[0][1] - inPts[1][1]) + inPts[1][1];

    inPts.append([np.int(xin), np.int(yin)]);

    xout = c60*(outPts[0][0] - outPts[1][0]) - s60*(outPts[0][1] - outPts[1][1]) + outPts[1][0];
    yout = s60*(outPts[0][0] - outPts[1][0]) + c60*(outPts[0][1] - outPts[1][1]) + outPts[1][1];

    outPts.append([np.int(xout), np.int(yout)]);

    tform = cv2.estimateRigidTransform(np.array([inPts]), np.array([outPts]), False);

    return tform;


# Check if a point is inside a rectangle
def rectContains(rect, point) :
    if point[0] < rect[0] :
        return False
    elif point[1] < rect[1] :
        return False
    elif point[0] > rect[2] :
        return False
    elif point[1] > rect[3] :
        return False
    return True

# Calculate delanauy triangle
def calculateDelaunayTriangles(rect, points):
    # Create subdiv
    subdiv = cv2.Subdiv2D(rect);

    # Insert points into subdiv
    for p in points:
        subdiv.insert((p[0], p[1]));


    # List of triangles. Each triangle is a list of 3 points ( 6 numbers )
    triangleList = subdiv.getTriangleList();

    # Find the indices of triangles in the points array

    delaunayTri = []

    for t in triangleList:
        pt = []
        pt.append((t[0], t[1]))
        pt.append((t[2], t[3]))
        pt.append((t[4], t[5]))

        pt1 = (t[0], t[1])
        pt2 = (t[2], t[3])
        pt3 = (t[4], t[5])

        if rectContains(rect, pt1) and rectContains(rect, pt2) and rectContains(rect, pt3):
            ind = []
            for j in xrange(0, 3):
                for k in xrange(0, len(points)):
                    if(abs(pt[j][0] - points[k][0]) < 1.0 and abs(pt[j][1] - points[k][1]) < 1.0):
                        ind.append(k)
            if len(ind) == 3:
                delaunayTri.append((ind[0], ind[1], ind[2]))

    return delaunayTri


def constrainPoint(p, w, h) :
    p =  ( min( max( p[0], 0 ) , w - 1 ) , min( max( p[1], 0 ) , h - 1 ) )
    return p;

# Apply affine transform calculated using srcTri and dstTri to src and
# output an image of size.
def applyAffineTransform(src, srcTri, dstTri, size) :

    # Given a pair of triangles, find the affine transform.
    warpMat = cv2.getAffineTransform( np.float32(srcTri), np.float32(dstTri) )

    # Apply the Affine Transform just found to the src image
    dst = cv2.warpAffine( src, warpMat, (size[0], size[1]), None, flags=cv2.INTER_LINEAR, borderMode=cv2.BORDER_REFLECT_101 )

    return dst


# Warps and alpha blends triangular regions from img1 and img2 to img
def warpTriangle(img1, img2, t1, t2) :

    # Find bounding rectangle for each triangle
    r1 = cv2.boundingRect(np.float32([t1]))
    r2 = cv2.boundingRect(np.float32([t2]))

    # Offset points by left top corner of the respective rectangles
    t1Rect = []
    t2Rect = []
    t2RectInt = []

    for i in xrange(0, 3):
        t1Rect.append(((t1[i][0] - r1[0]),(t1[i][1] - r1[1])))
        t2Rect.append(((t2[i][0] - r2[0]),(t2[i][1] - r2[1])))
        t2RectInt.append(((t2[i][0] - r2[0]),(t2[i][1] - r2[1])))


    # Get mask by filling triangle
    mask = np.zeros((r2[3], r2[2], 3), dtype = np.float32)
    cv2.fillConvexPoly(mask, np.int32(t2RectInt), (1.0, 1.0, 1.0), 16, 0);

    # Apply warpImage to small rectangular patches
    img1Rect = img1[r1[1]:r1[1] + r1[3], r1[0]:r1[0] + r1[2]]

    size = (r2[2], r2[3])

    img2Rect = applyAffineTransform(img1Rect, t1Rect, t2Rect, size)

    img2Rect = img2Rect * mask

    # Copy triangular region of the rectangular patch to the output image
    img2[r2[1]:r2[1]+r2[3], r2[0]:r2[0]+r2[2]] = img2[r2[1]:r2[1]+r2[3], r2[0]:r2[0]+r2[2]] * ( (1.0, 1.0, 1.0) - mask )

    img2[r2[1]:r2[1]+r2[3], r2[0]:r2[0]+r2[2]] = img2[r2[1]:r2[1]+r2[3], r2[0]:r2[0]+r2[2]] + img2Rect


if __name__ == '__main__' :

    path = 'presidents/'

    # Dimensions of output image
    w = 600;
    h = 600;

    # Read points for all images
    allPoints = readPoints(path);

    # Read all images
    images = readImages(path);

    # Eye corners
    eyecornerDst = [ (np.int(0.3 * w ), np.int(h / 3)), (np.int(0.7 * w ), np.int(h / 3)) ];

    imagesNorm = [];
    pointsNorm = [];

    # Add boundary points for delaunay triangulation
    boundaryPts = np.array([(0,0), (w/2,0), (w-1,0), (w-1,h/2), ( w-1, h-1 ), ( w/2, h-1 ), (0, h-1), (0,h/2) ]);

    # Initialize location of average points to 0s
    pointsAvg = np.array([(0,0)]* ( len(allPoints[0]) + len(boundaryPts) ), np.float32());

    n = len(allPoints[0]);

    numImages = len(images)

    # Warp images and trasnform landmarks to output coordinate system,
    # and find average of transformed landmarks.

    for i in xrange(0, numImages):

        points1 = allPoints[i];

        # Corners of the eye in input image
        eyecornerSrc  = [ allPoints[i][36], allPoints[i][45] ] ;

        # Compute similarity transform
        tform = similarityTransform(eyecornerSrc, eyecornerDst);

        # Apply similarity transformation
        img = cv2.warpAffine(images[i], tform, (w,h));

        # Apply similarity transform on points
        points2 = np.reshape(np.array(points1), (68,1,2));

        points = cv2.transform(points2, tform);

        points = np.float32(np.reshape(points, (68, 2)));

        # Append boundary points. Will be used in Delaunay Triangulation
        points = np.append(points, boundaryPts, axis=0)

        # Calculate location of average landmark points.
        pointsAvg = pointsAvg + points / numImages;

        pointsNorm.append(points);
        imagesNorm.append(img);


    # Delaunay triangulation
    rect = (0, 0, w, h);
    dt = calculateDelaunayTriangles(rect, np.array(pointsAvg));

    # Output image
    output = np.zeros((h,w,3), np.float32());

    # Warp input images to average image landmarks
    for i in xrange(0, len(imagesNorm)) :
        img = np.zeros((h,w,3), np.float32());
        # Transform triangles one by one
        for j in xrange(0, len(dt)) :
            tin = [];
            tout = [];

            for k in xrange(0, 3) :
                pIn = pointsNorm[i][dt[j][k]];
                pIn = constrainPoint(pIn, w, h);

                pOut = pointsAvg[dt[j][k]];
                pOut = constrainPoint(pOut, w, h);

                tin.append(pIn);
                tout.append(pOut);


            warpTriangle(imagesNorm[i], img, tin, tout);


        # Add image intensities for averaging
        output = output + img;


    # Divide by numImages to get average
    output = output / numImages;

    # Display result
    cv2.imshow('image', output);
    cv2.waitKey(0);


 724
724

 被折叠的 条评论
为什么被折叠?
被折叠的 条评论
为什么被折叠?
 到【灌水乐园】发言


