


#import "ViewController.h"
#define WIDTH [UIScreen mainScreen].bounds.size.width
#define HEIGHT [UIScreen mainScreen].bounds.size.height
@interface ViewController ()<UITableViewDataSource,UITableViewDelegate>
@property (nonatomic, strong) NSMutableArray *dataArray;
@property (nonatomic, strong) NSMutableArray *stateArray;
@property (nonatomic, strong) NSMutableArray *sectionArray;
@property (nonatomic, strong) UITableView *tableView;
@end
@implementation ViewController
- (void)viewDidLoad {
[super viewDidLoad];
self.title = @"使用TableView进行分组";
[self initDataSource];
[self initTable];
}
/**
* 初始化选择行业
*/
- (void)initDataSource
{
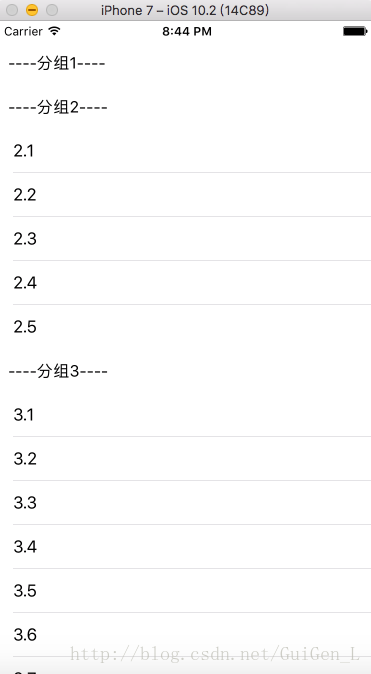
_sectionArray = [NSMutableArray arrayWithObjects:@"----分组1----",@"----分组2----",@"----分组3----",@"----分组4----",@"----分组5----",nil];
NSArray *one = @[@"1.1",@"1.2",@"1.3",@"1.4",@"1.5",@"1.6"];
NSArray *two = @[@"2.1",@"2.2",@"2.3",@"2.4",@"2.5"];
NSArray *three = @[@"3.1",@"3.2",@"3.3",@"3.4",@"3.5",@"3.6",@"3.7"];
NSArray *four = @[@"4.1",@"4.2",@"4.3",@"4.4"];
NSArray *five = @[@"5.1",@"5.2",@"5.3"];
_dataArray = [NSMutableArray arrayWithObjects:one,two,three,four,five, nil];
_stateArray = [NSMutableArray array];
for (int i = 0; i < _dataArray.count; i++)
{
//所有的分区都是闭合
[_stateArray addObject:@"0"];
}
}
/**
* 初始化TableView
*/
- (void)initTable{
_tableView = [[UITableView alloc]initWithFrame:CGRectMake(0, 20, WIDTH, HEIGHT) style:UITableViewStylePlain];
_tableView.delegate = self;
_tableView.dataSource = self;
_tableView.tableFooterView = [UIView new];
[self.view addSubview:_tableView];
}
#pragma mark - UITableViewDataSource UITableViewDelegate
- (NSInteger)numberOfSectionsInTableView:(UITableView *)tableView
{
return _sectionArray.count;
}
- (NSInteger)tableView:(UITableView *)tableView numberOfRowsInSection:(NSInteger)section
{
if ([_stateArray[section] isEqualToString:@"1"]){
//如果是展开状态
NSArray *array = [_dataArray objectAtIndex:section];
return array.count;
}else{
//如果是闭合,返回0
return 0;
}
}
- (UITableViewCell *)tableView:(UITableView *)tableView cellForRowAtIndexPath:(NSIndexPath *)indexPath
{
static NSString *cellID = @"cellID";
UITableViewCell *cell = [tableView dequeueReusableCellWithIdentifier:cellID];
if (cell == nil) {
cell = [[UITableViewCell alloc]initWithStyle:UITableViewCellStyleDefault reuseIdentifier:cellID];
}
cell.textLabel.text = _dataArray[indexPath.section][indexPath.row];
cell.backgroundColor = [UIColor whiteColor];
cell.selectionStyle = UITableViewCellAccessoryNone;
// cell.tag = _dataArray[indexPath.section][indexPath.row];
cell.tag = indexPath.row;
return cell;
}
/**
* 设置section的title
*/
- (NSString *)tableView:(UITableView *)tableView titleForHeaderInSection:(NSInteger)section
{
return _sectionArray[section];
}
/**
* 设置头标题的样式,我这里是手写了一个button,在button上放的图片,文字.可以用别的方式
*/
- (UIView *)tableView:(UITableView *)tableView viewForHeaderInSection:(NSInteger)section
{
UIButton *button = [UIButton buttonWithType:UIButtonTypeCustom];
[button setFrame:CGRectMake(0, 0, self.view.frame.size.width, 44)];
[button setTag:section+1];
button.backgroundColor = [UIColor whiteColor];
[button setTitleColor:[UIColor grayColor] forState:UIControlStateNormal];
[button addTarget:self action:@selector(buttonPress:) forControlEvents:UIControlEventTouchUpInside];
[tableView addSubview:button];
UILabel *tlabel = [[UILabel alloc]initWithFrame:CGRectMake( 10, (44-20)/2, 200, 20)];
[tlabel setBackgroundColor:[UIColor clearColor]];
[tlabel setFont:[UIFont systemFontOfSize:16]];
[tlabel setText:_sectionArray[section]];
[button addSubview:tlabel];
return button;
}
/**
* headButton点击
*/
- (void)buttonPress:(UIButton *)sender
{
//判断状态值
if ([_stateArray[sender.tag - 1] isEqualToString:@"1"]){
//修改
[_stateArray replaceObjectAtIndex:sender.tag - 1 withObject:@"0"];
}else{
[_stateArray replaceObjectAtIndex:sender.tag - 1 withObject:@"1"];
}
[_tableView reloadSections:[NSIndexSet indexSetWithIndex:sender.tag - 1] withRowAnimation:UITableViewRowAnimationAutomatic];
}
/**
* 返回section的高度
*/
- (CGFloat)tableView:(UITableView *)tableView heightForHeaderInSection:(NSInteger)section
{
return 44;
}
@end使用TableView进行分组
最新推荐文章于 2021-04-27 19:26:11 发布


 4828
4828

 被折叠的 条评论
为什么被折叠?
被折叠的 条评论
为什么被折叠?
 到【灌水乐园】发言


