


项目环境: 在SpringMVC + MyBatis + Mysql。Redis部署在Linux虚拟机。
1、整体思路
- 参考Ehcache实现MyBatis二级缓存代码(Maven引用对应jar查阅)
- 使用Spring管理Redis连接池
- 模仿EhcacheCache,实现RedisCache
2、pom.xml中加入Maven依赖
<!-- spring-redis实现 -->
<dependency>
    <groupId>org.springframework.data</groupId>
    <artifactId>spring-data-redis</artifactId>
    <version>1.6.2.RELEASE</version>
</dependency>
<!-- redis客户端jar -->
<dependency>
    <groupId>redis.clients</groupId>
    <artifactId>jedis</artifactId>
    <version>2.8.0</version>
</dependency>
<!-- Ehcache实现,用于参考 -->
<dependency>
    <groupId>org.mybatis</groupId>
    <artifactId>mybatis-ehcache</artifactId>
    <version>1.0.0</version>
</dependency>
- 1
- 2
- 3
- 4
- 5
- 6
- 7
- 8
- 9
- 10
- 11
- 12
- 13
- 14
- 15
- 16
- 17
- 18
3、引入applicationContext.xml中引入redis配置
<!-- 引入数据库配置文件 -->
<bean id="propertyConfigurer"    class="org.springframework.beans.factory.config.PropertyPlaceholderConfigurer">
    <property name="locations">
        <list>
            <value>classpath:jdbc.properties</value>
            <value>classpath:redis.properties</value>
        </list>
    </property>
</bean>
<!-- redis数据源 -->
<bean id="poolConfig" class="redis.clients.jedis.JedisPoolConfig">
    <property name="maxIdle" value="${redis.maxIdle}" />
    <property name="maxTotal" value="${redis.maxActive}" />
    <property name="maxWaitMillis" value="${redis.maxWait}" />
    <property name="testOnBorrow" value="${redis.testOnBorrow}" />
</bean>
<!-- Spring-redis连接池管理工厂 -->
<bean id="jedisConnectionFactory" class="org.springframework.data.redis.connection.jedis.JedisConnectionFactory"
    p:host-name="${redis.host}" p:port="${redis.port}" p:password="${redis.pass}"  p:pool-config-ref="poolConfig"/>
<!-- 使用中间类解决RedisCache.jedisConnectionFactory的静态注入,从而使MyBatis实现第三方缓存 -->
<bean id="redisCacheTransfer" class="com.strive.cms.cache.RedisCacheTransfer">
    <property name="jedisConnectionFactory" ref="jedisConnectionFactory"/>
</bean>
- 1
- 2
- 3
- 4
- 5
- 6
- 7
- 8
- 9
- 10
- 11
- 12
- 13
- 14
- 15
- 16
- 17
- 18
- 19
- 20
- 21
- 22
- 23
4、创建缓存实现类RedisCache
/**
 *
 * @描述: 使用第三方内存数据库Redis作为二级缓存
 * @版权: Copyright (c) 2016
 * @作者: xiad
 * @版本: 1.0
 * @创建日期: 2016年3月2日
 * @创建时间: 下午8:02:57
 */
public class RedisCache implements Cache
{
    private static final Logger logger = LoggerFactory.getLogger(RedisCache.class);

    private static JedisConnectionFactory jedisConnectionFactory;

    private final String id;

    /**
     * The {@code ReadWriteLock}.
     */
    private final ReadWriteLock readWriteLock = new ReentrantReadWriteLock();

    public RedisCache(final String id) {
        if (id == null) {
            throw new IllegalArgumentException("Cache instances require an ID");
        }
        logger.debug("MybatisRedisCache:id=" + id);
        this.id = id;
    }

    @Override
    public void clear()
    {
        JedisConnection connection = null;
        try
        {
            connection = jedisConnectionFactory.getConnection();
            connection.flushDb();
            connection.flushAll();
        }
        catch (JedisConnectionException e)
        {
            e.printStackTrace();
        }
        finally
        {
            if (connection != null) {
                connection.close();
            }
        }
    }

    @Override
    public String getId()
    {
        return this.id;
    }

    @Override
    public Object getObject(Object key)
    {
        Object result = null;
        JedisConnection connection = null;
        try
        {
            connection = jedisConnectionFactory.getConnection();
            RedisSerializer<Object> serializer = new JdkSerializationRedisSerializer();
            result = serializer.deserialize(connection.get(serializer.serialize(key)));
        }
        catch (JedisConnectionException e)
        {
            e.printStackTrace();
        }
        finally
        {
            if (connection != null) {
                connection.close();
            }
        }
        return result;
    }

    @Override
    public ReadWriteLock getReadWriteLock()
    {
        return this.readWriteLock;
    }

    @Override
    public int getSize()
    {
        int result = 0;
        JedisConnection connection = null;
        try
        {
            connection = jedisConnectionFactory.getConnection();
            result = Integer.valueOf(connection.dbSize().toString());
        }
        catch (JedisConnectionException e)
        {
            e.printStackTrace();
        }
        finally
        {
            if (connection != null) {
                connection.close();
            }
        }
        return result;
    }

    @Override
    public void putObject(Object key, Object value)
    {
        JedisConnection connection = null;
        try
        {
            connection = jedisConnectionFactory.getConnection();
            RedisSerializer<Object> serializer = new JdkSerializationRedisSerializer();
            connection.set(serializer.serialize(key), serializer.serialize(value));
        }
        catch (JedisConnectionException e)
        {
            e.printStackTrace();
        }
        finally
        {
            if (connection != null) {
                connection.close();
            }
        }
    }

    @Override
    public Object removeObject(Object key)
    {
        JedisConnection connection = null;
        Object result = null;
        try
        {
            connection = jedisConnectionFactory.getConnection();
            RedisSerializer<Object> serializer = new JdkSerializationRedisSerializer();
            result =connection.expire(serializer.serialize(key), 0);
        }
        catch (JedisConnectionException e)
        {
            e.printStackTrace();
        }
        finally
        {
            if (connection != null) {
                connection.close();
            }
        }
        return result;
    }

    public static void setJedisConnectionFactory(JedisConnectionFactory jedisConnectionFactory) {
        RedisCache.jedisConnectionFactory = jedisConnectionFactory;
    }

}
- 1
- 2
- 3
- 4
- 5
- 6
- 7
- 8
- 9
- 10
- 11
- 12
- 13
- 14
- 15
- 16
- 17
- 18
- 19
- 20
- 21
- 22
- 23
- 24
- 25
- 26
- 27
- 28
- 29
- 30
- 31
- 32
- 33
- 34
- 35
- 36
- 37
- 38
- 39
- 40
- 41
- 42
- 43
- 44
- 45
- 46
- 47
- 48
- 49
- 50
- 51
- 52
- 53
- 54
- 55
- 56
- 57
- 58
- 59
- 60
- 61
- 62
- 63
- 64
- 65
- 66
- 67
- 68
- 69
- 70
- 71
- 72
- 73
- 74
- 75
- 76
- 77
- 78
- 79
- 80
- 81
- 82
- 83
- 84
- 85
- 86
- 87
- 88
- 89
- 90
- 91
- 92
- 93
- 94
- 95
- 96
- 97
- 98
- 99
- 100
- 101
- 102
- 103
- 104
- 105
- 106
- 107
- 108
- 109
- 110
- 111
- 112
- 113
- 114
- 115
- 116
- 117
- 118
- 119
- 120
- 121
- 122
- 123
- 124
- 125
- 126
- 127
- 128
- 129
- 130
- 131
- 132
- 133
- 134
- 135
- 136
- 137
- 138
- 139
- 140
- 141
- 142
- 143
- 144
- 145
- 146
- 147
- 148
- 149
- 150
- 151
- 152
- 153
- 154
- 155
- 156
- 157
- 158
- 159
- 160
- 161
- 162
5、创建中间类RedisCacheTransfer,完成RedisCache.jedisConnectionFactory的静态注入
/**
 *
 * @描述: 静态注入中间类
 * @版权: Copyright (c) 2016
 * @作者: xiad
 * @版本: 1.0
 * @创建日期: 2016年3月2日
 * @创建时间: 下午8:02:57
 */
public class RedisCacheTransfer
{

    @Autowired
    public void setJedisConnectionFactory(JedisConnectionFactory jedisConnectionFactory) {
        RedisCache.setJedisConnectionFactory(jedisConnectionFactory);
    }

}
- 1
- 2
- 3
- 4
- 5
- 6
- 7
- 8
- 9
- 10
- 11
- 12
- 13
- 14
- 15
- 16
- 17
- 18
6、配置文件redis.properties
# Redis settings
redis.host=192.168.25.132
redis.port=6379
redis.pass=

redis.maxIdle=300
redis.maxActive=600
redis.maxWait=1000
redis.testOnBorrow=true
- 1
- 2
- 3
- 4
- 5
- 6
- 7
- 8
- 9
7、mapper中加入MyBatis二级缓存
<mapper namespace="com.strive.cms.dao.site.CatalogMapper" >
  <cache type="com.strive.cms.cache.RedisCache"/>
  .....
</mapper>
- 1
- 2
- 3
- 4
8、Mybatis全局配置
<?xml version="1.0" encoding="UTF-8" ?>
<!DOCTYPE configuration
        PUBLIC "-//mybatis.org//DTD Config 3.0//EN"
        "http://mybatis.org/dtd/mybatis-3-config.dtd">
<configuration>
    <!-- 配置mybatis的缓存,延迟加载等等一系列属性 -->
    <settings>

        <!-- 全局映射器启用缓存 -->
        <setting name="cacheEnabled" value="true"/>

        <!-- 查询时,关闭关联对象即时加载以提高性能 -->
        <setting name="lazyLoadingEnabled" value="false"/>

        <!-- 对于未知的SQL查询,允许返回不同的结果集以达到通用的效果 -->
        <setting name="multipleResultSetsEnabled" value="true"/>

        <!-- 允许使用列标签代替列名 -->
        <setting name="useColumnLabel" value="true"/>

        <!-- 不允许使用自定义的主键值(比如由程序生成的UUID 32位编码作为键值),数据表的PK生成策略将被覆盖 -->
        <setting name="useGeneratedKeys" value="false"/>

        <!-- 给予被嵌套的resultMap以字段-属性的映射支持 FULL,PARTIAL -->
        <setting name="autoMappingBehavior" value="PARTIAL"/>

        <!-- 对于批量更新操作缓存SQL以提高性能 BATCH,SIMPLE -->
        <!-- <setting name="defaultExecutorType" value="BATCH" /> -->

        <!-- 数据库超过25000秒仍未响应则超时 -->
        <!-- <setting name="defaultStatementTimeout" value="25000" /> -->

        <!-- Allows using RowBounds on nested statements -->
        <setting name="safeRowBoundsEnabled" value="false"/>

        <!-- Enables automatic mapping from classic database column names A_COLUMN to camel case classic Java property names aColumn. -->
        <setting name="mapUnderscoreToCamelCase" value="true"/>

        <!-- MyBatis uses local cache to prevent circular references and speed up repeated nested queries. By default (SESSION) all queries executed during a session are cached. If localCacheScope=STATEMENT
            local session will be used just for statement execution, no data will be shared between two different calls to the same SqlSession. -->
        <setting name="localCacheScope" value="SESSION"/>

        <!-- Specifies the JDBC type for null values when no specific JDBC type was provided for the parameter. Some drivers require specifying the column JDBC type but others work with generic values
            like NULL, VARCHAR or OTHER. -->
        <setting name="jdbcTypeForNull" value="OTHER"/>

        <!-- Specifies which Object's methods trigger a lazy load -->
        <setting name="lazyLoadTriggerMethods" value="equals,clone,hashCode,toString"/>

        <!-- 设置关联对象加载的形态,此处为按需加载字段(加载字段由SQL指 定),不会加载关联表的所有字段,以提高性能 -->
        <setting name="aggressiveLazyLoading" value="true"/>

    </settings>

</configuration>
- 1
- 2
- 3
- 4
- 5
- 6
- 7
- 8
- 9
- 10
- 11
- 12
- 13
- 14
- 15
- 16
- 17
- 18
- 19
- 20
- 21
- 22
- 23
- 24
- 25
- 26
- 27
- 28
- 29
- 30
- 31
- 32
- 33
- 34
- 35
- 36
- 37
- 38
- 39
- 40
- 41
- 42
- 43
- 44
- 45
- 46
- 47
- 48
- 49
- 50
- 51
- 52
- 53
- 54
- 55
9、打印Sql日志,方便测试
#定义LOG输出级别为INFO
log4j.rootLogger=INFO,Console,File

####定义日志输出目的地为控制台
log4j.appender.Console=org.apache.log4j.ConsoleAppender
log4j.appender.Console.Target=System.out
#可以灵活地指定日志输出格式,下面一行是指定具体的格式
log4j.appender.Console.layout = org.apache.log4j.PatternLayout
log4j.appender.Console.layout.ConversionPattern=[%c] - %m%n

####文件大小到达指定尺寸的时候产生一个新的文件
log4j.appender.File = org.apache.log4j.RollingFileAppender
#指定输出目录
log4j.appender.File.File = logs/ssm.log
#定义文件最大大小
log4j.appender.File.MaxFileSize = 10MB
#输出所以日志,如果换成DEBUG表示输出DEBUG以上级别日志
log4j.appender.File.Threshold = ALL
log4j.appender.File.layout = org.apache.log4j.PatternLayout
log4j.appender.File.layout.ConversionPattern =[%p] [%d{yyyy-MM-dd HH\:mm\:ss}][%c]%m%n

####显示本项目SQL语句部分
log4j.logger.com.strive.cms=DEBUG
- 1
- 2
- 3
- 4
- 5
- 6
- 7
- 8
- 9
- 10
- 11
- 12
- 13
- 14
- 15
- 16
- 17
- 18
- 19
- 20
- 21
- 22
- 23
10、测试代码
@RunWith(SpringJUnit4ClassRunner.class)
@ContextConfiguration(locations = {"classpath:applicationContext.xml"})
public class MyBatisCacheSecondTest
{
    private static final Logger logger = LoggerFactory.getLogger(MyBatisCacheSecondTest.class);

    @Autowired
    private  SiteService service;

    /*
     * 二级缓存测试
     */
    @Test
    public void testCache2() {
        PageInfo<Site> page1 = service.querySite("", 1, 2, "", "");
        logger.info(page1.getList().get(1).getName());

        PageInfo<Site> page2 = service.querySite("", 2, 2, "", "");
        logger.info(page2.getList().get(0).getName());

        PageInfo<Site> page3 = service.querySite("", 1, 2, "", "");
        logger.info(page3.getList().get(0).getName());
    }

}
- 1
- 2
- 3
- 4
- 5
- 6
- 7
- 8
- 9
- 10
- 11
- 12
- 13
- 14
- 15
- 16
- 17
- 18
- 19
- 20
- 21
- 22
- 23
- 24
- 25
首次运行结果

后续运行结果

同条件的查询语句可以发现,已经不再查询Mysql,而是直接取Redis数据
查看Redis数据库 keys *, 会发现多了很多数据,结果如下
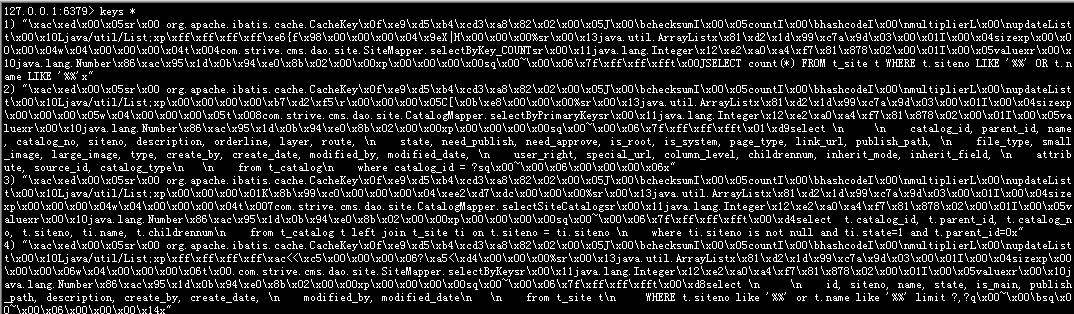
至此,Redis基本配置成功。


 455
455

 被折叠的 条评论
为什么被折叠?
被折叠的 条评论
为什么被折叠?
 到【灌水乐园】发言


