


code小生,一个 Android 领域技术分享平台
作者:许渺
链接:https://www.jianshu.com/p/b529e61d220a
声明:本文是 许渺 原创,转发等请联系原作者授权。
背景
从Android 8.0(API 26)开始,所有的 Notification 都要指定 Channel(通道),对于每一个 Channel 你都可以单独去设置它;比如通知开关、提示音、是否震动或者是重要程度等;这样每个应用程序的通知在用户面前都是透明的。
下面我们来看一下通知的设置页面和 Channel 的设置界面

Notification Setting
这边通知设置界面中的类别指的就是 Channel,你必须要创建一个或者多个Channel;这边需要注意的是如果你的 tartgetSdkVersion>=26,如果你发布通知不指定 Channel 的话,通知是不会显示的(系统会自动记录错误)。
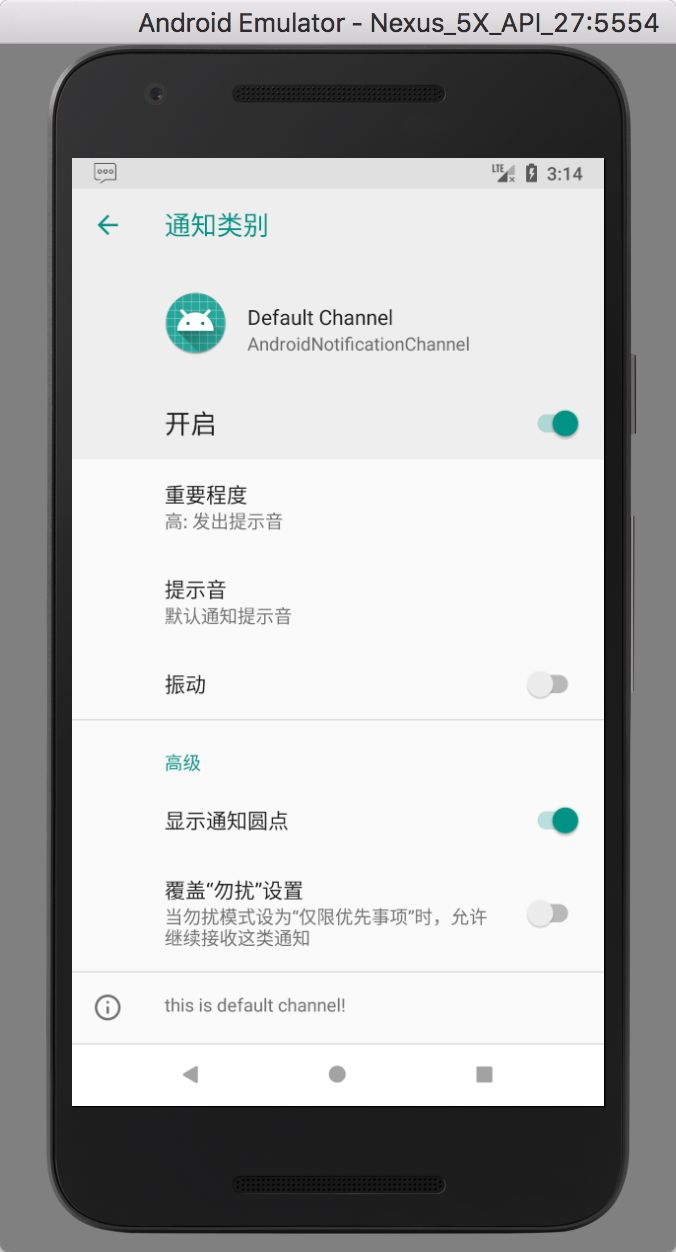
Channel Setting
创建 Notification Channel
创建 NotificationChannel 对象,指定 Channel 的 id、name 和通知的重要程度。
setDescription 可以指定设置中 Channel 的描述,如上图中的(this is default channel!)
使用NotificationMannager的createNotificationChannel方法来添加Channel。
if (Build.VERSION.SDK_INT >= Build.VERSION_CODES.O)
{
    mNotificationChannel = new NotificationChannel(CHANNEL_ID, CHANNEL_NAME, NotificationManager.IMPORTANCE_DEFAULT);
    mNotificationChannel.setDescription(CHANNEL_DESCRIPTION);
    getNotificationManager().createNotificationChannel(mNotificationChannel);
}
设置通知重要性级别
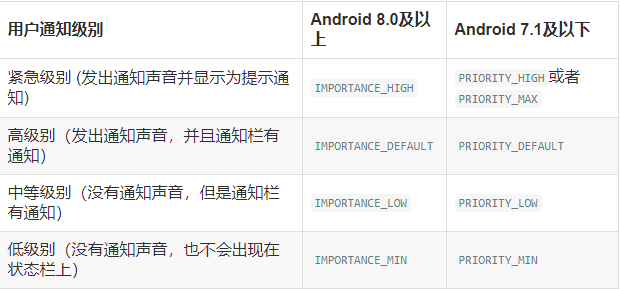
该级别必须要在 NotificationChannel 的构造函数中指定,总共要五个级别;范围是从 NotificationManager.IMPORTANCE_NONE(0) ~ NotificationManager.IMPORTANCE_HIGH(4)
,如果要支持 Android 7.1(API 25)及以下的设备,还得调用NotificationCompat 的 setPriority 方法来设置,如下所示
builder.setPriority(NotificationCompat.PRIORITY_DEFAULT);
我们总结一下;Android 8.0 及以上是使用NotificationManager.IMPORTANCE_,Android 7.1 及以下是使用NotificationCompat.PRIORITY_它们都是定义的常量;下面我们以表格的形式更好的展示出来。
对于上面这些通知级别用户都是可以在 Channel 设置中更改的,嗯就是这样!
打开 Channel 设置
为了让用户能够轻松访问 Channel 设置,我们可以通过下面的代码在 APP 中加入设置入口点,这样用户体验可能会更好!
public void openChannelSetting(String channelId)
{
    Intent intent = new Intent(Settings.ACTION_CHANNEL_NOTIFICATION_SETTINGS);
    intent.putExtra(Settings.EXTRA_APP_PACKAGE, getPackageName());
    intent.putExtra(Settings.EXTRA_CHANNEL_ID, channelId);
    if (getPackageManager().resolveActivity(intent, PackageManager.MATCH_DEFAULT_ONLY) != null)
        startActivity(intent);
}
打开通知设置
public void openNotificationSetting()
{
    Intent intent = new Intent(Settings.ACTION_APP_NOTIFICATION_SETTINGS);
    intent.putExtra(Settings.EXTRA_APP_PACKAGE, getPackageName());
    if (getPackageManager().resolveActivity(intent, PackageManager.MATCH_DEFAULT_ONLY) != null)
        startActivity(intent);
}
最后贴一下封装的代码(封装的不是很好)
/**
 * @author xuyj
 */
public class NotificationHelper extends ContextWrapper
{
    private NotificationManager mNotificationManager;
    private NotificationChannel mNotificationChannel;

    public static final  String CHANNEL_ID          = "default";
    private static final String CHANNEL_NAME        = "Default Channel";
    private static final String CHANNEL_DESCRIPTION = "this is default channel!";

    public NotificationHelper(Context base)
    {
        super(base);
        if (Build.VERSION.SDK_INT >= Build.VERSION_CODES.O)
        {
            mNotificationChannel = new NotificationChannel(CHANNEL_ID, CHANNEL_NAME, NotificationManager.IMPORTANCE_DEFAULT);
            mNotificationChannel.setDescription(CHANNEL_DESCRIPTION);
            getNotificationManager().createNotificationChannel(mNotificationChannel);
        }
    }

    public NotificationCompat.Builder getNotification(String title, String content)
    {
        NotificationCompat.Builder builder = null;
        if (Build.VERSION.SDK_INT >= Build.VERSION_CODES.O)
        {
            builder = new NotificationCompat.Builder(this, CHANNEL_ID);
        } else
        {
            builder = new NotificationCompat.Builder(this);
            builder.setPriority(NotificationCompat.PRIORITY_DEFAULT);
        }
        builder.setContentTitle(title);
        builder.setContentText(content);
        builder.setSmallIcon(R.mipmap.comments);
        builder.setLargeIcon(BitmapFactory.decodeResource(getResources(), R.mipmap.comments));
        //点击自动删除通知
        builder.setAutoCancel(true);
        return builder;
    }

    public void notify(int id, NotificationCompat.Builder builder)
    {
        if (getNotificationManager() != null)
        {
            getNotificationManager().notify(id, builder.build());
        }
    }

    public void openChannelSetting(String channelId)
    {
        Intent intent = new Intent(Settings.ACTION_CHANNEL_NOTIFICATION_SETTINGS);
        intent.putExtra(Settings.EXTRA_APP_PACKAGE, getPackageName());
        intent.putExtra(Settings.EXTRA_CHANNEL_ID, channelId);
        if (getPackageManager().resolveActivity(intent, PackageManager.MATCH_DEFAULT_ONLY) != null)
            startActivity(intent);
    }

    public void openNotificationSetting()
    {
        Intent intent = new Intent(Settings.ACTION_APP_NOTIFICATION_SETTINGS);
        intent.putExtra(Settings.EXTRA_APP_PACKAGE, getPackageName());
        if (getPackageManager().resolveActivity(intent, PackageManager.MATCH_DEFAULT_ONLY) != null)
            startActivity(intent);
    }

    private NotificationManager getNotificationManager()
    {
        if (mNotificationManager == null)
            mNotificationManager = (NotificationManager) this.getSystemService(this.NOTIFICATION_SERVICE);
        return mNotificationManager;
    }

}
Demo地址
https://link.jianshu.com/?t=https%3A%2F%2Fgithub.com%2FXuMiaoLee%2FAndroidNotificationChannel.git
参考
https://developer.android.google.cn/training/notify-user/channels.html
https://github.com/googlesamples/android-NotificationChannels/#readme


 3万+
3万+


 被折叠的 条评论
为什么被折叠?
被折叠的 条评论
为什么被折叠?
 到【灌水乐园】发言


