


微信小程序新版隐私协议弹窗实现最新版
1. 微信小程序又双叒叕更新了
2023.08.22更新:【原文连接】
以下指南中涉及的 getPrivacySetting、onNeedPrivacyAuthorization、requirePrivacyAuthorize 等接口目前可以正常接入调试。调试说明:
- 在 2023年9月15号之前,在 app.json 中配置
__usePrivacyCheck__: true后,会启用隐私相关功能,如果不配置或者配置为 false 则不会启用。 - 在 2023年9月15号之后,不论 app.json 中是否有配置
__usePrivacyCheck__,隐私相关功能都会启用。uniapp需要在manifest.json中加入"usePrivacyCheck": true
 "mp-weixin" : {
        "appid" : "wx4xxxxxxxxa5c",
        "__usePrivacyCheck__": true
  },
涉及到以下接口的地方需要加上隐私协议弹窗
| 处理的信息 | 接口或组件 |
|---|---|
| 收集你的昵称、头像 | 、、wx.getUserInfo (已回收)、wx.getUserProfile (已回收)、(已回收) |
| 收集你的位置信息 | wx.authorize({scope:‘scope.userLocation’})、wx.authorize({scope: ‘scope.userLocationBackground’})、wx.authorize({scope: ‘scope.userFuzzyLocation’})、wx.getLocation、wx.startLocationUpdate、wx.startLocationUpdateBackground、wx.getFuzzyLocation |
| 收集你选择的位置信息 | wx.choosePoi、wx.chooseLocation |
| 收集你的地址 | wx.chooseAddress |
| 收集你的发票信息 | wx.chooseInvoiceTitle、wx.chooseInvoice |
| 收集你的微信运动步数 | wx.authorize({scope: ‘scope.werun’})、wx.getWeRunData |
| 收集你的手机号 | 、 |
| 收集你的车牌号 | wx.chooseLicensePlate |
| 收集你选中的照片或视频信息 | wx.chooseImage、wx.chooseMedia、wx.chooseVideo |
| 收集你选中的文件 | wx.chooseMessageFile |
| 访问你的麦克风 | wx.authorize({scope: ‘scope.record’})、wx.startRecord、RecorderManager.start、、wx.joinVoIPChat |
| 访问你的摄像头 | wx.authorize({scope: ‘scope.camera’})、wx.createVKSession、、、 |
| 访问你的蓝牙 | wx.authorize({scope: ‘scope.bluetooth’})、wx.openBluetoothAdapter、wx.createBLEPeripheralServer |
| 使用你的相册(仅写入)权限 | wx.authorize({scope: ‘scope.writePhotosAlbum’})、wx.saveImageToPhotosAlbum、wx.saveVideoToPhotosAlbum |
| 使用你的通讯录(仅写入)权限 | wx.authorize({scope: ‘scope.addPhoneContact’})、wx.addPhoneContact |
| 使用你的日历(仅写入)权限 | wx.authorize({scope: ‘scope.addPhoneCalendar’})、wx.addPhoneRepeatCalendar、wx.addPhoneCalendar |
| 调用你的加速传感器 | wx.stopAccelerometer、wx.startAccelerometer、wx.onAccelerometerChange、wx.offAccelerometerChange |
| 调用你的磁场传感器 | wx.stopCompass、wx.startCompass、wx.onCompassChange、wx.offCompassChange |
| 调用你的方向传感器 | wx.stopDeviceMotionListening、wx.startDeviceMotionListening、wx.onDeviceMotionChange、wx.offDeviceMotionChange |
| 调用你的陀螺仪传感器 | wx.stopGyroscope、wx.startGyroscope、wx.onGyroscopeChange、wx.offGyroscopeChange |
| 读取你的剪切板 | wx.setClipboardData、wx.getClipboardData |
2. 实现思路
- 初始化进入小程序时先检测用户是否已经授权了隐私协议。如果没有授权,就弹出用户授权隐私协议的弹窗
- 用户点击确认授权,即可正常使用小程序
- 用户如果取消授权,当用户点击需要授权的功能,比如获取手机号的按钮,开启蓝牙的按钮等待涉及用户隐私的功能,就重新弹窗,让用户确认授权后,才能使用对应的功能。否则只能浏览页面,无法使用小程序的功能。
- 隐私协议的名字和内容都是通过微信接口获得的。
获取隐私协议名字接口
 uni.getPrivacySetting({
          success: res => {
            console.log("是否需要授权:", res.needAuthorization, "隐私协议的名称为:", res.privacyContractName)
          },
          fail: () => {
          },
          complete: () => {},
        })
获取隐私协议内容接口如下,调用该方法会自动进入隐私协议详情页面。
 openYsXyDetail(){
      uni.openPrivacyContract({});
},
- 如果是原生小程序只需要把下方代码实现中的所有uni.替换为wx.即可使用
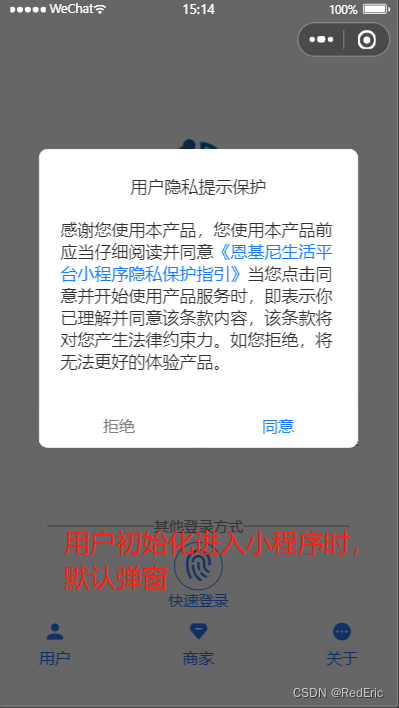
3. 实现效果
用户初始化进入小程序时,弹出授权窗口,用户点击登录按钮时,如果未授权也弹出此窗口
4. 代码实现
<template>
  <view class="login-page">
<!--    当用户点击授权同意隐私协议后才可以正常点击登录按钮获取手机号码-->
    <button open-type="getPhoneNumber" @getphonenumber="authPhone" v-if="ysxy.agree">
      <u-icon name="fingerprint" color="#2979ff" size="68"></u-icon>
    </button>
    <!--    当用户未授权同意意思协议时,打开授权隐私协议的弹窗,否则无法登录系统-->
    <button v-else @click="ysxy.show = true">
      <u-icon name="fingerprint" color="#2979ff" size="68"></u-icon>
    </button>
    <u-modal v-model="ysxy.show" :negative-top="200" title="用户隐私提示保护" :show-confirm-button="false"
             :mask-close-able="true">
      <view class="slot-content" >
        <view class="ysbox">
          感谢您使用本产品,您使用本产品前应当仔细阅读并同意<span  @click="openYsXyDetail" class="ysname">{

     { ysxy.name }}</span>
          当您点击同意并开始使用产品服务时,即表示你已理解并同意该条款内容,该条款将对您产生法律约束力。如您拒绝,将无法更好的体验产品。
        </view>
        <div class="auth-btncard">
          <div class="btn-unok">
            <u-button :hair-line='false' :custom-style="customStyleUnOk" @click="ysxy.show=false">
              拒绝</u-button>
          </div>
          <div class="btn-ok">
            <u-button :hair-line='false' :custom-style="customStyleOk" open-type="agreePrivacyAuthorization"
                      @click="ysxy.show=false;ysxy.agree=true;"> 同意</u-button>
          </div>
        </div>
      </view>
    </u-modal>
  </view>
</template>
<script>
import global from "../../common/utils/global";
export default {
  data() {
    return {
      ysxy:{
        show:false,
        name:'《小程序隐私保护指引》',
        agree:false
      },
      customStyleOk: {
        marginTop: '20rpx', // 注意驼峰命名,并且值必须用引号包括,因为这是对象
        border: 'none',
        color: '#157DFB'
      },
      customStyleUnOk: {
        marginTop: '20rpx', // 注意驼峰命名,并且值必须用引号包括,因为这是对象
        border: 'none',
        color: 'gray'
      },
    }
  },
  onLoad(option) {
    //#ifdef MP-WEIXIN
    this.initYsxy();
    //#endif
  },
  methods: {
    openYsXyDetail(){
      uni.openPrivacyContract({});
    },
    initYsxy(){
      this.ysxy.agree = false;
      let _this=this;
      if (uni.getPrivacySetting) {
        uni.getPrivacySetting({
          success: res => {
            console.log("是否需要授权:", res.needAuthorization, "隐私协议的名称为:", res.privacyContractName)
            if (res.needAuthorization) {
              _this.ysxy.name = res.privacyContractName
              _this.ysxy.show = true;
            } else {
              //已经同意了
              _this.ysxy.agree = true;
            }
          },
          fail: () => {
          },
          complete: () => {},
        })
      }
    },
  }
}
</script>
<style lang="scss" scoped>
.ysbox{
  margin: 40rpx;
  .ysname{
    color: #157DFB;
  }
}
.auth-btncard {
  .btn-unok {
    width: 50%;
    float: left;
  }
  .btn-ok {
    width: 50%;
    float: left;
    margin: 0;
    padding: 0;
    border: 0px solid transparent; //自定义边框
    outline: none; //消除默认点击蓝色边框效果
    u-button {
      margin: 0;
      padding: 0;
      border: 0px solid transparent; //自定义边框
      outline: none; //消除默认点击蓝色边框效果
    }
  }
}
</style>


 4765
4765


 被折叠的 条评论
为什么被折叠?
被折叠的 条评论
为什么被折叠?
 到【灌水乐园】发言


