


原文链接:Android Custom ListView with Image and Text using Volley
我(作者:Ravi Tamada)在之前的一篇博文 中向大家介绍了一种自定义ListView的方法,该自定义ListView包含了一张缩略图和一些文本框,所有的数据通过网络获取。其中最大的挑战在于如何异步的下载图片并且将其缓存。因为缺乏好的工具所以我使用了一个第三方库 用来下载数据和缓存图片。
今天我将使用另外一个叫做Volley的库来实现相似的功能。使用Volley可以使ListView的性能大大改善。
最终结果
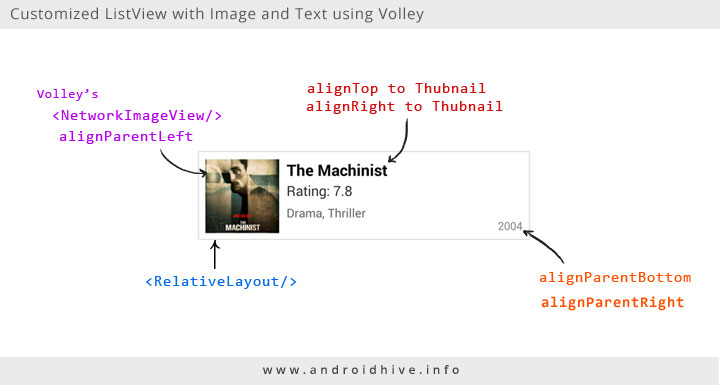
我们创建的ListView将会展示一组电影的信息,每一行表示一部电影。左侧是电影海报的缩略图,在其右侧是电影标题,评分,类型以及发布日期。效果如下图所示:

1. JSON示例
使用这个 JSON示例来加载电影数据。 其中包含了一组JSON对象,每个JSON对象包含了诸如电影名称,评分,类型和发布日期等信息。
JSON Url: http://api.androidhive.info/json/movies.json
[
    {
        "title": "Dawn of the Planet of the Apes",
        "image": "http://api.androidhive.info/json/movies/1.jpg",
        "rating": 8.3,
        "releaseYear": 2014,
        "genre": ["Action", "Drama", "Sci-Fi"]
    },
    ....
    ....
]
2. 下载Volley库(Volley.jar)
如果你是第一次使用volley,我建议你阅读我之前写的博文Android working with Volley Library ,这篇博文介绍了关于volley所需要知道的知识以及其他一些关于构建volley库并生成volley.jar的内容。至于是自己生成还是下载volley.jar,完全取决于你自己。
译者注:如果使用的IDE为Android Studio,建议看看Google官方提供的文档:Transmitting NetWork Data Using Volley
3. 构造ListView布局
为了实现自定义ListView布局,我选择RelativeLayout作为父布局元素,所有的子控件通过align below, align right, align parent bottom等属性进行对其。
4. 创建新项目
1. 在 Eclipse 创建一个新项目 File ⇒ New ⇒ Android Application Project . 我将新项目命名为
info.androidhive.customlistviewvolley
2. 项目创建完成后将 volley.jar 导入 libs 文件夹.
3. 创建下面四个package,保证项目结构清晰。这一步并不是必须的,但是我推荐这么做。
info.androidhive.customlistviewvolley.adater
info.androidhive.customlistviewvolley.app
info.androidhive.customlistviewvolley.model
info.androidhive.customlistviewvolley.util
4. 打开 colors.xml ,如果没有自行创建。
colors.xml
<?xml version="1.0" encoding="utf-8"?>
<resources>

    <color name="genre">#666666</color>
    <color name="year">#888888</color>
    <color name="list_divider">#d9d9d9</color>
    <color name="list_row_start_color">#ffffff</color>
    <color name="list_row_end_color">#ffffff</color>
    <color name="list_row_hover_start_color">#ebeef0</color>
    <color name="list_row_hover_end_color">#ebeef0</color>

</resources>
5 . 同时添加下面的dimensions 到 dimens.xml
dimens.xml
<resources>

    <dimen name="title">17dp</dimen>
    <dimen name="rating">15dip</dimen>
    <dimen name="genre">13dip</dimen>
    <dimen name="year">12dip</dimen>

</resources>6.在开始写Java代码前,我通常喜欢先完成UI部分。
在drawable目录下创建 list_row_bg.xml,list_row_bg_hover.xml 以及 list_row_selector.xml 三个文件。
list_row_bg.xml – 默认情况下,ListView的背景。
list_row_bg_hover.xml
<?xml version="1.0" encoding="utf-8"?>
<shape xmlns:android="http://schemas.android.com/apk/res/android"
    android:shape="rectangle" >

    <gradient
        android:angle="270"
        android:endColor="@color/list_row_hover_end_color"
        android:startColor="@color/list_row_hover_start_color" />

</shape>
list_row_bg_hover.xml –当ListView的某一项被选中
list_row_bg_hover.xml
<?xml version="1.0" encoding="utf-8"?>
<shape xmlns:android="http://schemas.android.com/apk/res/android"
    android:shape="rectangle" >

    <gradient
        android:angle="270"
        android:endColor="@color/list_row_hover_end_color"
        android:startColor="@color/list_row_hover_start_color" />

</shape>
list_row_selector.xml – 根据不同的状态进行切换
list_row_selector.xml
<?xml version="1.0" encoding="utf-8"?>
<selector xmlns:android="http://schemas.android.com/apk/res/android">

    <item android:drawable="@drawable/list_row_bg" android:state_pressed="false" android:state_selected="false"/>
    <item android:drawable="@drawable/list_row_bg_hover" android:state_pressed="true"/>
    <item android:drawable="@drawable/list_row_bg_hover" android:state_pressed="false" android:state_selected="true"/>

</selector>
7 . 在 activity_main.xml 中添加ListView元素。
activity_main.xml
<RelativeLayout xmlns:android="http://schemas.android.com/apk/res/android"
    xmlns:tools="http://schemas.android.com/tools"
    android:layout_width="match_parent"
    android:layout_height="match_parent"
    tools:context=".MainActivity" >

    <ListView
        android:id="@+id/list"
        android:layout_width="fill_parent"
        android:layout_height="wrap_content"
        android:divider="@color/list_divider"
        android:dividerHeight="1dp"
        android:listSelector="@drawable/list_row_selector" />

</RelativeLayout>
8 . 我们需要创建另外一个布局文件,用来展示ListView的每一行。这是自定义ListView最为关键的一步。将其命名为l ist_row.xml
list_row.xml
<?xml version="1.0" encoding="utf-8"?>
<RelativeLayout xmlns:android="http://schemas.android.com/apk/res/android"
    android:layout_width="fill_parent"
    android:layout_height="wrap_content"
    android:background="@drawable/list_row_selector"
    android:padding="8dp" >

    <!-- Thumbnail Image -->
    <com.android.volley.toolbox.NetworkImageView
        android:id="@+id/thumbnail"
        android:layout_width="80dp"
        android:layout_height="80dp"
        android:layout_alignParentLeft="true"
        android:layout_marginRight="8dp" />

    <!-- Movie Title -->
    <TextView
        android:id="@+id/title"
        android:layout_width="wrap_content"
        android:layout_height="wrap_content"
        android:layout_alignTop="@+id/thumbnail"
        android:layout_toRightOf="@+id/thumbnail"
        android:textSize="@dimen/title"
        android:textStyle="bold" />

    <!-- Rating -->
    <TextView
        android:id="@+id/rating"
        android:layout_width="fill_parent"
        android:layout_height="wrap_content"
        android:layout_below="@id/title"
        android:layout_marginTop="1dip"
        android:layout_toRightOf="@+id/thumbnail"
        android:textSize="@dimen/rating" />

    <!-- Genre -->
    <TextView
        android:id="@+id/genre"
        android:layout_width="fill_parent"
        android:layout_height="wrap_content"
        android:layout_below="@id/rating"
        android:layout_marginTop="5dp"
        android:layout_toRightOf="@+id/thumbnail"
        android:textColor="@color/genre"
        android:textSize="@dimen/genre" />

    <!-- Release Year -->
    <TextView
        android:id="@+id/releaseYear"
        android:layout_width="wrap_content"
        android:layout_height="wrap_content"
        android:layout_alignParentBottom="true"
        android:layout_alignParentRight="true"
        android:textColor="@color/year"
        android:textSize="@dimen/year" />

</RelativeLayout>
我们已经完成了UI部分。下面开始Java代码的编写。
9. 在util包下创建 LruBitmapCache.java 类。这个类用来将图片缓存到磁盘。
LruBitmapCache.java
package info.androidhive.customlistviewvolley.util;

import com.android.volley.toolbox.ImageLoader.ImageCache;

import android.graphics.Bitmap;
import android.support.v4.util.LruCache;

public class LruBitmapCache extends LruCache<String, Bitmap> implements
        ImageCache {
    public static int getDefaultLruCacheSize() {
        final int maxMemory = (int) (Runtime.getRuntime().maxMemory() / 1024);
        final int cacheSize = maxMemory / 8;

        return cacheSize;
    }

    public LruBitmapCache() {
        this(getDefaultLruCacheSize());
    }

    public LruBitmapCache(int sizeInKiloBytes) {
        super(sizeInKiloBytes);
    }

    @Override
    protected int sizeOf(String key, Bitmap value) {
        return value.getRowBytes() * value.getHeight() / 1024;
    }

    @Override
    public Bitmap getBitmap(String url) {
        return get(url);
    }

    @Override
    public void putBitmap(String url, Bitmap bitmap) {
        put(url, bitmap);
    }
}
10 . 在app包下创建 AppController.java 类。这个类将会初始化volley库中的核心对象。
AppController.java
package info.androidhive.customlistviewvolley.app;

import info.androidhive.customlistviewvolley.util.LruBitmapCache;
import android.app.Application;
import android.text.TextUtils;

import com.android.volley.Request;
import com.android.volley.RequestQueue;
import com.android.volley.toolbox.ImageLoader;
import com.android.volley.toolbox.Volley;

public class AppController extends Application {

    public static final String TAG = AppController.class.getSimpleName();

    private RequestQueue mRequestQueue;
    private ImageLoader mImageLoader;

    private static AppController mInstance;

    @Override
    public void onCreate() {
        super.onCreate();
        mInstance = this;
    }

    public static synchronized AppController getInstance() {
        return mInstance;
    }

    public RequestQueue getRequestQueue() {
        if (mRequestQueue == null) {
            mRequestQueue = Volley.newRequestQueue(getApplicationContext());
        }

        return mRequestQueue;
    }

    public ImageLoader getImageLoader() {
        getRequestQueue();
        if (mImageLoader == null) {
            mImageLoader = new ImageLoader(this.mRequestQueue,
                    new LruBitmapCache());
        }
        return this.mImageLoader;
    }

    public <T> void addToRequestQueue(Request<T> req, String tag) {
        // set the default tag if tag is empty
        req.setTag(TextUtils.isEmpty(tag) ? TAG : tag);
        getRequestQueue().add(req);
    }

    public <T> void addToRequestQueue(Request<T> req) {
        req.setTag(TAG);
        getRequestQueue().add(req);
    }

    public void cancelPendingRequests(Object tag) {
        if (mRequestQueue != null) {
            mRequestQueue.cancelAll(tag);
        }
    }
}
11 . 在AndroidManifest.xml中添加 AppController.java到 <application> 标签,同时添加 INTERNET 权限 ,因为我们需要访问网络。
<application
        android:name="info.androidhive.customlistviewvolley.app.AppController" ../>
AndroidManifest.xml
<?xml version="1.0" encoding="utf-8"?>
<manifest xmlns:android="http://schemas.android.com/apk/res/android"
    package="info.androidhive.customlistviewvolley"
    android:versionCode="1"
    android:versionName="1.0" >

    <uses-sdk
        android:minSdkVersion="11"
        android:targetSdkVersion="18" />

    <uses-permission android:name="android.permission.INTERNET" />

    <application
        android:name="info.androidhive.customlistviewvolley.app.AppController"
        android:allowBackup="true"
        android:icon="@drawable/ic_launcher"
        android:label="@string/app_name"
        android:theme="@style/AppTheme" >
        <activity
            android:name="info.androidhive.customlistviewvolley.MainActivity"
            android:label="@string/app_name" >
            <intent-filter>
                <action android:name="android.intent.action.MAIN" />

                <category android:name="android.intent.category.LAUNCHER" />
            </intent-filter>
        </activity>
    </application>

</manifest>
12 . 在model包下创建 Movie.java 类。当解析Json时,我们使用这个模型类表示Movie对象。
Movie.java
package info.androidhive.customlistviewvolley.model;

import java.util.ArrayList;

public class Movie {
    private String title, thumbnailUrl;
    private int year;
    private double rating;
    private ArrayList<String> genre;

    public Movie() {
    }

    public Movie(String name, String thumbnailUrl, int year, double rating,
            ArrayList<String> genre) {
        this.title = name;
        this.thumbnailUrl = thumbnailUrl;
        this.year = year;
        this.rating = rating;
        this.genre = genre;
    }

    public String getTitle() {
        return title;
    }

    public void setTitle(String name) {
        this.title = name;
    }

    public String getThumbnailUrl() {
        return thumbnailUrl;
    }

    public void setThumbnailUrl(String thumbnailUrl) {
        this.thumbnailUrl = thumbnailUrl;
    }

    public int getYear() {
        return year;
    }

    public void setYear(int year) {
        this.year = year;
    }

    public double getRating() {
        return rating;
    }

    public void setRating(double rating) {
        this.rating = rating;
    }

    public ArrayList<String> getGenre() {
        return genre;
    }

    public void setGenre(ArrayList<String> genre) {
        this.genre = genre;
    }

}
13 . 创建 CustomListAdapter.java 。该自定义Adapter将数据部署到ListView上。
CustomListAdapter.java
package info.androidhive.customlistviewvolley.adater;

import info.androidhive.customlistviewvolley.R;
import info.androidhive.customlistviewvolley.app.AppController;
import info.androidhive.customlistviewvolley.model.Movie;

import java.util.List;

import android.app.Activity;
import android.content.Context;
import android.view.LayoutInflater;
import android.view.View;
import android.view.ViewGroup;
import android.widget.BaseAdapter;
import android.widget.TextView;

import com.android.volley.toolbox.ImageLoader;
import com.android.volley.toolbox.NetworkImageView;

public class CustomListAdapter extends BaseAdapter {
    private Activity activity;
    private LayoutInflater inflater;
    private List<Movie> movieItems;
    ImageLoader imageLoader = AppController.getInstance().getImageLoader();

    public CustomListAdapter(Activity activity, List<Movie> movieItems) {
        this.activity = activity;
        this.movieItems = movieItems;
    }

    @Override
    public int getCount() {
        return movieItems.size();
    }

    @Override
    public Object getItem(int location) {
        return movieItems.get(location);
    }

    @Override
    public long getItemId(int position) {
        return position;
    }

    @Override
    public View getView(int position, View convertView, ViewGroup parent) {

        if (inflater == null)
            inflater = (LayoutInflater) activity
                    .getSystemService(Context.LAYOUT_INFLATER_SERVICE);
        if (convertView == null)
            convertView = inflater.inflate(R.layout.list_row, null);

        if (imageLoader == null)
            imageLoader = AppController.getInstance().getImageLoader();
        NetworkImageView thumbNail = (NetworkImageView) convertView
                .findViewById(R.id.thumbnail);
        TextView title = (TextView) convertView.findViewById(R.id.title);
        TextView rating = (TextView) convertView.findViewById(R.id.rating);
        TextView genre = (TextView) convertView.findViewById(R.id.genre);
        TextView year = (TextView) convertView.findViewById(R.id.releaseYear);

        // getting movie data for the row
        Movie m = movieItems.get(position);

        // thumbnail image
        thumbNail.setImageUrl(m.getThumbnailUrl(), imageLoader);

        // title
        title.setText(m.getTitle());

        // rating
        rating.setText("Rating: " + String.valueOf(m.getRating()));

        // genre
        String genreStr = "";
        for (String str : m.getGenre()) {
            genreStr += str + ", ";
        }
        genreStr = genreStr.length() > 0 ? genreStr.substring(0,
                genreStr.length() - 2) : genreStr;
        genre.setText(genreStr);

        // release year
        year.setText(String.valueOf(m.getYear()));

        return convertView;
    }

}
14 . 下面修改 MainActivity.java 中的代码。我创建了volley包中的JsonArrayRequest对象,该对象从url中获取json。我将json数据转化成ArrayList。最后通过CustomListAdapter实例调用 notifyDataSetChanged() 方法,将ListView进行填充。
MainActivity.java
package info.androidhive.customlistviewvolley;

import info.androidhive.customlistviewvolley.adater.CustomListAdapter;
import info.androidhive.customlistviewvolley.app.AppController;
import info.androidhive.customlistviewvolley.model.Movie;

import java.util.ArrayList;
import java.util.List;

import org.json.JSONArray;
import org.json.JSONException;
import org.json.JSONObject;

import android.app.Activity;
import android.app.ProgressDialog;
import android.graphics.Color;
import android.graphics.drawable.ColorDrawable;
import android.os.Bundle;
import android.util.Log;
import android.view.Menu;
import android.widget.ListView;

import com.android.volley.Response;
import com.android.volley.VolleyError;
import com.android.volley.VolleyLog;
import com.android.volley.toolbox.JsonArrayRequest;

public class MainActivity extends Activity {
    // Log tag
    private static final String TAG = MainActivity.class.getSimpleName();

    // Movies json url
    private static final String url = "http://api.androidhive.info/json/movies.json";
    private ProgressDialog pDialog;
    private List<Movie> movieList = new ArrayList<Movie>();
    private ListView listView;
    private CustomListAdapter adapter;

    @Override
    protected void onCreate(Bundle savedInstanceState) {
        super.onCreate(savedInstanceState);
        setContentView(R.layout.activity_main);

        listView = (ListView) findViewById(R.id.list);
        adapter = new CustomListAdapter(this, movieList);
        listView.setAdapter(adapter);

        pDialog = new ProgressDialog(this);
        // Showing progress dialog before making http request
        pDialog.setMessage("Loading...");
        pDialog.show();

        // changing action bar color
        getActionBar().setBackgroundDrawable(
                new ColorDrawable(Color.parseColor("#1b1b1b")));

        // Creating volley request obj
        JsonArrayRequest movieReq = new JsonArrayRequest(url,
                new Response.Listener<JSONArray>() {
                    @Override
                    public void onResponse(JSONArray response) {
                        Log.d(TAG, response.toString());
                        hidePDialog();

                        // Parsing json
                        for (int i = 0; i < response.length(); i++) {
                            try {

                                JSONObject obj = response.getJSONObject(i);
                                Movie movie = new Movie();
                                movie.setTitle(obj.getString("title"));
                                movie.setThumbnailUrl(obj.getString("image"));
                                movie.setRating(((Number) obj.get("rating"))
                                        .doubleValue());
                                movie.setYear(obj.getInt("releaseYear"));

                                // Genre is json array
                                JSONArray genreArry = obj.getJSONArray("genre");
                                ArrayList<String> genre = new ArrayList<String>();
                                for (int j = 0; j < genreArry.length(); j++) {
                                    genre.add((String) genreArry.get(j));
                                }
                                movie.setGenre(genre);

                                // adding movie to movies array
                                movieList.add(movie);

                            } catch (JSONException e) {
                                e.printStackTrace();
                            }

                        }

                        // notifying list adapter about data changes
                        // so that it renders the list view with updated data
                        adapter.notifyDataSetChanged();
                    }
                }, new Response.ErrorListener() {
                    @Override
                    public void onErrorResponse(VolleyError error) {
                        VolleyLog.d(TAG, "Error: " + error.getMessage());
                        hidePDialog();

                    }
                });

        // Adding request to request queue
        AppController.getInstance().addToRequestQueue(movieReq);
    }

    @Override
    public void onDestroy() {
        super.onDestroy();
        hidePDialog();
    }

    private void hidePDialog() {
        if (pDialog != null) {
            pDialog.dismiss();
            pDialog = null;
        }
    }

    @Override
    public boolean onCreateOptionsMenu(Menu menu) {
        // Inflate the menu; this adds items to the action bar if it is present.
        getMenuInflater().inflate(R.menu.main, menu);
        return true;
    }

}
下面运行程序即可
友情提示:
1.作者在写这篇博文时仍然使用的是Eclipse,使用Android Studio的读者要学会导入Volley作为本地库。
2.如果在调用getActionBar() 方法时出现空指针异常,改成getSupportActionBar() 即可。
3.建议读者阅读Volley源码解析


 2876
2876

 被折叠的 条评论
为什么被折叠?
被折叠的 条评论
为什么被折叠?
 到【灌水乐园】发言


