


插件化
这一篇主要是个人对插件化涉及到的一些基础知识的理解,内容都比较简单:
包括以下内容:
目录:
1、类加载机制
2、Binder机制
3、APP、四大组件的启动流程
4、APK安装过程
5、资源的加载过程
6、Hook机制
7、OOP
8、面向切面编程
9、代理模式
10、插件化框架
插件化的发展已经越来越成熟,Android 9.0 之后的 @hide API 对一些插件化的做法也有越来越大的限制,当然也有人找出了一些解决的方法,
比如这篇:https://juejin.im/post/5acf3be5f265da23a40534f4
总体来说,了解一下插件化也是挺不错的,了解过程中可以对其它方面代码顺带了解下:
要查看 Android 源码的话,比较好是有一份编译好的源码,导入到android studio 里面,ubuntu、window都可以查看,主要是需要有 android.ipr 文件,这里在android studio 调试的是 android-6.0.1_r72 的源码,文中一些也有 5.0 的代码 ~~~,或者 在 http://androidxref.com/ 以及 https://www.androidos.net.cn/ 也可以查看,或者谷歌的 AOSP里面也可以查看,AOSP 目前有8.1的版本,AndroidXRef 最新只到了8.0
1、类加载机制:
Module First : java 虚拟机的类加载机制
类加载机制是老生常谈的了,很多大神都写了非常优秀的文章,小虾米这里简单再捋一遍,当作一个记录,
那么,首先记住这5个词语就好了:
加载、验证、准备、解析、初始化
然后,脑海里默默读十遍:
加载、验证、准备、解析、初始化
加载、验证、准备、解析、初始化
。。。
好了,已经掌握了,本文结束,over!
剩下的就是这5个词语展开了,加载什么呢?怎么加载?验证什么呢?怎么验证?等等问题,就像脑海里有一个xmind图一样,一点点地展开,具体可以参考 geeksforgeeks 这个网站jvm的讲解,贴个网址:
https://www.geeksforgeeks.org/jvm-works-jvm-architecture/ ,这个网站也有很多其他方面的知识,算法、c++等,或者 深入jvm这本书 的介绍。
这里简单过一下:
(1) 五个过程:
Class文件:二进制字节流
a、加载
- 通过类的全限定名来获取定义此类的二进制字节流
- 将这个字节流所代表的静态存储结构转化为方法区的运行时数据结构
- 在内存中生成一个代表这个类的java.lang.Class对象,作为方法区这个类的各种数据的访问入口。
b、验证
- 文件格式验证
- 元数据验证
- 字节码验证
- 符号引用验证。
c、准备
略。。。
d、解析
略。。。
e、初始化
略。。。
问题1:五个阶段的开始顺序是什么:
加载 -> 验证 ->准备 -> 初始化
这四个阶段“开始”的顺序是固定的,“进行”过程顺序不定,交叉混合进行
解析有时候在初始化之后再开始,这是为了支持Java的动态绑定
(2) 类加载器:
a、对于任意一个类,都需要由加载它的类加载器和这个类本身一同确立其在Java虚拟机中的唯一性,每一个类加载器,都拥有一个独立的类名称空间,也就是说,即使两个类来源于同一个Class文件,并且被同一个虚拟机加载,只要加载它们的类加载器不同,那么这两个类就必定不相等。
b、双亲委派模型:组合关系复用父加载器的代码
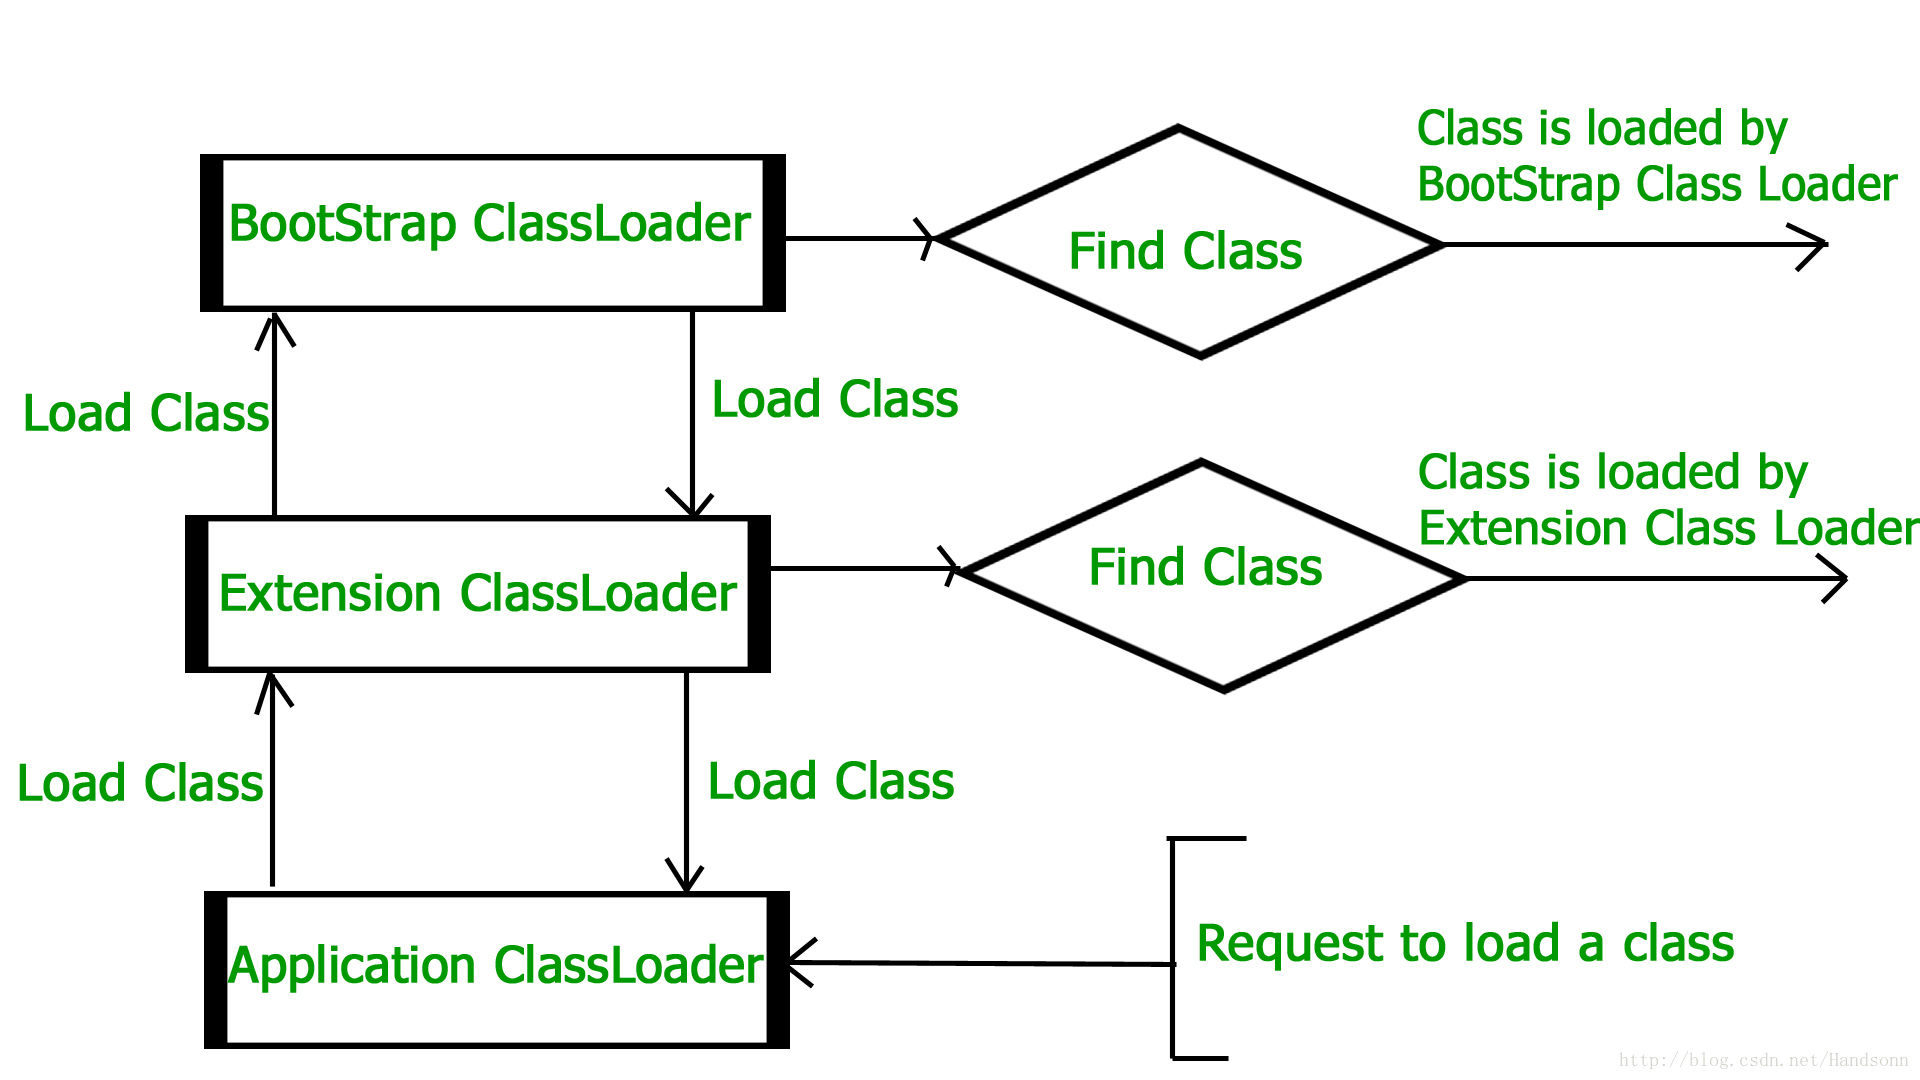
代码可以对比下 Android 的 DexClassLoader 的 findClass 过程,过程都是一样的
Module Second : android虚拟机的类加载机制
PathClassLoader
DexClassLoader
这两个类进行流程一步步调试就可以知道了,注意源码里这两个类的构造方法对应参数的解释。
ok,玩一把游戏休息下~~~~

2、Binder
首先简单了解下 Linux 的 IPC,Linux内核是超级优秀的 c 程序,常说的 fork()、pipe() 等也是这段程序里面的一个函数
Module First:linux 的 进程间通信 (IPC)
IPC是进程间通信的缩写,通常指允许用户态进程执行下列操作的一组机制:
- 通过信号量与其它进程进行同步
- 向其它进程发送消息或者从其它进程接收消息
- 和其它进程共享一段内存区
IPC数据结构是在进程请求IPC资源(信号量、消息队列或者共享内存区)时动态创建的,每个IPC资源都是持久的,除非被进程显示地释放,否则永远驻留在内存中,知道系统关闭。
linux用户态的进程之间进行同步和交换数据,有以下几种进程间通信的基本机制:
管道
管道是进程之间的一个单向数据流:一个进程写入管道的所有数据都由内核定向到另一个进程,另一个进程由此就可以从管道中读取数据
可以使用 pipe()来创建一个新的管道,这个系统调用返回一对文件描述符,然后进程通过 fork() 把这两个描述符传递给它的子进程,由此与子进程共享管道。进程可以在 read() 系统调用中使用第一个文件描述符从管道中读取数据,同样也可以在 write() 系统调用中使用第二个文件描述符向管道中写入数据。
一个管道可以供任意个进程使用,当然,如果两个或者多个进程对同一个管道进行读写,那么这些进程必须使用文件加锁或者IPC信号量进行显示同步
管道有一个主要缺点:无法打开已经存在的管道,这就使得任意的两个进程不可能共享同一个管道,除非管道是由一个共同的祖先进程创建
FIFO(命名管道)
由于管道的缺点,引入了命名管道FIFO,FIFO是一种双向通信管道
信号量
IPC信号量和内核信号量非常类似,都是计数器,用来为多个进程共享的数据结构提供受控访问。要访问资源的进程试图把信号量的值减1,但是,内核阻塞这个进程,知道在这个信号量上的操作产生一个正值。内核给每个IPC信号量都分配了一个挂起请求对垒,用来标识正在等待数组中的一个(或多个)信号量的进程
消息
进程彼此之间可以通过IPC消息进行通信。进程产生的每条消息都被发送到一个IPC消息队列中,这个消息一直存放在队列中直到另一个进程将其读走为止。
Linux内核提供两种不同的消息版本:System V IPC 消息 和 POSIX 消息
共享内存区
最有用的IPC机制。允许两个或多个进程通过把公共数据结构放入一个共享内存区来访问它们,如果进程要访问这种存放在共享内存区的数据结构,就必须在自己的地址空间中增加一个新内存区,它将映射与这个共享内存区相关的页框,这样的页框可以很容易地由内核通过请求调页进行处理。
套接字(socket)
Module Second:Android 的 Binder
除了 Socket、匿名管道以外,传统的 IPC 如命名管道、信号量、消息队列等已经从Android中去除掉了,而在网络通信,socket很适合,在进程通信效率就不太高。并且在安全的要求上,linux 原有的通信不能很好满足。Android 需要建立一套新的IPC 机制来满足系统对通信方式,传输性能和安全性的要求,这就是Binder。
关于 Binder 的 种种,
推荐一篇非常牛的文章:https://blog.csdn.net/universus/article/details/6211589 ,讲得非常详细。
a、这里是AIDL的一点基本理解:
https://blog.csdn.net/handsonn/article/details/51508951
b、 接下来梳理一下 binder 的应用层
用 Android Studio 建立一个默认的AIDL文件,编译成功之后生成了 IMyAidlInterface.java,进入这个类查看,查看一下文件格式:
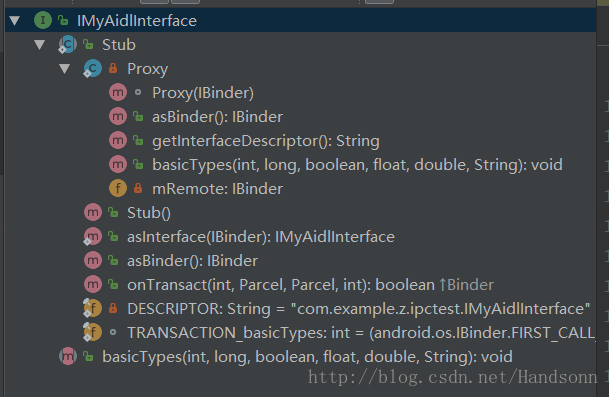
可以看到,IMyAidlInterface 有一个内部类 Stub,Stub 也有一个内部类 Proxy
首先关注这里:
queryLocalInterface(String params) 方法:
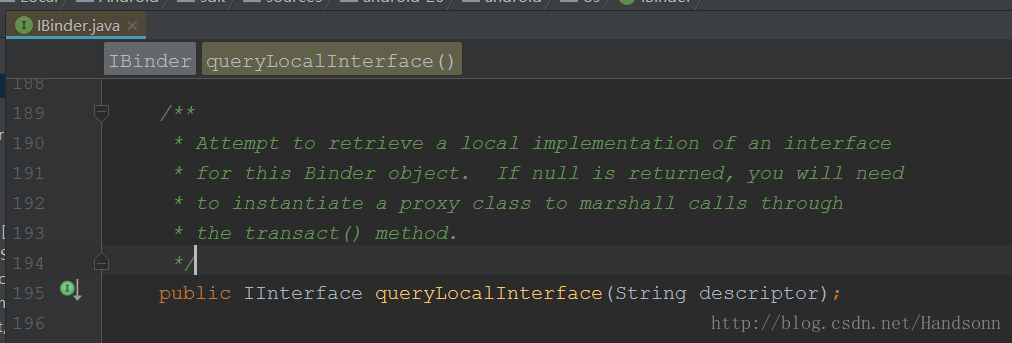
方法的参数是一个类的全限定类名,可用于唯一标识,这个方法相当于解释了 返回 null 和 不返回 null 的区别,首先尝试检索接口的本地实现,返回 null 会 走Stub 的代理 类Proxy 里面的 transact 方法,否则不执行
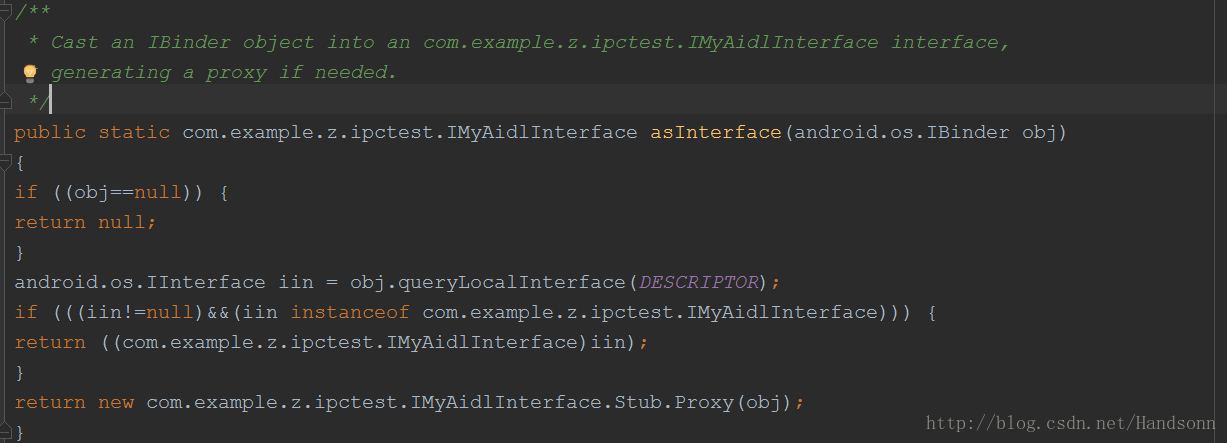
asInterface 方法:
通过 queryLocalInterface 来确定是否要执行 Proxy
接下来看下 Proxy:
private static class Proxy implements com.example.z.ipctest.IMyAidlInterface
{
private android.os.IBinder mRemote;
Proxy(android.os.IBinder remote)
{
mRemote = remote;
}
@Override public android.os.IBinder asBinder()
{
return mRemote;
}
public java.lang.String getInterfaceDescriptor()
{
return DESCRIPTOR;
}
/**
     * Demonstrates some basic types that you can use as parameters
     * and return values in AIDL.
     */
@Override public void basicTypes(int anInt, long aLong, boolean aBoolean, float aFloat, double aDouble, java.lang.String aString) throws android.os.RemoteException
{
android.os.Parcel _data = android.os.Parcel.obtain();
android.os.Parcel _reply = android.os.Parcel.obtain();
try {
_data.writeInterfaceToken(DESCRIPTOR);
_data.writeInt(anInt);
_data.writeLong(aLong);
_data.writeInt(((aBoolean)?(1):(0)));
_data.writeFloat(aFloat);
_data.writeDouble(aDouble);
_data.writeString(aString);
mRemote.transact(Stub.TRANSACTION_basicTypes, _data, _reply, 0);
_reply.readException();
}
finally {
_reply.recycle();
_data.recycle();
}
}
}
Proxy 是 Stub 的内部类,asBinder 返回一个 Binder 对象,getInterfaceDescriptor 返回唯一标识,basicTypes 在写入参数之后执行 mRemote.transact,这个是发生在对应进程的事务线程池中,并且是同步的。执行之后,该线程被挂起直到回调回来再继续执行,后面可以看下IBinder.java 的解释。
读一下 IBinder.java
这个类看一下挺好的,读这个类实际主要是读它的注释,整个类的代码实际也不多:
package android.os;

import java.io.FileDescriptor;

/**
 * Base interface for a remotable object, the core part of a lightweight
 * remote procedure call mechanism designed for high performance when
 * performing in-process and cross-process calls.  This
 * interface describes the abstract protocol for interacting with a
 * remotable object.  Do not implement this interface directly, instead
 * extend from {@link Binder}.
 *
 * <p>The key IBinder API is {@link #transact transact()} matched by
 * {@link Binder#onTransact Binder.onTransact()}.  These
 * methods allow you to send a call to an IBinder object and receive a
 * call coming in to a Binder object, respectively.  This transaction API
 * is synchronous, such that a call to {@link #transact transact()} does not
 * return until the target has returned from
 * {@link Binder#onTransact Binder.onTransact()}; this is the
 * expected behavior when calling an object that exists in the local
 * process, and the underlying inter-process communication (IPC) mechanism
 * ensures that these same semantics apply when going across processes.
 *
 * <p>The data sent through transact() is a {@link Parcel}, a generic buffer
 * of data that also maintains some meta-data about its contents.  The meta
 * data is used to manage IBinder object references in the buffer, so that those
 * references can be maintained as the buffer moves across processes.  This
 * mechanism ensures that when an IBinder is written into a Parcel and sent to
 * another process, if that other process sends a reference to that same IBinder
 * back to the original process, then the original process will receive the
 * same IBinder object back.  These semantics allow IBinder/Binder objects to
 * be used as a unique identity (to serve as a token or for other purposes)
 * that can be managed across processes.
 *
 * <p>The system maintains a pool of transaction threads in each process that
 * it runs in.  These threads are used to dispatch all
 * IPCs coming in from other processes.  For example, when an IPC is made from
 * process A to process B, the calling thread in A blocks in transact() as
 * it sends the transaction to process B.  The next available pool thread in
 * B receives the incoming transaction, calls Binder.onTransact() on the target
 * object, and replies with the result Parcel.  Upon receiving its result, the
 * thread in process A returns to allow its execution to continue.  In effect,
 * other processes appear to use as additional threads that you did not create
 * executing in your own process.
 *
 * <p>The Binder system also supports recursion across processes.  For example
 * if process A performs a transaction to process B, and process B while
 * handling that transaction calls transact() on an IBinder that is implemented
 * in A, then the thread in A that is currently waiting for the original
 * transaction to finish will take care of calling Binder.onTransact() on the
 * object being called by B.  This ensures that the recursion semantics when
 * calling remote binder object are the same as when calling local objects.
 *
 * <p>When working with remote objects, you often want to find out when they
 * are no longer valid.  There are three ways this can be determined:
 * <ul>
 * <li> The {@link #transact transact()} method will throw a
 * {@link RemoteException} exception if you try to call it on an IBinder
 * whose process no longer exists.
 * <li> The {@link #pingBinder()} method can be called, and will return false
 * if the remote process no longer exists.
 * <li> The {@link #linkToDeath linkToDeath()} method can be used to register
 * a {@link DeathRecipient} with the IBinder, which will be called when its
 * containing process goes away.
 * </ul>
 *
 * @see Binder
 */
public interface IBinder {
    /**
     * The first transaction code available for user commands.
     */
    int FIRST_CALL_TRANSACTION  = 0x00000001;
    /**
     * The last transaction code available for user commands.
     */
    int LAST_CALL_TRANSACTION   = 0x00ffffff;

    /**
     * IBinder protocol transaction code: pingBinder().
     */
    int PING_TRANSACTION        = ('_'<<24)|('P'<<16)|('N'<<8)|'G';

    /**
     * IBinder protocol transaction code: dump internal state.
     */
    int DUMP_TRANSACTION        = ('_'<<24)|('D'<<16)|('M'<<8)|'P';

    /**
     * IBinder protocol transaction code: execute a shell command.
     * @hide
     */
    int SHELL_COMMAND_TRANSACTION = ('_'<<24)|('C'<<16)|('M'<<8)|'D';

    /**
     * IBinder protocol transaction code: interrogate the recipient side
     * of the transaction for its canonical interface descriptor.
     */
    int INTERFACE_TRANSACTION   = ('_'<<24)|('N'<<16)|('T'<<8)|'F';

    /**
     * IBinder protocol transaction code: send a tweet to the target
     * object.  The data in the parcel is intended to be delivered to
     * a shared messaging service associated with the object; it can be
     * anything, as long as it is not more than 130 UTF-8 characters to
     * conservatively fit within common messaging services.  As part of
     * {@link Build.VERSION_CODES#HONEYCOMB_MR2}, all Binder objects are
     * expected to support this protocol for fully integrated tweeting
     * across the platform.  To support older code, the default implementation
     * logs the tweet to the main log as a simple emulation of broadcasting
     * it publicly over the Internet.
     *
     * <p>Also, upon completing the dispatch, the object must make a cup
     * of tea, return it to the caller, and exclaim "jolly good message
     * old boy!".
     */
    int TWEET_TRANSACTION   = ('_'<<24)|('T'<<16)|('W'<<8)|'T';

    /**
     * IBinder protocol transaction code: tell an app asynchronously that the
     * caller likes it.  The app is responsible for incrementing and maintaining
     * its own like counter, and may display this value to the user to indicate the
     * quality of the app.  This is an optional command that applications do not
     * need to handle, so the default implementation is to do nothing.
     *
     * <p>There is no response returned and nothing about the
     * system will be functionally affected by it, but it will improve the
     * app's self-esteem.
     */
    int LIKE_TRANSACTION   = ('_'<<24)|('L'<<16)|('I'<<8)|'K';

    /** @hide */
    int SYSPROPS_TRANSACTION = ('_'<<24)|('S'<<16)|('P'<<8)|'R';

    /**
     * Flag to {@link #transact}: this is a one-way call, meaning that the
     * caller returns immediately, without waiting for a result from the
     * callee. Applies only if the caller and callee are in different
     * processes.
     */
    int FLAG_ONEWAY             = 0x00000001;

    /**
     * Limit that should be placed on IPC sizes to keep them safely under the
     * transaction buffer limit.
     * @hide
     */
    public static final int MAX_IPC_SIZE = 64 * 1024;

    /**
     * Get the canonical name of the interface supported by this binder.
     */
    public String getInterfaceDescriptor() throws RemoteException;

    /**
     * Check to see if the object still exists.
     *
     * @return Returns false if the
     * hosting process is gone, otherwise the result (always by default
     * true) returned by the pingBinder() implementation on the other
     * side.
     */
    public boolean pingBinder();

    /**
     * Check to see if the process that the binder is in is still alive.
     *
     * @return false if the process is not alive.  Note that if it returns
     * true, the process may have died while the call is returning.
     */
    public boolean isBinderAlive();

    /**
     * Attempt to retrieve a local implementation of an interface
     * for this Binder object.  If null is returned, you will need
     * to instantiate a proxy class to marshall calls through
     * the transact() method.
     */
    public IInterface queryLocalInterface(String descriptor);

    /**
     * Print the object's state into the given stream.
     *
     * @param fd The raw file descriptor that the dump is being sent to.
     * @param args additional arguments to the dump request.
     */
    public void dump(FileDescriptor fd, String[] args) throws RemoteException;

    /**
     * Like {@link #dump(FileDescriptor, String[])} but always executes
     * asynchronously.  If the object is local, a new thread is created
     * to perform the dump.
     *
     * @param fd The raw file descriptor that the dump is being sent to.
     * @param args additional arguments to the dump request.
     */
    public void dumpAsync(FileDescriptor fd, String[] args) throws RemoteException;

    /**
     * Execute a shell command on this object.  This may be performed asynchrously from the caller;
     * the implementation must always call resultReceiver when finished.
     *
     * @param in The raw file descriptor that an input data stream can be read from.
     * @param out The raw file descriptor that normal command messages should be written to.
     * @param err The raw file descriptor that command error messages should be written to.
     * @param args Command-line arguments.
     * @param shellCallback Optional callback to the caller's shell to perform operations in it.
     * @param resultReceiver Called when the command has finished executing, with the result code.
     * @hide
     */
    public void shellCommand(FileDescriptor in, FileDescriptor out, FileDescriptor err,
            String[] args, ShellCallback shellCallback,
            ResultReceiver resultReceiver) throws RemoteException;

    /**
     * Perform a generic operation with the object.
     *
     * @param code The action to perform.  This should
     * be a number between {@link #FIRST_CALL_TRANSACTION} and
     * {@link #LAST_CALL_TRANSACTION}.
     * @param data Marshalled data to send to the target.  Must not be null.
     * If you are not sending any data, you must create an empty Parcel
     * that is given here.
     * @param reply Marshalled data to be received from the target.  May be
     * null if you are not interested in the return value.
     * @param flags Additional operation flags.  Either 0 for a normal
     * RPC, or {@link #FLAG_ONEWAY} for a one-way RPC.
     */
    public boolean transact(int code, Parcel data, Parcel reply, int flags)
        throws RemoteException;

    /**
     * Interface for receiving a callback when the process hosting an IBinder
     * has gone away.
     *
     * @see #linkToDeath
     */
    public interface DeathRecipient {
        public void binderDied();
    }

    /**
     * Register the recipient for a notification if this binder
     * goes away.  If this binder object unexpectedly goes away
     * (typically because its hosting process has been killed),
     * then the given {@link DeathRecipient}'s
     * {@link DeathRecipient#binderDied DeathRecipient.binderDied()} method
     * will be called.
     *
     * <p>You will only receive death notifications for remote binders,
     * as local binders by definition can't die without you dying as well.
     *
     * @throws RemoteException if the target IBinder's
     * process has already died.
     *
     * @see #unlinkToDeath
     */
    public void linkToDeath(DeathRecipient recipient, int flags)
            throws RemoteException;

    /**
     * Remove a previously registered death notification.
     * The recipient will no longer be called if this object
     * dies.
     *
     * @return {@code true} if the <var>recipient</var> is successfully
     * unlinked, assuring you that its
     * {@link DeathRecipient#binderDied DeathRecipient.binderDied()} method
     * will not be called;  {@code false} if the target IBinder has already
     * died, meaning the method has been (or soon will be) called.
     *
     * @throws java.util.NoSuchElementException if the given
     * <var>recipient</var> has not been registered with the IBinder, and
     * the IBinder is still alive.  Note that if the <var>recipient</var>
     * was never registered, but the IBinder has already died, then this
     * exception will <em>not</em> be thrown, and you will receive a false
     * return value instead.
     */
    public boolean unlinkToDeath(DeathRecipient recipient, int flags);
}
首先,通过阅读整个类头的注释,可以获取一些信息:
1) IBinder 的关键是 匹配 transact() 和 onTransact() 方法,可以通过这些方法分别发送一个IBinder对象并接收一个Binder对象,并且是同步的。
2)系统在每个进程中维护一个事务线程池,这些线程用于分派所有来自其他进程的IPC。例如:
从 进程 A 到 进程 B,
I、A块中开启一个线程,执行 transact() 并发送一些事务 transaction 给 B
II 、此时 B中下一个可用的线程池接收到 A 发送过来的事务,通过目标对象回调用 Binder.onTransact() 方法,并返回结果给 A
III、A 直到收到结果反馈,该线程才可以继续执行,从而也说明了同步执行。
3) Binder系统还支持跨进程的递归
4)使用远程对象时,通过以下三个方法可以确认不再有效:
I、transact() : 如果在IBinder上调用它,则会发生 RemoteException 异常,说明其进程不再存在。
II、pingBinder() : 返回一个布尔值,如果远程进程不再存在则返回 false。
III、linkToDeath() :通过 DeathRecipient 注册一个死亡代理,当远程进程消失的时候里面的方法会被回调。
其次,除了 queryLocalInterface() 这个类提供了一些方法,通过方法名也可以看出具体作用,具体也可以看方法的注释:
public boolean isBinderAlive();public boolean transact(int code, Parcel data, Parcel reply, int flags) throws RemoteException;public void linkToDeath(DeathRecipient recipient, int flags) throws RemoteException;public boolean unlinkToDeath(DeathRecipient recipient, int flags);c、上面是 binder 应用层的简单梳理,稍微看下 c++ 的binder,这里是 Android 5.0 的
/frameworks/native/libs/binder/IServiceManager.cpp , 截取一段 onTransact 的:
status_t BnServiceManager::onTransact(
    uint32_t code, const Parcel& data, Parcel* reply, uint32_t flags)
{
    //printf("ServiceManager received: "); data.print();
    switch(code) {
        case GET_SERVICE_TRANSACTION: {
            CHECK_INTERFACE(IServiceManager, data, reply);
            String16 which = data.readString16();
            sp<IBinder> b = const_cast<BnServiceManager*>(this)->getService(which);
            reply->writeStrongBinder(b);
            return NO_ERROR;
        } break;
        case CHECK_SERVICE_TRANSACTION: {
            CHECK_INTERFACE(IServiceManager, data, reply);
            String16 which = data.readString16();
            sp<IBinder> b = const_cast<BnServiceManager*>(this)->checkService(which);
            reply->writeStrongBinder(b);
            return NO_ERROR;
        } break;
       default:
            return BBinder::onTransact(code, data, reply, flags);
    }
}
再看下 /frameworks/native/libs/binder/BpBinder.cpp,BpBinder 是 IBinder 的子类
这里还要注意另外的一个 BBinder,这个类和 BpBinder 都是 IBinder 的子类,类的内容初看也是一模一样,不同的是,BBinder 有 onTransact() 方法,但 BpBindr 没有,。。。
c++ 的binder 先暂时到这里,可以看到,c++ 和 Java 使用Binder服务方式基本一样,函数的接口类型都相同。
ok,玩一把游戏休息下~~~~
3、APP、四大组件的启动流程
四大组件的工作流程梳理之前,有几个概念可以先了解下,基本上在调试四大组件启动过程都会看到这些方法或者这些类里面的方法的调用:
1、ContextWrappr.java 和 ContextImpl.java 这两个类的关系
这两个类都是Context的子类,从名字上可以看出,ContextWraper 是Context的包装类,实际上也是如此,并且实际执行中,ContextWrapper 会通过 attachBaseContext 先实例化一个 ContextImpl 的对象 mBase,并持有这个 mBase,并通过这个 mBase 进行一系列实际的操作。
2、ActivityManagerNative.getDefault():

看下 gDefault:

可以看到,Singleton 是一个单例类,而对于四大组件的启动过程,在启动过程中最终都会调用到 ActivityManagerNative.getDefault() 里面对应的启动方法。

3、ContextImpl 的 startActivity 、ContextWrapper 的 startActivity 以及 Activity 的 startActivity 关系
4、LoadedApk.java、PackageManagerService.java、ActivityThread.java、ActivityManagerService.java
LoadedApk 包含了应用的一系列信息:
public final class LoadedApk {
    ...
    private static final String TAG = "LoadedApk";

    private final ActivityThread mActivityThread;
    private ApplicationInfo mApplicationInfo;
    final String mPackageName;
    private final String mAppDir;
    private final String mResDir;
    private final String[] mSplitAppDirs;
    private final String[] mSplitResDirs;
    private final String[] mOverlayDirs;
    private final String[] mSharedLibraries;
    private final String mDataDir;
    private final String mLibDir;
    private final File mDataDirFile;
    private final ClassLoader mBaseClassLoader;
    private final boolean mSecurityViolation;
    private final boolean mIncludeCode;
    private final boolean mRegisterPackage;
    private final DisplayAdjustments mDisplayAdjustments = new DisplayAdjustments();
    Resources mResources;
    private ClassLoader mClassLoader;
    private Application mApplication;

    ...
}
PackageManagerService 可用于组件安装时候的注册:
/**
 * Keep track of all those .apks everywhere.
 *
 * This is very central to the platform's security; please run the unit
 * tests whenever making modifications here:
 */
 public class PackageManagerService extends IPackageManager.Stub {
 }
而关于 ActivityManagerService,是Binder的实现类,组件的启动最后需要经过 ActivityManagerService 里面的对应方法处理调度。
ActivityThread.java 用于管理主线程的执行,管理 activities、broadcasts 以及其它在 atcivityThread 的操作
5、ProcessRecord.java 的各种 Record,用于记录对应的组件:
...

// all activities running in the process
final ArrayList<ActivityRecord> activities = new ArrayList<>();
// all ServiceRecord running in this process
final ArraySet<ServiceRecord> services = new ArraySet<>();
// services that are currently executing code (need to remain foreground).
final ArraySet<ServiceRecord> executingServices = new ArraySet<>();
// All ConnectionRecord this process holds
final ArraySet<ConnectionRecord> connections = new ArraySet<>();
// all IIntentReceivers that are registered from this process.
final ArraySet<ReceiverList> receivers = new ArraySet<>();
// class (String) -> ContentProviderRecord
final ArrayMap<String, ContentProviderRecord> pubProviders = new ArrayMap<>();
// All ContentProviderRecord process is using
final ArrayList<ContentProviderConnection> conProviders = new ArrayList<>();

...
那么开始瞧一瞧:

Part 1 : Activity启动流程
1、涉及到的类和方法
2、流程
3、看下代码
4、总结
1、涉及到的类和方法:
涉及到的类不多,只要跟着源码一步步跟进,很快的最后可以理清楚脉络:
- Activity.java
- startActivity
- startActivityForResult
- performCreate
- Context.java
- startActivity
- Instrumentation.java
- execStartActivity
- callActivityOnCreate
- ActivityManagerNative.java
- ActivityManagerService.java
- startActivity
- startActivityAsUser
- ActivityStackSupervisor.java
- startActivityMayWait
- startActivityLocked
- startActivityUncheckedLocked
- startSpecificActivityLocked
- realStartActivityLocked
- ActivityStack.java
- resumeTopActivityLocked
- resumeTopActivityInnerLocked
- startSpecificActivityLocked
- realStartActivityLocked
- IApplicationThread.java
- ApplicationThreadNative.java
- scheduleLaunchActivity
- handleLaunchActivity
- performLaunchActivity
2、流程:
用 visio 画了下流程图

3、看下代码:
首先在 Context.java 中,有 startActivity 方法

这是一个抽象方法,需要看具体实现
选中该方法,然后在 Android Studio 中 按 Ctrl + Alt + Shift + F7,出现如下,勾选 implementing methods

接下来可以看到具体实现:

可以看到重载了 startActivity 方法,继续跟进,代码如下:
/**
 * Launch a new activity.  You will not receive any information about when
 * the activity exits.  This implementation overrides the base version,
 * providing information about
 * the activity performing the launch.  Because of this additional
 * information, the {@link Intent#FLAG_ACTIVITY_NEW_TASK} launch flag is not
 * required; if not specified, the new activity will be added to the
 * task of the caller.
 *
 * <p>This method throws {@link android.content.ActivityNotFoundException}
 * if there was no Activity found to run the given Intent.
 *
 * @param intent The intent to start.
 * @param options Additional options for how the Activity should be started.
 * See {@link android.content.Context#startActivity(Intent, Bundle)
 * Context.startActivity(Intent, Bundle)} for more details.
 *
 * @throws android.content.ActivityNotFoundException
 *
 * @see {@link #startActivity(Intent)}
 * @see #startActivityForResult
 */
@Override
public void startActivity(Intent intent, @Nullable Bundle options) {
    if (options != null) {
        startActivityForResult(intent, -1, options);
    } else {
        // Note we want to go through this call for compatibility with
        // applications that may have overridden the method.
        startActivityForResult(intent, -1);
    }
}
稍微看下英文注释,意思就是如果是默认的activity启动,那么新的activity将会被添加到调用的栈,除非用了 FLAG_ACTIVITY_NEW_TASK 这个标志。可以看到,最后都会调用 startActivityForResult,并且传入的 requestCode 都是 -1,那么看下startActivityForResult:
/**
 * Launch an activity for which you would like a result when it finished.
 * When this activity exits, your
 * onActivityResult() method will be called with the given requestCode.
 * Using a negative requestCode is the same as calling
 * {@link #startActivity} (the activity is not launched as a sub-activity).
 *
 * <p>Note that this method should only be used with Intent protocols
 * that are defined to return a result.  In other protocols (such as
 * {@link Intent#ACTION_MAIN} or {@link Intent#ACTION_VIEW}), you may
 * not get the result when you expect.  For example, if the activity you
 * are launching uses the singleTask launch mode, it will not run in your
 * task and thus you will immediately receive a cancel result.
 *
 * <p>As a special case, if you call startActivityForResult() with a requestCode
 * >= 0 during the initial onCreate(Bundle savedInstanceState)/onResume() of your
 * activity, then your window will not be displayed until a result is
 * returned back from the started activity.  This is to avoid visible
 * flickering when redirecting to another activity.
 *
 * <p>This method throws {@link android.content.ActivityNotFoundException}
 * if there was no Activity found to run the given Intent.
 *
 * @param intent The intent to start.
 * @param requestCode If >= 0, this code will be returned in
 *                    onActivityResult() when the activity exits.
 * @param options Additional options for how the Activity should be started.
 * See {@link android.content.Context#startActivity(Intent, Bundle)
 * Context.startActivity(Intent, Bundle)} for more details.
 *
 * @throws android.content.ActivityNotFoundException
 *
 * @see #startActivity
 */
public void startActivityForResult(Intent intent, int requestCode, @Nullable Bundle options) {
    if (mParent == null) {
        Instrumentation.ActivityResult ar =
            mInstrumentation.execStartActivity(
                this, mMainThread.getApplicationThread(), mToken, this,
                intent, requestCode, options);
        if (ar != null) {
            mMainThread.sendActivityResult(
                mToken, mEmbeddedID, requestCode, ar.getResultCode(),
                ar.getResultData());
        }
        if (requestCode >= 0) {
            // If this start is requesting a result, we can avoid making
            // the activity visible until the result is received.  Setting
            // this code during onCreate(Bundle savedInstanceState) or onResume() will keep the
            // activity hidden during this time, to avoid flickering.
            // This can only be done when a result is requested because
            // that guarantees we will get information back when the
            // activity is finished, no matter what happens to it.
            mStartedActivity = true;
        }

        cancelInputsAndStartExitTransition(options);
        // TODO Consider clearing/flushing other event sources and events for child windows.
    } else {
        if (options != null) {
            mParent.startActivityFromChild(this, intent, requestCode, options);
        } else {
            // Note we want to go through this method for compatibility with
            // existing applications that may have overridden it.
            mParent.startActivityFromChild(this, intent, requestCode);
        }
    }
}
startActivityForResult 的代码不多,注意方法前面注释第二段的 Note that this method should only be used with Intent protocols hat are defined to return a result. 以及第三段的 This is to avoid visible flickering when redirecting to another activity.
上面的代码中,mMainThread 在 方法 attach 中被赋值,
final void attach(Context context, ActivityThread aThread,
        Instrumentation instr, IBinder token, int ident,
        Application application, Intent intent, ActivityInfo info,
        CharSequence title, Activity parent, String id,
        NonConfigurationInstances lastNonConfigurationInstances,
        Configuration config, String referrer, IVoiceInteractor voiceInteractor) {
    attachBaseContext(context);
    ...
    mUiThread = Thread.currentThread();
    mMainThread = aThread;
}
接着看下 mParent == null 这个条件里面的语句,主要看 mInstrumentation.execStartActivity ,mInstrumentation 是一个 Instrumentation 对象,接着进入Instrumentation 这个类看下:
/**
* Execute a startActivity call made by the application. The default
* implementation takes care of updating any active {@link ActivityMonitor}
* objects and dispatches this call to the system activity manager; you can
* override this to watch for the application to start an activity, and
* modify what happens when it does.
*
* <p>This method returns an {@link ActivityResult} object, which you can
* use when intercepting application calls to avoid performing the start
* activity action but still return the result the application is
* expecting. To do this, override this method to catch the call to start
* activity so that it returns a new ActivityResult containing the results
* you would like the application to see, and don't call up to the super
* class. Note that an application is only expecting a result if
* <var>requestCode</var> is >= 0.
*
* <p>This method throws {@link android.content.ActivityNotFoundException}
* if there was no Activity found to run the given Intent.
*
* @param who The Context from which the activity is being started.
* @param contextThread The main thread of the Context from which the activity
* is being started.
* @param token Internal token identifying to the system who is starting
* the activity; may be null.
* @param target Which activity is performing the start (and thus receiving
* any result); may be null if this call is not being made
* from an activity.
* @param intent The actual Intent to start.
* @param requestCode Identifier for this request's result; less than zero
* if the caller is not expecting a result.
* @param options Addition options.
*
* @return To force the return of a particular result, return an
* ActivityResult object containing the desired data; otherwise
* return null. The default implementation always returns null.
*
* @throws android.content.ActivityNotFoundException
*
* @see Activity#startActivity(Intent)
* @see Activity#startActivityForResult(Intent, int)
* @see Activity#startActivityFromChild
*
* {@hide}
*/
public ActivityResult execStartActivity(
Context who, IBinder contextThread, IBinder token, Activity target,
Intent intent, int requestCode, Bundle options) {
IApplicationThread whoThread = (IApplicationThread) contextThread;
Uri referrer = target != null ? target.onProvideReferrer() : null;
if (referrer != null) {
intent.putExtra(Intent.EXTRA_REFERRER, referrer);
}
if (mActivityMonitors != null) {
synchronized (mSync) {
final int N = mActivityMonitors.size();
for (int i=0; i<N; i++) {
final ActivityMonitor am = mActivityMonitors.get(i);
if (am.match(who, null, intent)) {
am.mHits++;
if (am.isBlocking()) {
return requestCode >= 0 ? am.getResult() : null;
}
break;
}
}
}
}
try {
intent.migrateExtraStreamToClipData();
intent.prepareToLeaveProcess();
int result = ActivityManagerNative.getDefault()
.startActivity(whoThread, who.getBasePackageName(), intent,
intent.resolveTypeIfNeeded(who.getContentResolver()),
token, target != null ? target.mEmbeddedID : null,
requestCode, 0, null, options);
checkStartActivityResult(result, intent);
} catch (RemoteException e) {
throw new RuntimeException("Failure from system", e);
}
return null;
}
顺着代码一行行走,可以看到,最后走到的是 ActivityManagerNative.getDefault().startActivity(),并且返回值还会经过一次 checkStartActivityResult,ActivityManagerNative.getDefault() 如下:
static public IActivityManager getDefault() {
    return gDefault.get();
}
// gDefault
private static final Singleton<IActivityManager> gDefault = new Singleton<IActivityManager>() {
        protected IActivityManager create() {
            IBinder b = ServiceManager.getService("activity");
            IActivityManager am = asInterface(b);
            return am;
        }
    };
//get
public abstract class Singleton<T> {
    private T mInstance;
    protected abstract T create();
    public final T get() {
        synchronized (this) {
            if (mInstance == null) {
                mInstance = create();
            }
            return mInstance;
        }
    }
}
这是一个单例模式的运用,返回的是一个 IActivityManager 对象,并且可以看到 gDefault 的 Singleton 泛型参数传入的是 IActivityManager,看下 ActivityManagerNative 的声明定义:
public abstract class ActivityManagerNative extends Binder implements IActivityManager
{}
ActivityManagerNative 继承了 Binder 并且实现了 IActivityManager,这是一个抽象类,android studio 快捷键ctrl + H 查看下 ActivityManagerNative 的具体实现类:

可以看到 ActivityManagerNative 的唯一实现类是 ActivityManagerService,ActivityManagerService也是一个Binder,接下来又到了 ActivityManagerService 的 startActivity:
@Override
public final int startActivity(IApplicationThread caller, String callingPackage,
        Intent intent, String resolvedType, IBinder resultTo, String resultWho, int requestCode,
        int startFlags, ProfilerInfo profilerInfo, Bundle options) {
    return startActivityAsUser(caller, callingPackage, intent, resolvedType, resultTo,
        resultWho, requestCode, startFlags, profilerInfo, options,
        UserHandle.getCallingUserId());
}
里面又调用到了 startActivityAsUser
@Override
public final int startActivityAsUser(IApplicationThread caller, String callingPackage,
        Intent intent, String resolvedType, IBinder resultTo, String resultWho, int requestCode,
        int startFlags, ProfilerInfo profilerInfo, Bundle options, int userId) {
    enforceNotIsolatedCaller("startActivity");
    userId = handleIncomingUser(Binder.getCallingPid(), Binder.getCallingUid(), userId,
            false, ALLOW_FULL_ONLY, "startActivity", null);
    // TODO: Switch to user app stacks here.
    return mStackSupervisor.startActivityMayWait(caller, -1, callingPackage, intent,
            resolvedType, null, null, resultTo, resultWho, requestCode, startFlags,
            profilerInfo, null, null, options, false, userId, null, null);
}
这里又跳转到了 startActivityMayWait,可以看到注释,switch to user app stacks here,mStackSupervisor 是 ActivityStackSupervisor 对象,声明和注释如下:Run all ActivityStacks through this
/** Run all ActivityStacks through this */
ActivityStackSupervisor mStackSupervisor;
也就是说,startActivityMayWait 在类 ActivityStackSupervisor 里面,startActivityMayWait 方法有点长:
final int startActivityMayWait(IApplicationThread caller, int callingUid,
        String callingPackage, Intent intent, String resolvedType,
        IVoiceInteractionSession voiceSession, IVoiceInteractor voiceInteractor,
        IBinder resultTo, String resultWho, int requestCode, int startFlags,
        ProfilerInfo profilerInfo, WaitResult outResult, Configuration config,
        Bundle options, boolean ignoreTargetSecurity, int userId,
        IActivityContainer iContainer, TaskRecord inTask) {
    // Refuse possible leaked file descriptors
       // ... 前面省略
        int res = startActivityLocked(caller, intent, resolvedType, aInfo,
                voiceSession, voiceInteractor, resultTo, resultWho,
                requestCode, callingPid, callingUid, callingPackage,
                realCallingPid, realCallingUid, startFlags, options, ignoreTargetSecurity,
                componentSpecified, null, container, inTask);

        Binder.restoreCallingIdentity(origId);

       // ... 后面省略
        return res;
}
startActivityMayWait 里面又调用了 startActivityLocked,方法也是很长:
final int startActivityLocked(IApplicationThread caller,
        Intent intent, String resolvedType, ActivityInfo aInfo,
        IVoiceInteractionSession voiceSession, IVoiceInteractor voiceInteractor,
        IBinder resultTo, String resultWho, int requestCode,
        int callingPid, int callingUid, String callingPackage,
        int realCallingPid, int realCallingUid, int startFlags, Bundle options,
        boolean ignoreTargetSecurity, boolean componentSpecified, ActivityRecord[] outActivity,
        ActivityContainer container, TaskRecord inTask) {
    int err = ActivityManager.START_SUCCESS;
    // ... 省略
    err = startActivityUncheckedLocked(r, sourceRecord, voiceSession, voiceInteractor,
            startFlags, true, options, inTask);
    // ... 省略
    return err;
}
可以看到里面调用了 startActivityUncheckedLocked,startActivityUncheckedLocked 里面调用了 resumeTopActivityLocked,这个方法在类 ActivityStack 里面,
final boolean resumeTopActivityLocked(ActivityRecord prev, Bundle options) {
    if (mStackSupervisor.inResumeTopActivity) {
        // Don't even start recursing.
        return false;
    }

    boolean result = false;
    try {
        // Protect against recursion.
        mStackSupervisor.inResumeTopActivity = true;
        if (mService.mLockScreenShown == ActivityManagerService.LOCK_SCREEN_LEAVING) {
            mService.mLockScreenShown = ActivityManagerService.LOCK_SCREEN_HIDDEN;
            mService.updateSleepIfNeededLocked();
        }
        result = resumeTopActivityInnerLocked(prev, options);
    } finally {
        mStackSupervisor.inResumeTopActivity = false;
    }
    return result;
}
可以看到,又调用了,resumeTopActivityInnerLocked
private boolean resumeTopActivityInnerLocked(ActivityRecord prev, Bundle options) {
    // ...
    if (next.app != null && next.app.thread != null) {
        try {
            // ...
            next.app.thread.scheduleResumeActivity(next.appToken, next.app.repProcState,
                        mService.isNextTransitionForward(), resumeAnimOptions);
            // ...
        } catch (Exception e) {
            // ...
            mStackSupervisor.startSpecificActivityLocked(next, true, false);
            // ...
        }
    } else {
        // ...
        mStackSupervisor.startSpecificActivityLocked(next, true, true);
    }
    return true;
}
里面调用了 startSpecificActivityLocked 方法:
void startSpecificActivityLocked(ActivityRecord r,
        boolean andResume, boolean checkConfig) {
    if (app != null && app.thread != null) {
        try {
            realStartActivityLocked(r, app, andResume, checkConfig);
            return;
        } catch (RemoteException e) {

        }
    }
}
里面调用了 realStartActivityLocked,
final boolean realStartActivityLocked(ActivityRecord r,
        ProcessRecord app, boolean andResume, boolean checkConfig)
        throws RemoteException {
        app.forceProcessStateUpTo(mService.mTopProcessState);
        app.thread.scheduleLaunchActivity(new Intent(r.intent), r.appToken,
                System.identityHashCode(r), r.info, new Configuration(mService.mConfiguration),
                new Configuration(stack.mOverrideConfig), r.compat, r.launchedFromPackage,
                task.voiceInteractor, app.repProcState, r.icicle, r.persistentState, results,
                newIntents, !andResume, mService.isNextTransitionForward(), profilerInfo);
    return true;
}
里面掉用了 scheduleLaunchActivity,继续跟进发现 scheduleLaunchActivity 是 IApplicationThread 里面的一个方法,这里截取部分,那么需要看下 scheduleLaunchActivity 的具体实现:
public interface IApplicationThread extends IInterface {
    void schedulePauseActivity(IBinder token, boolean finished, boolean userLeaving,
            int configChanges, boolean dontReport) throws RemoteException;
    void scheduleStopActivity(IBinder token, boolean showWindow,
            int configChanges) throws RemoteException;
    void scheduleWindowVisibility(IBinder token, boolean showWindow) throws RemoteException;
    void scheduleSleeping(IBinder token, boolean sleeping) throws RemoteException;
    void scheduleResumeActivity(IBinder token, int procState, boolean isForward, Bundle resumeArgs)
            throws RemoteException;
    void scheduleSendResult(IBinder token, List<ResultInfo> results) throws RemoteException;
    void scheduleLaunchActivity(Intent intent, IBinder token, int ident,
            ActivityInfo info, Configuration curConfig, Configuration overrideConfig,
            CompatibilityInfo compatInfo, String referrer, IVoiceInteractor voiceInteractor,
            int procState, Bundle state, PersistableBundle persistentState,
            List<ResultInfo> pendingResults, List<ReferrerIntent> pendingNewIntents,
            boolean notResumed, boolean isForward, ProfilerInfo profilerInfo) throws RemoteException;
      // ...
 }
android studio 快捷键 ctrl + H,

可以看到有两个实现类,这两个类都在 ApplicationThreadNative.java 里面, 首先看下ApplicationThreadNative:
public abstract class ApplicationThreadNative extends Binder
        implements IApplicationThread {
    /**
     * Cast a Binder object into an application thread interface, generating
     * a proxy if needed.
     */
    static public IApplicationThread asInterface(IBinder obj) {
        if (obj == null) {
            return null;
        }
        IApplicationThread in =
            (IApplicationThread)obj.queryLocalInterface(descriptor);
        if (in != null) {
            return in;
        }

        return new ApplicationThreadProxy(obj);
    }

    public ApplicationThreadNative() {
        attachInterface(this, descriptor);
    }

    @Override
    public boolean onTransact(int code, Parcel data, Parcel reply, int flags)
            throws RemoteException {
    }
}
class ApplicationThreadProxy implements IApplicationThread {
    private final IBinder mRemote;

    public ApplicationThreadProxy(IBinder remote) {
        mRemote = remote;
    }

    public final IBinder asBinder() {
        return mRemote;
    }
    // ...
}
这个类很类似 AIDL 的写法,ApplicationThreadNative 是一个抽象类,那么同样快捷键看下 ApplicationThreadNative 的关系:

可以看到,实现由 ActivityThread 的内部类 ApplicationThread 来做唯一的实现,看下 ApplicationThread 里面的 scheduleLaunchActivity:
@Override
public final void scheduleLaunchActivity(Intent intent, IBinder token, int ident,
        ActivityInfo info, Configuration curConfig, Configuration overrideConfig,
        CompatibilityInfo compatInfo, String referrer, IVoiceInteractor voiceInteractor,
        int procState, Bundle state, PersistableBundle persistentState,
        List<ResultInfo> pendingResults, List<ReferrerIntent> pendingNewIntents,
        boolean notResumed, boolean isForward, ProfilerInfo profilerInfo) {

    updateProcessState(procState, false);

    ActivityClientRecord r = new ActivityClientRecord();

    r.token = token;
    r.ident = ident;
    r.intent = intent;
    r.referrer = referrer;
    r.voiceInteractor = voiceInteractor;
    r.activityInfo = info;
    r.compatInfo = compatInfo;
    r.state = state;
    r.persistentState = persistentState;

    r.pendingResults = pendingResults;
    r.pendingIntents = pendingNewIntents;

    r.startsNotResumed = notResumed;
    r.isForward = isForward;

    r.profilerInfo = profilerInfo;

    r.overrideConfig = overrideConfig;
    updatePendingConfiguration(curConfig);

    sendMessage(H.LAUNCH_ACTIVITY, r);
}
这是一个消息发送,H 继承了 Handler 跟进下 H 的 handleMessage:
public void handleMessage(Message msg) {
    if (DEBUG_MESSAGES) Slog.v(TAG, ">>> handling: " + codeToString(msg.what));
    switch (msg.what) {
        case LAUNCH_ACTIVITY: {
            Trace.traceBegin(Trace.TRACE_TAG_ACTIVITY_MANAGER, "activityStart");
            final ActivityClientRecord r = (ActivityClientRecord) msg.obj;
            r.packageInfo = getPackageInfoNoCheck(
                    r.activityInfo.applicationInfo, r.compatInfo);
            handleLaunchActivity(r, null);
        } break;
 }
继续跟进 handleLaunchActivity:
private void handleLaunchActivity(ActivityClientRecord r, Intent customIntent) {
    // If we are getting ready to gc after going to the background, well
    // we are back active so skip it.
    WindowManagerGlobal.initialize();

    Activity a = performLaunchActivity(r, customIntent);
    if (a != null) {
        r.createdConfig = new Configuration(mConfiguration);
        Bundle oldState = r.state;
        handleResumeActivity(r.token, false, r.isForward,
                !r.activity.mFinished && !r.startsNotResumed);

        if (!r.activity.mFinished && r.startsNotResumed) {
            // The activity manager actually wants this one to start out
            // paused, because it needs to be visible but isn't in the
            // foreground.  We accomplish this by going through the
            // normal startup (because activities expect to go through
            // onResume() the first time they run, before their window
            // is displayed), and then pausing it.  However, in this case
            // we do -not- need to do the full pause cycle (of freezing
            // and such) because the activity manager assumes it can just
            // retain the current state it has.
            try {
                r.activity.mCalled = false;
                mInstrumentation.callActivityOnPause(r.activity);
                // We need to keep around the original state, in case
                // we need to be created again.  But we only do this
                // for pre-Honeycomb apps, which always save their state
                // when pausing, so we can not have them save their state
                // when restarting from a paused state.  For HC and later,
                // we want to (and can) let the state be saved as the normal
                // part of stopping the activity.
                if (r.isPreHoneycomb()) {
                    r.state = oldState;
                }
                if (!r.activity.mCalled) {
                    throw new SuperNotCalledException(
                        "Activity " + r.intent.getComponent().toShortString() +
                        " did not call through to super.onPause()");
                }

            }
            r.paused = true;
        }
    } else {
        // If there was an error, for any reason, tell the activity
        // manager to stop us.
        try {
            ActivityManagerNative.getDefault()
                .finishActivity(r.token, Activity.RESULT_CANCELED, null, false);
        } catch (RemoteException ex) {
            // Ignore
        }
    }
}
接着查看下 performLaunchActivity:
private Activity performLaunchActivity(ActivityClientRecord r, Intent customIntent) {
    // ...
    try {
        Application app = r.packageInfo.makeApplication(false, mInstrumentation);

        if (localLOGV) Slog.v(TAG, "Performing launch of " + r);
        if (activity != null) {
            Context appContext = createBaseContextForActivity(r, activity);
            CharSequence title = r.activityInfo.loadLabel(appContext.getPackageManager());
            Configuration config = new Configuration(mCompatConfiguration);
            activity.attach(appContext, this, getInstrumentation(), r.token,
                    r.ident, app, r.intent, r.activityInfo, title, r.parent,
                    r.embeddedID, r.lastNonConfigurationInstances, config,
                    r.referrer, r.voiceInteractor);
            // ...
            if (r.isPersistable()) {
                mInstrumentation.callActivityOnCreate(activity, r.state, r.persistentState);
            } else {
                mInstrumentation.callActivityOnCreate(activity, r.state);
            }
    }
    return activity;
}
接着看下 callActivityOnCreate,这个方法在类 Instrumentation.java 里面:
/**
 * Perform calling of an activity's {@link Activity#onCreate}
 * method.  The default implementation simply calls through to that method.
 *
 * @param activity The activity being created.
 * @param icicle The previously frozen state (or null) to pass through to onCreate().
 */
public void callActivityOnCreate(Activity activity, Bundle icicle) {
    prePerformCreate(activity);
    activity.performCreate(icicle);
    postPerformCreate(activity);
}
接着里面执行了 activity.performCreate(),这个方法在类 Activity.java 里面:
final void performCreate(Bundle icicle) {
    restoreHasCurrentPermissionRequest(icicle);
    onCreate(icicle);
    mActivityTransitionState.readState(icicle);
    performCreateCommon();
}
哇哦,可以看到,onCreate 被回调了,接着就是常见的调用了。。。
Part 2 : Service 工作过程
1、涉及到的类和方法
2、流程
3、看下代码
4、总结
1、涉及到的类和方法:
startService 方式启动:
- Context.java
- startService
- ContextWrapper.java
- startService
- bindService
- ContextImpl.java
- startService
- ActivieServices.java
- startServiceLocked
- startServiceInnerLocked
- bringUpServiceLocked
- realStartServiceLocked
- ActivityManagerService.java
- startService
- ActivityThread.java
- scheduleCreateService
- handleCreateService
bindService 方式启动:
- ContextImpl.java
- bindService
- bindServiceCommon
- ActivityManagerService.java
- bindService
- publishService
- ActivieServices.java
- bindServiceLocked
- bringUpServiceLocked
- publishServiceLocked
- ActivityThread.java
- scheduleBindService
- handleBindService
- ConnectionRecord.java
- IServiceConnection.AIDL
- LoadedApk.java
- InnerConnection.java
- doConnected
2、流程:
3、看下代码:
service 有 startService 和 bindService,这里先从 startService 开始看起:
a、startService
和 Activity 一样,同样在 Context.java 中,可以看到 startService
/**
* Request that a given application service be started. The Intent
* should contain either contain the complete class name of a specific service
* implementation to start or a specific package name to target. If the
* Intent is less specified, it log a warning about this and which of the
* multiple matching services it finds and uses will be undefined. If this service
* is not already running, it will be instantiated and started (creating a
* process for it if needed); if it is running then it remains running.
*
* <p>Every call to this method will result in a corresponding call to
* the target service's {@link android.app.Service#onStartCommand} method,
* with the <var>intent</var> given here. This provides a convenient way
* to submit jobs to a service without having to bind and call on to its
* interface.
*
* <p>Using startService() overrides the default service lifetime that is
* managed by {@link #bindService}: it requires the service to remain
* running until {@link #stopService} is called, regardless of whether
* any clients are connected to it. Note that calls to startService()
* are not nesting: no matter how many times you call startService(),
* a single call to {@link #stopService} will stop it.
*
* <p>The system attempts to keep running services around as much as
* possible. The only time they should be stopped is if the current
* foreground application is using so many resources that the service needs
* to be killed. If any errors happen in the service's process, it will
* automatically be restarted.
*
* <p>This function will throw {@link SecurityException} if you do not
* have permission to start the given service.
*
* @param service Identifies the service to be started. The Intent must be either
* fully explicit (supplying a component name) or specify a specific package
* name it is targetted to. Additional values
* may be included in the Intent extras to supply arguments along with
* this specific start call.
*
* @return If the service is being started or is already running, the
* {@link ComponentName} of the actual service that was started is
* returned; else if the service does not exist null is returned.
*
* @throws SecurityException
*
* @see #stopService
* @see #bindService
*/
@Nullable
public abstract ComponentName startService(Intent service);上面粘贴了这么多,主要是为了看注释,
第一段:开启一个服务参数要正确匹配,如果该服务不存在则常见一个新的,如果已经在运行则继续运行
第二段:每次调用此方法,都会回调 onStartCommand
第三段:Note that calls to startService() are not nesting: no matter how many times you call startService(), a single call to {@link #stopService} will stop it.
看下具体实现在 ContextImpl.java 的 startService
@Override
public ComponentName startService(Intent service) {
    warnIfCallingFromSystemProcess();
    return startServiceCommon(service, mUser);
}

private ComponentName startServiceCommon(Intent service, UserHandle user) {
        try {
            validateServiceIntent(service);
            service.prepareToLeaveProcess();
            ComponentName cn = ActivityManagerNative.getDefault().startService(
                mMainThread.getApplicationThread(), service, service.resolveTypeIfNeeded(
                            getContentResolver()), getOpPackageName(), user.getIdentifier());
            if (cn != null) {
                if (cn.getPackageName().equals("!")) {
                    throw new SecurityException(
                            "Not allowed to start service " + service
                            + " without permission " + cn.getClassName());
                } else if (cn.getPackageName().equals("!!")) {
                    throw new SecurityException(
                            "Unable to start service " + service
                            + ": " + cn.getClassName());
                }
            }
            return cn;
        } catch (RemoteException e) {
            throw new RuntimeException("Failure from system", e);
        }
    }
可以看到,里面和 Activity 一样,都调用到了 ActivityManagerNative.getDefault() 方法,并调用其 startService 方法,ActivityManagerNative.getDefault() 是一个 ActivityManagerService 对象,其 startService 如下:
@Override
public ComponentName startService(IApplicationThread caller, Intent service,
        String resolvedType, String callingPackage, int userId)
        throws TransactionTooLargeException {
    enforceNotIsolatedCaller("startService");
    // Refuse possible leaked file descriptors
    if (service != null && service.hasFileDescriptors() == true) {
        throw new IllegalArgumentException("File descriptors passed in Intent");
    }

    if (callingPackage == null) {
        throw new IllegalArgumentException("callingPackage cannot be null");
    }

    if (DEBUG_SERVICE) Slog.v(TAG_SERVICE,
            "startService: " + service + " type=" + resolvedType);
    synchronized(this) {
        final int callingPid = Binder.getCallingPid();
        final int callingUid = Binder.getCallingUid();
        final long origId = Binder.clearCallingIdentity();
        ComponentName res = mServices.startServiceLocked(caller, service,
                resolvedType, callingPid, callingUid, callingPackage, userId);
        Binder.restoreCallingIdentity(origId);
        return res;
    }
}
里面又调用了 mServices.startServiceLocked ,mServices 是一个 ActivieServices 对象,startServiceLocked 里面调用了 startServiceInnerLocked,startServiceInnerLocked 方法 里面 又调用了 bringUpServiceLocked,bringUpServiceLocked 里面又 调用了 realStartServiceLocked,如下:
private final void realStartServiceLocked(ServiceRecord r,
        ProcessRecord app, boolean execInFg) throws RemoteException {
    if (app.thread == null) {
        throw new RemoteException();
    }
    if (DEBUG_MU)
        Slog.v(TAG_MU, "realStartServiceLocked, ServiceRecord.uid = " + r.appInfo.uid
                + ", ProcessRecord.uid = " + app.uid);
    r.app = app;
    r.restartTime = r.lastActivity = SystemClock.uptimeMillis();

    final boolean newService = app.services.add(r);
    bumpServiceExecutingLocked(r, execInFg, "create");
    mAm.updateLruProcessLocked(app, false, null);
    mAm.updateOomAdjLocked();

    boolean created = false;
    try {
        if (LOG_SERVICE_START_STOP) {
            String nameTerm;
            int lastPeriod = r.shortName.lastIndexOf('.');
            nameTerm = lastPeriod >= 0 ? r.shortName.substring(lastPeriod) : r.shortName;
            EventLogTags.writeAmCreateService(
                    r.userId, System.identityHashCode(r), nameTerm, r.app.uid, r.app.pid);
        }
        synchronized (r.stats.getBatteryStats()) {
            r.stats.startLaunchedLocked();
        }
        mAm.ensurePackageDexOpt(r.serviceInfo.packageName);
        app.forceProcessStateUpTo(ActivityManager.PROCESS_STATE_SERVICE);
        app.thread.scheduleCreateService(r, r.serviceInfo,
                mAm.compatibilityInfoForPackageLocked(r.serviceInfo.applicationInfo),
                app.repProcState);
        r.postNotification();
        created = true;
    } catch (DeadObjectException e) {
        Slog.w(TAG, "Application dead when creating service " + r);
        mAm.appDiedLocked(app);
        throw e;
    } finally {
        if (!created) {
            // Keep the executeNesting count accurate.
            final boolean inDestroying = mDestroyingServices.contains(r);
            serviceDoneExecutingLocked(r, inDestroying, inDestroying);

            // Cleanup.
            if (newService) {
                app.services.remove(r);
                r.app = null;
            }

            // Retry.
            if (!inDestroying) {
                scheduleServiceRestartLocked(r, false);
            }
        }
    }

    requestServiceBindingsLocked(r, execInFg);

    updateServiceClientActivitiesLocked(app, null, true);

    // If the service is in the started state, and there are no
    // pending arguments, then fake up one so its onStartCommand() will
    // be called.
    if (r.startRequested && r.callStart && r.pendingStarts.size() == 0) {
        r.pendingStarts.add(new ServiceRecord.StartItem(r, false, r.makeNextStartId(),
                null, null));
    }

    sendServiceArgsLocked(r, execInFg, true);

    if (r.delayed) {
        if (DEBUG_DELAYED_STARTS) Slog.v(TAG_SERVICE, "REM FR DELAY LIST (new proc): " + r);
        getServiceMap(r.userId).mDelayedStartList.remove(r);
        r.delayed = false;
    }

    if (r.delayedStop) {
        // Oh and hey we've already been asked to stop!
        r.delayedStop = false;
        if (r.startRequested) {
            if (DEBUG_DELAYED_STARTS) Slog.v(TAG_SERVICE,
                    "Applying delayed stop (from start): " + r);
            stopServiceLocked(r);
        }
    }
}
realStartServiceLocked 里面调用 scheduleCreateService 方法,这个方法在 ActivityThread.java 里面
public final void scheduleCreateService(IBinder token,
        ServiceInfo info, CompatibilityInfo compatInfo, int processState) {
    updateProcessState(processState, false);
    CreateServiceData s = new CreateServiceData();
    s.token = token;
    s.info = info;
    s.compatInfo = compatInfo;

    sendMessage(H.CREATE_SERVICE, s);
}
和 Activity 一样,通过 sendMessage 来发送一个消息,在 H 的handleMessage 里面,调用了 handleCreateService:
case CREATE_SERVICE:
    Trace.traceBegin(Trace.TRACE_TAG_ACTIVITY_MANAGER, "serviceCreate");
    handleCreateService((CreateServiceData)msg.obj);
    Trace.traceEnd(Trace.TRACE_TAG_ACTIVITY_MANAGER);
    break;
在 handleCreateService 里面回调了 Service 的onCreate。
接下来看下 bindService 的方式:
b、bindService
首先先从 ContextImpl.java 里面开始:bindService 里面调用了 bindServiceCommon :
@Override
public boolean bindService(Intent service, ServiceConnection conn,
        int flags) {
    warnIfCallingFromSystemProcess();
    return bindServiceCommon(service, conn, flags, Process.myUserHandle());
}

private boolean bindServiceCommon(Intent service, ServiceConnection conn, int flags,
            UserHandle user) {
        IServiceConnection sd;
        if (conn == null) {
            throw new IllegalArgumentException("connection is null");
        }
        if (mPackageInfo != null) {
            sd = mPackageInfo.getServiceDispatcher(conn, getOuterContext(),
                    mMainThread.getHandler(), flags);
        } else {
            throw new RuntimeException("Not supported in system context");
        }
        validateServiceIntent(service);
        try {
            IBinder token = getActivityToken();
            if (token == null && (flags&BIND_AUTO_CREATE) == 0 && mPackageInfo != null
                    && mPackageInfo.getApplicationInfo().targetSdkVersion
                    < android.os.Build.VERSION_CODES.ICE_CREAM_SANDWICH) {
                flags |= BIND_WAIVE_PRIORITY;
            }
            service.prepareToLeaveProcess();
            int res = ActivityManagerNative.getDefault().bindService(
                mMainThread.getApplicationThread(), getActivityToken(), service,
                service.resolveTypeIfNeeded(getContentResolver()),
                sd, flags, getOpPackageName(), user.getIdentifier());
            if (res < 0) {
                throw new SecurityException(
                        "Not allowed to bind to service " + service);
            }
            return res != 0;
        } catch (RemoteException e) {
            throw new RuntimeException("Failure from system", e);
        }
} 可以看到,上面的 sd 是一个 IServiceConnection 对象,IServiceConnection 是一个 AIDL 文件,也就是通过binder 来实现了 服务的绑定,然后接着调用了 ActivityManagerNative.getDefault().bindService,也就是在类 ActivityManagerService.java 里面:
public int bindService(IApplicationThread caller, IBinder token, Intent service,
        String resolvedType, IServiceConnection connection, int flags, String callingPackage,
        int userId) throws TransactionTooLargeException {
    enforceNotIsolatedCaller("bindService");

    // Refuse possible leaked file descriptors
    if (service != null && service.hasFileDescriptors() == true) {
        throw new IllegalArgumentException("File descriptors passed in Intent");
    }

    if (callingPackage == null) {
        throw new IllegalArgumentException("callingPackage cannot be null");
    }

    synchronized(this) {
        return mServices.bindServiceLocked(caller, token, service,
                resolvedType, connection, flags, callingPackage, userId);
    }
}
里面 调用了 bindServiceLocked 方法,mServices 在 startService 有提到过,mServices 是一个 ActivieServices 对象,bindServiceLocked 方法比较长,截取一段内容:
...

IBinder binder = connection.asBinder();
ArrayList<ConnectionRecord> clist = s.connections.get(binder);
if (clist == null) {
    clist = new ArrayList<ConnectionRecord>();
    s.connections.put(binder, clist);
}
clist.add(c);
b.connections.add(c);
if (activity != null) {
    if (activity.connections == null) {
        activity.connections = new HashSet<ConnectionRecord>();
    }
    activity.connections.add(c);
}
b.client.connections.add(c);
if ((c.flags&Context.BIND_ABOVE_CLIENT) != 0) {
    b.client.hasAboveClient = true;
}
if (s.app != null) {
    updateServiceClientActivitiesLocked(s.app, c, true);
}
clist = mServiceConnections.get(binder);
if (clist == null) {
    clist = new ArrayList<ConnectionRecord>();
    mServiceConnections.put(binder, clist);
}
clist.add(c);

if ((flags&Context.BIND_AUTO_CREATE) != 0) {
    s.lastActivity = SystemClock.uptimeMillis();
    if (bringUpServiceLocked(s, service.getFlags(), callerFg, false) != null) {
        return 0;
    }
}

...
可以看到这里面用了 binder,并且有一个 list 来记录连接,最后 可以看到 一个位运算,BIND_AUTO_CREATE,如果结果为真,则调用 bringUpServiceLocked 这个方法,也就是如果正常运行就会调用 bringUpServiceLocked 这个方法,这个方法里面又会调用 realStartServiceLocked,realStartServiceLocked 方法在 startService 里面有提及过,这两个方法是同一个方法,那么怎么区分是 startService 还是 bindService 呢,在 realStartServiceLocked 里面有调用了 requestServiceBindingsLocked 这个方法:
private final void requestServiceBindingsLocked(ServiceRecord r, boolean execInFg)
        throws TransactionTooLargeException {
    for (int i=r.bindings.size()-1; i>=0; i--) {
        IntentBindRecord ibr = r.bindings.valueAt(i);
        if (!requestServiceBindingLocked(r, ibr, execInFg, false)) {
            break;
        }
    }
}
requestServiceBindingsLocked 方法里面的 bindings 是一个 Arraymap,定义如下:
final ArrayMap<Intent.FilterComparison, IntentBindRecord> bindings
        = new ArrayMap<Intent.FilterComparison, IntentBindRecord>();
它在 retrieveAppBindingLocked 这个方法里面进行赋值,而 retrieveAppBindingLocked 这个方法是在 bindServiceLocked 里面才会被唯一调用,所以 如果 bindings 里面没有内容的话,说明没有进行 bindService:
public AppBindRecord retrieveAppBindingLocked(Intent intent,
        ProcessRecord app) {
    Intent.FilterComparison filter = new Intent.FilterComparison(intent);
    IntentBindRecord i = bindings.get(filter);
    if (i == null) {
        i = new IntentBindRecord(this, filter);
        bindings.put(filter, i);
    }
    AppBindRecord a = i.apps.get(app);
    if (a != null) {
        return a;
    }
    a = new AppBindRecord(this, i, app);
    i.apps.put(app, a);
    return a;
}
回到 requestServiceBindingsLocked 方法,里面又调用了 requestServiceBindingLocked 方法,只是参数不一样:
private final boolean requestServiceBindingLocked(ServiceRecord r, IntentBindRecord i,
        boolean execInFg, boolean rebind) throws TransactionTooLargeException {
    if (r.app == null || r.app.thread == null) {
        // If service is not currently running, can't yet bind.
        return false;
    }
    if ((!i.requested || rebind) && i.apps.size() > 0) {
        try {
            bumpServiceExecutingLocked(r, execInFg, "bind");
            r.app.forceProcessStateUpTo(ActivityManager.PROCESS_STATE_SERVICE);
            r.app.thread.scheduleBindService(r, i.intent.getIntent(), rebind,
                    r.app.repProcState);
            if (!rebind) {
                i.requested = true;
            }
            i.hasBound = true;
            i.doRebind = false;
        } catch (TransactionTooLargeException e) {
            // Keep the executeNesting count accurate.
            if (DEBUG_SERVICE) Slog.v(TAG_SERVICE, "Crashed while binding " + r, e);
            final boolean inDestroying = mDestroyingServices.contains(r);
            serviceDoneExecutingLocked(r, inDestroying, inDestroying);
            throw e;
        } catch (RemoteException e) {
            if (DEBUG_SERVICE) Slog.v(TAG_SERVICE, "Crashed while binding " + r);
            // Keep the executeNesting count accurate.
            final boolean inDestroying = mDestroyingServices.contains(r);
            serviceDoneExecutingLocked(r, inDestroying, inDestroying);
            return false;
        }
    }
    return true;
}
很熟悉的,又看到了 app.thread 的影子,都是方法命名为 schedule啥啥啥 的,这里是调用了 scheduleBindService,方法,在 ActivityThread.java 里面:
public final void scheduleBindService(IBinder token, Intent intent,
        boolean rebind, int processState) {
    updateProcessState(processState, false);
    BindServiceData s = new BindServiceData();
    s.token = token;
    s.intent = intent;
    s.rebind = rebind;

    if (DEBUG_SERVICE)
        Slog.v(TAG, "scheduleBindService token=" + token + " intent=" + intent + " uid="
                + Binder.getCallingUid() + " pid=" + Binder.getCallingPid());
    sendMessage(H.BIND_SERVICE, s);
}
可以看到,依旧还是 sendMessage 处理:
case BIND_SERVICE:
    Trace.traceBegin(Trace.TRACE_TAG_ACTIVITY_MANAGER, "serviceBind");
    handleBindService((BindServiceData)msg.obj);
    Trace.traceEnd(Trace.TRACE_TAG_ACTIVITY_MANAGER);
    break;

private void handleBindService(BindServiceData data) {
        Service s = mServices.get(data.token);
        if (DEBUG_SERVICE)
            Slog.v(TAG, "handleBindService s=" + s + " rebind=" + data.rebind);
        if (s != null) {
            try {
                data.intent.setExtrasClassLoader(s.getClassLoader());
                data.intent.prepareToEnterProcess();
                try {
                    if (!data.rebind) {
                        IBinder binder = s.onBind(data.intent);
                        ActivityManagerNative.getDefault().publishService(
                                data.token, data.intent, binder);
                    } else {
                        s.onRebind(data.intent);
                        ActivityManagerNative.getDefault().serviceDoneExecuting(
                                data.token, SERVICE_DONE_EXECUTING_ANON, 0, 0);
                    }
                    ensureJitEnabled();
                } catch (RemoteException ex) {
                }
            } catch (Exception e) {
                if (!mInstrumentation.onException(s, e)) {
                    throw new RuntimeException(
                            "Unable to bind to service " + s
                            + " with " + data.intent + ": " + e.toString(), e);
                }
            }
        }
    }
handleBindService 里面调用了 ActivityManagerNative.getDefault().publishService,该方法回到了 ActivityManagerService.java 里面:
public void publishService(IBinder token, Intent intent, IBinder service) {
    // Refuse possible leaked file descriptors
    if (intent != null && intent.hasFileDescriptors() == true) {
        throw new IllegalArgumentException("File descriptors passed in Intent");
    }

    synchronized(this) {
        if (!(token instanceof ServiceRecord)) {
            throw new IllegalArgumentException("Invalid service token");
        }
        mServices.publishServiceLocked((ServiceRecord)token, intent, service);
    }
}
里面调用了 publishServiceLocked,这个方法在 ActiveServices.java 里面:
void publishServiceLocked(ServiceRecord r, Intent intent, IBinder service) {
    final long origId = Binder.clearCallingIdentity();
    try {
        if (DEBUG_SERVICE) Slog.v(TAG_SERVICE, "PUBLISHING " + r
                + " " + intent + ": " + service);
        if (r != null) {
            Intent.FilterComparison filter
                    = new Intent.FilterComparison(intent);
            IntentBindRecord b = r.bindings.get(filter);
            if (b != null && !b.received) {
                b.binder = service;
                b.requested = true;
                b.received = true;
                for (int conni=r.connections.size()-1; conni>=0; conni--) {
                    ArrayList<ConnectionRecord> clist = r.connections.valueAt(conni);
                    for (int i=0; i<clist.size(); i++) {
                        ConnectionRecord c = clist.get(i);
                        if (!filter.equals(c.binding.intent.intent)) {
                            if (DEBUG_SERVICE) Slog.v(
                                    TAG_SERVICE, "Not publishing to: " + c);
                            if (DEBUG_SERVICE) Slog.v(
                                    TAG_SERVICE, "Bound intent: " + c.binding.intent.intent);
                            if (DEBUG_SERVICE) Slog.v(
                                    TAG_SERVICE, "Published intent: " + intent);
                            continue;
                        }
                        if (DEBUG_SERVICE) Slog.v(TAG_SERVICE, "Publishing to: " + c);
                        try {
                            c.conn.connected(r.name, service);
                        } catch (Exception e) {
                            Slog.w(TAG, "Failure sending service " + r.name +
                                  " to connection " + c.conn.asBinder() +
                                  " (in " + c.binding.client.processName + ")", e);
                        }
                    }
                }
            }

            serviceDoneExecutingLocked(r, mDestroyingServices.contains(r), false);
        }
    } finally {
        Binder.restoreCallingIdentity(origId);
    }
}
可以看到各种 log,关键是 try 代码块的一句话:c.conn.connected(r.name, service); c 是一个 ConnectionRecord 对象,conn 是一个 IServiceConnection 对象,具体实现在 LoadedApk.java 中 的 InnerConnection.java,里面调用了 connected方法:
public void connected(ComponentName name, IBinder service) {
    if (mActivityThread != null) {
        mActivityThread.post(new RunConnection(name, service, 0));
    } else {
        doConnected(name, service);
    }
}
调用了 post 方法回到主线程:
private final class RunConnection implements Runnable {
    RunConnection(ComponentName name, IBinder service, int command) {
        mName = name;
        mService = service;
        mCommand = command;
    }

    public void run() {
        if (mCommand == 0) {
            doConnected(mName, mService);
        } else if (mCommand == 1) {
            doDeath(mName, mService);
        }
    }

    final ComponentName mName;
    final IBinder mService;
    final int mCommand;
}
里面调用了 doConnected:
public void doConnected(ComponentName name, IBinder service) {
    ServiceDispatcher.ConnectionInfo old;
    ServiceDispatcher.ConnectionInfo info;

    synchronized (this) {
        if (mForgotten) {
            // We unbound before receiving the connection; ignore
            // any connection received.
            return;
        }
        old = mActiveConnections.get(name);
        if (old != null && old.binder == service) {
            // Huh, already have this one.  Oh well!
            return;
        }

        if (service != null) {
            // A new service is being connected... set it all up.
            mDied = false;
            info = new ConnectionInfo();
            info.binder = service;
            info.deathMonitor = new DeathMonitor(name, service);
            try {
                service.linkToDeath(info.deathMonitor, 0);
                mActiveConnections.put(name, info);
            } catch (RemoteException e) {
                // This service was dead before we got it...  just
                // don't do anything with it.
                mActiveConnections.remove(name);
                return;
            }

        } else {
            // The named service is being disconnected... clean up.
            mActiveConnections.remove(name);
        }

        if (old != null) {
            old.binder.unlinkToDeath(old.deathMonitor, 0);
        }
    }

    // If there was an old service, it is not disconnected.
    if (old != null) {
        mConnection.onServiceDisconnected(name);
    }
    // If there is a new service, it is now connected.
    if (service != null) {
        mConnection.onServiceConnected(name, service);
    }
}
可以看到,里面调用了 mConnection.onServiceConnected(name, service);,并且里面还有对 old 的 unlinkedToDeath、onServiceDisconnected 等的调用。

Part 3 : BroadCaseReceiver 过程
略 ~~~
Part 4 :ContentProvider 过程
略 ~~~
Part 5 : app 的启动过程
这里的 Lancher.java 是 com.android.launcher3 包下,可以看到,它继承了 Activity 并实现了 OnClickListener 接口:
public class Launcher extends Activity
        implements View.OnClickListener, OnLongClickListener, LauncherModel.Callbacks,
                   View.OnTouchListener, PageSwitchListener, LauncherProviderChangeListener {
 }

  public void onClick(View v) {
        // Make sure that rogue clicks don't get through while allapps is launching, or after the
        // view has detached (it's possible for this to happen if the view is removed mid touch).
        if (v.getWindowToken() == null) {
            return;
        }

        if (!mWorkspace.isFinishedSwitchingState()) {
            return;
        }

        if (v instanceof Workspace) {
            if (mWorkspace.isInOverviewMode()) {
                showWorkspace(true);
            }
            return;
        }

        if (v instanceof CellLayout) {
            if (mWorkspace.isInOverviewMode()) {
                showWorkspace(mWorkspace.indexOfChild(v), true);
            }
        }

        Object tag = v.getTag();
        if (tag instanceof ShortcutInfo) {
            onClickAppShortcut(v);
        } else if (tag instanceof FolderInfo) {
            if (v instanceof FolderIcon) {
                onClickFolderIcon(v);
            }
        } else if (v == mAllAppsButton) {
            onClickAllAppsButton(v);
        } else if (tag instanceof AppInfo) {
            startAppShortcutOrInfoActivity(v);
        } else if (tag instanceof LauncherAppWidgetInfo) {
            if (v instanceof PendingAppWidgetHostView) {
                onClickPendingWidget((PendingAppWidgetHostView) v);
            }
        }
    }
里面响应了各种点击,这里响应的是 onClickAppShortcut 方法,一路跟进,会发现最后调用到了 Activity 的 startActivity 方法,后面便是 Activity 的启动了。

4、Apk 安装过程:
首先关注下 IPackageManagerService.aidl
 interface IPackageManager {
        // ...
        void installPackage(in String originPath,
                in IPackageInstallObserver2 observer,
                int flags,
                in String installerPackageName,
                in VerificationParams verificationParams,
                in String packageAbiOverride);
       // ...
    }
这里有一个 installPackage 的方法,具体实现在 PackageManagerService.java 里面,
 @Override
        public void installPackage(String originPath, IPackageInstallObserver2 observer,
                int installFlags, String installerPackageName, VerificationParams                               verificationParams, String packageAbiOverride) {
            installPackageAsUser(originPath, observer, installFlags, installerPackageName,
                    verificationParams, packageAbiOverride, UserHandle.getCallingUserId());
        }
可以看到里面调用了 installPackageAsUser,installPackageAsUser 方法关键是下面的几行代码:
@Override
        public void installPackageAsUser(String originPath, IPackageInstallObserver2 observer,
                int installFlags, String installerPackageName, VerificationParams                       verificationParams,String packageAbiOverride, int userId) {

            //  ...
            final Message msg = mHandler.obtainMessage(INIT_COPY);
            msg.obj = new InstallParams(origin, null, observer, installFlags, installerPackageName,
                    null, verificationParams, user, packageAbiOverride, null);
            mHandler.sendMessage(msg);
        }
方法最后发送一个 INIT_COPY 的 msg,根据英文意思很明显在说初始化复制,最后在 PackageHandler 的 doHandleMessage 方法进行处理:
 void doHandleMessage(Message msg) {
                switch (msg.what) {
                    case INIT_COPY: {
                        HandlerParams params = (HandlerParams) msg.obj;
                        int idx = mPendingInstalls.size();
                        if (DEBUG_INSTALL) Slog.i(TAG, "init_copy idx=" + idx + ": " + params);
                        // If a bind was already initiated we dont really
                        // need to do anything. The pending install
                        // will be processed later on.
                        if (!mBound) {
                            // If this is the only one pending we might
                            // have to bind to the service again.
                            if (!connectToService()) {
                                Slog.e(TAG, "Failed to bind to media container service");
                                params.serviceError();
                                return;
                            } else {
                                // Once we bind to the service, the first
                                // pending request will be processed.
                                mPendingInstalls.add(idx, params);
                            }
                        } else {
                            mPendingInstalls.add(idx, params);
                            // Already bound to the service. Just make
                            // sure we trigger off processing the first request.
                            if (idx == 0) {
                                mHandler.sendEmptyMessage(MCS_BOUND);
                            }
                        }
                        break;
                    }
                }
            }
初始进来的时候,mBound 为 false,mPendingInstalls的size() 是0,所以接下来会发送一个空的 msg,即:mHandler.sendEmptyMessage(MCS_BOUND),同样也是在 doHandleMessage 里面进行处理:
 case MCS_BOUND: {
                        if (DEBUG_INSTALL) Slog.i(TAG, "mcs_bound");
                        if (msg.obj != null) {
                            mContainerService = (IMediaContainerService) msg.obj;
                        }
                        if (mContainerService == null) {
                            if (!mBound) {
                                // Something seriously wrong since we are not bound and we are not
                                // waiting for connection. Bail out.
                                Slog.e(TAG, "Cannot bind to media container service");
                                for (HandlerParams params : mPendingInstalls) {
                                    // Indicate service bind error
                                    params.serviceError();
                                }
                                mPendingInstalls.clear();
                            } else {
                                Slog.w(TAG, "Waiting to connect to media container service");
                            }
                        } else if (mPendingInstalls.size() > 0) {
                            HandlerParams params = mPendingInstalls.get(0);
                            if (params != null) {
                                if (params.startCopy()) {
                                    // We are done...  look for more work or to
                                    // go idle.
                                    if (DEBUG_SD_INSTALL) Log.i(TAG,
                                            "Checking for more work or unbind...");
                                    // Delete pending install
                                    if (mPendingInstalls.size() > 0) {
                                        mPendingInstalls.remove(0);
                                    }
                                    if (mPendingInstalls.size() == 0) {
                                        if (mBound) {
                                            if (DEBUG_SD_INSTALL) Log.i(TAG,
                                                    "Posting delayed MCS_UNBIND");
                                            removeMessages(MCS_UNBIND);
                                            Message ubmsg = obtainMessage(MCS_UNBIND);
                                            // Unbind after a little delay, to avoid
                                            // continual thrashing.
                                            sendMessageDelayed(ubmsg, 10000);
                                        }
                                    } else {
                                        // There are more pending requests in queue.
                                        // Just post MCS_BOUND message to trigger processing
                                        // of next pending install.
                                        if (DEBUG_SD_INSTALL) Log.i(TAG,
                                                "Posting MCS_BOUND for next work");
                                        mHandler.sendEmptyMessage(MCS_BOUND);
                                    }
                                }
                            }
                        } else {
                            // Should never happen ideally.
                            Slog.w(TAG, "Empty queue");
                        }
                        break;
                    }
在 上一次处理 INIT_COPY 这个 msg 的时候,也就是在 mHandler.sendEmptyMessage(MCS_BOUND) 之前,mPendingInstalls 添加了一次 params,即:mPendingInstalls.add(idx, params); 所以此时 mPendingInstalls 的 size() 大于0,接下来便会进入 params.startCopy(),startCopy() 方法里面调用了 handleStartCopy(),handleStartCopy() 是一个抽象方法,具体实现在 PMS 的内部类 InstallParams 里面,
    /*
         * Invoke remote method to get package information and install
         * location values. Override install location based on default
         * policy if needed and then create install arguments based
         * on the install location.
         */
        public void handleStartCopy() throws RemoteException {
            int ret = PackageManager.INSTALL_SUCCEEDED;
            // ...
          if(){
            // ...
          }else {
                    /*
                     * No package verification is enabled, so immediately start
                     * the remote call to initiate copy using temporary file.
                     */
                    ret = args.copyApk(mContainerService, true);
            }
            mRet = ret;
        }
可以看到调用了 copyApk 方法,接着,我们回到 startCopy() 方法:
 final boolean startCopy() {
                boolean res;
                try {
                    // ...
                    handleStartCopy();
                    // ...
                } catch (RemoteException e) {

                }
                handleReturnCode();
                return res;
            }
在执行完handleStartCopy() 之后,接着执行了 handleReturnCode(),接着看 InstallParams 的 handleReturnCode() 方法:
    @Override
            void handleReturnCode() {
                // If mArgs is null, then MCS couldn't be reached. When it
                // reconnects, it will try again to install. At that point, this
                // will succeed.
                if (mArgs != null) {
                    processPendingInstall(mArgs, mRet);
                }
            }
很明显,只有两行代码,里面执行了 processPendingInstall 方法,后续的流程可以通过继续断点查看 ~~~
5、资源的加载过程
首先,从 LoadApk.java 的 makeApplication 入手
public Application makeApplication(boolean forceDefaultAppClass,
                Instrumentation instrumentation) {
            if (mApplication != null) {
                return mApplication;
            }
            Application app = null;
             // ...
            try {
                // ...
                ContextImpl appContext = ContextImpl.createAppContext(mActivityThread, this);
                // ...
            } catch (Exception e) {
                 // ...
            }
           // ...
            return app;
        }
在 makeApplication 里面,调用了 ContextImpl.java 的 createAppContext() 方法,接着目光转移到 ContextImpl.java 的 createAppContext() 方法 :
static ContextImpl createAppContext(ActivityThread mainThread, LoadedApk packageInfo) {
            if (packageInfo == null) throw new IllegalArgumentException("packageInfo");
            return new ContextImpl(null, mainThread,
                    packageInfo, null, null, false, null, null, Display.INVALID_DISPLAY);
        }
继续跟进,看下new ContextImpl:
private ContextImpl(ContextImpl container, ActivityThread mainThread,
                LoadedApk packageInfo, IBinder activityToken, UserHandle user, boolean restricted,
                Display display, Configuration overrideConfiguration, int createDisplayWithId) {

            // ....
            Resources resources = packageInfo.getResources(mainThread);
            if (resources != null) {
                if (displayId != Display.DEFAULT_DISPLAY
                        || overrideConfiguration != null
                        || (compatInfo != null && compatInfo.applicationScale
                                != resources.getCompatibilityInfo().applicationScale)) {
                    resources = mResourcesManager.getTopLevelResources(packageInfo.getResDir(),
                            packageInfo.getSplitResDirs(), packageInfo.getOverlayDirs(),
                            packageInfo.getApplicationInfo().sharedLibraryFiles, displayId,
                            overrideConfiguration, compatInfo);
                }
            }
            mResources = resources;
            // ...
        }
可以看到代码里面有一个 mResources 变量,在平时调用调用获取资源的时候,通常用
getResources().get×××()
getResources 里面返回的就是这个 mResources :

接下来看下 mResourcesManager.getTopLevelResources:
这个方法在 ResourcesManager.java 里面:
  /**
         * Creates the top level Resources for applications with the given compatibility info.
         *
         * @param resDir the resource directory.
         * @param splitResDirs split resource directories.
         * @param overlayDirs the resource overlay directories.
         * @param libDirs the shared library resource dirs this app references.
         * @param displayId display Id.
         * @param overrideConfiguration override configurations.
         * @param compatInfo the compatibility info. Must not be null.
         */
        Resources getTopLevelResources(String resDir, String[] splitResDirs,
                String[] overlayDirs, String[] libDirs, int displayId,
                Configuration overrideConfiguration, CompatibilityInfo compatInfo) {
            // ...
            AssetManager assets = new AssetManager();
            // ...
            r = new Resources(assets, dm, config, compatInfo);
            // ...
            return r;
            }
        }
可以看到,最后通过 AssetManager 的实例进行资源获取。
6、Hook机制
利用反射,我们可以在加载过程中替换类的一些属性行为,例如在 ContextWrapper 通过 attachBaseContext来实例化mBase的时机,可以进行一些系统类的反射。
7、OOP
继承、封装、多态
8、面向切面编程
在运行时,动态地将代码切入到类的指定方法、指定位置上的编程思想就是面向切面的编程。
例如,在某些网络请求里面,你需要加上鉴权,但是有一些不需要,这个时候就可以使用面向切面的思想,
对某些url,不需要鉴权就可以访问,需要有特定权限的用户才能访问
http
        .authorizeRequests()
        .***
例如打日志log,在有需要的地方动态加入log,
像 url鉴权、log日志打印这些与主流程业务无关的
推荐阅读:
http://www.baeldung.com/spring-aop-vs-aspectj
9、代理模式
代理模式属于结构型模式,在代理模式中,一个类代表另一个类的功能,例如:火车站买票,乘客不一定要到火车站去买,可以通过每个代售点进行购票。
代理模式和装饰器模式以及适配器模式略有不同,装饰器是进行包装,可以对对象的功能进行增加,适配器主要是为了解决两个不兼容的接口进行兼容的问题,例如:笔记本USB转接器,相当于一个适配器。
代理模式可以参考:https://zh.wikipedia.org/wiki/%E4%BB%A3%E7%90%86%E6%A8%A1%E5%BC%8F
以及 ApplicationThreadProxy 以及 IPC等 Android源码中的代理模式
10、插件化框架
插件化框架很多很多,这里略。。。
一口气写了这么多,说不出的感觉,整体比较简单。。。插件化更多的是要学习背后的原理,以后不需要用到插件化的地方也许需要插件化的思想嘛,好了,到此结束,有不对的欢迎批评指正


 4796
4796

 被折叠的 条评论
为什么被折叠?
被折叠的 条评论
为什么被折叠?
 到【灌水乐园】发言


